

Use an ultrasonic cleaner for fountain pens only when flushing and soaking fail. If ink is dried deep in the feed, a short ultrasonic cycle can help. But the wrong parts, wrong liquid, or too much time in the tank can damage the pen.
Here’s the short version:
- I use plain distilled water first
- I clean only nib-and-feed parts that are safe to remove
- I keep cycles to 30–60 seconds at first
- I keep total time around 3–5 minutes max
- I leave out barrels, caps, plated trim, celluloid, and hard rubber
- I rinse right away and let parts dry fully before reassembly
A few numbers matter here. Using a fountain pen cleaning kit for regular maintenance often takes 5–10 flushes with water. Pen flush soaking may take 15–30 minutes. Ultrasonic cleaning should be much shorter: start with 30–60 seconds, use room temperature to lukewarm water (68–77 °F), and stay below 122 °F (50 °C).
If I had to sum it up in one line: flush first, use the ultrasonic cleaner only for stubborn clogs, and keep the run short.
| What to check | Best practice |
|---|---|
| When to use it | Only for dried ink and clogs that flushing won’t clear |
| Tank liquid | Distilled water first; mild pen flush only if needed |
| Safe parts | Removable nibs, feeds, and plain modern sections |
| Keep out of tank | Caps, barrels, trim, plated parts, vintage materials |
| Cycle length | Start at 30–60 seconds |
| Total exposure | About 3–5 minutes max |
| Heat | Heater off; use 68–77 °F |
That’s the core advice. The rest comes down to part safety, short cycles, and careful rinsing.
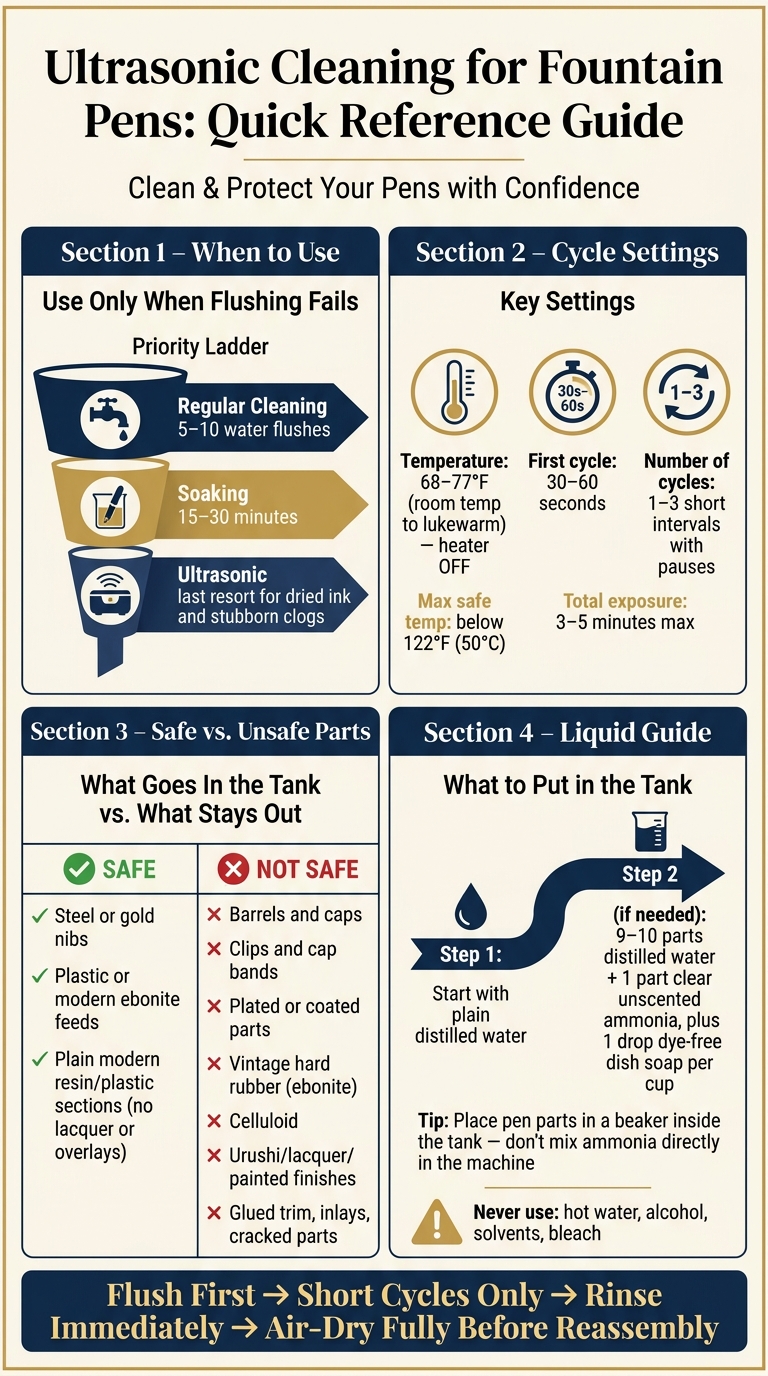
Fountain Pen Ultrasonic Cleaning: Safe Parts vs. Parts to Avoid
How to Prepare Your Pen and Pick the Right Cleaning Liquid
Disassemble and Flush the Pen Before Using the Tank
Begin at the sink. Remove the cartridge or converter, then flush the nib-and-section unit with cool or lukewarm water until it runs mostly clear. Stop at the manufacturer’s disassembly limit. A bulb syringe makes this part much faster.
This first rinse clears out loose ink, so the ultrasonic cleaner can focus on the stubborn residue buried deeper in the feed channels.
Many modern cartridge/converter pens make this easy. The nib unit may unscrew or slide out cleanly, which means you can place it in the tank as a separate piece. If a friction-fit part pushes back, don’t force it. Clean only the nib and front section.
Piston-fillers and vacuum-fill pens need a lighter touch. Flush the reservoir again and again, keep the barrel and piston assembly out of the tank, and place only a removable nib unit in the cleaner.
Once the loose ink is out, it’s time to choose the liquid for the tank as part of your pen cleaning and maintenance routine.
Choosing Between Water and a Pen Flush Solution
For most clogs, plain distilled water is the safest starting point. Use distilled water in the tank by default. You can still do the first sink flush with tap water, then switch to distilled water for the ultrasonic cleaner.
If distilled water doesn’t do the job, move to a mild pen-flush mix:
- About 9–10 parts distilled water to 1 part clear, unscented household ammonia
- One drop of dye-free dish soap per cup
Put the flush in a small glass or beaker, then place that container inside the water-filled ultrasonic tank. That way, the pen parts sit in the flush, while the machine itself still runs with water in the main tank. After the cycle, rinse the parts well before drying.
Use only clear, unscented household ammonia. Never mix it with bleach or chlorine cleaners, and make sure the area has good ventilation.
Which Parts Can Go in the Tank
Some parts are usually safe to place in the tank: steel or gold nibs, plastic or modern ebonite feeds, and plain modern resin or plastic sections without lacquer, celluloid, or metal overlays.
These materials tend to handle ultrasonic vibration well. The cavitation helps clean the tiny ink channels inside the feed, which is often where the worst buildup hides.
Keep these parts out of the tank:
- Barrels
- Caps
- Clips
- Cap bands
- Plated parts
- Vintage hard rubber
- Any part with an unknown finish
Clean those by hand with a soft cloth instead. If you’re not sure what a material is, play it safe and stick with soaking and manual flushing.
With the safe parts sorted out, the next step is setting the cycle time and temperature.
sbb-itb-1dd4fe9
Using an Ultrasonic Cleaner with Your Pens | FP Basics
How to Run the Ultrasonic Cleaner Without Damaging Pen Parts
Run the cleaner in short, controlled cycles. The goal is simple: unclog dried ink without putting extra stress on delicate pen parts.
Time and Temperature Settings to Use
Keep the liquid at room temperature to lukewarm, around 68–77 °F, and leave the heater off. For fountain pens, it’s smart to stay below 122 °F (50 °C) to help protect plastics, adhesives, and plated or coated parts.
Start with a 30–60 second test cycle. That short run gives you a chance to check two things: whether dried ink is starting to come loose, and whether the part is handling the vibration well.
If the nib and feed still need more cleaning, continue in short intervals. Keep total exposure to 3–5 minutes, split across one to three short cycles with pauses in between. That makes it easier to stop as soon as the ink loosens instead of letting the parts sit in the cleaner longer than needed.
How to Load Parts and Start the Cycle
Always use the basket. Don’t place parts directly on the tank floor.
Keep each part separated so pieces don’t bump into one another during the cycle. If you’re only cleaning the nib section, load only the nib-and-feed assembly.
Once the parts are in place, start the cycle. When it ends, rinse off any loosened residue.
What Not to Do During the Cycle
A few rules matter here:
- Never put your hands in the tank while the cleaner is running.
- Do not use hot water, alcohol, or other solvents in the tank.
- Stop at once if parts rattle, move violently, discolor, or flex.
After the cycle, rinse the parts before drying.
Rinsing, Drying, and Testing After the Cycle
Rinse Out Any Soap or Ammonia Residue
As soon as the cycle ends, rinse the parts right away. That matters because loosened ink can dry back into the feed if it sits too long.
Run cool water over the parts for 30–60 seconds. If you used soap or ammonia, flush the feed and converter with clean water until there’s no slippery feel and no odor left. Then do one last rinse with distilled water to help avoid mineral spots from tap water.
Let Parts Air-Dry Completely
Once rinsed, move straight to drying so moisture doesn’t stay stuck inside the feed. Blot the parts with a lint-free cloth, then stand the nib-and-feed unit tip-down on an absorbent towel.
Let the parts air-dry at room temperature until fully dry. For more complex feeds or internal parts, overnight is the safer call.
Fountain Pen Revolution's maintenance guidance recommends rinsing thoroughly after ultrasonic cleaning, patting components dry with a microfiber cloth, and air-drying for 15–20 minutes before reassembly.
Reassemble and Do a Test Write
When everything is dry, put the pen back together and test it on scrap paper. Reassemble only when all parts are fully dry.
Fill the pen with an ink you already know well, then write a few lines. You want to see:
- steady flow
- no hard starts
- no skipping
If the pen still skips or struggles to start, do a few more rounds of plain-water flushing. If that doesn’t fix it, inspect the nib and feed for damage or misalignment.
Parts to Keep Out of the Tank and Key Takeaways
Before cleaning, check what the pen is made of. Some parts should NEVER go in the tank.
Materials and Finishes That Should Not Go in the Tank
Keep these materials out of the tank:
- Ebonite and hard rubber: These are easy to damage. They can discolor, fade, or oxidize, especially if heat or ammonia is involved.
- Celluloid: This material can warp, blister, turn cloudy, or develop stress cracks under ultrasonic action.
- Any part with decorative coating, bonded trim, inlays, or existing damage
Hand-clean any bonded or decorative exterior part.
Modern Pens vs. Vintage Pens
Modern nib-and-feed assemblies made from stable resin or metal are often safe to clean this way. Vintage pens are a different story. Older plastics, shellac, and past repairs can fail under vibration, so the risk is much higher.
Material Safety Reference Table and Conclusion
Use the table below as a last check before cleaning.
| Material / Finish | Safe in Ultrasonic Cleaner | Notes |
|---|---|---|
| Modern resin / plastic nib-feed parts | Usually yes | Best candidates when fully disassembled and run briefly. |
| Metal nib / feed parts | Usually yes | Avoid contact with tank walls; short cycles are preferred. |
| Ebonite / hard rubber | No | May discolor, fade, or oxidize, especially with heat or ammonia. |
| Celluloid | Usually no | Risk of warping, blistering, clouding, or stress cracking. |
| Urushi / lacquer / painted finishes | No | Coatings can flake or be damaged by vibration and cleaners. |
| Glued trim / inlays / molded-in parts | Avoid | Ultrasonic energy can weaken adhesive bonds or loosen components. |
| Cracked or fragile parts | No | Existing damage can worsen under vibration. |
Flush first. Use ultrasonic cleaning only for stubborn clogs. Keep cycles short, and leave old, decorative, bonded, or fragile parts out of the tank.
FAQs
When should I use an ultrasonic cleaner on a fountain pen?
Use an ultrasonic cleaner when a pen has stubborn ink buildup or dried ink that regular flushing just won’t clear. It’s especially handy for intricate feeds, hooded nibs, and pens that have been sitting around for a long time, including many vintage models.
That said, this step is optional. You don’t need it for normal upkeep. Before you try it, check your specific pen model first. Ultrasonic cleaning can harm some vintage pens, modern materials, decorative inlays, celluloid, and other fragile parts.
Which fountain pen parts are safe to put in the tank?
Place only disassembled pen parts in the ultrasonic cleaner basket. Take out the cap, grip section, and ink cartridge or converter first.
Check your specific model before cleaning. Skip vintage pens and parts made from celluloid, ebonite, wood, heavily plated metals, or pieces with decorative inlays or delicate finishes. If the pen isn’t meant to come apart, or you’re not sure, don’t force it.
How long should I run an ultrasonic cleaner for pen parts?
Run an ultrasonic cleaner for fountain pen parts for 3 to 5 minutes in most cases. If you’re dealing with stubborn residue or a more involved cleaning job, you can extend the cycle to 10 minutes.
Keep an eye on the cleaning cycle so delicate parts don’t get more wear than they need. Use cool or lukewarm water, not hot water, and rinse each part well with clean water afterward.