

You can turn a round nib into a stub, but you have to remove metal in very small amounts and stop as soon as you get clean line change. A stub works because the tip becomes flatter, which gives you broader downstrokes and thinner crossstrokes. The safe path is simple: check the nib, mark the tip, grind in short sets of 2–3 strokes or 3–5 passes, test often, and smooth the corners just enough.
Here’s the short version:
- Start with a nib that has enough tipping material (refer to our guide to fountain pen nib sizes to understand different starting points)
- Make sure the tines are aligned before you touch abrasive
- Use a marker so I can see where metal is coming off
- Flatten the underside and top a little at a time
- Shape both sides evenly to keep the tip level
- Test after every few passes for line change
- Round the corners slightly, not too much
- Stop early once it writes smooth and shows contrast
A few hard facts matter here. First, nib grinding is permanent: once tipping is gone, it’s gone. Second, even a small tilt can make one tine sit lower than the other, which often leads to scratchy writing. Third, this job usually goes better on an inexpensive steel nib than on a rare pen.
If I had to sum up the whole process in one line, it would be this: <u>remove less than you think, inspect more than you want, and quit as soon as it works.</u>
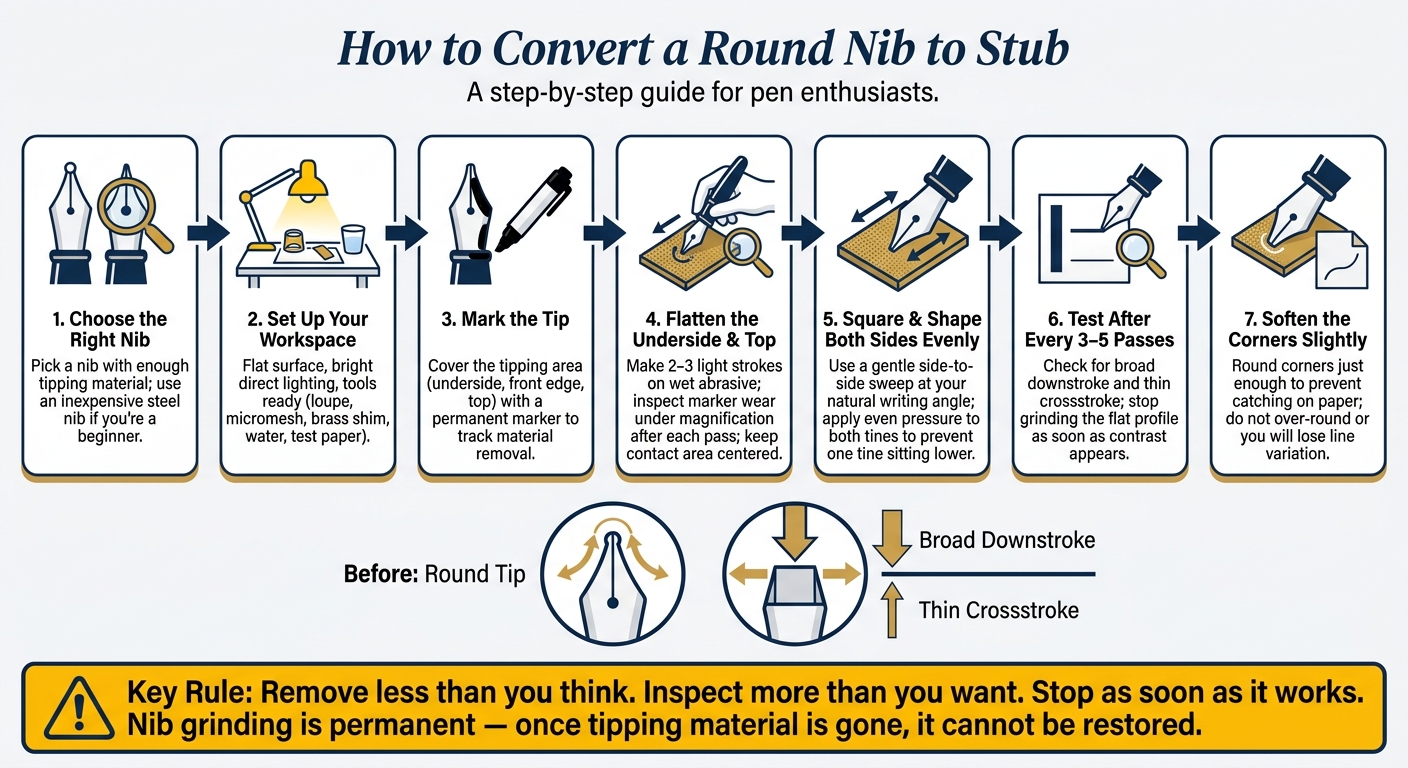
How to Convert a Round Nib to Stub: Step-by-Step Guide
Choose Your Nib and Set Up Your Work Area
Before you grind, choose the right nib and get set up on a clean, steady surface. Once you've picked the nib, prep your workspace before you put any marks on the tip.
What to Look for in a Nib Before You Start
Start with a nib that has enough tipping material to shape into a stub. Just as important, make sure it already writes smoothly and that the tines are aligned. That tipping material is what you'll reshape. If there isn't enough of it, you can wear through it before the stub even takes shape.
If you're new to this, use an inexpensive #6 steel nib first. It's the safer way to learn. Leave rare or vintage nibs alone until you've had more practice. If you need a dedicated practice pen, consider one of the best fountain pens for beginners.
Tools You Need for a Basic Stub Grind
You don't need a huge kit. A few simple tools will do the job:
| Tool | Purpose |
|---|---|
| Loupe | Check tine alignment and tip shape |
| Micromesh or fine abrasive sheet | Remove material and smooth the tip during final stages |
| Brass shim | Clear metal burrs and debris from the nib slit |
| Clean water | Lubricate the abrasive surface and rinse the nib between passes |
| Smooth test paper | Test line variation and feel |
Set everything up on a flat, steady surface with bright, direct light aimed at the work area. Good lighting makes it much easier to catch alignment issues early, before they turn into bigger problems.
Once the nib and workspace are ready, mark the tip and start flattening.
sbb-itb-1dd4fe9
Mark the Tip and Start Flattening the Edge
Before you grind, inspect the tip with a 10x or 20x loupe and find the tipping edge. Mark the tip first. Then flatten only the contact area.
Use a Marker to Track Where Material Is Being Removed
Clean the tip, then cover the tipping area with a permanent marker. Ink the underside, the front edge, and the top all the way. As you grind, the marker rubs off at the contact points, which shows the bare metal where the abrasive is cutting.
That makes it easy to see what's going on. If the wear spot drifts off-center, change the angle before you keep going. Reapply the marker after each pass so you can keep checking the shape. Once the wear stays centered, you can start flattening.
Flatten the Underside and Top in Short Passes
Start on the underside of the nib. Hold it at a steady, shallow angle and make 2–3 light strokes across the wet abrasive sheet, then stop. Lift the nib, inspect the marker wear under magnification, and make sure the contact area is centered and even across both tines.
At this point, you're making a small flat surface, not the final stub. After the underside is flat, do the same on the top surface. Keep the passes short and the pressure light. Once you have a small, even flat, you're ready to square the tip in the next step.
Shape the Stub Profile and Test as You Go
Square the Tip and Keep Both Sides Even
Next, turn that flat tip into a stub by working both sides evenly. Hold the pen at your usual writing angle and keep your hand steady so the flat edge stays level. Then use a gentle side-to-side sweep across a micro-mesh smoothing sheet with light, even pressure.
That steady motion helps both sides wear down at the same pace. If one side wears faster, one tine can end up lower than the other, and that’s where scratchy writing starts.
Test Line Variation After Each Short Grinding Session
Check your progress after every 3 to 5 passes. You’re looking for a broad downstroke and a thin crossstroke.
Keep grinding in short sessions until the downstroke gets wider while the crossstroke stays thin. As soon as that contrast shows up, stop grinding the flat profile.
Soften the Corners Without Losing the Stub Effect
Once the stub shape looks even, soften the corners just a bit so they won’t catch on paper during diagonal or side-to-side strokes. Go easy here. If you round the corners too much, you can also round the nib too much, which cuts down line variation.
The goal is simple: a smooth stub that still gives you that crisp contrast. Stop as soon as the nib writes cleanly.
Conclusion: Go Slow and Stop as Soon as It Works
Converting a round nib to a stub comes down to one rule: stop early instead of grinding too far. Begin with enough tipping material, make short passes, and quit as soon as the stub shape starts to show. At that point, you’re not chasing perfection. You’re aiming for a shape that works.
The finish line is simple: stop when the nib gives clear line variation and still writes smoothly. Once you remove tipping material, you can’t put it back.
If you’re unsure, stop. You can always practice on a replacement stub nib instead of risking a favorite pen.
FAQs
Can I turn any round nib into a stub?
You can turn many round nibs into a stub, but some are much better suited to the job than others. Broad and double-broad nibs are usually the best place to start because they have more tipping material. That gives you more room to shape the nib and makes it easier to get clear line variation.
By contrast, finer nibs like Extra Fine and Fine don’t give you much material to work with. You can shape them, but the line variation is often slight. If you’re practicing, it’s smart to begin with an affordable pen.
How do I know when to stop grinding?
Stop when the nib writes smoothly and reliably. Grinding takes material off for good, so go slow and test it often.
Use small figure-eight motions in sets of three to five strokes, then test on high-quality, fountain pen-friendly paper. Stop as soon as you get the smoothness you want. If you keep polishing, you can end up with a baby’s bottom effect, which can lead to skipping and poor ink flow.
What should I do if the nib feels scratchy after shaping?
First, inspect the tines with a 10x magnifying loupe to make sure they’re level. Misaligned tines are the most common cause of scratchiness.
Then clean the nib to remove any paper fibers or debris.
If the tines are aligned, use 8,000 to 12,000 grit micro-mesh or Mylar sheets. Apply light pressure and move in small figure-eight motions.
If the pen feels scratchy only in certain directions, check your writing angle, grip, and pen rotation.