

Most scratchy nibs should not be ground first. In many cases, the problem starts with tine height, slit shape, tipping balance, or writing angle - and if you grind before checking those, you can remove metal from the wrong spot.
Here’s the short version:
- Check tine alignment and other quick fixes first. Even a small height difference can cause scratchiness in one stroke direction.
- Look for off-center tipping. If one side of the tip hits paper first, the nib can feel smooth one way and rough the other.
- Inspect the slit from breather hole to tip. A crooked or tight slit can affect flow and hard starts.
- Match the nib to your own writing angle. A nib that’s ground for the wrong hand position may only feel good at one angle.
- Remove as little material as possible. A few light passes are safer than trying to fix everything at once.
A loupe in the 10x–20x range catches most of this before any abrasive work starts. And if you’re testing flow, use a separate vial of ink so metal dust stays out of your main bottle.
In plain terms: I’d treat grinding as the last step, not the first. If the nib geometry is off, polishing often hides the problem for a moment - or makes it worse.
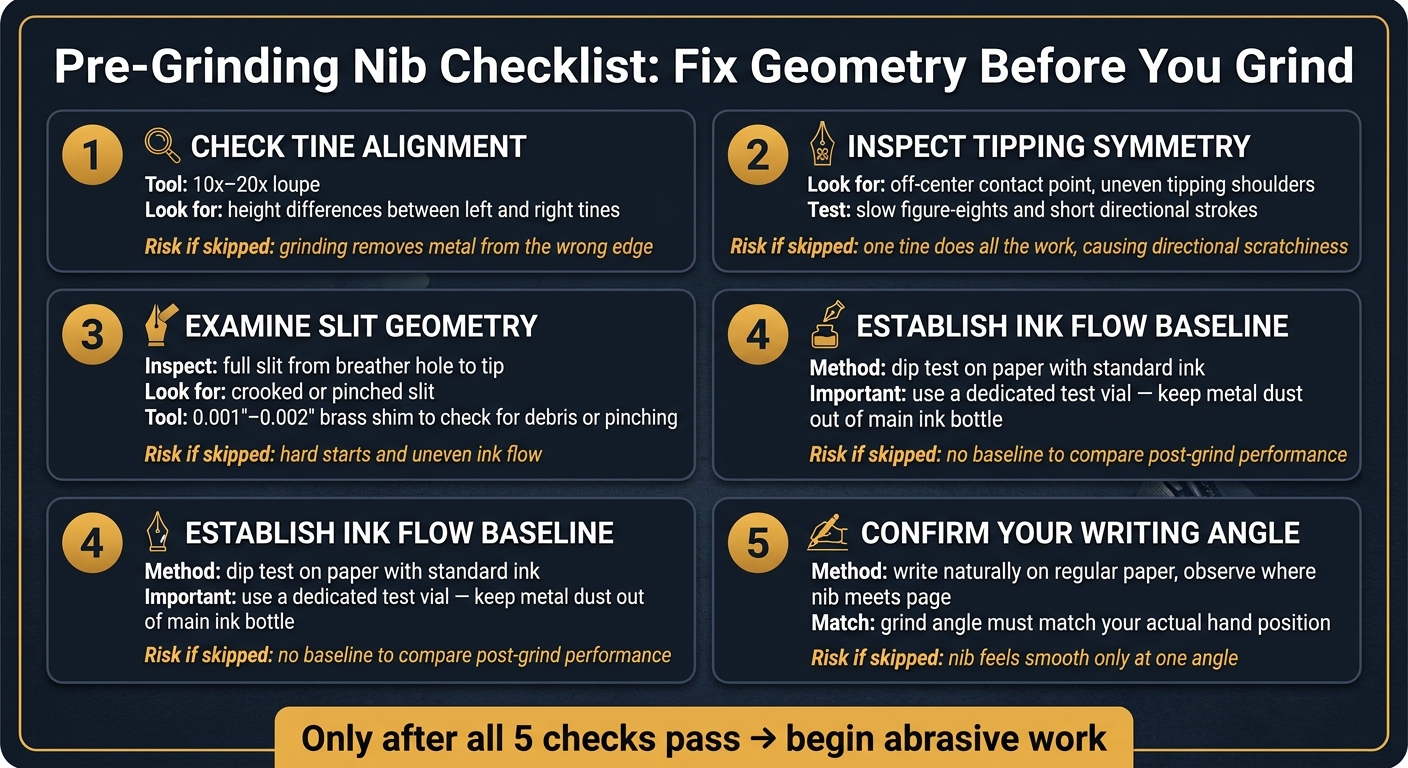
Pre-Grinding Nib Checklist: Fix Geometry Before You Grind
Nib Tuning 101 - How to Troubleshoot and Fix your Nib*
sbb-itb-1dd4fe9
Uneven Tipping and Off-Center Contact Points
Uneven tipping happens when one side of the contact point is larger, flatter, or lower than the other. This is not the same as a planned grind like a cursive italic or architect. It’s accidental, and it often leaves one tine doing most of the work.
On paper, the nib may feel smooth in one direction and scratchy in the other. You may also notice the line width shift as the pen rotates. Once tine height is close, the next thing to check is whether the tipping is centered.
How to Spot Uneven Tipping Early
Look at the tipping head-on under magnification. The left and right shoulders should match, and the lowest point should sit in the center of the slit. A macro photo can make the offset much easier to spot.
Then test the nib with slow figure-eights and short strokes. If the scratchiness shows up the same way in one direction again and again, that often points to off-center tipping. If the contact point is still offset, fix the geometry before doing any polishing.
What to Fix Before Grinding
Center the tipping before any smoothing.
Use one or two very light passes on ultra-fine abrasive, then check alignment and write again. Keep the pressure light. You’re adjusting the last tiny bit of tipping geometry, not reshaping the whole nib. If the tip is centered but the nib still feels off, move on to tine alignment checks.
Misaligned Tines and Irregular Slit Geometry
If the tipping is centered but the nib still catches, look at tine level and slit shape next. A tine that sits a bit higher than the other, or tines that have shifted sideways, can make one side hit the paper first. When that happens, grinding removes material from the wrong edge.
Check the slit too. A straight, even slit helps keep ink flow steady. If the tip geometry is uneven, hard starts often show up right after. Fix the geometry before you do any smoothing.
Checks That Reveal Alignment Problems
Use a 10x–20x loupe and inspect the nib from the tip and from above. The tines should look perfectly level. Then rotate the nib slowly under one bright light and compare the reflections on both tipping shoulders. If the reflections match and line up cleanly across the slit, the geometry is in good shape. If one side throws a different highlight or the symmetry breaks across the slit, one tine is out of place.
A slight catch on your fingernail at the tip usually means one tine sits lower and is striking first. Deal with that before any abrasive work starts.
Safe Pre-Grind Corrections for Alignment
For small vertical misalignment, use light pressure from a fingernail or thumbnail to nudge the high tine down or the low tine up. Skip tools and pliers. They can mark the metal and cause a whole new set of problems. After each tiny adjustment, check again with the loupe. Stop as soon as the tines are level and the catch is gone. Bend the nib too many times and you can fatigue it or knock it back out of line.
If flow seems tight, a thin brass shim - usually 0.001" or 0.002" - can help you check for debris in the slit or show whether the tines are pinched too tightly. First fix the geometry, then check the slit, and only after that think about any micromesh or mylar work.
Once the tines and slit are set, choose the grind angle from your actual writing posture.
Wrong Target Angle and Overgrinding One Side
Once the tines and slit are lined up, one last variable decides how the nib will feel: the angle you grind for. At this point, two problems show up again and again. People either grind for the wrong writing angle, or they take off more material from one tine than the other. Both can leave you with a nib that feels smooth at only one angle. In some cases, they can also create permanent unevenness.
Set the Target Angle from Your Real Writing Habits
Match the angle you actually use when you write. Before you touch any abrasive, write a few lines on regular paper and pay attention to where the nib naturally meets the page. That contact point is the angle the grind should follow.
Then test on normal paper after a few light passes. If the grind matches your natural posture, the nib stays usable in everyday writing. Use light pressure, and stop after a few passes. The nib should fit your hand, not the bench. If you find the original nib is beyond repair, consider swapping it for a fine JoWo compatible nib unit to start fresh.
How to Prevent One-Sided Material Removal
Once the angle is set, the next danger is simple: taking off more material from one side than the other. Flip the nib between passes and use the same light pressure on both sides so material comes off evenly.
Check the nib with a loupe after every few passes so you spot uneven removal early. Then check your writing sample again to make sure the grind still matches your hand. If the nib feels smooth in one direction but catches in the other, that's a warning sign. One side is likely being ground more than the other.
Catching that early is much easier than trying to fix a nib after it has already gone lopsided.
Pre-Grinding Checklist and Conclusion
Use this checklist to make sure the nib is ready for grinding and not still hiding a geometry issue.
| Checklist Item | How to Verify | Why It Matters |
|---|---|---|
| Tine Alignment | Check with a 10x–20x loupe. | Confirms alignment is already corrected. |
| Even Tipping | Confirm the tipping is centered and symmetrical. | Confirms the contact point is centered. |
| Slit Straightness | Inspect the gap from breather hole to tip. | Confirms the slit is ready as a baseline before abrasive work. |
| Ink Flow | Dip test on paper with standard ink. Use a dedicated ink vial for test passes so shavings stay out of your main bottle. | Establishes a flow baseline before geometry changes. |
| Writing Angle | Watch your natural hand position during the dip test. | Confirms the target writing angle before grinding. |
If these checks pass, abrasive work should fix shape, not patch over damage.
Key Points to Remember
Uneven tipping, misaligned tines, the wrong target angle, and one-sided removal are all preventable. Small, careful adjustments tend to give more predictable results than hard, aggressive passes. Good grinds start with correct geometry, not more polishing.
FAQs
How do I know if a nib needs alignment instead of grinding?
Inspect the nib with a 10x to 20x loupe in good light. Look at it straight on and check whether one tine sits higher or lower than the other.
A common clue is directional scratchiness: the pen feels smooth in one stroke, then catches in another. Always check alignment first. Grinding or polishing a misaligned nib won’t solve the problem, and it can leave permanent damage.
What does off-center tipping look like under a loupe?
Under a 10× to 20× loupe, off-center tipping shows up as an uneven, lopsided spread of tipping material at the nib tip. Instead of a centered, split sphere lined up with the slit, the tipping sits off to one side.
That usually points to a factory alignment issue. Over time, it can lead to uneven wear and ink flow that feels inconsistent.
Can overgrinding one side of a nib be fixed?
Usually, no. Overgrinding is permanent because once tipping material is removed, you can't put it back.
It can also leave a flat spot or take off too much material. When that happens, the nib may skip, start hard, or catch paper fibers in the slit.
Small tweaks might help a little. But if the overgrinding is severe, the damage is often permanent. At that point, you may need a professional nibmeister or a replacement nib unit.
Use a 10x loupe to inspect the nib, and test it often so you stop the moment it writes smoothly.