
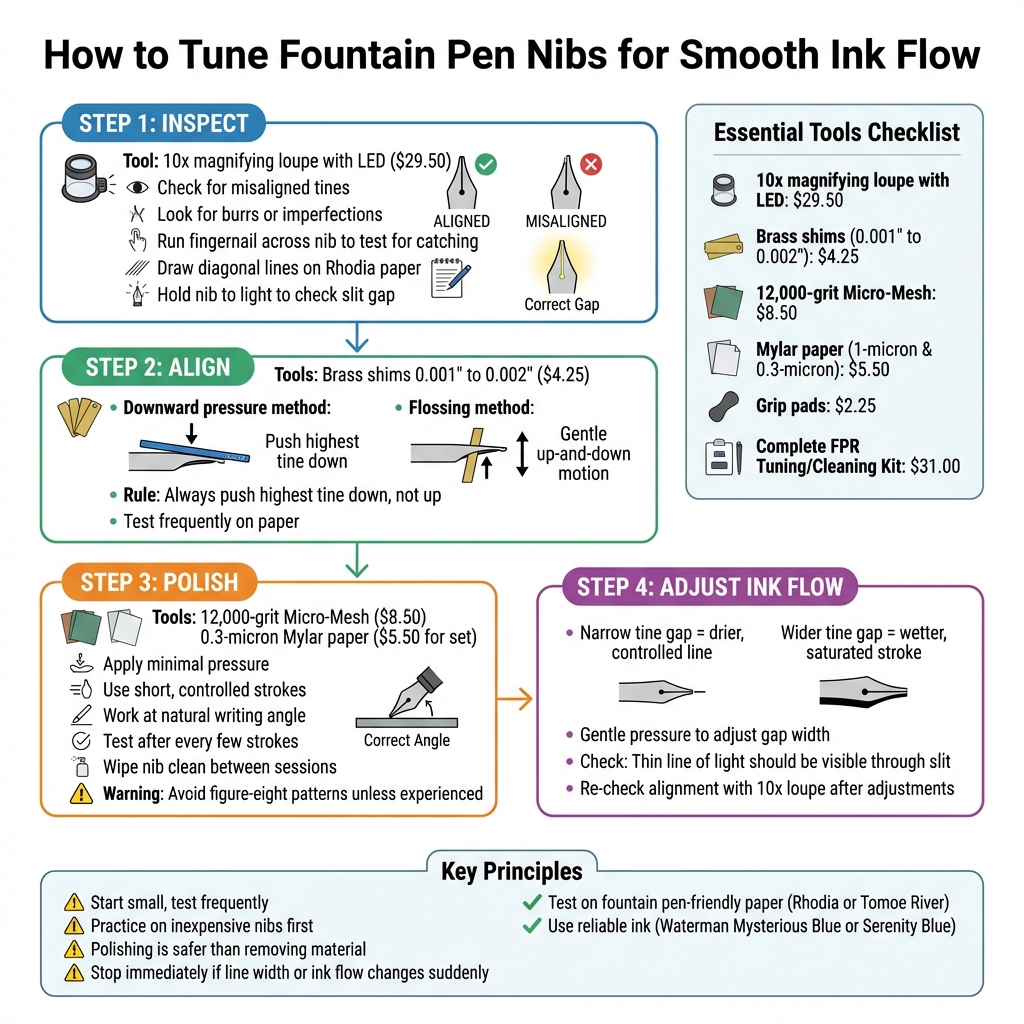
Tuning a fountain pen nib ensures smooth writing by fixing common nib issues like scratchiness, skipping, or inconsistent ink flow. Even new nibs can have flaws, and regular use may introduce problems. Here's how to improve your pen's performance:
- Inspect: Use a 10x magnifying loupe to check for misaligned tines, burrs, or other imperfections.
- Align: Carefully adjust the tines using methods like gentle downward pressure or flossing with brass shims.
- Polish: Smooth the nib tip with 12,000-grit Micro-Mesh or Mylar paper, using light pressure and frequent testing.
- Adjust Ink Flow: Fine-tune the tine gap for wetter or drier ink flow, ensuring balance without damaging the nib.
Start small, test frequently, and practice on inexpensive nibs before working on cherished pens. With patience and the right tools, you can transform your writing experience. For tools and kits, check out Fountain Pen Revolution.
Complete Fountain Pen Nib Tuning Process: 4-Step Guide with Tools and Techniques
Make your fountain pen write better: nib adjustment and polishing
sbb-itb-1dd4fe9
Tools You'll Need for Nib Tuning
Fixing issues like misaligned tines or burrs requires the right tools. Having the proper equipment ensures precision and helps you avoid causing permanent damage to your nib. The good news? You don’t need a pricey setup - most of these tools are affordable, with many complete kits costing under $50.
Inspection and Adjustment Tools
A 10x magnifying loupe, ideally one with LED lighting (around $29.50), is essential for spotting tine misalignments or tiny burrs that are impossible to see with the naked eye.
"So often a scratchy fountain pen nib is simply a matter of having the tines misaligned, and a loupe will make your life much easier when it comes time to try to align them."
– Brian Goulet, Founder, The Goulet Pen Company
Brass shims, which are thin metal sheets (0.001″ to 0.002″ thick), help clean out dried ink or paper fibers stuck between the tines. They also allow you to check the spacing between the tines. A set of two typically costs about $4.25.
For smoothing scratchy nibs, Micro-Mesh with a 12,000 grit (around $8.50) is your go-to abrasive. It polishes the nib gently, removing tiny imperfections. For even finer polishing, Mylar paper in 1-micron and 0.3-micron grits (about $5.50 for a set) is ideal. It provides a smooth finish without removing too much material.
You’ll also need grip pads (around $2.25) to safely remove the nib and feed from the pen section without slipping or damaging the components. Additionally, keep some high-quality test paper, like Rhodia, on hand to evaluate your progress during adjustments.
If you’re just starting, consider the Fountain Pen Revolution Tuning/Cleaning Kit. For $31.00, it includes all the essentials, such as a loupe, Micro-Mesh, brass shims, pen flush, and more.
Using the Right Tools
Having the tools is one thing, but knowing how to use them is equally important. The golden rule? Minimal intervention. Every time you use an abrasive, you’re removing a small amount of the nib’s tipping material, so it’s crucial to work carefully and check your progress often.
"This 12,000 grit abrasive is the most aggressive approach you should take towards smoothing your nib, and you'll want to be really careful when you use it."
– Brian Goulet, Founder, The Goulet Pen Company
Start by using the loupe to identify the problem. Many times, a scratchy nib only needs tine alignment rather than aggressive smoothing. If you do use Micro-Mesh or Mylar paper, apply light pressure, work in short, controlled strokes, and test frequently on paper. Avoid using brass shims to force the tines apart, as this could permanently damage the nib.
For practice, work on inexpensive steel nibs before attempting adjustments on your more valuable pens. This way, you can refine your technique without risking damage to prized pieces.
How to Tune Your Fountain Pen Nib
To get your fountain pen performing at its best, you’ll need to carefully tune the nib. The process involves three key steps: inspect, align, and polish. Skipping or rearranging these steps could permanently damage your nib, so follow them in order. Start by inspecting the nib for any alignment issues, then move on to adjustments, and finish with polishing for a smooth writing experience.
Checking Nib Alignment
Begin by flushing your pen with clean water to clean and maintain your fountain pen to clear away dried ink or leftover machining oils. Once the nib is dry, use a 10x loupe to closely examine the tipping material under good lighting. You’re looking for burrs, uneven surfaces, or tines that don’t meet properly.
Run your fingernail lightly across the nib. If it catches, it’s a sign that one tine is higher than the other. Another way to test is by drawing diagonal lines on high-quality paper like Rhodia; uneven drag in certain directions indicates misaligned tines.
"Scratchiness is that sensation you get when the nib of your pen, instead of dancing across the page, seems to stumble and trip along the way."
– EndlessPens
Next, hold the nib up to a light source and inspect the slit. The gap should gradually narrow as it approaches the tip, but the tips themselves shouldn’t touch. If the inner edges of the tipping are overly rounded - commonly called a "baby’s bottom" - you may experience hard starts or skipping, as ink struggles to flow properly onto the paper.
Aligning the Tines
Before you even think about polishing, ensure the tines are perfectly aligned. If they’re not, begin with the downward pressure method. Flip the nib upside down, identify the higher tine, and gently press it down against the edge of a credit card while keeping the feed stable.
"We nearly always push the highest down, closer to the feed, because we want to keep the nib in close contact with it and pushing a tine up risks reducing that contact."
– ChrisR
For minor adjustments, try the flossing method. Take a thin brass shim (0.001") and slide it carefully between the tines. Move the shim in a gentle up-and-down motion, making small adjustments. Test the nib frequently on paper as you go. If you notice sudden changes in line width or ink wetness, stop immediately to avoid overcorrecting.
Polishing the Nib Tip
Once the tines are aligned, you can move on to polishing. Use a 12,000-grit Micro-Mesh or 0.3-micron Mylar sheet for this step. Apply minimal pressure and stick to short, controlled strokes at the angle you naturally write with.
"The accuracy of nib smoothing is inversely proportional to the speed at which tipping material is removed."
– Richard Binder, Professional Nib Technician
After a few strokes, test the nib on paper to check for smoothness. Wipe the nib clean with a soft cloth between polishing sessions to remove any metal dust. Avoid using figure-eight patterns unless you’re highly experienced, as they can create uneven flat spots. If you notice changes in line width while polishing, stop immediately - this means you’re removing too much material.
Adjusting Ink Flow to Match Your Writing
Controlling Wet vs. Dry Flow
Once you've aligned and polished your nib, the next step is fine-tuning the ink flow to suit your personal writing style. The key lies in the tine gap: a narrower gap results in a drier, more controlled line, while a wider gap creates a wetter, more saturated stroke.
"A narrow tine gap may be unpleasantly dry, while a wide tine gap may either not write or have excessive ink flow."
– Solar Quills
To make adjustments, use gentle, downward pressure on the nib to slightly widen the tine gap for a wetter flow. For a drier line, carefully press the tines closer together. Always work in small increments - too much force can permanently damage the nib. After each adjustment, hold the nib up to a light source to check the gap. A thin line of light should be visible through the slit. If no light passes through, the tines are too tight; if the gap appears too wide, the pen may release too much ink. Always re-check the tine alignment with your 10× loupe, as altering the slit width can accidentally misalign the tines.
Testing with Inks and Papers
After adjusting the flow, it's essential to test the changes under actual writing conditions. Use a reliable ink and fountain pen-friendly paper, such as Rhodia or Tomoe River, to ensure consistent results.
"Choose a good, reliable, non-funky ink - I recommend Waterman Mysterious Blue or Serenity Blue - and a good middle-ground paper, and stick with them. Always."
– Richard Binder, Nib Technician
Write a few lines at your usual writing angle, paying attention to the ink flow, smoothness, and any skipping or hard starts. Keep a test sheet to compare your results before and after adjustments. If needed, make small tweaks to achieve the perfect balance between ink delivery and writing performance.
Testing Your Work and What's Next
Testing the Tuned Nib
Once you've tuned your nib, it's time to test it out. Grab some fountain pen-friendly paper - like a Rhodia A5 pad - and write using your usual angle. Try figure-eight strokes and short, straight lines to assess the ink flow and smoothness.
Pay close attention to how the nib performs on high-quality paper. Are there any sudden changes in line width or ink flow? Test the nib at different angles to ensure it doesn’t scratch or feel rough during various writing styles. If you notice anything unusual - like inconsistent ink flow or uneven lines - stop immediately. This could mean the nib has been over-tuned. Use a 10× loupe to check that the tines are still properly aligned, and make a note of any before-and-after differences in performance.
Once you're confident that the nib is smooth and consistent, you’re ready to move forward and explore the next steps in your fountain pen journey.
Fountain Pen Revolution Nib Options

If tuning has sparked your interest in fountain pens, Fountain Pen Revolution (FPR) offers a wide range of options for every skill level. Their starter sets begin at just $35, and they even provide free U.S. shipping on orders over $65.
Looking to elevate your writing experience? FPR’s gold nib collection might be the perfect next step. These 14k gold nibs offer a luxurious writing feel with added flexibility and a soft, cushioned touch. Whether you're refining your tuning skills or searching for a reliable everyday pen, FPR’s affordable range has something to suit your needs.
Conclusion
As outlined earlier, even small tweaks can make a big difference in how your fountain pen performs. Tuning a fountain pen nib calls for patience, the right tools, and a steady approach. Here's a quick reminder to streamline the process: use a 10× loupe to diagnose issues, align the tines before smoothing, and polish gradually. Frequent testing is key, and always remember: polishing is safer than removing material.
"Fountain pen nib tuning is a patient craft: start small, test often, and prefer polish over material removal." - Carolyn, Author
With these techniques and tools at your disposal, you're ready to start honing your skills. If you're just beginning, try practicing on more affordable pens before working on ones you treasure. Keep track of your progress using test sheets, and if you notice sudden changes in line width or ink flow, stop immediately. For pens with high sentimental or monetary value, consulting a professional nibmeister is always a wise choice.
A well-tuned nib glides effortlessly, provides steady ink flow, and elevates your writing experience. This fine-tuning lays the groundwork for an even more enjoyable connection to your pen.
Start with small adjustments and build your confidence over time. For affordable architect nibs and tuning tools, check out Fountain Pen Revolution to enhance your journey.
FAQs
How can I tell if my fountain pen nib needs tuning?
If your fountain pen feels scratchy, skips while writing, or leaves uneven ink lines, the nib might need some attention. These problems can make writing frustrating and often point to issues like misaligned tines or a rough nib surface.
To check if the tines are aligned, grab a 10x magnifying loupe and take a closer look. Misaligned tines can mess with the ink flow and lead to that scratchy feeling. On the other hand, if the ink flow is inconsistent or the nib drags uncomfortably on the paper, you might need to smooth or adjust the nib to get it writing smoothly again.
What’s the best way to practice tuning a fountain pen nib without risking damage?
To safely practice nib tuning, it’s a good idea to start with inexpensive pens or spare nibs. This way, you won’t risk damaging your more cherished ones. A 10x loupe is essential for checking tine alignment with precision, while tools like Micro-Mesh pads or Mylar paper are handy for smoothing out imperfections. Take a gentle and cautious approach - small adjustments are key. During the process, write with the pen often to test the results rather than relying solely on visual checks.
Steer clear of aggressive filing or grinding, as these can cause irreversible damage to the nib. If you’re hesitant or feel unsure about making adjustments, it’s worth reaching out to a professional nib technician to keep your pen in top shape.
What can I do if I over-tune my fountain pen nib?
If you've gone a bit too far with tuning your fountain pen nib, it's a good idea to reach out to a professional nib technician or repair service. Over-tuning can lead to problems like misaligned tines or inconsistent ink flow, and trying to fix it yourself might make things worse.
For those with experience, you could carefully attempt a fix by realigning the tines or smoothing the nib with tools like micromesh pads or Mylar sheets. But be cautious - incorrect adjustments can cause even more damage. When in doubt, leaving it to a professional is the safest way to get your nib back in top shape.