

A good pen barrel comes down to five things: accurate drilling, square ends, careful mounting, light cuts, and the right finish. If you miss any one of them, the pen can end up out of round, chipped, cracked, or loose at the hardware.
If I wanted to sum up pen barrel turning in plain terms, I’d put it like this: you start with a blank that is often 3/4" × 3/4" × 5" or 6", drill it to match the tube, glue in the brass tube, trim the ends dead square, turn it to the bushing size, sand it smooth, then finish and press it together. Most fountain pens for beginners land around 5 to 6 inches long, about 1/2 inch in diameter, and often weigh 20 to 30 grams.
Here’s the short version of what matters most:
- Pick the right blank: wood, stabilized wood, acrylic, or hybrid
- Follow the kit sizes exactly: tube length, drill bit, and bushings must match
- Drill slow: about 500 RPM, clearing chips often
- Scuff tubes before gluing: usually with 120- to 220-grit
- Trim ends square: this helps stop gaps at the hardware
- Mount with light tailstock pressure: too much can bend the mandrel
- Turn to the bushings: and leave about 1/32" extra room if using a thick CA finish
- Sand in steps: wood often from 180–240 grit up to 800 grit
- Polish acrylics higher: often with Micro-Mesh up to 12,000 grit
- Use the right lathe speed: about 2,000–2,500 RPM for wood and 2,000–3,000 RPM for acrylic
- Apply CA slowly: often at 100–250 RPM
- Press parts in carefully: crooked hardware can crack the blank
A few material facts help too. Raw wood is lower cost, often around $1.50 to $5.00 per blank, but it can move with humidity. Acrylic is often $7.00 to $11.00 and polishes to a glass-like shine, though heat can be a problem. High-end blanks can reach $22.00 to $28.00 each.
If you want a clean result, the goal is simple: keep everything straight, square, and sized to the kit. The rest of the article walks through each step in order so you can do that with fewer mistakes.
Turning a Pen with Traditional Tools (How-to Beginners Guide)
sbb-itb-1dd4fe9
Choose and Prepare Pen Barrel Materials
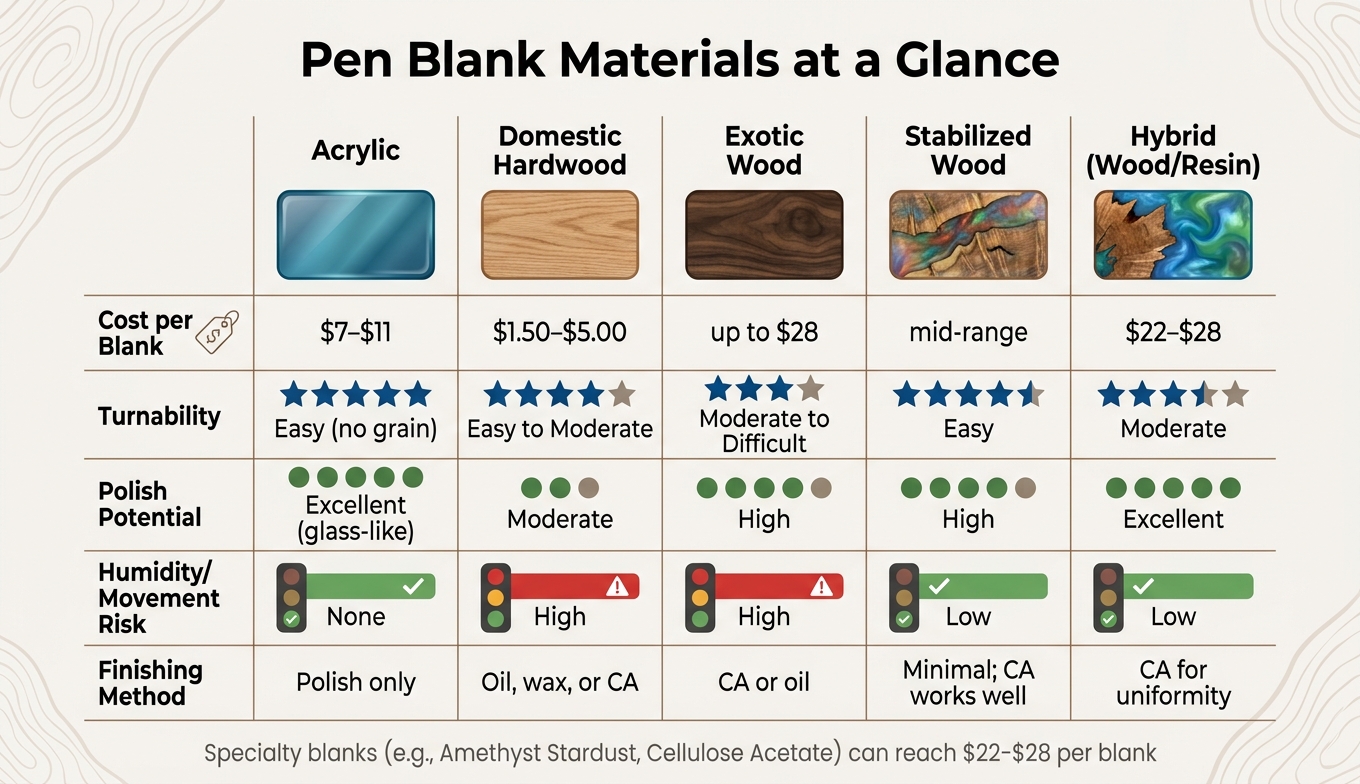
Pen Blank Materials Compared: Cost, Turnability & Finish
Your blank choice changes almost everything that happens next: how the material drills, how it turns, how it finishes, and how well it holds up over time. Most commercial pen blanks come in a standard 3/4" × 3/4" × 5" or 6" size. Pick for machinability first and looks second. That one call shapes the drilling, squaring, and finishing steps that follow.
Wood, Stabilized Wood, Acrylic, and Hybrid Blanks
Domestic hardwoods like Curly Maple and Padauk are a good place to start. They’re affordable - usually $1.50 to $5.00 per blank - and easy to find. The catch is that raw wood reacts to humidity, so it often needs a sealant or CA finish to stay stable and look clean over time. Exotic woods can have more figure and personality, but they can also be harder to turn cleanly and may crack more easily.
Acrylic blanks behave more predictably than wood because there’s no grain to fight. They usually cost $7.00 to $11.00. The main issue is heat. If your tools are dull or your cuts are too heavy, the material can melt and clog. Sharp tools and light passes make a big difference. Stabilized wood cuts down on cracking and movement caused by humidity, which makes it a solid middle ground between raw wood and resin-based blanks.
Hybrid blanks - wood burls cast in resin - can look stunning, but they ask for a lighter touch. The shift from wood to resin can chip if your tool control slips. At the high end, specialty blanks like Amethyst Stardust or Cellulose Acetate can run $22.00 to $28.00 per blank.
| Material | Turnability | Durability | Polish Potential | Movement Risk | Finishing Needs |
|---|---|---|---|---|---|
| Acrylic | Easy (no grain) | High | Excellent (glass-like) | None | Polish only |
| Domestic Hardwood | Easy to Moderate | Moderate | Moderate | High | Oil, wax, or CA |
| Exotic Wood | Moderate to Difficult | Very High | High | High | CA or oil finish |
| Stabilized Wood | Easy | Very High | High | Low | Minimal; CA works well |
| Hybrid (Wood/Resin) | Moderate | High | Excellent | Low | CA for uniformity |
Pen Tubes, Hardware, and Fountain Pen Compatibility
Every pen kit comes with instructions for tube length, drill bit diameter, and the matching bushing set. Those measurements need to match the kit exactly. Use the drill bit size listed by the kit maker so the tube fits snugly without splitting the blank.
Some premium kits, like the Jr. Statesman, use two tubes with different lengths for the upper and lower barrels, so check the kit specs before cutting anything. Wall thickness and internal diameter also come from the kit design. Stay inside those numbers, and the hardware will seat the way it should.
Cut, Drill, Glue, and Square the Blank
Start by marking a centerline across the blank before you cut it into sections. That simple line helps keep the grain lined up across the finished pen. Cut each piece about 1/16" to 1/8" longer than its brass tube so you have extra stock for squaring.
Drill on a drill press or lathe at about 500 RPM, and back the bit out often to clear chips and keep heat down. In wood, sharp brad-point bits usually give the cleanest entry. One handy trick: place the blank so the center joint faces up while drilling. If the bit blows out on exit, the damage ends up on the outer ends instead of the center seam people will notice.
Before gluing, scuff the outside of the brass tube with 120- to 220-grit sandpaper so the adhesive has more bite. Then apply medium-viscosity CA glue or two-part epoxy and insert the tube with a twisting motion to spread the glue evenly. After the glue cures, use a barrel trimmer (pen mill) or disc sander to bring the blank ends flush and square to the tube.
"Barrel trimming not only trims excess blank to match the tube, it squares up the end of the blank with the tube ensuring a gap free fit with the pen components." - Mike at Craft Supplies USA
Before mounting, clear any glue from inside the tube so the blank seats cleanly on the mandrel. Once the ends are square, the blank is ready for mandrel mounting.
Set Up the Lathe and Mount the Barrel
Once the blank is drilled, glued, and squared, the next step is the lathe. This part has a big effect on accuracy. If the lathe is stable and lined up well, you'll get less vibration and cleaner cuts. It also helps keep the barrel concentric, which matters when it's time to fit the kit hardware. For pen turning, a mini or midi lathe is plenty.
Pen-Turning Tools and Accessories You Need
The core setup is pretty simple. You need a pen mandrel, the right bushing set for your kit, a few turning tools, and calipers. The mandrel holds the blanks in place, and the bushings show you the target diameter.
High-speed steel tools like a spindle gouge and skew chisel can cut cleanly. Just make sure they're sharp before each session, because sharp tools leave cleaner cuts. Carbide tools stay sharp longer and lower the chance of catches. A 2-inch radius carbide cutter gives you good control and comes with less catch risk.
| Tool | Primary Role | Key Consideration |
|---|---|---|
| Pen Mandrel | Holds blanks and bushings on the lathe | Must match the specific pen kit hardware |
| Bushings | Set the final barrel diameter | Must match the specific pen kit hardware |
| Spindle Gouge | Rough shaping | Sharp tools help produce cleaner cuts |
| Skew Chisel | Final planing cuts | Produces a smooth surface requiring less sanding |
| Carbide Cutter (2-inch radius) | Shaping with reduced catch risk | No sharpening needed; good for beginners |
| Calipers | Measuring barrel diameter | Helps ensure symmetry and precise sizing |
Mandrel Setup, Between-Centers Options, and Lathe Speed
Load the blanks onto the mandrel in the order listed in your kit instructions, with the right bushings between them and at each end. Then bring the tailstock up to support the free end of the mandrel. Here's the part that trips people up: don't overtighten it. Too much pressure can bend the steel rod and leave you with an oval barrel instead of a round one. Tighten it only enough to hold the blanks firm.
Before turning the lathe on, spin the blank slowly by hand. If you see a wobble, the barrel ends may not be sitting flat against the bushings, so it's worth checking the squaring work again. Set the tool rest within 1 inch of the blank and keep it centered at spindle height. That small gap helps cut down on flex and chatter. When the blank spins true, you're ready to shape it.
After everything is mounted and lined up, set the speed to match the material. For most wood blanks, use 2,000–2,500 RPM. For acrylic bodies, use 2,000–3,000 RPM. If you're working on premium kits and want tighter concentricity, turn each barrel between centers instead of on a mandrel. That setup cuts down on flex and improves concentricity.
Turn, Sand, and Finish the Barrel
Shape the Barrel to Match the Hardware
Once the blank is running true, start cutting it down with the right tool for the material. For wood, use a sharp spindle gouge or skew chisel. For acrylic, use a sharp scraper or negative-rake scraper. Acrylic doesn't forgive heavy cuts. Push too hard, and it can chip or crack, so use a light touch.
A simple trick helps here: cut from the ends toward the center. That reduces edge chipping and keeps the blank cleaner at both ends.
Most pen barrels follow a few common shapes:
- a gentle barrel
- a straight taper
- a soft curve
As you get close to the final size, back off and take lighter passes. Stop when the barrel sits flush with the bushings on both ends. If you're using a high-build CA finish, turn the wood to about 1/32" smaller than the bushing diameter. That leaves room for the finish to build without going past the hardware fit. Once the shape looks right, move right into sanding before heat starts to build.
Sand for a Clean Surface Without Flat Spots or Heat Damage
Lower the lathe speed to about 1,500 RPM. For wood, start at 180–240 grit, then work up through 400, 600, and 800 grit, clearing dust between each step. If you skip a grit, the scratches usually show up later under a glossy finish. And that's always frustrating because the barrel can look fine until the shine hits it.
Use a light grip on the sandpaper and keep it moving along the length of the barrel. If you lean on one area too much, you can sand a flat spot into the shape. After that, hand-sand with the grain to remove lathe marks.
For acrylic, polyester, and stabilized blanks, wet-sand with Micro-Mesh pads up to 12,000 grit. Keep the pads wet so dust doesn't melt back onto the blank. Stabilized wood acts a lot like acrylic at the polishing stage and can reach a near-glass shine from high-grit sanding alone.
Pick the Right Finish for Wood or Acrylic
Once the surface is free of scratches, match the finish to the material. Acrylic is finished with sanding and polishing only.
For wood and hybrid blanks, CA glue (cyanoacrylate) is the toughest option. It forms a hard, waterproof shell that stands up to skin oils and acids. Apply thin coats. Up to 20 layers is common, and an accelerator can bring curing down to minutes. During CA application, slow the lathe to 100–250 RPM. One detail matters here: don't sand wood past 400 grit before applying CA, or the surface can get too burnished for the glue to bond well.
CA glue gives wood and hybrid blanks the hardest shell. Friction polish and oil-wax are faster, but they don't last as long. Once the finish cures, assemble the pen and check the fit.
Assemble the Pen, Check Fit, and Fix Common Problems
Press Assembly and Final Alignment
Once the finish is fully cured, it’s time for final assembly.
Before you take the barrel off the mandrel, score the rim 1–2 mm from each bushing. Then lightly sand the edges with 240 grit and clear tube burrs with rolled 120 grit.
Next, line up the witness marks before pressing the parts together. Use a pen press and apply slow, even pressure. As Emily Woodman puts it:
"If a component feels like it is not going in straight, stop, realign and try again. Forcing a crooked fit can crack the blank."
That advice saves a lot of ruined blanks. If something starts to go in crooked, don’t push your luck.
For fountain pens, press the kit hardware in the stated order. Then check nib-unit clearance and barrel depth. Make sure the converter or cartridge has enough room inside the barrel. A bit of glue inside the tube can block the ink system from seating all the way. In this case, a light epoxy fit is usually better than forcing a tight press fit.
Common Barrel-Turning Defects and How to Fix Them
Most barrel issues come back to three things: fit, alignment, or tool control.
| Defect | Likely Cause | Fix |
|---|---|---|
| Tear-out / Chip-out | Dull tools or heavy cuts | Sharpen tools and take lighter cuts. Fill small gaps with CA glue and sawdust before finishing. |
| Out-of-round barrel | Mandrel flex | Turn between centers. If enough material remains, sand it back to round. |
| Finish chipping at ends | CA bonded to bushings | Lightly sand the edge and apply finish again to the rim. |
| Cracked blank | Hole too tight for tube | Match the drill size to the tube. Use epoxy for loose fits. Fill small cracks with CA and sanding dust; replace the blank if the crack affects strength. |
| Gaps at hardware | Ends not squared to tube | Disassemble and re-square the ends if possible. |
| Oversized turning | Turned past bushing diameter | Use a decorative accent ring to hide the transition. |
| Misaligned grain | No witness lines marked before cutting | Disassemble and rotate the barrels to find the best match. |
Conclusion: The Core Steps to Better Pen Barrels
Better pen barrels come from accurate drilling, square ends, true mounting, careful shaping, and a finish that fits the material. Rush any one of those steps, and it usually shows in the final pen.
FAQs
What is the easiest blank for beginners?
For beginners, acrylic and Kirinite blanks are often easier to work with than wood. They have no grain direction, so there’s less risk of tear-out.
If you’d rather use wood, start with stable hardwoods like maple, walnut, or cherry. A gentle barrel shape that’s a little wider in the center is also the easiest profile to turn well.
Should I use a mandrel or turn between centers?
For beginners, a pen mandrel is the standard and most practical way to turn pen barrels. It uses a rod and matching bushings to keep the blank centered and help you hit the right finished diameter.
One thing can trip people up fast: too much pressure. If you overtighten the nut or tailstock, the rod can bend. And when that happens, the pen can come out oval instead of round.
Some more advanced turners work between centers for certain jobs. But when you're just starting, a mandrel is the easier, more user-friendly option.
How do I prevent cracks and chip-out?
Use sharp bits at a moderate speed of 500 RPM when drilling. Also leave 5 to 10 mm of extra blank length so there’s room for chip-out at the ends.
During turning, cut toward the center with light passes. When pressing parts into the tubes, apply steady, even pressure. If the fit goes in crooked and you force it, cracks are common.