

If a nib gets worse after grinding, I treat it as a stop-and-check problem, not a smooth-more problem. Metal removed from a nib is gone for good, so the safest path is simple: try fountain pen quick fixes like flushing and inspecting under 10× magnification before making tiny changes.
Here’s the short version:
- Scratchy in one direction usually points to tine alignment or a sharp edge.
- Hard starts after a pause often point to baby bottom from too much polishing.
- Skipping mid-stroke can mean debris in the slit or a tight tine gap.
- Suddenly wet flow may mean the tines were spread too far.
- On low-cost steel nibs, replacement can cost as little as $4 to $19.
- On gold nibs, replacement often starts around $70 and can go past $100.
What I’d do first:
- Flush the pen with lukewarm water
- Reseat the nib and feed
- Check alignment with a loupe and bright light
- Test with normal pressure on good paper
- Stop early if the nib shows cracks, missing tipping, or sprung tines
A few fast checks save a lot of damage. For most post-grind problems, the fix is cleaning, alignment, or knowing when to stop.
| Problem | Most likely cause | First move |
|---|---|---|
| Scratchiness | Misaligned tines or sharp edge | Inspect under 10× |
| Hard starts | Baby bottom | Test on absorbent paper, then inspect |
| Mid-stroke skips | Debris or tight slit | Flush and check slit |
| Too-wet flow | Tines too open | Check gap before touching abrasives |
| Lost line variation | Over-polishing | Stop and reassess |
I see this article as a practical guide to diagnosing the problem, trying the lowest-risk fixes first, and deciding when a new nib or pro repair makes more sense than more DIY work.
Nib Problems & How They Are Fixed with Joshua Lax of the J.J. Lax Pen Company
sbb-itb-1dd4fe9
Symptom Charts: Match Writing Problems to Likely Causes
Use these charts before you reach for any tool. They help you sort out residue, alignment trouble, and grind-related shape issues. Start by matching the symptom. Then do the safest check first. Once you have a likely match, move to cleaning and visual inspection before you touch the nib.
Scratchiness and directional drag chart
Directional scratchiness often means one tine sits a bit higher than the other, or one edge wasn't polished evenly. If the pen feels smooth on downstrokes but rough on upstrokes, that's a strong hint. If it only catches when you write left to right, one tine edge may be sharper on that side.
| Symptom | Likely Cause | First Check |
|---|---|---|
| Scratchy only on left-to-right strokes | Sharp outer edge on one tine, or slight tine misalignment | Inspect under a 10× loupe; rotate the pen slightly while writing to confirm |
| Rough on upstrokes, smooth going down | One tine lower than the other; uneven polishing | Check tine alignment under bright light; test whether rotation changes the feel |
| Catches or digs in on curves | Burr left from micro-mesh, or a flat facet from uneven smoothing | Clean the nib; test on smoother paper to rule out paper drag |
| Scratchy at a specific angle or on one side of the line | Uneven tipping shape or tine misalignment exposed at that angle | Hold the nib to diffuse light and look for uneven tipping; slowly rotate the pen while writing and note exactly where the scratch appears |
Skipping, hard starts, and flow problems chart
Hard starts, skipping, and flow changes sound similar, but they are not the same thing. A hard start shows up at the beginning of a stroke after a pause. Skipping happens in the middle of a stroke. Flow changes show up as shifts in line width or darkness across several words. Make that distinction first, and the cause gets a lot easier to pin down.
| Symptom | Likely Cause | First Check |
|---|---|---|
| Pen doesn't start without extra pressure, or skips only on smooth paper but writes fine on copy paper | Baby bottom: tipping is too rounded to contact the paper consistently | Test on more absorbent paper; try a shallower angle; flush the pen first |
| Skips mid-stroke, especially on fast cross strokes | Tine gap too tight, restricting capillary flow | Flush thoroughly; inspect the slit for debris or dried ink |
| First few letters are dry, then flow normalizes | Debris or dried ink in the slit or feed channels | Flush with clean, room-temperature water before any other step |
| Pen suddenly writes much wetter after grinding | Over-opened tines - spread too far apart, disrupting capillary action | Check the tine gap visually; test with a medium-flow ink to confirm |
DIY risk chart by nib type and replacement cost
Not all nibs carry the same risk. Some are cheap enough to learn on. Others are the kind you do not want to experiment with on a random Tuesday. Use this chart to judge how careful you need to be, what kind of inspection makes sense, and when to stop before trying any adjustment.
| Nib Type | Approx. Replacement Cost (USD) | DIY Risk Level | Notes |
|---|---|---|---|
| Inexpensive steel #5/#6 replacement nibs | $4–$19 | Low | Good for learning; easy to replace if you make a mistake |
| Entry-level steel pen (full pen) | $20–$40 | Low–Medium | Affordable to replace; still worth practicing safe habits |
| Mid-range steel nib pen | $40–$100 | Medium | Proceed carefully; limit adjustments to cleaning and minor alignment |
| Modern flex nibs (steel) | $20–$80 | Medium–High | Flex geometry is easy to damage; avoid aggressive bending or grinding |
| Gold nib pens | $100–$300+ (nib alone often $70+) | High | Minimal DIY beyond cleaning; one mistake can ruin the tipping |
| Custom-ground or specialty nibs | Grind cost $45–$60+ on top of the pen | High | Send it back to the nibmeister; don't regrind without professional guidance |
| Vintage or discontinued nibs | Variable; replacement often unavailable | Very High | No DIY adjustments beyond cleaning and gentle alignment checks |
Practice on low-cost steel nibs first. Leave expensive or hard-to-replace nibs alone. After you identify the likely cause, make sure the nib is clean and aligned before you change anything.
Tools, Cleaning, and Writing Tests Before Any Fix
Once you’ve matched the symptom to a likely cause in the charts above, don’t reach for an abrasive right away.
Basic tools you need
For safe post-grind diagnosis, use a 7×–12× loupe. In most cases, 10× is the best all-around pick for checking tine alignment, tipping shape, and the slit. Good lighting matters just as much as the loupe, because dim or uneven light can hide alignment problems.
| Tool | Required or Optional | Notes |
|---|---|---|
| 10× loupe | Required | Inspect tine alignment, tipping shape, and the slit |
| Bright neutral-white desk lamp | Required | Reveals alignment and surface issues clearly |
| Clean lukewarm water | Required | For flushing ink and abrasive residue from the nib and feed |
| Fountain-pen-friendly paper | Required | Smooth, non-fibrous paper |
| Brass shims | Optional | Useful for gently clearing dried ink or debris from the slit |
| 8,000–12,000-grit micromesh or nib-safe mylar | Optional | Use only after diagnosis confirms a smoothing need |
| Bulb syringe | Optional | Speeds up flushing but is not strictly necessary |
Do not use coarse abrasives like low-grit sandpaper, nail buffers, or generic polishing blocks. They remove tipping for good.
Once the pen is flushed and your tools are ready, run a short writing test before changing anything.
Clean and reset the nib before diagnosis
Flush the pen with lukewarm water until it runs clear. If the nib was recently ground, rinse the section well so any loose abrasive particles clear out of the slit or feed channel.
Once it’s flushed and dry enough to handle, reinstall the nib and feed. Make sure the nib sits squarely on the feed with no gaps, and check that the shoulders line up. On friction-fit nibs, confirm both pieces are pushed in fully and straight. If your pen uses a screw-in nib unit, make sure it is snug but not over-tightened.
Then re-ink with a medium-wet, standard dye-based ink. Skip permanent inks, shimmer-heavy inks, and iron gall. A plain blue or blue-black makes line consistency much easier to judge. Let the ink saturate the feed for a few minutes before you start testing.
Writing tests and visual checks to run first
Start with very light, normal writing pressure. Write horizontal, vertical, and diagonal strokes. Then add loops, upstrokes, and downstrokes. Write a few sentences and the numbers 0–9 at a normal pace to see how the pen behaves in regular use.
Next, change your pen angle slightly - hold it a bit higher and lower than usual - to see if the nib has a narrow sweet spot. Rotate the pen a few degrees clockwise and counterclockwise, then note which direction, angle, and pressure bring out the problem. Those notes will help you pick the first safe fix below.
Finish with a quick check for common nib issues rather than grind issues. Under the loupe, look at the tipping head-on. The two tines should meet level, with no step or overlap. Check the slit for fibers, dried ink, or abrasive dust. If the slit looks much wider or narrower than a typical nib of the same size, that points to a mechanical issue, not just residue. If the problem is still there after these checks, move to the safe fix sequence below.
Use what you find here to start with the least invasive fix first.
Safe Fix Order for Post-Grinding Problems
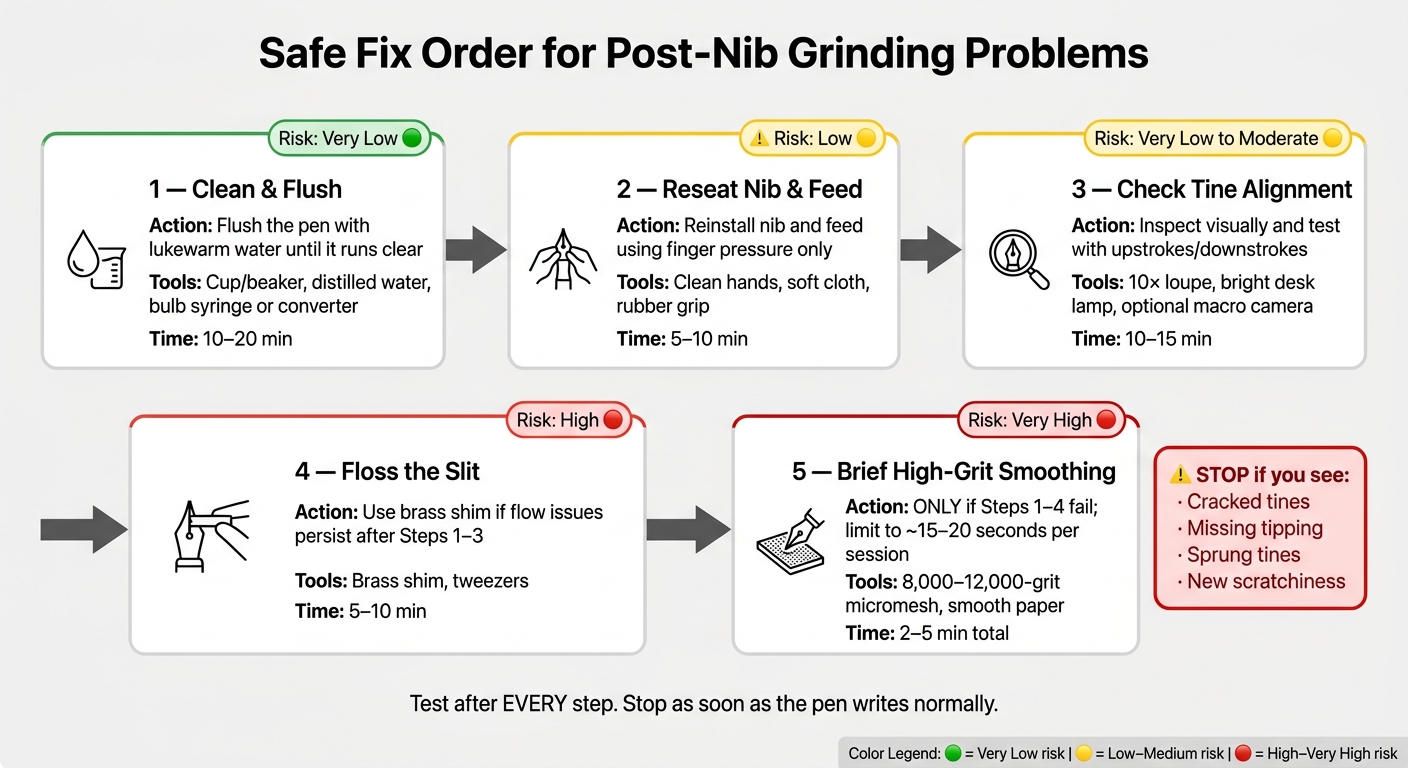
Post-Nib Grinding Fix Sequence: Step-by-Step Repair Guide
Start with the symptom you matched above, then try the least invasive fix first. After grinding, most issues come from residue, paper drag, or a small nib/feed problem - not the grind itself. Test after each step, and stop as soon as the pen writes normally.
Match the problem you saw - scratchiness, skipping, or hard starts - to the gentlest fix below.
Step-by-step fix sequence
| Step | Action | Tools | Typical Time | Risk Level |
|---|---|---|---|---|
| 1 | Clean and flush the pen until water runs clear | Cup or beaker, distilled water, bulb syringe or converter, optional pen flush | 10–20 min | Very Low |
| 2 | Reseat nib and feed using finger pressure only | Clean hands, soft cloth, rubber grip if needed | 5–10 min | Low |
| 3 | Check tine alignment visually and with upstrokes and downstrokes | 10× loupe, bright desk lamp, optional macro phone camera | 10–15 min | Very Low (inspection); Moderate (adjustment) |
| 4 | Floss the slit with a brass shim if flow issues persist | Brass shim, tweezers | 5–10 min | High |
| 5 | Brief high-grit smoothing, only if Steps 1–4 fail | 8,000–12,000-grit micromesh, smooth paper | 2–5 min total | Very High |
Retest after each step using the same stroke patterns from the previous section. Once the pen writes well enough, stop there.
For Step 5, assume every stroke is permanent. About 15–20 seconds of smoothing is usually the limit for one abrasive session; going longer tends not to help and makes over-polishing and baby bottom more likely. Test with words that use lots of curves and direction changes, such as minimum and onomatopoeia, after just a few light strokes. If the nib feels smoother but starts to show hard starts or broader lines, stop at once.
How to spot baby bottom, over-polishing, and tine problems
Baby bottom means the contact area has been rounded too much, so the nib does not meet the paper the way it should. Under a loupe, the area around the slit looks rounded inward instead of flatter. On paper, the clue is pretty plain: the pen skips on the first stroke after uncapping, then writes fine once ink gets going. One simple check is to rest the nib on paper at your normal writing angle with no added pressure. A properly tuned nib should put down a line under its own weight. If it won’t, baby bottom is a likely cause.
Over-polishing is that same problem pushed farther. Common signs are a line that has become broader than the nib was meant to make, a shiny flat patch at the tip that looks too wide, and a nib that feels smooth but still hard-starts or skips. With a stub or italic, losing line variation is another clear sign. Once you spot any of that, stop right away. You can always take more material off, but you can’t put it back.
Tine misalignment usually feels different. The nib feels rough in one direction and smoother in the other. Under magnification, the tines should meet evenly, with no step or overlap. A small misalignment can sometimes be fixed with gentle finger pressure, but check under magnification after every tiny change. It’s easy to overdo it.
Extra care needed for stubs, italics, and flex nibs
Stubs, italics, and flex nibs can lose their writing character fast if you smooth too much, so keep every adjustment tiny and retest each time. If you don’t see a clear improvement after one or two very small passes, stop.
If these small adjustments still don’t bring back clean starts and steady flow, move to the replace-or-call-a-pro section next.
When to Stop: Replace the Nib or Get Professional Help
If the safe fix sequence still hasn't solved the problem, stop tuning. At that point, you're down to two smart options: replace the nib or hand it over for repair.
Signs the nib should not be adjusted further
Stop right away if the nib shows structural damage or still won't write well after cleaning and light alignment.
- Cracked tines - Any visible crack is a hard stop. More bending or grinding can snap the tine and damage the feed or section.
- Missing tipping material - If the tipping is gone, the nib is scraping into the nib metal itself. Smoothing won't fix that. It will just make the wear worse.
- Twisted or badly uneven tines - If the slit is no longer centered or one tine sits higher than the other, the metal has already been pushed too far. More force can crease or crack the tine at the base.
- Sprung tines - If the tines stay spread open after flexing, DIY tuning should end here.
When buying a new nib makes more sense
For everyday steel-nib pens, replacement is often the fastest and cheapest fix. For U.S. buyers, Fountain Pen Revolution's steel nibs are cheap enough that swapping for a JoWo compatible nib unit is often the easiest path for common pens.
Gold nibs, vintage pens, and pens with sentimental value are a different story. A 14k gold replacement nib can cost well over $100–$170. In those cases, a skilled nib specialist can often fix moderate issues like baby bottom, minor asymmetry, or small bends for less than the cost of full replacement, while keeping the pen's original character.
Key takeaways and next-step checklist
Use this as the last decision gate before you stop working on the nib.
| Check | Done? |
|---|---|
| Inspected under 10× magnification for cracks, missing tipping, or twisted tines | ☐ |
| Tried only gentle tine alignment and minimal fine-grit smoothing (12,000-grit max) | ☐ |
| Retested after each small change and tracked whether it improved or worsened | ☐ |
| Checked for new warning signs: creases, changed springiness, new scratchiness | ☐ |
If small adjustments helped, stop there. If the nib stayed the same or got worse after two or three careful tries, replace a low-cost steel nib or contact a professional for a pen that's valuable, rare, or sentimental.
FAQs
How do I tell baby bottom from a flow issue?
First, clean the nib well to rule out dried ink, debris, or a clogged feed. Ink flow problems often come down to a few usual suspects: misaligned tines, a feed that isn’t seated right, or something blocking the slit.
Baby's bottom happens when the inner edges of the tipping are polished too much or rounded too far. The result is simple: ink doesn’t make solid contact with the paper until you press harder. If the tines look aligned under a 10x to 20x loupe but skipping still happens after cleaning, baby's bottom is a likely cause.
Can I fix a scratchy nib without abrasives?
Yes. A scratchy pen often has a simple cause, and it usually doesn't mean you need to grind the nib or reach for abrasives.
Start by flushing the pen with cool water. That can wash out dried ink or small bits of debris that make the nib feel rough on the page.
If the scratchiness is still there, take a close look at the nib with a 10x to 20x loupe. You're checking for misaligned tines, which is one of the most common reasons a pen feels scratchy. If they look slightly off, gently nudge them into place with your fingernail. You can also run a brass shim through the slit to clear out any debris stuck inside.
When should I stop and replace the nib?
Stop and get help from a pro - or replace the nib - if you spot clear physical damage, like a bent tine, cracked metal, or missing tipping material.
You should also stop if skipping, hard starts, or scratchiness keep happening after basic cleaning and alignment checks. If you’re unsure, don’t push it. It’s better to avoid more adjustments, especially with pens that are expensive or mean a lot to you.