

Your desk setup can make journaling feel easy or annoying in under 60 seconds.
If I strip this down to the main point, it’s simple: the best layout depends on three things - your handedness, how you store supplies, and how many pens you use. In this article, I compare six desk layouts across writing flow, comfort, storage access, and cleanup time.
Here’s the short version:
- Right-handed + one pen + open desk = the fastest start and the least cleanup
- Drawer-based layouts = a cleaner surface, but one more step before writing
- Multi-pen layouts = more ink and nib options, but more decisions and more reset time
- Left-handed layouts work best with the notebook turned 30–45° clockwise and the lamp on the right
- Right-handed layouts usually work best with the lamp on the left
- A desk height of about 28–30 in. (71–76 cm) and elbows near 90° help keep writing more comfortable
- A small board tilt of 5–15° can help with longer sessions
- Open multi-pen setups often work best when I keep only 3–5 pens out
- Drawer-based rotations often fit 4–8 pens well for color-coding or bullet journaling
- If cost matters, a starter pen like the FPR Guru at about $11.00 keeps entry cost low, with starter sets around $35.00
What I like about this comparison is that it focuses on the stuff that changes daily use: shadow control, wet ink placement, reach, spill risk, and drying time. So instead of asking, “Which layout is best?” I’d ask, “Which layout lets me start writing with the least friction?”
Cozy Desk Tour - Fountain Pens, Journaling Supplies & other Stationery ✏️
sbb-itb-1dd4fe9
Quick Comparison
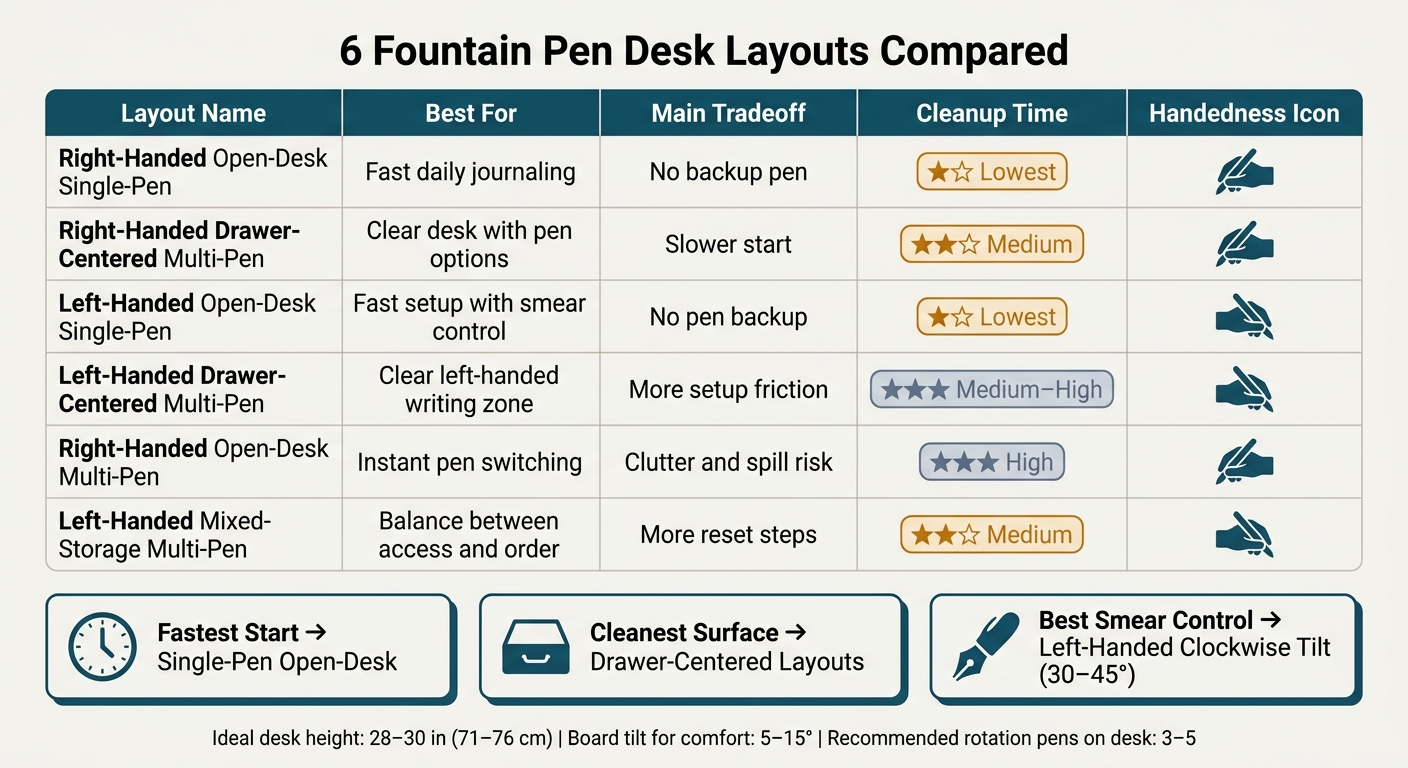
6 Fountain Pen Desk Layouts Compared: Speed, Storage & Cleanup
| Layout | Best For | Main Tradeoff | Cleanup |
|---|---|---|---|
| Right-Handed Open-Desk Single-Pen | Fast daily journaling | No backup fountain pen | Lowest |
| Right-Handed Drawer-Centered Multi-Pen | Clear desk with pen options | Slower start | Medium |
| Left-Handed Open-Desk Single-Pen | Fast setup with smear control | No pen backup | Lowest |
| Left-Handed Drawer-Centered Multi-Pen | Clear left-handed writing zone | More setup friction | Medium to high |
| Right-Handed Open-Desk Multi-Pen | Instant pen switching | Clutter and spill risk | High |
| Left-Handed Mixed-Storage Multi-Pen | Balance between access and order | More reset steps | Medium |
If I were starting from scratch, I’d treat the single-pen open-desk layout as the baseline, then change one variable at a time for a week.
1. Right-Handed Open-Desk Single-Pen Layout
This baseline setup uses one pen, one notebook, and a clear desk surface, so everything you need is close by. There’s nothing to sort through and no drawer to open, which means you can begin writing in seconds.
Writing Flow
With only one pen to grab and one notebook to open, getting started is almost instant. That low-friction setup makes daily writing easier to stick with.
There is a downside, though. If the pen hard-starts or runs dry in the middle of a session, there’s no backup waiting on the desk.
Ergonomics
Place your notebook slightly left of center so your right hand can write with a straight wrist. Keep your elbow close to 90°, and let your forearm rest lightly on the desk. Standard guidance puts the ideal seated desk height at around 28–30 inches (71–76 cm) for most adults, which helps keep the forearm level.
Lighting matters too. Light from the left or from overhead can help cut down shadows from your writing hand.
Storage Access
Keep only the ink bottle, pen rest, and writing tools on the desk. Put the ink bottle at the upper-right edge, outside the main writing zone, and use a pen rest or tray so the pen doesn’t roll away.
A nearby drawer can hold blotting paper, tissue, and a cleaning cloth. Backup ink, spare nibs, pen cases, and other tools you don’t use often should stay somewhere else.
Cleanup Time
Cleanup is fastest with this layout. Since the setup is so simple, putting things away is simple too.
If the pen rest, blotter, and tissue are within reach, cleanup can take less than a minute. Cap the pen, wipe the nib if needed, and you’re done. It’s the fastest cleanup of any layout covered here, but it also gives you the least backup if something goes wrong mid-session. That tradeoff stands out more in the drawer-centered multi-pen layout.
2. Right-Handed Drawer-Centered Multi-Pen Layout
Compared with the open-desk setup, this layout keeps your work surface clear and shifts backup pens, ink, and cleaning tools into drawers. The tradeoff is simple. You get better order and easier access to backups, but each session starts with one extra move: opening a drawer.
Writing Flow
Switching pens mid-session stays fast and easy. The top right drawer holds your daily rotation, sorted by nib size or ink color, so your hand can go straight to the pen you want. When you're done, put the pen back in its slot. The journal doesn't move, and your writing rhythm stays intact.
For bullet journaling or color-coded notes, having 4–8 pens pre-filled and sorted by job means you're spending more time writing and less time choosing.
Ergonomics
The main shift here is reach. Right-side drawers open with a short side motion, so you don't have to reach across your body or twist your shoulder. Keep pen trays in the front half of the drawer so you aren't bending your wrist to grab pens from the back.
A slight writing board tilt of 5–15 degrees under the journal can also make longer sessions easier on your wrist, as long as the drawers still open without trouble.
Storage Access
A tiered setup works well here:
- One pen on the desk
- Daily-use pens in the top drawer
- Inks and cleaning supplies in the drawer below
- Rarely used items in lower drawers
Modular trays stop the top drawer from turning into a catch-all. A solid setup might have one area for 3–6 pens in individual slots, one for cartridges and converters, and one for small accessories. Specialized pen and ink trays let you pull out a single tray for filling, then put it back cleanly.
If you use more than one journaling style in the same notebook, this system also helps. You can keep specialty pens - flex nibs, shimmer inks, stub nibs for headers - in the back row of the top drawer: close at hand, but not taking up your easiest-to-reach space.
Cleanup Time
Cleanup is straightforward. Cap each pen, return it to its slot, wipe the desk, and place any low pen in a small "to clean" section of the drawer. Absorbent cloth or paper towels stored in the ink drawer help contain drips during refilling right where they happen.
It's a few deliberate moves, not a full reset.
3. Left-Handed Open-Desk Single-Pen Layout
The same open-desk setup can work well for left-handed writers. The key is simple: keep fresh ink away from your writing hand. If your writing path stays clear of wet ink, you get the clean, uncluttered feel of a one-pen desk without the usual smudging mess.
Writing Flow
Turn the journal 30–45° clockwise so your hand approaches from below the line instead of dragging across it. That small shift keeps your hand off wet ink and deals with smudging without piling extra stuff onto the desk. Set the notebook a little right of center, and place the pen on a rest at the notebook’s upper-right corner.
Ergonomics
Put the lamp at the front-right of the desk, keep your elbows close to 90°, and place the journal near enough that you don’t have to lean in. Store the pen in a cup or stand on the right side, with the nib facing up, so you can grab it without reaching across your body.
Storage Access
On the desktop, a single pen cup or a slim stand to the right of the journal is usually all you need. Keep ink bottles, spare cartridges, and a cleaning cloth in a nearby top drawer. That keeps the surface open and helps you avoid bumping things with your left hand.
Cleanup Time
When you’re done, cap the pen and wipe the nib with a lint-free cloth if you refilled during the session. Close the ink bottle, then let the last page dry before you shut the journal. One last check helps too: look at your left hand for stray ink, so you don’t end up wearing it for the rest of the day.
Its main edge is speed, but there’s no backup if the pen stops working.
4. Left-Handed Drawer-Centered Multi-Pen Layout
Compared with the open-desk single-pen setup, this layout keeps backup pens tucked away while keeping the same ink-control angle. Your desk stays clean, and extra pens are just a drawer pull away instead of sitting all over the surface.
Writing Flow
Set the journal a little left of center so your hand moves down and to the right, which helps keep wet ink out of your stroke path. Tilt the top edge toward your right shoulder so your hand stays below the line while you write. Keep one active pen on a rest directly above the journal.
Store the other pens in the drawer until you need them. That simple move keeps the desktop clear and cuts down on those annoying mid-line pauses.
Ergonomics
Put the main pen drawer on the left side of the desk, where your non-writing hand can open it without reaching across your writing arm. Keep the desk surface around elbow height, relax your shoulders, and stay centered to the desk rather than turning toward the drawer.
The right side of the desk is a good spot for a lamp, reference book, or laptop. That helps balance the setup and keeps your shoulders from drifting out of line during longer writing sessions.
Storage Access
Inside the drawer, use a shallow foam insert or pen tray to separate pens by nib size or ink color. Place your daily writers in the front so you can grab them fast without digging around.
A few small choices make this setup easier to live with:
- Keep ink bottles in a deeper or lower drawer to cut spill risk.
- Use a small index card in the drawer to note which pens are inked with which colors.
Cleanup Time
Recap daily-use pens, return them to their slots, and keep a small staging section for pens that need a full flush. Handle those during a weekly cleaning session instead of after every writing session.
That way, daily cleanup stays short, and the desk is ready when you want to swap pens.
5. Right-Handed Open-Desk Multi-Pen Layout
This setup gives up drawer neatness for instant access. The idea is simple: less time opening, closing, and hunting for pens means less interruption while you write. Every pen stays visible and close at hand, but this only works if the desk stays intentionally tidy.
Writing Flow
Place the journal a little left of center and angle it about 20–35°, with the top-right corner slightly higher so the page lines up with your forearm. Keep one active pen on the right side, and place the others in a tray at the far-right edge. Stick to three to five pens in rotation. That gives you enough range for headings and body text without slowing yourself down with too many choices. The whole point is speed, and that falls apart if the pens drift outside your normal writing reach.
Ergonomics
Keep your elbow bent at about 90–100° and let your forearm rest flat on the desk. Put a lamp on your left at roughly a 45° angle, and keep your pens close enough that your shoulder can stay loose. The main risk here is easy to miss: if the pens slide too far to the right, you start reaching for them over and over, and that can pull your shoulder forward.
Storage Access
Use a horizontal multi-slot tray or a pen stand with separate slots so the nibs don’t touch. Put your daily journaling pens in the front slots. Keep specialty pens - such as different nib sizes or less-used ink colors - in the back. Store pens horizontally or nib-up. Nib-down storage can increase leak risk, so skip it.
If you keep an ink bottle on the desk, move it to a steady side area away from the notebook. That cuts the chance of a spill. And in this kind of setup, less is more: the fewer tools you leave out, the faster it is to reset the desk.
Cleanup Time
Since everything is already out in the open, cleanup is usually quick. Cap each pen right after use, return it to its slot, and clear the notebook area. Water-based fountain pen ink can start drying on the nib within minutes, so capping the pen right away helps prevent hard starts and saves you from extra cleaning later.
The downside is obvious: an open desk can look messy fast if tools get left wherever they land. A fixed place for each item keeps cleanup short and the whole setup easy to use next time.
6. Left-Handed Mixed-Storage Multi-Pen Layout
This setup splits your tools into two zones: a small set of inked pens and your notebook stay on the desk, while backup pens, ink bottles, and cleaning supplies stay in a drawer. The idea is simple. Keep the pens you use in plain sight, but don’t let them drift all over the desk. That’s what sets this layout apart from the fully open-desk and drawer-first setups covered earlier.
Writing Flow
Angle the journal 30–45° clockwise and place it slightly right of center. Keep 3–5 inked pens in an easy-to-reach stand or cup on the front-left side of the desk, stored upright, nib-up. Leave active pens on the desk and backups in the drawer.
It helps to think of the desk as your working stage and the drawer as your bench. The pens you’re using stay out. Everything else waits its turn.
Ergonomics
Keep your hips, knees, and elbows close to 90°, with your forearm flat. Set the page about a hand’s width from the desk edge and tilt it clockwise to ease wrist strain. Put the lamp on the right so the desk stays open and the page gets even light.
For a left-handed writer, small shifts like this can make a big difference. A page that’s off by just a little can turn a smooth writing session into a cramped one.
Storage Access
Use a two-tier system:
- Tier 1: Your desk, with a stand or cup holding active pens and 3–5 inked pens ready to use
- Tier 2: Your drawer, with backup pens stored horizontally in a felt-lined, divided tray
Keep ink bottles, converters, and cleaning tools in a separate drawer. That includes syringes, pen flush, and microfiber cloths. A 6-slot roll-up case can keep spare pens sorted in the drawer.
This split keeps the desktop usable while you write, and it makes resetting the space less of a chore afterward.
Cleanup Time
More pens mean more end-of-session steps. Cap each pen, check the nibs, close any ink bottles, wipe smudges, and return supplies to the drawer. If you refilled pens or switched inks, expect a bit more time.
Return pens to their fixed zones last. It also helps to give pens set roles, like drafting, headings, and edits. That way, cleanup feels less random and more routine. Over daily sessions, that extra reset time becomes a lot more noticeable.
How These Layouts Hold Up Day to Day
Once you get past the six layouts, the day-to-day difference is mostly about movement, not complexity.
What matters most isn’t how many pens you own. It’s how much you have to move to keep writing without breaking your flow. Open-desk layouts lean toward speed. Drawer-centered layouts lean toward order. That’s the main tradeoff: speed versus order.
Handedness changes a few practical details, too. It affects where the lamp goes, where the notebook feels natural, and how easy it is to stay clear of wet ink. Right-handed writers usually place the lamp on the left. Left-handed writers usually place it on the right, with the notebook tilted so the writing hand doesn’t drag across the page.
Single-pen layouts tend to support consistency. multi-pen layouts give you more options, often requiring essential fountain pen accessories like cases or rolls. A single-pen setup makes it easier to keep a steady rhythm and move fast. A multi-pen setup gives you flexibility, but every pen switch adds a small pause.
The table below puts those patterns side by side.
| Layout | Writing Flow | Ergonomics | Storage Access | Cleanup Time |
|---|---|---|---|---|
| Right-Handed Open-Desk Single-Pen | Fastest; no switching or drawer motion | Lamp left, page angled anti-clockwise; low shadow risk | Immediate; pen and notebook always in view | Lowest; minimal items to reset |
| Right-Handed Drawer-Centered Multi-Pen | Slower to start; drawer retrieval interrupts flow | Lamp left; ergonomics solid once set up | Requires opening drawers before each session | Moderate; pens and cases must be returned |
| Left-Handed Open-Desk Single-Pen | Fast when mirrored correctly | Lamp right, page rotated clockwise | Immediate with items placed on the right | Lowest; minimal kit to reset |
| Left-Handed Drawer-Centered Multi-Pen | Slower; handedness plus drawer access compounds delays | Requires careful drawer positioning to avoid torso twisting | Slowest access; drawer position affects reach | Moderate to high; more steps and tighter workspace |
| Right-Handed Open-Desk Multi-Pen | Fast pen switching; can fragment focus mid-sentence | Lamp left; more items on surface increase reach frequency | Fastest for switching; all pens visible and in reach | High; multiple pens need capping and repositioning |
| Left-Handed Mixed-Storage Multi-Pen | Balanced; daily drivers stay out, extras stay in a drawer | Lamp right; clockwise notebook angle reduces smearing | Good for daily-use pens; slower for drawer backups | Moderate; limit daily cleanup to pens actually used |
There’s also a simple pattern underneath all of this. Open-desk layouts create more small reach-and-reset motions during a session. Drawer-centered layouts keep the desktop calmer, but they add a short setup step before you begin.
Neither option is automatically better. It comes down to how you write each day. If you journal in short bursts, an open desk may feel easier. If you sit down for one focused block, a drawer-based setup may feel cleaner. Use these patterns to judge the tradeoffs in the pros-and-cons breakdown below.
Pros and Cons of Each Layout
Every layout makes a different trade: speed, order, and flexibility don't usually peak at the same time. The table below strips those trade-offs down to the basics.
| Layout | Strengths | Weaknesses |
|---|---|---|
| Right-Handed Open-Desk Single-Pen | Fastest start; easiest cleanup | No backup pen; limited ink and nib variety |
| Right-Handed Drawer-Centered Multi-Pen | Clean surface; structured storage | Slower to start; out-of-sight, out-of-mind risk |
| Left-Handed Open-Desk Single-Pen | Fast setup; easier smear control | No mid-session flexibility; can't switch inks if smearing starts |
| Left-Handed Drawer-Centered Multi-Pen | Keeps extra pens out of the writing path | Higher decision fatigue; adds friction for short sessions |
| Right-Handed Open-Desk Multi-Pen | All pens visible and reachable | Most visual clutter; higher spill risk; more cleanup |
| Left-Handed Mixed-Storage Multi-Pen | Reduces smear risk in the main writing zone | Backups can dry out if left idle too long |
The short notes below show where those trade-offs matter most.
Single-pen layouts cut down on decisions. That makes them easier to live with, especially if you just want to sit down and write.
Multi-pen layouts give you more room to switch inks, nibs, or writing feel mid-session. The catch is simple: more choice can slow you down.
Open-desk multi-pen setups lean toward speed. Everything is right there. But they also ask for more self-control, since clutter and spills become more likely.
Drawer-centered layouts keep the desk cleaner and protect your pens better, but they add one small bit of friction: you have to open the drawer and pull things out.
Mixed-storage only works when the pens on the desk stay limited and the backups stay in the drawer. If too many pens drift onto the desktop, the whole setup starts to lose the point.
Conclusion
Every layout comes with a tradeoff between speed, order, and smudge control. An open-desk single-pen setup is the fastest to start with. Drawer-centered and mixed-storage multi-pen setups keep the desk surface cleaner. Left-handed layouts help cut down smear risk.
Use that tradeoff as your guide. Test one change at a time. Think of your first layout as a baseline, not the final version. Change one variable, write for a week, and keep the setup that makes the process feel easier.
If price is the sticking point, start small with affordable fountain pens for beginners and add more later. Fountain Pen Revolution sells the FPR Guru for about $11.00, and starter sets for around $35.00.
The best desk layout is the one that makes daily writing easy to start.
FAQs
Which desk layout should I start with?
Start with a dedicated, uncluttered workspace. A sturdy desk, a comfortable chair, and good lighting make a big difference. Keep your notebook ready to go, and set your desk height so your forearms can rest lightly on the surface.
Place your daily-use pen within easy reach in a simple tray or pen stand. Keep scrap paper, a cleaning cloth, and ink nearby too. That way, you spend less time setting up and more time writing.
How do I know if I need one pen or several?
It comes down to how you write and what you want from the experience.
Starting with one pen is often the easiest move. It gives you time to figure out what you like in a nib size, how much weight feels right in your hand, and which grip style you can use for longer writing sessions without getting annoyed.
A multi-pen setup can make more sense if you switch between different jobs. Maybe you journal with one pen, jot quick notes with another, and keep different ink colors ready to go. In that case, having a few pens on hand isn’t overkill - it’s just practical.
Whatever route you take, make sure your storage matches your setup, whether that means a desk stand or a case.
What small desk changes improve comfort most?
A few small tweaks can make journaling feel a lot more comfortable:
- Turn your journal about 15–20 degrees toward your writing arm.
- Set your desk height so your forearm rests lightly on the surface.
- Keep your everyday pens in an easy-to-reach stand instead of a drawer.
- Use a light tripod grip, hold the pen 2–3 cm from the nib, and move your forearm more than your fingers.