

If I need cheap fit checks and tougher test parts, I start with FDM. If I need cleaner threads, smoother surfaces, and tighter fit, I move to resin.
That’s the short answer. For fountain pen parts, FDM is usually the better pick for barrels, caps, and early prototypes, while resin is usually the better pick for sections, trim, and final mockups. The tradeoff is simple: FDM is lower-cost and easier to run, but resin gives finer detail and tighter tolerances.
Here’s what matters most:
- Barrels: FDM is often the first step for shape, size, and drop testing
- Caps: FDM works for rough thread tests; resin helps when thread feel matters more
- Sections: Resin is often the safer choice for fine threads and close mating parts
- Trim and mockups: Resin gives smoother surfaces and sharper small details
- Cost: Entry printers for both types often sit around $200–$400
- Material cost: FDM is often about $0.10–$0.50 per part, while resin is often $0.20–$1.00 per part
- Accuracy: FDM is often around ±0.2–0.5 mm; resin is often around ±0.025–0.1 mm
- Surface finish: Resin usually looks smoother right off the printer
- Cleanup: FDM means support removal and sanding; resin means gloves, IPA wash, and UV cure
My rule of thumb: use FDM first, then use resin when the design is close. That cuts wasted time, wasted material, and bad thread tests.
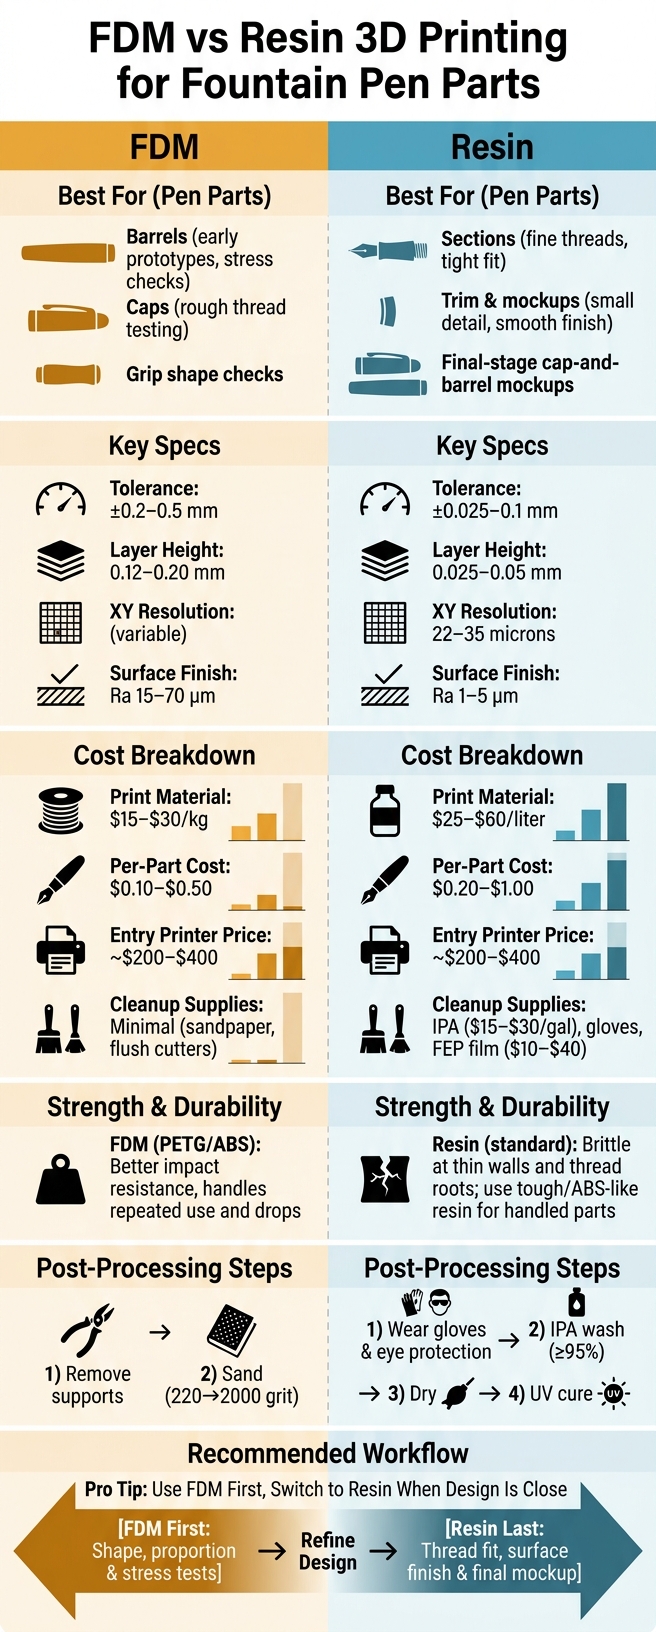
FDM vs Resin 3D Printing for Fountain Pen Parts: Full Comparison
Is Resin 3D Printing better than FDM? (I tested it)
sbb-itb-1dd4fe9
Quick Comparison
| Part or factor | FDM | Resin |
|---|---|---|
| Barrels | Good for early prototypes and stress checks | Better for smooth display mockups |
| Caps | Good for rough thread testing | Better for cleaner thread feel |
| Sections | Fine for grip shape checks | Better for fine threads and fit |
| Trim/mockups | Fine for rough samples | Better for small detail and finish |
| Tolerance | ±0.2–0.5 mm | ±0.025–0.1 mm |
| Surface finish | Visible layer lines | Smoother at small layer heights |
| Strength | Often better for repeated handling | Standard resin can crack at thin spots |
| Post-processing | Sanding and support cleanup | IPA wash, drying, UV cure |
| Per-part cost | Often lower | Often higher |
If you’re making a pen and want the fewest surprises, this is the split I’d use.
FDM Printing for Barrels, Caps, and Early Prototypes
For barrels and caps, FDM is usually the first thing to try. It builds parts by laying down melted filament in thin layers. On small pen parts, 0.12–0.16 mm tends to give better detail, while 0.20 mm prints faster and often gives stronger layer bonding.
The big draw is simple: fast, cheap iteration. A barrel or cap prototype usually costs under $1 in filament, which means you can print a few diameter or length versions in a single evening without thinking twice.
Thread quality and strength limits with FDM
FDM can make working cap and barrel threads, but it has clear limits. Threads printed this way tend to show layer steps, especially on fine cap pitches, so they can feel rough or bind if the printer is even a little out of tune.
Calibration matters a lot. If you over-extrude, thread crests swell up and the cap gets hard to screw on. If you under-extrude, gaps show up at the thread roots and weaken the part. For threaded areas, 3–5 perimeters - about 1.6–2.0 mm of wall thickness - help cut down the risk of cracking and stripping. Print barrels and caps vertically so the threads hold up better and are less likely to crack. For sealing threads that matter more, like those on eyedropper barrels, some pen makers use FDM only to check fit, then make the final threads in resin or machined material.
Surface finish, workflow, and typical cost
Even at 0.12 mm, curved barrel surfaces still show banding. Sanding through finer grits - starting around 220–320 and working up to 1,000–2,000 - smooths the ridges enough for realistic grip and balance testing, even if it still won’t look like a commercial pen finish.
The cleanup is about as simple as it gets: remove supports, then sand. A typical FDM prototype only needs a few minutes of post-processing. That makes FDM the faster option when you’re still dialing in shape, fit, and feel.
When thread detail or surface finish matters more, resin becomes the better next step.
Resin Printing for Fine Threads, Smooth Surfaces, and Detail
Resin printing cures liquid photopolymer with UV light, which lets it reproduce much finer pen details than FDM. Typical layer heights fall between 0.025-0.05 mm, and that’s fine enough for threads, curves, and small trim features. Where this shows up most is on threads and other mating surfaces.
Consumer MSLA printers often reach 22-35 micron XY resolution, which helps keep thread flanks, chamfers, and grip texture intact.
That makes resin a strong option when you need cleaner thread starts, smoother walls, and tighter fit checks. With such thin layers and tight XY resolution, thread crests and roots tend to come out sharper and more even on section threads, cap liners, and trim mockups.
Dimensional accuracy is also better in a noticeable way. While consumer FDM printers usually land within ±0.2-0.5 mm, resin printers commonly hold ±0.025-0.1 mm when properly calibrated. That tighter range matters when you’re checking whether a section fits snugly into a barrel without wobble, or whether a cap liner makes a proper seal.
There is a downside: standard resin is brittle. The weakest areas are usually thread roots, thin section walls, clip mounting points, and cap lips. If the part will be handled again and again, tough or ABS-like resin is a better pick than general-purpose resin.
Finish, cleanup, and material handling
Resin gives you the cleanest surface finish of the two. At 0.05 mm layers, layer lines are almost invisible, and curved barrel or cap surfaces usually need very little post-processing. For a presentation mockup or a design you plan to photograph, that difference stands out fast.
The catch is the workflow. Compared with FDM, resin printing is slower to deal with and a lot messier. Fresh prints need a wash in ≥95% isopropyl alcohol (IPA), then drying, then UV curing. Small parts usually take minutes, not hours.
Safety also matters more here. Uncured resin can irritate skin and the respiratory system, so nitrile gloves, eye protection, and good ventilation are standard practice. IPA is flammable too, which means open flames near the wash station are a real risk.
For U.S. hobbyists, standard resin typically costs $25-$60 per liter. IPA usually runs about $15-$30 per gallon, and replacement FEP film or vats add $10-$40 each.
That extra cleanup and material handling is the price you pay for sharper detail and smoother surfaces.
FDM vs Resin: Thread Fit, Strength, Finish, and Cost Compared
Thread fit and tolerance for mating pen parts
For pen parts, the main issue isn’t which printer wins in general. It’s which one fits the job.
When two pen parts need to screw together, tiny dimensional shifts can turn good threads into threads that feel loose, bind up, or wear unevenly. That’s why thread fit matters so much here.
Hobby FDM printers usually land around ±0.2–0.5 mm on small features, while hobby resin printers often hold ±0.05–0.1 mm, with best-case results as tight as ±0.025–0.05 mm. On narrow section threads and inner cap threads, that gap is hard to ignore.
With FDM, it’s smart to print a test ring first and then dial things in with horizontal expansion, flow rate, or scale. With resin, nominal dimensions often work once shrinkage compensation is set.
| Factor | FDM | Resin |
|---|---|---|
| Tolerance | ±0.2–0.5 mm | ±0.05–0.1 mm |
| Thread detail | Rounded, less defined | Crisp crests and roots |
| Fit tuning needed | Yes - test rings and slicer tweaks | Minimal - shrinkage compensation |
Once the fit is close, the next call comes down to two things: how well the part holds up and what to consider for the final look and feel.
Strength, finish, and cleanup by part type
Good fit is only part of the story. A pen gets tightened, uncapped, pocketed, dropped, and handled over and over. That changes the answer fast.
PETG and ABS deal with repeated tightening and drops better than standard resin. Standard resin has little flex, so thin threads and thin walls are at more risk of cracking.
Surface finish flips the comparison. Resin prints come out at roughly Ra 1–5 µm, which is close to injection-molded quality. FDM surfaces usually measure Ra 15–70 µm depending on layer height, so layer lines tend to show and often need sanding. For display or presentation parts, primer is often part of the job too.
By part type, the split usually looks like this:
- Barrel - FDM: tougher and better at dealing with drops and repeated use
- Cap - FDM: better impact resistance, and coarser threads are usually fine
- Section - Resin: fine threads need tighter tolerance, but torque should stay low
- Trim/mockup - Resin: sharper detail, smoother surface, less finish work
Cleanup is different too. FDM cleanup is mostly mechanical. Resin cleanup is chemical.
That matters a lot in practice. Sanding a print is messy, sure, but washing uncured resin, handling IPA, and working through post-cure steps is a whole different kind of hassle.
Cost and time tradeoffs for U.S. hobbyists
The cost gap gets clearer once you start doing test fits.
FDM is usually the cheaper route for repeat iterations. Resin tends to cost more because failed prints waste not just print material, but also cleanup supplies and more hands-on work.
| Item | FDM | Resin |
|---|---|---|
| Print material | $15–$30/kg | $25–$60/liter |
| Cleanup supplies | Minimal (flush cutters, sandpaper) | IPA, gloves, and other consumables |
| Failed-print cost | Low - filament is cheap | Higher - resin and consumables are wasted |
| Hands-on finishing time | More sanding for cosmetic parts | Less sanding; more chemical handling steps |
| Best for frequent iteration | ✓ Yes | Not ideal |
| Best for final-stage mockups | Not ideal | ✓ Yes |
Those extra resin steps can add up in a hurry, especially when a thread is just a bit off and you need to reprint more than once.
Best Use Cases and Final Recommendation
Best method for barrels, caps, sections, and trim
Pick the method based on where you are in the process: use FDM for shape checks and stress tests, then move to resin for final fit and surface finish.
FDM is the best place to start for barrels and caps. Print a few barrel diameters in PETG and compare how they feel in the hand and how they post. At this point, thread detail doesn’t need to be perfect. Once the proportions feel right, switch to resin to fine-tune thread engagement and surface finish for a final cap-and-barrel mockup.
Sections are where resin starts to matter most. Internal section threads are narrow, and they need tight tolerances to seat cleanly against the barrel shoulder and nib collar. Use FDM to test grip shape first, then use resin to check section threads and nib-seat fit. If there’s one part where the handoff from FDM to resin makes the most sense, it’s the section.
Use resin for finials, decorative rings, and logo inserts. It can reproduce features as small as 0.5 mm, which matters when you want shallow relief and crisp edges. But there’s a catch: if a trim piece takes mechanical load, like a threaded finial that holds a clip, print it in FDM first and stress-test the geometry before you spend time on a resin cosmetic mockup.
How prototyping connects to nibs, ink, and accessories
Once the outer shell fits, it’s time to test the writing hardware. A standard #5 or #6 nib unit from Fountain Pen Revolution is a simple way to confirm section fit and nib-seat alignment. FDM barrel prototypes also help you check converter and cartridge clearance before you lock in the design.
Resin barrel mockups with a smooth finish can also show you how the pen will look with accessories. A translucent or demonstrator-style resin barrel, for example, lets you see how a shimmering or sheening ink looks through the body. That can help you decide on ink choice and even whether a pen stand or case fits the look of the finished pen.
Conclusion: Choosing between FDM and resin
After the part-level fit checks, the last thing to verify is how the pen writes. FDM wins on cost, speed, and toughness in early-stage work: rough barrels, cap proportion checks, and repeated-use stress testing. Resin wins on thread detail, surface finish, and final fit when you’re ready to verify the design before moving to production materials like ebonite or acrylic.
A simple workflow works best: FDM first, resin last. Print thread test coupons before you print the full part, keep notes on what worked, and move to resin only when the geometry is close. That saves material and time, no matter which printer you start with.
FAQs
Which pen parts should I print in FDM first?
Start with non-functional parts or fit mockups. Begin with barrels, caps, and trim pieces so you can check dimensions and ergonomics before you move on to more complex sections or threaded parts.
It also helps to print test pieces first. That way, you can confirm that internal diameters match your nib housing needs, such as 6.4 mm or 7.9–8.4 mm. And before assembly, always dry-fit every part. That small step can save you a lot of hassle later.
When should I switch from FDM to resin?
Switch to resin when your project needs fine detail, bold color, or a look that’s tough to pull off with FDM.
FDM is often the better pick for strength and heat resistance. Resin, on the other hand, works well for decorative parts or for embedding charms and beads in a pen barrel. One thing to watch: resin can start to soften at around 120°F, so it needs extra care in hot conditions.
What resin is best for threaded pen parts?
For threaded fountain pen parts, cast resin - especially cast acrylic - is usually the better pick than compression-molded resin. The big reason is simple: it tends to have less internal stress. And that matters, because lower stress helps cut down the risk of cracking when threads are tightened.
Compression-molded resins can hold onto more stress from the manufacturing process. That can make failures more likely, especially around cap lips and barrel threads. Those spots take a lot of strain, so weak points tend to show up there first.
For custom or hybrid parts, Alumilite resin and two-part epoxy are both common choices. But the end result depends a lot on the process. Proper curing matters, and so does using a pressure pot. If either part goes wrong, the finished piece may not hold up well.