
DIY nib customization allows you to modify fountain pen nibs to match your writing style. Whether it's fixing scratchiness, improving ink flow, or experimenting with line variations, small adjustments can transform your writing experience. Here's what you need to know:
- Start Simple: Begin with tine alignment, light polishing, or minor ink flow tweaks. These are safe for beginners and often solve common issues like scratchiness or skipping.
- Use the Right Tools: Essential tools include a loupe (15–20x magnification), micro-mesh pads (8,000–12,000 grit), and reliable ink and paper for testing. Avoid abrasive materials like brown paper bags.
- Practice on Inexpensive Pens: Mistakes are part of the learning process. Use affordable pens, like those from Fountain Pen Revolution, to build confidence.
- Know Your Limits: Advanced modifications like cursive italic or architect grinds require precision and experience. When in doubt, consult a professional to avoid irreversible damage.
Customizing nibs takes patience and practice, but with the right approach, you can achieve smoother writing and unique line styles. Always test frequently and stop as soon as you see improvement.
10 Most Essential tools for tuning your Nibs
sbb-itb-1dd4fe9
What You Can and Cannot Do with Nib Customization
Now that we've covered the basics, let's dive into what you can safely tackle on your own and what’s better left to the experts. When it comes to nib customization, understanding your limits is key. Some adjustments are beginner-friendly and relatively low-risk, while others can lead to irreversible damage in seconds - even for seasoned hobbyists.
Safe Adjustments for Beginners
One of the easiest and safest adjustments to try is tine alignment. This involves ensuring both sides of the nib tip are level with each other, which can fix about 80% of performance issues without needing to remove any material. Often, nibs that feel scratchy or don’t write well just need careful alignment rather than drastic measures like grinding.
If you want to go a step further, beginners can also try:
- Light smoothing and polishing: Use high-grit micro-abrasives (8,000–12,000 grit) to gently smooth the nib’s surface.
- Minor ink flow adjustments: Small tweaks can improve how ink flows through the nib.
- Basic reshaping of bent nibs: If a nib has been accidentally bent, careful, slow adjustments by hand can sometimes restore its shape.
The key to all of these tasks is patience. Work slowly, test frequently, and avoid rushing.
When to Call a Professional
Some nib work is simply not suited for DIY efforts. Advanced modifications, such as specialized grinds (e.g., Cursive Italic or Architect), demand precise geometry and years of practice to execute well. Attempting these without proper experience can ruin the nib entirely.
Another area to avoid is flex modifications, which involve altering how the nib tines spread under pressure. These adjustments are highly risky and can easily result in cracked or permanently bent tines. Similarly, repairs on rare or collectible pens should always be handled by a professional. Mistakes in these cases can destroy not only the pen’s functionality but also its financial value.
As nib expert Richard Binder explains:
"Smoothing a nib might seem like a simple thing, but unless you have years of training and experience under your belt, you... run the risk of destroying your nib."
If you’re unsure whether a task is within your skill level, that hesitation is a clear signal to stop and seek professional help. Better safe than sorry.
Safety Tips and Work Setup
Your workspace plays a big role in successful nib adjustments. Always use a loupe or magnifying glass along with a strong, focused light to catch even the smallest misalignments. Keep your work sessions short - limit yourself to just 3–5 strokes at a time before testing the nib’s performance.
One golden rule from nib specialists: stop as soon as the nib’s performance improves. Overworking the nib is where most DIY disasters happen. As Filip from Follow My Pen warns:
"Grinding or adjusting a fountain pen nib is always done at your own risk. Any modification to the nib can result in partial or complete loss of functionality."
Approach every adjustment as a small step forward, not a race to perfection. Incremental progress, combined with a careful and deliberate mindset, will save you from costly mistakes.
Tools and Materials You Need for Nib Customization
When it comes to nib customization, having the right tools is just as important as following safe adjustment practices. The tools you choose will directly impact how successful your adjustments are. Luckily, most beginner tasks require only a few essential items.
Inspection and Adjustment Tools
To inspect your nib tip properly, you'll need a high-magnification loupe (15–20x) and a focused light. These tools allow you to spot small details and misalignments that are invisible to the naked eye but can cause major writing issues.
For basic adjustments, your fingers might suffice. However, for more precise work, you may need tools like brass shims or even an X-Acto knife for fine-tuning ink flow.
"Thou Shalt Not Attempt to Smooth a Misaligned Nib." - Richard Binder, Nib Technician
Before reaching for abrasive tools, always check and correct nib alignment.
Abrasives and Polishing Supplies
Smoothing and polishing your nib requires the right abrasives. The table below lists common materials and their uses:
| Material | Grit Range | Primary Use |
|---|---|---|
| Wet/Dry Sandpaper | ~1,000 grit | Smoothing sharp interior corners of the tipping |
| Micro-mesh Pads | 3,600–12,000 grit | General smoothing and reducing scratchiness |
| Mylar Sheets | 8,000–12,000 grit | Final polishing and ultra-fine adjustments |
| Soft Cloth/Dremel | N/A | High-gloss finish without material removal |
Start with the finest abrasive and use a light touch. Adding a drop of water helps the nib move smoothly, reducing unnecessary material removal. If using a Dremel, limit it to final polishing and keep the speed low - it’s not suitable for grinding.
Avoid using brown paper bags, a common DIY suggestion. They lack consistency and can push paper fibers into the nib slit, potentially causing clogs.
Testing and Cleaning Supplies
Testing your nib consistently is crucial. Stick to the same ink and paper for every test to ensure reliable results. Reliable inks like Waterman Serenity Blue or Waterman Mysterious Blue are excellent choices due to their predictable flow.
"Choose a good, reliable, non-funky ink - I recommend Waterman Mysterious Blue or Serenity Blue - and a good middle-ground paper, and stick with them. Always." - Richard Binder, Nib Specialist
For paper, use smooth, fountain pen–friendly options such as Rhodia, Clairefontaine, or Tomoe River to accurately evaluate scratchiness or skipping. After using abrasives, clean the nib slit with 0.0015" brass foil to remove any leftover grit or debris before testing.
If you’re new to nib customization, practice on inexpensive nibs before working on a pen you value. Affordable replacement nibs from sources like Fountain Pen Revolution (https://fprevolutionusa.com) are perfect for building your skills while minimizing the risk of damaging a cherished pen.
With these tools in hand, you’ll be ready to tackle nib problems with greater precision in the next steps.
How to Diagnose Nib Problems Before Making Changes
Before diving into fixes, it's crucial to diagnose the problem properly. Jumping straight to solutions, especially abrasive ones, can turn a small issue into a permanent problem - something beginners often learn the hard way.
How to Test Nib Performance
Start by giving the pen a thorough cleaning. Residue from manufacturing or dried ink can mimic nib issues, so cleaning ensures you're working with a clear starting point.
Once cleaned and filled with ink, test the nib by making strokes in all directions: vertical, horizontal, and diagonal. If the nib catches only on leftward strokes, the issue is different than if it feels scratchy in every direction. Next, try small figure-eights and short strokes at your natural writing angle, using light pressure. This simulates real writing conditions and helps identify any snags or skips.
After testing, compare the results to common nib problems to narrow down the cause before making adjustments.
Common Nib Problems and Their Causes
Knowing what you're dealing with is key. Here's a quick guide to some of the most frequent nib issues:
| Problem | Likely Cause | DIY Fix |
|---|---|---|
| Scratchiness | Misaligned tines; sharp inner edges | Yes |
| Hard starts/skipping | "Baby's bottom" (over-polished inner slit) | Yes |
| Dry flow | Tines too close at the tip | Yes |
| Railroading | Ink flow can't keep up with tine spread | No |
| Catching on left strokes | One tine sits lower than the other | Yes |
One common issue, known as "baby's bottom", happens when the tipping material is over-polished on the inside edges. This defect prevents ink from properly contacting the paper unless you press harder than normal.
Always start by checking nib alignment. Misalignment can't be fixed by smoothing alone - in fact, smoothing a misaligned nib can create uneven flat spots and lead to permanent damage.
Setting a Baseline Before You Start
Before making any changes, establish a baseline. Write a few sentences, take a photo of the nib under magnification, and test using the same ink and paper. This helps you track the effects of any adjustments.
"If you change inks and/or papers all the time... you will never know whether Nib A... is smoother than Nib B... because of the ink and paper or because you weren't as careful." - Richard Binder, Nib Specialist
A clear baseline gives you a reference point for measuring progress and avoids unnecessary or irreversible changes. These diagnostic steps set the stage for informed, deliberate adjustments in the next section.
Basic DIY Nib Adjustments
Successful nib customization starts with a careful diagnosis and small, deliberate adjustments. Once you know the issue, proceed cautiously.
Tine Alignment and Ink Flow Adjustment
Tine alignment is a common starting point. As nib expert Richard Binder advises:
"Thou Shalt Not Attempt to Smooth a Misaligned Nib." - Richard Binder, Nib Specialist
Trying to smooth a nib without fixing misaligned tines can ruin it. One tine may become flattened while the other stays sharp, leading to permanent damage. Use a loupe to inspect the tines, and if one is raised, adjust it gently with the least amount of pressure. This simple fix can resolve about 80% of writing issues, such as clogged fountain pens.
Ink flow depends on the gap between the tines. A wider gap increases flow, while a narrower gap restricts it. Adjust carefully by applying small amounts of pressure. Test on an inexpensive pen, like those from Fountain Pen Revolution, before working on a cherished one.
Once alignment and flow are sorted, move on to smoothing and polishing.
Smoothing and Polishing a Nib
After confirming proper alignment, tackle scratchiness using micro-abrasives like Mylar sheets or micro-mesh pads (8,000–12,000 grit). Avoid sandpaper or brown paper bags, as these can clog the feed.
Add a drop of water to the abrasive surface. Hold the pen at your natural writing angle and use light, short strokes - vertical, horizontal, or figure-eights. Test the nib after every 3–5 strokes and stop as soon as you notice improvement.
"If it improves, stop immediately." - filip, Author at Follow My Pen
Once the nib is smooth, you might consider reshaping the tip for added character.
Minor Tip Reshaping
Tip reshaping is an advanced step and should only be attempted after mastering alignment and smoothing. A common goal is creating a "soft stub" for subtle line variation without committing to a full grind.
Since grinding permanently removes material, practice on a less expensive pen first. Start with a 3,600-grit pad, then move to 6,000 and 12,000 grit. Keep your natural writing angle consistent - grinding at the wrong angle can make the nib incompatible with your writing style. Use light pressure and check your progress often.
"Grinding a nib permanently removes material from it. If you are a beginner, practice exclusively on an inexpensive pen." - filip, Author at Follow My Pen
Beginner-Friendly Nib Grinds
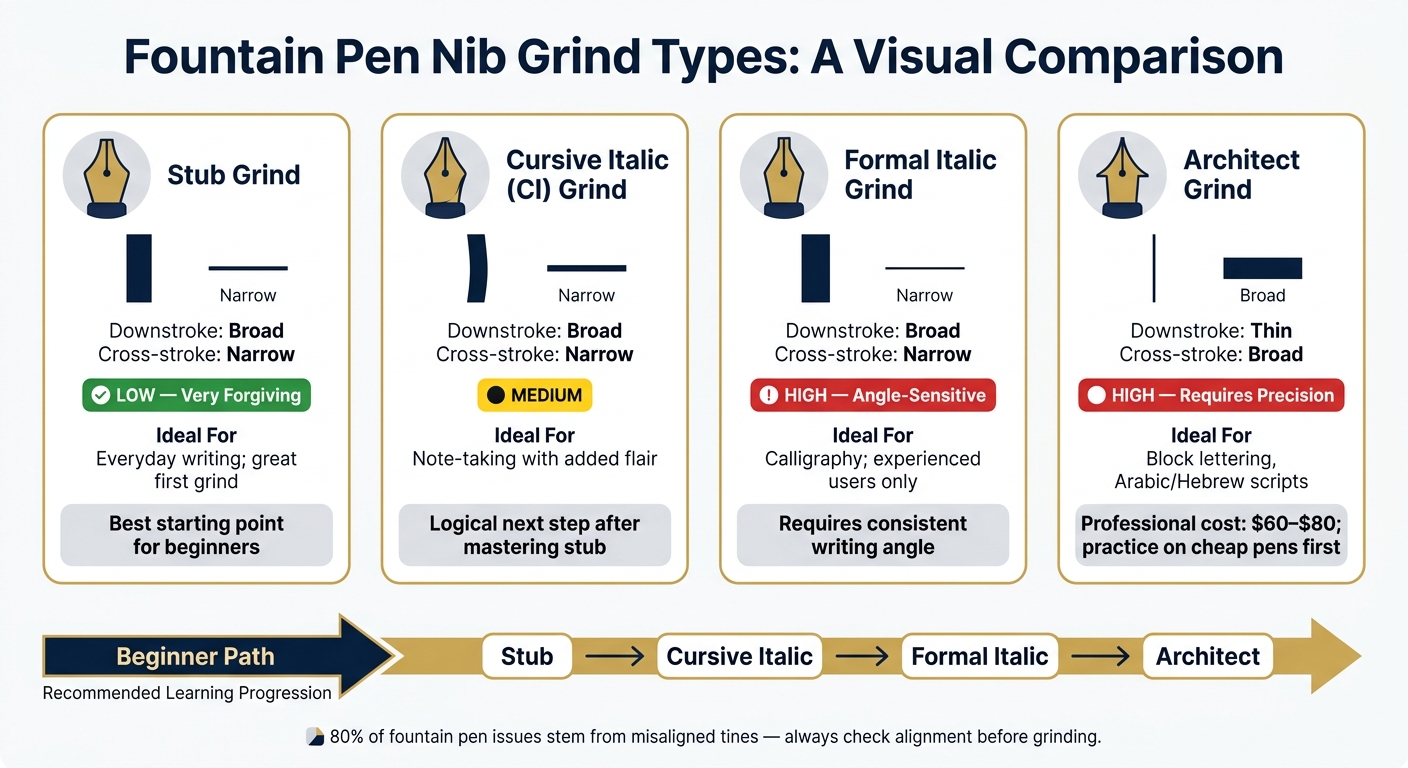
Nib Grind Types Compared: Stub vs Cursive Italic vs Formal Italic vs Architect
Once you've gotten the hang of smoothing and reshaping nib tips, you can move on to nib grinds to create line variation. This refers to the difference in width between your downstrokes and cross-strokes. Generally, the wider your nib to start with, the more noticeable the variation will be after grinding.
Stub and Cursive Italic Grinds: The Basics
The stub grind is an ideal first project for beginners. It creates broad downstrokes and narrow cross-strokes, making it forgiving of slight changes in writing angle. As one nib expert explains:
"The stub is generally a more forgiving version of the italic. It has a larger radius making contact to the page. This will attribute to slightly less line variation." - Nib Grinder
A cursive italic (CI) grind, on the other hand, offers more pronounced line variation than a stub while still being practical for everyday use. It’s less sensitive to the writing angle than a formal italic, which makes it a logical second step after you’ve mastered the stub process.
Both grinds follow a similar process. First, check that the tines are aligned using a loupe. Then, flatten the tipping on the back and the writing side of the nib. To create the square profile, hold the pen at a 90° angle to your abrasive surface and gently grind the nose of the nib. Afterward, roll the pen upward while dragging it along 1,500-grit sandpaper to soften any sharp edges. This rolling motion helps you control how rounded or sharp the final grind will be. Finally, use figure-eights on 12,000-grit micro-mesh at your natural writing angle to polish the nib. Always run a brass shim through the tines afterward to remove any metal dust before inking your pen.
While stub and cursive italic grinds are great for everyday writing, the architect grind opens up new possibilities but requires a higher degree of precision.
Architect Grind: Proceed with Care
The architect grind flips the typical pattern - it creates thin downstrokes and wide cross-strokes. This makes it perfect for block lettering and certain calligraphy styles. However, because of its reversed geometry, it demands greater precision and is less forgiving of errors in angle or pressure.
For this grind, starting with a broad nib is usually necessary (see our fountain pen buying checklist for more on nib selection) to ensure there’s enough tipping material to shape the squared profile. It’s highly recommended to practice stub techniques on less expensive pens before attempting an architect grind. Professional nib technicians often charge $60–$80 for this type of modification.
"If you have a favorite pen and it writes perfectly for you, leave it alone unless you are absolutely certain what you want to do with it because most nib modifications are irreversible." - Joe, The Gentleman Stationer
Comparing Nib Grind Types
Here’s a quick overview of how the main grind types differ in terms of line variation, difficulty, and ideal use cases. Start with a stub, move on to a cursive italic for more variation, and tackle the architect grind once you’ve built solid skills.
| Grind Type | Downstroke | Cross-stroke | Difficulty | Ideal For |
|---|---|---|---|---|
| Stub | Broad | Narrow | Low - very forgiving | Everyday writing; great first grind |
| Cursive Italic | Broad | Narrow | Medium | Note-taking with added flair |
| Formal Italic | Broad | Narrow | High - angle-sensitive | Calligraphy; for experienced users |
| Architect | Thin | Broad | High - requires precision | Block lettering, Arabic/Hebrew scripts |
Conclusion: Getting Started with Nib Customization
The key to success? Start small and stop as soon as you see improvement. Did you know that around 80% of fountain pen writing issues stem from misaligned tines rather than the tipping shape? This means that with just a loupe and a gentle tine adjustment, you can solve most problems without ever reaching for an abrasive tool. It’s all about taking a practical, hands-on approach from the start.
When you’re ready to try grinding, stick to inexpensive practice pens. A great option is Fountain Pen Revolution, where you can find affordable starter sets starting at $35 and bundles from $29. These pens create a "no-pressure" environment to experiment and learn without worrying about damaging something valuable. As nib expert Richard Binder wisely advises:
"Thou Shalt Not Learn on Pens That Thou Carest About. Or That Anyone Else Does."
Using these practice pens allows you to get comfortable handling different grits, understand how much material can be safely removed based on the nib size, and make mistakes without regret. It’s a learning process, and mistakes are part of the journey.
As you refine your skills, keep three golden rules in mind: always grind with a clear purpose, work at your natural writing angle, and stop as soon as the nib shows improvement. Over-grinding is the quickest way to ruin a nib, especially for beginners.
"Patience, a gentle touch, and respect for the material are absolutely key." - Filip, Author of Follow My Pen
FAQs
How do I tell if my nib needs alignment or smoothing?
To clean your pen, flush it thoroughly with water to remove any debris or dried ink. Once clean, use a 10x loupe under good lighting to inspect the nib. Check if the tines are level and evenly touch at the tip.
To test alignment, gently drag the nib sideways across your fingernail. If it catches, the tines might be misaligned. If the tines are aligned but the nib still feels scratchy, you can smooth it using 12,000-grit micro-mesh or Mylar paper for a finer finish.
What’s the safest way to increase ink flow without damaging the nib?
To get more ink flowing safely, begin by flushing the nib to clear out any debris. If that doesn’t do the trick, try using a thin brass shim (between 0.001 and 0.0015 inches) to clean out the slit of the nib. For finer adjustments, you can carefully lift the tines near the tip - about 2–3 mm - using your thumbnail. Make sure to work in small increments, test often, and use a 10x jeweler’s loupe to check that the tines stay properly aligned.
When should I stop DIY and send the nib to a professional?
If your nib belongs to a rare or high-value pen, it’s best to leave adjustments to a professional. DIY modifications are permanent and might void your pen’s warranty. You should also seek expert help for serious issues like cracks, missing tipping, bent tines, or deep scratches. Additionally, if you’re dealing with persistent problems like skipping, poor ink flow, or want a specialized grind (such as an architect or cursive italic), a professional touch is the way to go.