
Testing the smoothness of a fountain pen nib ensures an effortless writing experience. A smooth nib glides over paper without catching or scratching, while a scratchy nib may indicate misalignment or imperfections. Here's how you can test and improve nib performance:
- Inspect the nib visually using a 10× loupe to check for misaligned tines or rough edges.
- Perform writing tests on fountain-pen-friendly paper, focusing on patterns like figure-8s, loops, and straight lines.
- Use tools like brass shims to align tines and remove debris.
- Polish the nib with micro-mesh (12,000 grit) or Mylar paper for a smoother feel.
- Test across different paper types to ensure consistent performance.
Regular care, including cleaning and alignment checks, keeps your nib in top shape. Affordable fountain pen tuning and cleaning kits make it easy to maintain your pen at home.
How to smooth a scratchy fountain pen nib
sbb-itb-1dd4fe9
Tools and Materials for Testing
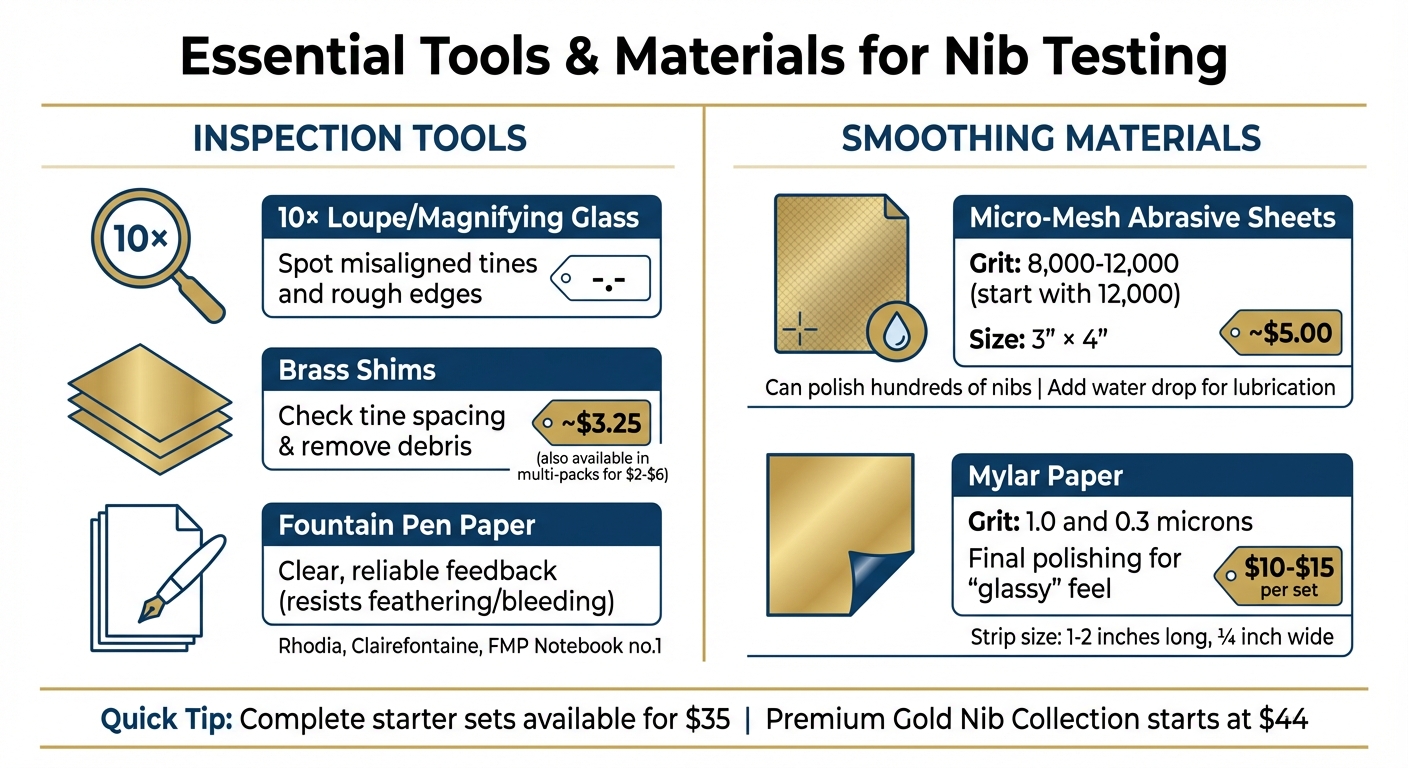
Essential Tools and Materials for Fountain Pen Nib Testing and Smoothing
Before diving into nib testing, it’s important to have the right tools on hand. These will help you examine the nib closely for any flaws and make precise adjustments when needed. From inspection tools to smoothing materials, each item plays a role in ensuring your nib performs as it should.
Inspection Tools
A 10× loupe or magnifying glass is indispensable for spotting imperfections like misaligned tines or rough edges that are hard to see with the naked eye. Another handy tool is brass shims - thin sheets often sold as "brass flossing sheets" for around $3.25. These are perfect for checking tine spacing and removing debris that might affect the nib's performance.
For writing tests, you’ll want fountain-pen-friendly paper, such as Rhodia. This type of paper resists feathering and bleeding, giving you clear and reliable feedback on how your nib is performing.
Smoothing Materials
If your inspection reveals imperfections, smoothing materials can help refine the nib. Micro-mesh abrasive sheets are highly recommended, especially those with a grit range between 8,000 and 12,000. A single sheet, typically sized at 3″ x 4″ and costing about $5.00, can polish hundreds of nibs. Start with the finest grit - 12,000 - to avoid over-smoothing. To make the process smoother, add a drop of clean water to the abrasive surface for lubrication.
For a gentler option, try Mylar paper. Cut a strip about 1–2 inches long and ¼ inch wide, fold it lengthwise, and stroke it under the nib at your natural writing angle. After every 3–5 strokes, test the nib on paper to track your progress. Stop once you notice the nib writing more smoothly.
How to Test Nib Smoothness
Evaluating nib smoothness involves both a careful visual inspection and practical writing tests. Here's how to approach it step by step.
Visual Nib Inspection
Start by taking a close look at the nib using a 10× loupe. Focus on the alignment of the tines - both sides should be even without one overlapping the other. Misaligned tines are often the main culprit behind a scratchy writing experience. Also, check the tipping material for any imperfections like rough edges or flat spots, as these can disrupt ink flow and affect how smoothly the pen writes.
Writing Tests for Smoothness
Once the nib passes the visual check, move on to testing how it performs on paper. Fill the pen with ink and use high-quality fountain pen paper for accurate results. Begin by drawing repetitive patterns like figure-8s and infinity loops to evaluate how the nib handles movement in all directions, which can vary depending on fountain pen nib sizes. Follow this with straight lines, curves, and sentence writing, applying only light pressure. Pay attention to any signs of skipping, catching, or resistance during these tests.
Testing at Natural Writing Angles
The angle at which you hold the pen plays a big role in its performance. Most people write at a natural angle of 45–55°. Conduct your tests while maintaining this angle consistently. Alternate between pattern exercises and regular sentence writing to ensure the nib delivers a smooth and reliable experience across different writing styles.
Smoothing and Adjusting Your Nib
If your testing reveals any issues, you can fine-tune your nib using specific smoothing techniques. These methods require precision and care, so take your time to avoid causing irreversible damage.
Micro-Mesh and Mylar Paper Techniques
Start by checking the tine alignment with a loupe, just as you did during your initial inspection. If the tines are misaligned, smoothing the nib at this stage could permanently ruin it. Before testing or smoothing, lubricate the nib with ink or water. This helps prevent damage and allows you to assess progress as you work.
Begin with 12,000-grit micro-mesh (priced around $5–$12 per sheet). Hold the pen at your natural writing angle and use only the pen's weight while drawing 3–5 small figure-eights. Avoid pressing down, as that can lead to over-smoothing. Test the nib on paper every 2–3 strokes to ensure you don’t overdo it. over-smoothing can create a "baby's bottom" effect (often requiring a replacement nib unit), where the tipping material becomes too rounded, leading to ink skipping.
Once the nib is smoothed, move on to Mylar paper for polishing. Mylar paper sets (1.0 and 0.3 microns) typically cost $10–$15. Use gentle back-and-forth or side-to-side motions to eliminate the fine scratches left by the micro-mesh. This step gives the nib a sleek, "glassy" feel without removing too much material. After polishing, use a brass shim to clean out any grit or fibers that may have accumulated in the nib slit.
Aligning Tines with a Brass Shim
Scratchiness is often caused by misaligned tines. If one tine sits higher than the other, the lower tine’s edge will catch on the paper as you write. To fix this, use a 0.002" brass shim, which usually comes in multi-packs for $2–$6. Insert the shim between the tines and move it gently back and forth to clear debris and check alignment. You can also use the shim to carefully nudge the higher tine into place. Always align the tines before smoothing to avoid creating flat spots that are difficult to correct.
Avoiding Common Smoothing Mistakes
One of the most frequent mistakes is applying too much pressure while smoothing. This can bend the tines or remove too much tipping material. Keep in mind that abrasives are more resistant than regular paper, so a nib that feels smooth on micro-mesh might actually be too slick for regular writing. Rotate the pen slowly as you make figure-eights to ensure even smoothing and avoid creating an uneven "sweet spot." Patience and a light touch are key to achieving the desired result without compromising the nib's performance.
Testing Results and Next Steps
After adjusting your nib, it’s time to ensure it performs consistently in various writing situations. This is how you differentiate a quick fix from a pen that’s truly fine-tuned.
Testing on Different Paper Types
A nib that writes smoothly on one type of paper may behave differently on another. To ensure reliable performance, test your pen on a variety of paper types. Start with high-quality, fountain-pen-friendly paper like Rhodia, Clairefontaine, or FMP Notebook no.1. These papers are known for their smooth surfaces and excellent ink absorption, giving you a clear sense of how your nib performs without interference from rough textures or feathering.
Write full sentences and practice figure-eights, as well as vertical and horizontal strokes, on each type of paper. This helps you spot any directional inconsistencies. A well-smoothed nib should glide effortlessly in all directions, without catching or scratching. Keep in mind, there will be differences between premium and standard papers (where non-feathering ink is essential), but the goal is consistent smoothness on quality options, which confirms proper ink flow and tine alignment.
Once you're satisfied with the performance, maintain the nib’s smoothness by cleaning it regularly and checking for common nib issues.
Fountain Pen Revolution Nib Options
If you’re new to nib testing, starting with affordable options can help you practice without worrying about expensive pens. Fountain Pen Revolution offers starter sets for $35, which include the tools you need to learn the basics of testing and adjusting nibs.
For those looking to elevate their writing experience, the Gold Nib Collection is worth exploring. These 14k gold nibs are easier to adjust than steel ones, making them more forgiving for beginners experimenting with smoothing techniques. While steel nibs are more durable, they’re harder to reshape, which can be challenging when learning. Premium pens in this collection start at $44, offering handcrafted quality at an accessible price point. This lets you refine your skills while building a collection of reliable writing instruments.
Keeping Your Nib Smooth
Once you’ve found the right nib, regular care is essential to keep it performing well. Clean your pen every 4–6 weeks, or whenever you switch inks, to prevent clogs and residue buildup. Store your pens horizontally or with the nib pointing up to maintain consistent ink flow and avoid leaks that could affect performance.
Check the nib’s alignment periodically using a loupe, especially after a drop or if you’ve applied extra pressure while writing. Catching misalignment early allows you to fix it with a brass shim, avoiding the need to re-smooth the nib entirely. With proper care, your nib will continue to deliver a great writing experience for years to come.
Conclusion
Mastering nib testing and adjustment is a rewarding skill for any pen enthusiast. A well-tuned nib can turn writing into an enjoyable and effortless activity. With tools like micro-mesh, mylar paper, and brass shims, you can tackle common nib issues right at home. Regular testing helps identify problems like scratchiness or misalignment early, preventing discomfort or interruptions to your writing flow.
Incorporating routine inspections into your pen care ensures consistent performance. Writing tests at your natural angle can confirm proper ink flow and alignment, helping you maintain an optimal writing experience. And when issues do arise, the techniques outlined - like realigning nib tines or smoothing rough edges - provide clear solutions.
For those new to nib care, Fountain Pen Revolution offers starter kits starting at $35, complete with essential tools and video tutorials. If you're looking to elevate your experience further, their Gold Nib Collection provides premium options for enhanced performance.
Once your nib is fine-tuned, maintaining it through regular care and testing will ensure smooth and reliable performance for years to come, making every writing session a pleasure.
FAQs
How do I tell scratchiness from dry ink flow?
Scratchiness happens when there are physical issues with the nib, such as misaligned tines. You’ll often notice this when writing in a particular direction. To check for this, use a loupe to closely examine the nib.
Dry ink flow, on the other hand, occurs when ink delivery is blocked. This can result in skipping, hard starts, or faint lines. You can test for this by drawing loops or straight lines to see if the ink flow is consistent.
To address scratchiness, carefully align the tines. For dry ink flow, cleaning the pen thoroughly should resolve the issue.
When should I stop smoothing to avoid “baby’s bottom”?
When smoothing a nib, stop as soon as it feels smooth and writes well on high-quality paper. Test it with consistent pressure and at various angles to ensure proper performance. Over-smoothing can result in a condition called baby’s bottom, where the nib tip becomes too rounded, leading to skipping and inconsistent ink flow. Take your time, practice on inexpensive pens to refine your technique, and stop once the nib glides effortlessly without any roughness or skipping.
What’s the safest way to fix misaligned tines at home?
To fix misaligned tines at home, start by examining the nib with a magnifier (10× to 20×) to clearly see the issue. If one tine is higher, use a soft tool, like the edge of a credit card, to gently nudge it downward. Be careful not to apply too much pressure or attempt to pull the lower tine upward, as this can cause damage. After each adjustment, test the pen on high-quality paper to check the alignment. If the problem persists or seems severe, it's best to reach out to a professional nibmeister. Regular, careful adjustments can help keep your pen writing smoothly over time.