
The tiny metal tip on a fountain pen, often called "iridium", is key to its performance - even though modern tips rarely contain actual iridium. These tips are crafted using advanced alloys like tungsten or osmium, ensuring durability and smooth writing through proper maintenance. The process involves welding the alloy to the nib, followed by grinding, slitting, and polishing to create a flawless writing surface. Skilled techniques and rigorous testing ensure the nib can handle years of use while delivering consistent ink flow. Here's how this detailed process transforms raw materials into reliable writing tools.
Fountain Pen Nib Iridium Tipping Process: From Raw Material to Finished Writing Tool
Retipping A Fountain Pen Nib!!!
sbb-itb-1dd4fe9
Materials and Tools for Iridium Tipping
Applying iridium tipping requires both the right materials and highly specialized equipment. The tipping alloy must strike a delicate balance: it needs to be tough enough to resist wear while bonding securely to the flexible nib body. Precision is absolutely critical when working with these materials.
Iridium Alloy: Properties and Selection
The tipping material addresses a key design challenge. While the nib body is designed to flex under writing pressure, the tip itself has to endure constant abrasion without wearing down - something gold or steel alone cannot handle.
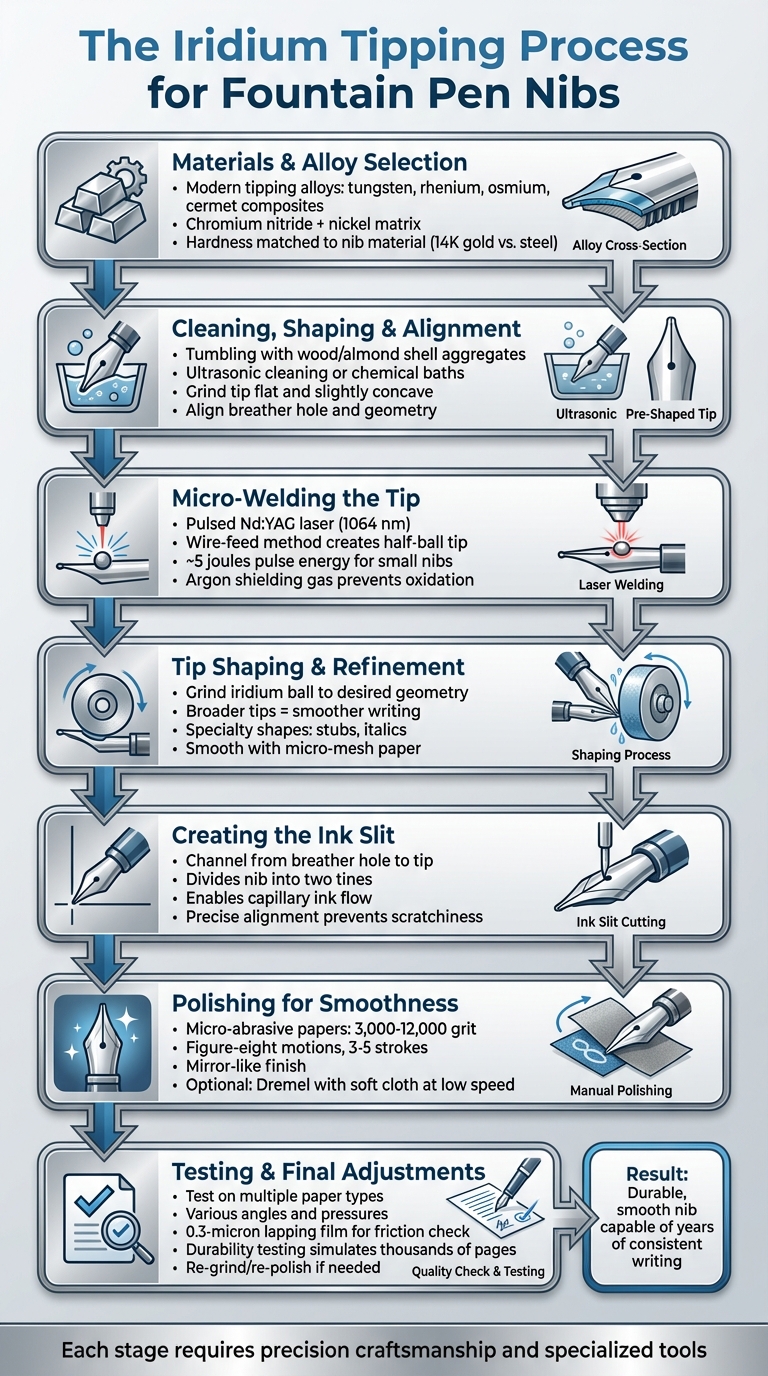
Interestingly, modern "iridium" tips often contain little to no actual iridium. Instead, manufacturers rely on advanced alloys made from tungsten, rhenium, osmium, or even cermet composites like chromium nitride and nickel. Studies of some contemporary tips reveal that they are composites featuring a nickel matrix with chromium and nitrogen dispersoids.
"Iridium is a silvery metal of the platinum group, notable for its hardness, resistance to corrosion, and rarity." - David Nishimura, Founder, Vintage Pens
The choice of material depends on the desired hardness and consistency. Early tipping materials, used before the 1940s, were often unrefined alloys containing osmium and ruthenium, which led to noticeable variations in quality. Modern synthetic composites, on the other hand, deliver more uniform performance. The trick lies in matching the hardness of the tip to the nib material - softer 14K gold nibs require a harder tip compared to stiffer steel nibs.
Once the ideal alloy is chosen for its hardness and reliability, the next step is using specialized tools to bond and shape the tip for long-lasting performance.
Specialized Tools for Precision Crafting
Because tipping alloys are extremely hard, crafting them requires specialized tools. Micro-welders are used to fuse the tipping material to the nib base, ensuring a bond strong enough to withstand years of writing pressure. After welding, grinding and polishing equipment comes into play to shape the tip into a smooth, functional writing surface. Since modern composites are harder than older materials, these tools must remove material with microscopic precision to avoid scratches and maintain a flawless finish.
While modern machinery has made the process faster, the core challenge remains the same: securely bonding a hard, durable tip to a flexible nib without compromising its performance or longevity.
Preparing the Nib for Iridium Tipping
Getting the nib ready for iridium tipping involves a few critical steps: cleaning, shaping, and aligning. These steps ensure a strong and durable bond during the welding process.
Start by cleaning the nib thoroughly. Tumbling it with wood or almond shell aggregates helps remove oils, stamping burrs, and oxidation. Follow this with ultrasonic cleaning or chemical baths to get rid of any remaining oils and reduce the risk of weld porosity.
Next, shape the nib tip. Grind it flat and slightly concave using precision wheels. This creates a clean, burr-free surface with a shallow centering groove for the alloy. For steel nibs, use stiffer, non-lubricated discs, while gold nibs require gentler methods due to their softness.
Alignment is just as important. Position the nib’s breather hole and overall geometry accurately, ensuring automated machines can place the iridium bead exactly at the center. Use the punched locating hole as a guide to avoid off-center tipping, which can lead to uneven wear and inconsistent ink flow.
This meticulous preparation ensures the nib is ready for welding. It must be resistant to wear and acid, easy to polish, and compatible with both gold and steel. Proper alignment of the tines is also crucial to maintain smooth capillary ink flow.
Once the nib is perfectly prepared, it’s time to move on to the precise welding of the iridium tip.
Application Techniques for Iridium Tipping
Micro-Welding the Iridium Tip
To attach the iridium alloy, a pulsed Nd:YAG laser (1064 nm) offers precise heat control, resulting in extremely fine welds with minimal heat spread. This modern approach has largely replaced older electric tack welding techniques.
The process involves a wire-feed method to create the tip. As jeweler Ludwig describes, "Imagine a wire of iridium perpendicular held to the nib, the wire slight protruding a bit. If you hit the end of the wire with a pulse a half ball forms". By cutting the wire and repeating this step, a complete spherical tip is formed. For smaller nibs, adjusting the laser pulse energy to about 5 joules ensures the ball forms properly without damaging the surrounding nib material.
Maintaining atmospheric control is also critical. Using argon as a shielding gas prevents oxidation, ensuring a clean and consistent melt. Iridium alloys are known for rapid grain growth, which can compromise fracture toughness. To counteract this, pulsed current processes - whether with a laser or Gas Tungsten Arc Welding (GTAW) - are used to refine the weld's grain structure and improve ductility. Researchers Stanley Pierce and Paul Moniz from Los Alamos National Laboratory highlighted that, "A pulsed current GTAW process... has shown improved grain refinement and ductility compared to a conventional constant current GTAW process, so this pulsed current approach is being investigated for the iridium welding process". Once the weld is complete, the tip is ready for shaping to enhance its performance.
Shaping and Refining the Tip
After welding, the iridium ball is carefully ground and refined to achieve the desired geometry. A broader tip provides a smoother writing experience due to increased contact with the paper, while finer tips demand meticulous shaping to prevent scratchiness.
For specialty nibs - like stubs or italics - the tip is ground into wider, flatter shapes, creating distinct contrasts between vertical and horizontal strokes. Once the tip is shaped, it is smoothed using micro-mesh paper to achieve a flawless finish. Proper alignment of the tines is also crucial, as misaligned tines often lead to scratchy writing.
Final Finishing: Grinding, Slitting, and Polishing
After shaping and welding the iridium tip, the last step focuses on refining the nib into a functional and elegant writing tool. This stage involves cutting the slit for ink flow and polishing the tip to ensure a smooth writing experience.
Creating the Slit for Proper Ink Flow
The slit is a carefully cut channel that extends from the breather hole to the tip of the nib, dividing it into two tines. This channel uses capillary action to draw ink from the pen's reservoir to the paper, ensuring smooth and consistent flow. Without this slit, even a perfectly welded iridium tip would fail to function as intended.
"The slit [is] the fine channel running from the breather hole to the tip, guiding ink flow through capillary action. This precision-cut feature controls how ink reaches the paper, maintaining consistent flow regardless of writing angle or speed." - Scriveiner
Precision is key. Misaligned tines can lead to a scratchy writing experience as the nib catches on the paper. Proper alignment ensures that ink flows evenly and the nib glides effortlessly. Professional nib tuning often involves adjusting the slit to suit specific writing styles, enhancing the overall performance.
Once the slit is cut and the tines are aligned, the nib is ready for polishing.
Polishing for a Smooth Writing Experience
To ensure optimal performance, tine alignment is verified under a loupe with focused lighting. Even microscopic misalignments can cause common issues like ink skipping or uneven flow. As filip, Author of Follow My Pen, notes:
"The most important thing is to ensure that the nib sits flush against the feed all the way to the tip, and that both tines are perfectly aligned where the nib is split".
Polishing involves using micro-abrasive papers or Mylar sheets with grits ranging from 3,000 to 12,000. These materials create a mirror-like finish while preserving the iridium alloy's integrity. A drop of water on the abrasive surface helps control the process. The nib is polished with small figure-eight motions and short strokes, typically in sets of 3–5 strokes, followed by testing to prevent over-grinding.
"Grinding a nib permanently removes material from it. If you are working with an expensive, historical, or limited-edition pen, it is always better to entrust the work to a professional nib specialist." - filip, Author of Follow My Pen
For the final touch, a Dremel tool with a soft, rotating cloth can be used at very low speeds to achieve a flawless finish without removing additional material. The iridium tip is shaped into a rounded profile, allowing it to glide effortlessly across paper while maintaining the precise geometry required for consistent ink flow. This careful process ensures the nib responds beautifully to different pressures, angles, and writing speeds.
Quality Control and Testing
After the nibs are polished, they go through a series of intensive tests to ensure they deliver a top-notch writing experience. This process identifies any flaws that might affect performance and confirms the nib's durability, simulating the equivalent of writing thousands of pages.
Testing for Smoothness and Durability
To test for smoothness, nibs are used on different types of paper, at various angles, and with different levels of pressure. This helps identify issues like skipping, railroading, or scratchiness. The nib is tested by moving it vertically, horizontally, and sideways, ensuring it provides consistent ink flow. A 0.3-micron 3M lapping film is also used to check for minimal friction during use.
Durability testing involves simulating extensive writing to ensure the nib can handle heavy use. The tipping material is evaluated for its resistance to wear, porosity, and exposure to acidic inks. Additionally, the iridium alloy used in the tip must resist abrasion, remain polishable, and stay securely welded to its gold or steel base. Specialized rigs apply consistent pressure during these tests, and microscopic inspections are conducted to analyze wear patterns. These steps ensure that the advanced welding and polishing methods meet the required performance standards.
Adjustments and Final Touches
If any issues are found during testing, adjustments are made to fix them. For example, the tip might be re-ground or re-polished to improve ink flow. If the tines are too tight, they may be re-slit, and the tension can be fine-tuned through precise manipulation. The ultimate goal is to ensure the nib delivers smooth ink transfer to paper without requiring excessive pressure.
The process concludes with a final polish using fine materials like almond shells to remove any remaining burrs from the slitting process. This creates an impeccably smooth surface. Once the nibs are assembled into pens, they undergo a last round of smoothness checks, and any necessary adjustments for flexibility are made. Only after passing these rigorous inspections are the nibs approved for sale or assembly into finished pens.
Conclusion
Turning raw nib material into a smooth, reliable writing tool requires incredible precision at every step. From intricate micro-welding to the final polish, every phase is designed to ensure top-notch performance. It’s a process that relies on specialized tools, skilled techniques, and unwavering attention to detail.
The iridium tipping process transforms a basic metal piece into a tough, smooth nib capable of handling heavy use. This design ensures consistent ink flow with minimal effort. Rigorous testing, including the use of 0.3-micron lapping films and multi-angle writing trials, guarantees that only the best nibs make it into your hands.
This meticulous process highlights the advanced engineering and craftsmanship involved in creating a nib. Appreciating the skilled labor and precise techniques behind these components helps us see them as more than just functional tools - they’re a blend of artistry and engineering. Combining traditional craftsmanship with modern quality standards, these nibs are built to perform seamlessly across various papers, angles, and writing styles.
Whether you’re exploring fountain pens for the first time or adding to your collection, experiencing these precision-crafted nibs is a game-changer. Check out Fountain Pen Revolution for high-quality, affordable fountain pens and accessories, starting at just $29 for complete bundles. Discover how expertly designed iridium-tipped nibs can elevate your writing experience.
FAQs
Why are fountain pen tips called “iridium” if they aren’t iridium?
Fountain pen tips are often referred to as “iridium” tips because iridium was once commonly used in gold nibs for its exceptional hardness and durability. While most modern tips are now made with other strong alloys, the term has stuck around, largely out of tradition and for branding purposes.
How does tipping material choice affect smoothness and wear?
Harder materials like tungsten-ruthenium alloys or stainless steel are known for their durability and ability to maintain smoothness over time. On the other hand, softer options, such as gold, deliver a smoother writing experience right from the start but tend to wear down more quickly with frequent use. Choosing the right material comes down to finding the balance between long-lasting performance and the writing feel you prefer.
Can I polish or grind an iridium-tipped nib myself?
It's usually a bad idea to try polishing or grinding an iridium-tipped nib on your own. Iridium is an extremely hard material, and working with it demands specific tools and expertise. If you attempt this without the right skills, you risk damaging the nib's shape or alignment, which can seriously affect how it performs. For any adjustments or repairs, reaching out to a professional nibmeister or repair specialist is the safest option.