

If you want to remove tipping material without ruining a nib, the rule is simple: take off very little, then check the nib after every few strokes.
I’d keep the process tight: clean first, fix tine alignment first, then use practice nibs, fine abrasives, magnification, bright light, a brass shim, a marker, and test paper in short cycles. The article’s big point is clear: 2–3 light passes can already change how a nib writes, and too many extra passes can lead to flat spots, skipping, or baby’s bottom.
Here’s the short version of what matters most:
- Practice nibs let me learn without risking a pen I care about.
- Micromesh handles light shaping and smoothing in stages.
- Mylar film is for the last polishing steps, not heavy cutting.
- A 10x loupe and bright task light help me spot uneven wear early.
- A brass shim clears grit and burrs from the slit between checks.
- A fine-tip marker shows where the abrasive is touching.
- Test paper is the final judge, because writing feel matters more than looks.
Step-by-step DIY Nib Grind
sbb-itb-1dd4fe9
Quick Comparison
| Tool | What I use it for | Best time to use it | Main risk |
|---|---|---|---|
| Practice nibs | Learning fountain pen nib sizes and testing strokes | Before touching a good pen | Building bad habits if I rush |
| Micromesh | Light shaping and smoothing | Early to mid-stage | Taking off too much if I press hard |
| Mylar film | Final polish | End stage | Over-polishing fast |
| 10x loupe | Checking tip shape and wear | After each short pass set | Missing flat spots if I skip checks |
| Bright task light | Seeing edges and symmetry | During all inspections | Uneven grinding if lighting is poor |
| Brass shim | Clearing debris from the slit | After abrasive work | Spreading tines if forced |
| Permanent marker | Tracking contact points | Early and mid-stage | Chasing leftover ink marks |
| Test paper pack | Checking feel, flow, and catching | After every abrasive change | Missing faults on paper that is too smooth |
One useful detail stood out to me: a 12,000-grit micromesh sheet can cost about $5.00, which shows this work is more about control than expensive gear. The safest rhythm is simple: <u>grind a little, inspect, clean, test, and stop as soon as the nib hits the target</u>.
Before You Remove Any Tip Material
Check tine alignment first. A tine that sits a bit higher or lower than the other is the most common reason a nib feels scratchy, and abrasive material won’t fix that.
Start with cleaning before you remove any metal. A quick flush with pen flush and a bulb syringe often clears dried ink and debris without touching the tip at all. Sometimes the fix is that simple.
If the nib still acts up after cleaning, then it makes sense to move to controlled removal. Keep the process slow and deliberate:
- Inspect the tip under a lighted loupe and look for shape and symmetry.
- Mark the tipping material with a fine-tip permanent marker so you can see where the abrasive is making contact.
- Make 2 to 3 light figure-eight passes on the abrasive.
- Test the nib right away on paper.
- Reinspect with the loupe and repeat only if needed.
This is one of those jobs where less is more. Grinding or smoothing can void the manufacturer's warranty, so only remove material after cleaning and alignment checks don't solve the problem.
1. Fountain Pen Revolution Affordable Practice Nibs and Pens
For controlled tip removal, begin with nibs you can afford to ruin. Before touching a pen you care about, use low-cost practice nibs from Fountain Pen Revolution so you can learn without putting a favorite pen at risk. Think of them as shop tools, not prized pens.
What It Teaches
A cheap practice nib gives you a clear baseline for every writing test. Leave one nib untouched as your control, and use the other as the working nib. After each pass, compare the two side by side. That way, you can see exactly what changed instead of guessing from memory.
That side-by-side check is what turns random grinding into a process you can repeat with confidence.
When to Use It
Use practice nibs first, before moving to any pen you care about.
Why a Practice Nib Matters
If you push a practice nib too far, it teaches the lesson fast. Catching on the page and dryness are the clearest warning signs. Once you feel that on a low-cost nib, you know where to stop on later grinds.
Use practice nibs to test each grit and stroke before moving to a better pen.
2. Micromesh Pads
Once you’ve seen how the nib behaves, micromesh is what you use for the last bit of controlled removal.
For the smoothing stage, micromesh pads are the main fine abrasive. A single 3" x 4" sheet of 12,000-grit micromesh costs about $5.00 and removes a very small amount of material.
Material Removal Control
Start small. Make 2–3 light figure-eight passes, then test the nib right away. Use the pad slightly damp, not dry, because that gives you smoother, more controlled cutting.
"It is a good idea to rotate the pen just a bit while making the figure eight pattern to avoid grinding a flat spot onto the round ball tipping of the nib."
Placement and Risk
Use micromesh only after tine alignment is correct and the shaping work is almost finished. It smooths the nib, but it won’t fix misalignment. As you stroke, rotate the pen a little so you don’t flatten the tip.
There’s another thing to watch for: if you round the underside of the tipping too much, the line can get wider.
After each pass, inspect the tip under magnification before you keep going.
3. Mylar Lapping Film
After micromesh, Mylar film gives you finer control for the last stage of tip removal. It’s a thin plastic sheet coated with micro-abrasive. For nib work, 1 micron and 0.3 micron are the grades you’ll use most often.
Material Removal Control
Mylar cuts faster than micromesh, so don’t add pressure. Let the pen’s own weight do the work, then test after a few light figure-8 passes. Use only a small amount of moisture. Even with light lubrication, Mylar removes material fast. That’s why it works best for finishing, not shaping.
Set the film on a flat, rigid surface like glass, acrylic, or a hard desk. That helps keep the tipping geometry even. A soft surface can round the tip in ways you didn’t plan for.
Inspection or Feedback Value
Check your work with a loupe as you go. You want to see that the contact patch stays even and that the tipping doesn’t start to flatten.
Best Stage in the Grinding Sequence
If the nib already writes well, save Mylar for the last bit of refining. Use 1 micron after micromesh, and keep 0.3 micron for the final touch.
Risk of Over-Correction
Mylar gives you very little room for mistakes. Stop as soon as the nib feels much smoother or the line width starts to change. Both are signs you’ve taken off too much material.
4. 10x Jeweler's Loupe
Once the abrasive starts cutting, the loupe helps you see if the tip is still centered and rounded. A 10x jeweler's loupe gives you a close look after each pass, so you can stop before taking off too much material. In nib grinding, that kind of visual feedback matters. Two passes can change the tip enough to matter.
Material Removal Control
Use the loupe to watch the tipping shape as you grind. You want to see a rounded contact patch, not a flat spot. Check the tip often so you can track how fast material is coming off.
Inspection or Feedback Value
Wipe away ink and debris before each inspection. A clean tip makes the contact patch much easier to judge.
Best Stage in the Grinding Sequence
Check after every 2–3 passes at first, then after every 1–2 passes as you get close to the target width. This precision is vital when choosing the perfect fountain pen for your specific writing style.
Risk of Over-Correction
Frequent checks help you avoid removing too much tipping material. Use the loupe under strong light so the edge of the tip is easier to read.
5. Bright Task Light
The loupe lets you see the shape. Bright task light shows the edge you're actually removing. That's the part that matters when you're checking how much tipping material is left after each pass.
Material Removal Control
Strong light makes it easier to see whether the tip is staying rounded and whether both sides are wearing down evenly. That matters more than it sounds. If the surface starts to develop flat spots or rough edges, the nib is more likely to catch on paper.
Inspection or Feedback Value
After each pass, inspect the tip for rounding, symmetry, and how much tipping material remains. What you're aiming for is a clean, continuous curve across the tip. If one side looks flatter or more worn than the other, the grind is uneven.
Best Stage in the Grinding Sequence
Bright light matters most when the tip is close to its final shape. At that stage, tiny changes can make a big difference, and it's easy to take off more than you meant to.
Risk of Over-Correction
There's another problem to watch for: over-grinding the underside of the tip. That area is often rounded to make writing feel smoother, but if you remove too much material there, the line can get wider and undo the narrowing you just made, affecting your fountain pen nib size. A focused light helps you track that underside, pass by pass.
Use the light to check the tip before moving to the next tool.
6. Brass Shims
After you inspect the tip under magnification, run a brass shim through the slit before testing. A brass shim is a thin strip of brass that clears debris and burrs from between the tines after grinding. It doesn't remove tipping material. Its job is to clean the slit so you can judge the grind as it is.
This step comes after cutting work, when residue can cloud what the nib is doing on paper.
Material Removal Control
Think of the shim like a thin flossing strip for the nib. Slide it through the slit after a few passes on the abrasive to pull out metal dust, loose particles, and micro-burrs. Once the slit is clean, you get a more honest read of how the grind writes on paper.
Inspection or Feedback Value
A brass shim can also tell you a lot by feel. If it passes through smoothly, the inner surfaces are likely clean and even. If it snags or catches, there's usually a burr in the way.
Best Stage in the Grinding Sequence
The sequence is simple:
- Grind
- Flush
- Shim
- Test
Go back to the abrasive only if the nib still shows shape or alignment issues.
Risk of Over-Correction
The big risk here is spreading the tines. Use the thinnest shim that will pass through without force, keep it lined up with the slit, and stop after a few light passes.
7. Fine-Tip Permanent Marker
Before each abrasive pass, use a fine-tip permanent marker to make the contact pattern easy to see. It works as a visual guide during staged tip removal. Color the fountain pen nib tipping before each pass. Then, as you move the nib across micromesh or lapping film, the ink wears off exactly where the abrasive touches the surface.
That simple color-grind-inspect cycle helps you spot uneven wear fast. After a few strokes, stop and check where the ink has cleared. If one side clears faster than the other, your pressure or angle is off. Recolor the tip, adjust, and go again. This helps keep the grind even and lowers the chance of taking off more material from one side than the other, which can be hard to fix later.
Under magnification, the contrast can show flat spots, uneven edges, and off-center wear. Once the pattern looks even, move to paper tests.
Use the marker most during early shaping and mid-refining. As you get closer to the final surface, use it less.
The biggest trap is chasing every trace of ink. Permanent ink can stay in tiny crevices even when the grind is already correct. Stop when the nib writes smoothly and evenly, even if a faint mark is still there. Use the marker to check symmetry, then test on paper.
8. Test Paper Pack
The loupe and marker help you spot contact points. But paper tells you something they can't: how the nib feels when it writes. That's why a test paper pack is the last check between passes. Only paper shows what the nib is doing on the page.
Material Removal Control
After 2–3 light abrasive passes, test the nib on paper. A few passes can change nib width fast, so you need to check more often as you make the tip narrower.
Inspection or Feedback Value
Ink the nib and write slow figure-eights. If it catches in one direction, that edge still needs more rounding.
Best Stage in the Grinding Sequence
Use paper after every abrasive change.
Risk of Over-Correction
If you skip paper tests, or if you use paper that's too smooth, you can miss catches and sharp edges. Those hidden catches can lead you to grind more than you should before you spot the issue. Let the paper decide whether you go back to the abrasive or stop.
Quick Grit and Tool Reference Table
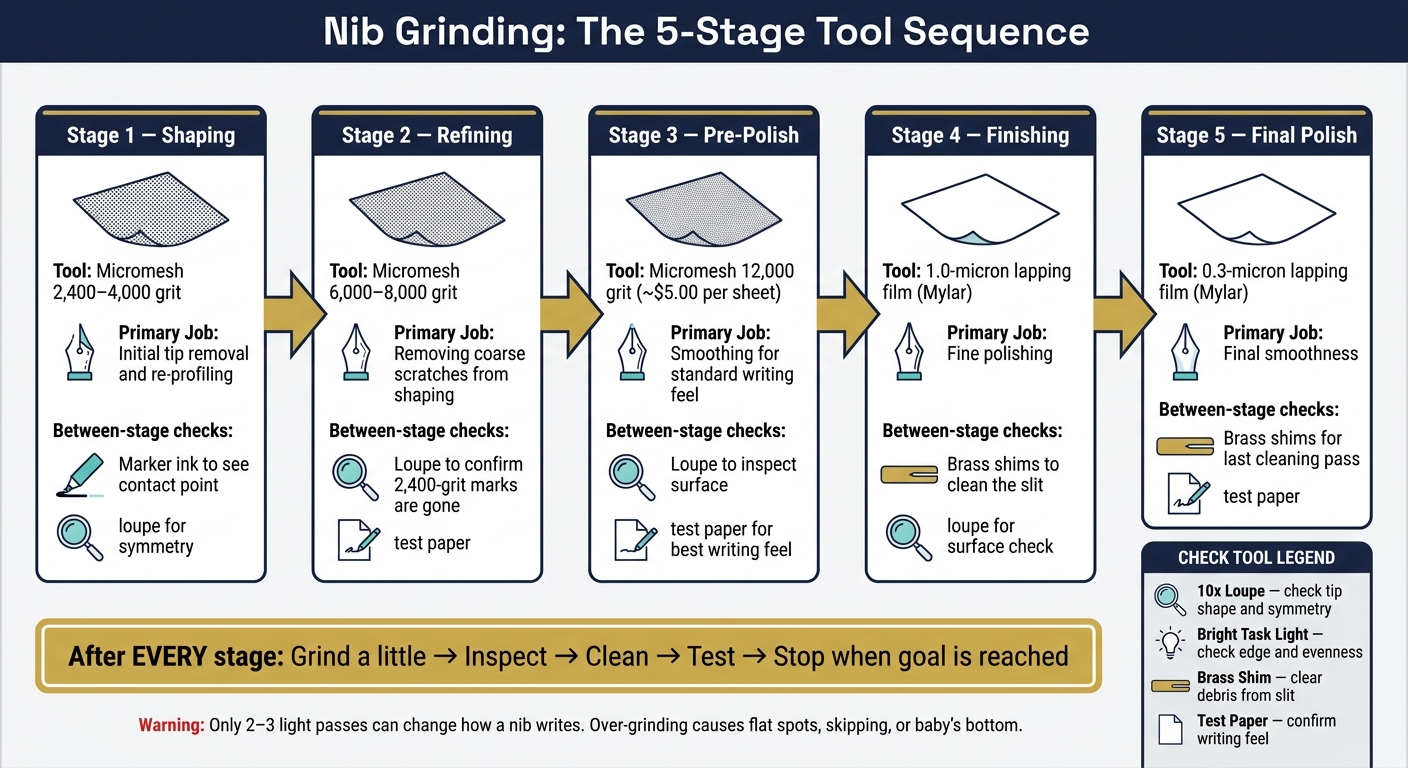
Nib Grinding Process: Step-by-Step Tool Sequence
Each tool does one job at one stage. Use this table as a quick checkpoint as you move from shaping to the final polish.
| Stage | Tool / Abrasive | Primary Job | Between-stage checks |
|---|---|---|---|
| 1. Shaping | Micromesh, 2,400–4,000 grit | Initial tip removal and re-profiling | Marker ink to see contact point; loupe for symmetry |
| 2. Refining | Micromesh, 6,000–8,000 grit | Removing coarse scratches from shaping | Loupe to confirm 2,400-grit marks are gone; test paper |
| 3. Pre-Polish | Micromesh, 12,000 grit | Smoothing for standard writing feel | Loupe to inspect surface; test paper for best writing feel |
| 4. Finishing | 1.0-micron lapping film | Fine polishing | Brass shims to clean the slit; loupe for surface check |
| 5. Final Polish | 0.3-micron lapping film | Final smoothness | Brass shims for last cleaning pass; test paper |
How to Check Progress Without Over-Grinding
Use the tools above in short check-and-test cycles, not long grinding sessions. Make 10–20 light figure-eight strokes, then wipe the nib and feed with a lightly damp cloth to clear away dust before you test again.
Once the nib is clean, run your brass shim through the slit. Then hold the tip under your 10x loupe with your task light aimed right at the tipping. Look for even tines, a smooth continuous curve, centered wear, and a slit that stays aligned. If the wear starts drifting to one side, back off and fix your pressure before you keep going. If the pattern looks centered and even, go straight to a paper test.
Switch between light micromesh passes and paper tests instead of trying to chase smoothness on the abrasive by itself. Re-ink the pen and write on the same paper with the same ink, same writing angle, and same pressure. That way, any change you notice is coming from the grind, not from some other variable. Scratchiness in one diagonal direction usually means a sharp corner on one tine edge. Scratchiness in every direction usually means the surface still needs more refining.
Once the writing feel settles down, use paper choice to check how the nib behaves in normal use. Start with smooth fountain pen paper for the main test. Near the end, test it on general-use paper too.
Stop the moment the nib hits your original goals: smooth in every direction, reliable starts, stable flow, and the line width you wanted. That’s the endpoint. Stop there. Extra passes can create common nib issues like baby’s bottom and lead to skipping.
Common Mistakes Beginners Make
Most beginner mistakes show up when the work gets rushed.
A big one is starting with an abrasive that's too rough. Coarse grits take off too much material before you have time to check what's happening. Stick with 600–800 grit or finer, and use micromesh in the 6,000–12,000 range or fine Mylar film when you want more control.
Pressure is another place where things go sideways fast. If you press too hard, you lose control almost at once. Use the lightest pressure possible. If the abrasive starts to bend or scrape hard, stop.
Inspection is the next common weak spot. It sounds boring, but it's where a lot of damage could've been avoided. Don't skip magnified checks. A 10x loupe can catch uneven tipping, flat spots, and tine misalignment before they get worse.
Cleaning tools can cause trouble too if you get too aggressive. Use only a thin shim, and move it straight through the slit. And go easy on fine-film polishing. Too much can over-round the tip and blur the nib's line character.
Before you touch a pen you care about, practice on an inexpensive nib first. That little bit of caution can save you a lot of regret.
Conclusion
Controlled tip removal is mostly about patience, not force. The safest results come from tiny passes and frequent checks, not long grinding sessions without stopping.
At each stage, the process stays the same: remove a little, inspect, clean, and test. Micromesh and 1- to 0.3-micron lapping film handle the final smoothing. A 10x loupe helps you see when to stop, brass shims clear the slit, and test paper shows how the nib is writing.
That’s what keeps nib grinding under control. The point of this kit is the feedback loop: grind a little, inspect, clean, test, then stop. Small passes and frequent testing are safer than trying to take off too much at once. Controlled tip removal works because each pass is small enough to let you stop in time.
FAQs
How do I know when to stop grinding?
Set your goal before you start. Then test the nib on paper after only a few strokes. Pause often and check your progress, so you don’t take off more material than you meant to.
Use a 10x lighted loupe often to inspect the nib straight on. Watch for unintended shapes, such as baby’s bottom. Nib grinding is permanent, so the safest move is to go slow and check your work as you go.
What grit should I start with on a practice nib?
For beginners, 800-grit sandpaper is a solid place to start when shaping the nib and squaring the tip into a stub profile. It cuts fast enough to let you make progress without feeling out of control. Once the basic shape is there, move to 1,500-grit sandpaper to smooth things out and start the polishing process.
Skip 12,000-grit micromesh at the shaping stage. That grit is for the last pass, when you want final smoothing and polish, not for removing material or setting the form. Keep a 10x loupe nearby the whole time so you can check your work as you go and avoid taking off too much material.
Can I fix skipping if I already over-polished the tip?
If you over-polished the nib, you may have caused baby’s bottom - an overly rounded tip that can lead to skipping.
That happens when too much material comes off the tip. In many cases, the fix is a replacement nib unit. So when you tune a nib, go slowly. If you work the material too much, the damage can be permanent.