

If my fountain pen feels smooth one way and rough another, I start with paper, cleaning, nib seating, and tine alignment - in that order. In many cases, the fix is simple, and I do not need to grind or reshape the nib.
Here’s the short version:
- I test on smooth paper first, because rough paper can fake a nib problem.
- I flush the pen with room-temperature water and, if needed, 1–2 drops of plain dish soap in 8 fl oz of water.
- I check that the nib and feed sit straight and that the converter or cartridge is seated all the way.
- I inspect the tines with a 5× to 10× loupe and look for one tine sitting higher.
- If I adjust a steel nib, I make no more than two tiny nudges.
- If there’s a bent tip, crease, crack, hard starts, heavy skipping, or no change after basic checks, I stop and send it out.
A simple writing test helps narrow it down fast. I make light strokes in 6 directions: up, down, left-to-right, right-to-left, and both diagonals. If the rough feel shows up only on certain strokes, misaligned tines are more likely. If it feels rough in every direction, the cause may be paper, dried ink, or flow trouble instead.
My goal is simple: rule out the safe, common causes before touching the nib. That cuts the risk of making a small issue worse.
| Check | What I’m looking for | Safe at home? |
|---|---|---|
| Paper | Rough feel improves on smoother sheets | Yes |
| Cleaning | Dried ink, fibers, residue | Yes |
| Nib/feed seating | Twist, gap, loose fit | Yes |
| Tine alignment | One tine higher than the other | Yes, with care |
| Bent, cracked, or creased nib | Visible damage | No |
If I follow that order, I can sort out most uneven feedback without guessing.
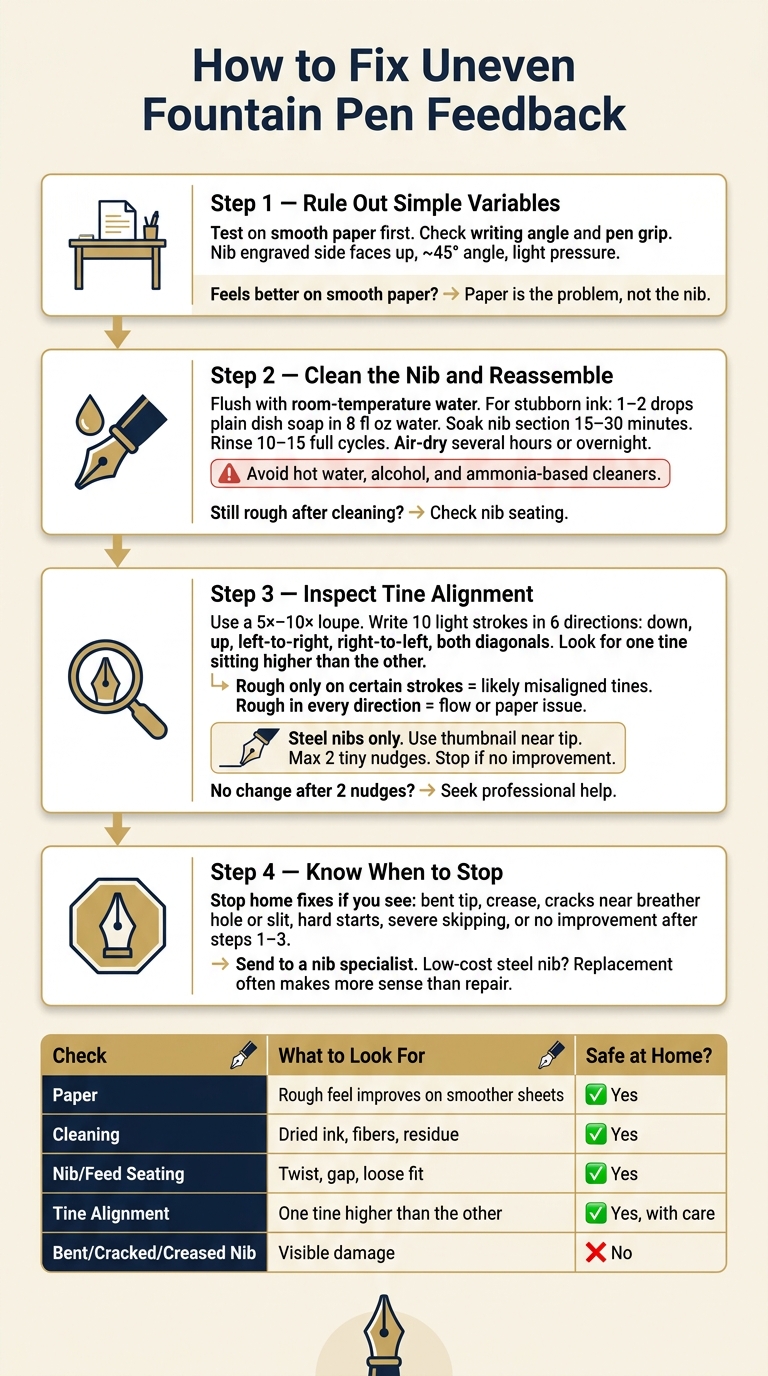
How to Fix Uneven Fountain Pen Feedback: 4-Step Troubleshooting Guide
Nib Tuning 101 - How to Troubleshoot and Fix your Nib*
sbb-itb-1dd4fe9
Step 1: Set Up Your Workspace and Rule Out Simple Variables
Start with the easy stuff before you touch the nib. In a lot of cases, the issue isn’t the nib at all. It’s the paper, the angle, or a bit of dried ink.
Set up on a stable, well-lit desk so you can see the nib tip clearly. You only need a few basic items: a soft lint-free cloth and room-temperature water. Skip hot water. It can put stress on adhesives and pen parts. Keep the area clear too. If you end up taking anything apart later, you don’t want small pieces wandering off.
Then do a short writing check. Write a few lines in different directions and pay close attention to where the uneven feel shows up. That small detail helps you narrow down the cause instead of guessing. If the pen still feels off after this first pass, move to a flush and reassembly check.
Test on Smooth Paper Before Blaming the Nib
Try the pen on smooth fountain pen paper or smooth, high-quality printer paper. If the feel gets better, the paper is the problem, not the nib. That one test helps separate paper texture from nib trouble.
It’s also worth checking how you’re holding the pen. A flipped nib or an uneven writing angle can make one direction feel scratchier than the others. The nib’s engraved side should face up, and the feed should face down. Aim for about a 45° writing angle and use light pressure.
If changing the paper and your writing posture doesn’t fix it, clean the nib next.
Basic Tools You Need for Safe Troubleshooting
For light residue, room-temperature water is usually enough. If ink has dried in place, add a drop of mild dish soap, then rinse well. A 10x loupe or magnifier makes it much easier to spot tine alignment issues or tiny bits of debris.
Once your workspace is ready and you’ve ruled out the easy variables, move on to cleaning the nib.
Step 2: Clean the Nib and Reassemble the Pen Correctly
Clean the pen before you adjust anything. Dried ink, paper fibers, and gunk in the nib slit can make a pen feel scratchy and uneven. It can feel like the nib is bent or out of line when the problem is much simpler. A good flush clears the most common causes of that false scratchiness.
Flush Out Dried Ink and Debris
Use the cleaning method that fits your filling system.
Cartridge and converter pens: Remove the cartridge or converter. Then rinse the nib section under a gentle stream of room-temperature tap water. Fill the converter with clean water and push it through the feed again and again until the water runs clear.
Piston-fill pens: Put the nib and section into a cup of clean water. Draw water in with the piston, then push it back out. Change the water in the cup when it gets dark with ink, and keep going until the water stays clear.
If plain water doesn't clear stubborn dried ink, mix 1–2 drops of plain, non-lotion dish soap into about 8 fl oz of room-temperature water. Soak only the nib and section for 15–30 minutes. After that, rinse the pen through 10–15 full cycles so no soap stays behind. Skip hot water, alcohol, and ammonia-based cleaners. They can warp the feed, harm finishes, or wear down some plastics.
After flushing, gently blot extra water with a lint-free cloth. Then set the section flat on a dry towel with the nib angled slightly downward. Let it air-dry for at least several hours, or overnight if the feed has deep channels. Test the pen only when the section is fully dry. A damp feed can make the pen feel rough even when nothing is wrong.
If cleaning doesn't change the feel, check how the nib and feed sit in the section.
Check That the Nib and Feed Sit Straight
Once the section is dry, look at the nib from the side. The nib and feed should sit flush against each other with no gap or twist. Then look from the front. The nib slit should line up with the feed channel. If the nib looks rotated even a little to one side, it's not seated straight. Reseat the nib and feed fully, then make sure they don't wiggle.
On pens with screw-in nib units, including many of the modular, affordable pens from Fountain Pen Revolution, thread the unit in until it sits firm. Don't force it. On cartridge and converter pens, push the cartridge or converter straight onto the nipple until you feel a firm stop or click. A loose converter can lead to uneven ink flow and uneven feedback.
If the pen still feels uneven after a proper flush and reassembly, move to tine alignment next.
Step 3: Inspect Tine Alignment and Make Only Small Adjustments
If cleaning and reseating didn't change the feel, the next job is to figure out where the nib catches. Cleaning gets rid of fake scratchiness caused by ink, fibers, or debris. This step checks whether the nib itself is slightly out of line.
Write in Every Direction to Find the Problem Spot
Before you inspect the nib under light, test it on the same smooth paper in every direction. Make about 10 light strokes going:
- down
- up
- left to right
- right to left
- both diagonals
Use your normal writing pressure, or even a touch less. Heavy pressure can mask a small alignment issue because it forces both tines flat against the page.
What to pay attention to: a rough feel, a scraping sound, or the nib catching right at the start of a stroke. If the pen feels smooth on downstrokes but catches on upstrokes or right-to-left diagonals, that's a classic clue that one tine is sitting a bit higher than the other. If it feels rough in every direction, tine alignment probably isn't the issue.
Circle or jot down the directions that feel rough. You'll use those notes when you check the nib.
Check Whether One Tine Sits Higher Than the Other
Hold the pen horizontally at eye level with the nib pointing straight at you. Under bright, indirect light - from a window or desk lamp - look directly at the tip. A well-aligned nib should show a straight, centered slit, and both tines should meet evenly at the tip. One side shouldn't appear higher than the other.
Then check from the side. Rest the nib very lightly on a flat sheet of smooth paper and see whether both tines touch the surface at the same time. If one tine seems to hover just above the paper while the other touches, you've likely found the high tine. A simple 5–10× loupe or magnifier makes this much easier to spot.
Now compare what you saw with what you felt. If the right tine looks higher and the nib felt scratchy on strokes where the right side leads, that lines up. If you still can't tell which tine is high, stop there instead of guessing.
If You Adjust, Make One Small Change at a Time
Keep home adjustment to durable steel nibs with only a slight, visible height difference. Do not try this on gold nibs, flex nibs, vintage pens, or any nib where a tine looks bent, twisted, or creased. If the damage is plain to see without magnification, it's time for a professional.
For a minor fix on a steel nib, hold the pen steady in one hand. Use your thumbnail only on the higher tine near the tip, not farther up the nib, and give it a tiny, controlled downward nudge. Barely move it. Then stop, inspect the alignment again, and test the pen in every direction.
Two rules matter here:
- Keep adjustments tiny
- Stop after two small nudges if nothing changes
Repeated bending wears out the metal and can crack the tine. Skip tools. Skip rocking motions. Use a thumbnail only.
If the nib still doesn't improve after two tiny nudges, stop and move to professional nib work.
Step 4: Know When to Stop and Get Professional Nib Work
If the pen still feels uneven after cleaning and a small alignment check, stop there and move to service-level fixes. More tinkering can damage the nib. At that point, the next step is not more bending.
Here’s the simple rule: if the pen still writes badly after those first steps, the problem is probably deeper than basic misalignment. Hard starts, severe skipping, or guttering that continue after cleaning and alignment usually point to ink-flow issues or nib-shape problems that home fixes can’t solve with much confidence.
Visible damage is an instant stop sign. A bent tip, a crease across the nib body, or fine cracks near the breather hole or slit all show that the metal has already been stressed past what gentle nudging can fix. If the nib is valuable or visibly damaged, stop here. If it’s a low-cost steel nib replacement often makes more sense than paying for service.
Stick to the sequence: smooth paper, cleaning, alignment, then stop. If the nib is damaged, valuable, or still not getting better, hand it to a nib specialist. When the issue is beyond safe home fixes, send the nib out.
FAQs
How do I tell if the paper is causing the rough feel?
Test your pen on fountain-pen-friendly paper like Rhodia or Clairefontaine. That gives you a clean read on the nib, without rough texture or loose paper fibers getting in the way.
If the pen writes smoothly there but feels rough on your usual paper, the paper is probably the issue. If it feels scratchy on every paper type, the problem is more likely the nib, debris stuck in the tines, or dried ink.
Can uneven feedback damage my nib if I keep writing?
Yes. If uneven feedback comes from misaligned tines, keep writing and you risk damaging the nib.
When one tine sits higher than the other, it can catch on paper fibers. That often makes the pen feel scratchy in one direction, and over time it can wear down or damage the tipping material.
If you notice directional scratchiness or the nib starts catching, stop writing. Fix the alignment issue first instead of forcing the pen to keep going.
How do I know when a nib needs professional repair?
Seek professional repair if the nib has physical damage, such as bending, warping, chipped tipping, or deep gouges.
You should also stop and contact an expert if careful cleaning and minor adjustments don’t fix misalignment or poor ink flow, or if the nib needs major smoothing. Pushing too far with DIY work can permanently damage the tipping material.