

Most nib problems do not need grinding or heavy tools. In many cases, I can fix scratchiness, hard starts, skipping, or uneven flow with three simple steps: clean the pen, check tine alignment, and make only tiny changes.
Here’s the short version:
- I start with a full flush, because dried ink causes a lot of nib trouble
- I inspect the nib head-on under bright light or a 10x–20x loupe
- I look for uneven tines, debris in the slit, and feed placement
- I use 0.001-inch brass shims only for gentle cleaning of the slit
- I use 12,000-grit micromesh only for light smoothing, about 10–15 light strokes
- I stop after one or two small attempts if the nib does not improve
- I do not use nail files, low-grit sandpaper, pliers, or heavy bending
- I switch to a cheap practice nib before touching a pen I care about
A good beginner goal is simple: make the nib write smoother and more steady, not turn it into a stub, italic, or needlepoint. That kind of shape change removes tipping material for good.
A close look matters because many writing issues point to a small set of causes. For example, scratchiness in one direction often means misaligned tines. Hard starts can mean dried ink or a tight slit. Skipping can come from a clogged feed or poor ink flow. In plain terms: clean first, inspect next, adjust last.
If I see cracks, bent shoulders, damage near the breather hole, or a nib that gets worse after each try, I stop and get help. That’s the safest way to begin.
Make your fountain pen write better: nib adjustment and polishing
sbb-itb-1dd4fe9
How a Fountain Pen Nib Affects Writing Feel
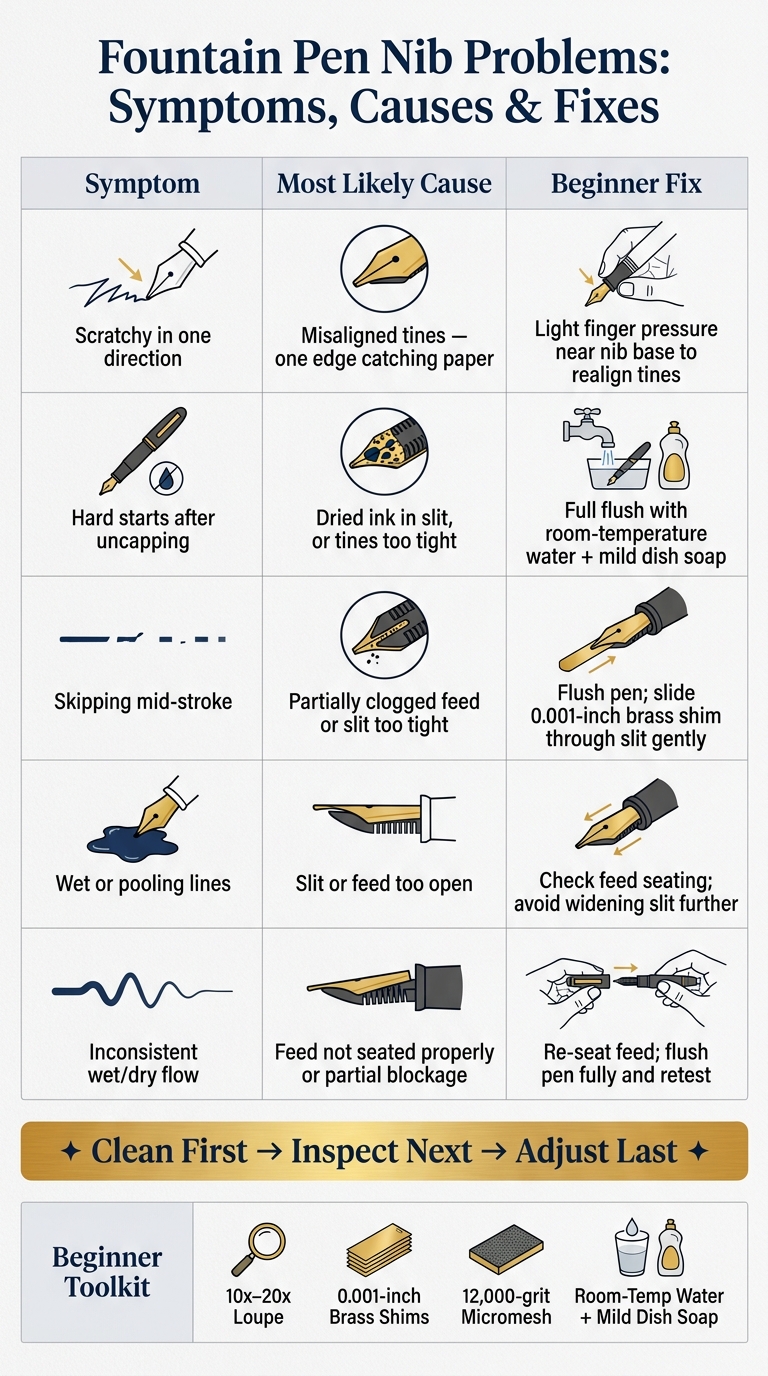
Fountain Pen Nib Problems: Symptoms, Causes & Fixes
If cleaning didn’t fix it, the next place to look is the nib. That’s where a lot of the writing feel comes from.
A fountain pen nib has four parts that directly shape how it behaves on paper:
- The tines are the two prongs at the tip.
- The slit carries ink. A tighter slit writes drier and finer. A wider slit writes wetter and broader.
- The tipping shapes smoothness and angle tolerance. More rounded, polished tipping is more forgiving when your writing angle shifts.
- The feed controls ink flow. A dirty or poorly seated feed can cause skipping, hard starts, or flooding.
What to Inspect Before Making Any Changes
Start with a close look under bright light. Hold the pen so you can inspect the tip head-on. The tines should meet evenly, and neither one should sit higher than the other. Check the slit for dried ink, paper fibers, or crust near the tip. Then look at the nib and feed together. They should sit snug, centered, and fully seated in the grip section, with no clear gaps or off-center placement.
After that, write a few lines on plain paper at your normal speed. Pay attention to what the pen is doing. Does it feel scratchy only in certain directions? Does it skip after sitting for a moment? Does one side of the line look wetter or drier than the other?
Those two checks matter because they show what’s actually wrong before you touch anything.
Common Nib Problems and Their Likely Causes
Use the symptom to narrow down the cause.
| Symptom | Most Likely Cause |
|---|---|
| Scratchy in one direction | Misaligned tines - one tine edge is catching the paper |
| Hard starts after uncapping | Dried ink in the slit, or tines pressed too tightly together |
| Skipping mid-stroke | Partially clogged feed, or a slit that is too tight for steady ink flow |
| Wet or pooling lines | Slit or feed too open, allowing more ink than the paper can handle |
| Inconsistent wet/dry flow | Feed not seated properly, or partial blockage disrupting ink exchange |
If the same scratchiness shows up across different inks and different papers, that’s a strong sign the tines need attention.
Stop adjusting if the nib still looks uneven under magnification.
One more thing: pressure changes a lot. Too much pressure spreads the tines, changes the slit width, and changes how the nib feels. A light, steady hand usually gives you the clearest read on the problem.
Simple Tools and Safe First Steps
Once you know what’s wrong with the nib, it’s tempting to jump straight into fixing it. Slow down for a second. The right tools can help. The wrong ones can ruin a nib in minutes.
Beginner Tools Worth Having
If your inspection suggests an alignment or ink flow issue, a beginner only needs a small kit.
A 10x–20x loupe is the big one. It lets you see what’s happening at the tip instead of guessing, including tine alignment, tipping shape, and any clear damage.
After that, keep it simple:
- clean room-temperature water
- a drop of mild dish soap
- 0.001-inch brass shims
- 12,000-grit micromesh
That’s enough for basic, low-risk work. If the nib just needs alignment or a slight flow fix, these tools will do the job. And if you’re new to this, practice on a cheap pen or spare nib before touching one you care about.
Always Start with Cleaning Before Adjusting Anything
Before you adjust the nib, flush and clean the pen.
Use room-temperature water with a drop of mild dish soap, then rinse until the water runs clear. Room-temperature water helps avoid thermal stress that could warp parts. After that, test the pen on plain paper. Sometimes the problem is gone after a simple cleaning.
Cleaning comes first. It’s not a backup step.
Tools and Actions Beginners Should Avoid
Some tools remove tipping material far too fast. That includes nail files, low-grit sandpaper, and sharpening stones. Just a few passes can flatten or reshape the tip for good.
Aggressive bending is another bad bet. Using your fingers or pliers can lead to metal fatigue, cracked tines, or a nib that won’t straighten again.
Advanced grinds, like italics, stubs, and architect points, are also not beginner work. Once tipping is removed, it can’t be put back. If the nib still seems to need major reshaping, stop there and move on to safer adjustments.
Low-Risk Techniques Beginners Can Try at Home
Once the pen is clean, start with the least invasive fixes. If cleaning didn't solve the problem, check tine alignment first before trying anything else.
How to Check and Correct Tine Alignment
Look at the nib head-on under bright light or with a loupe. The two tines should meet at the same height, and the slit should sit in the middle.
If one tine is off, use very light, controlled finger pressure near the base of the nib, not the tip. Keep the movement tiny. Nib metal can flex more than most beginners expect, so even a small push can move it farther than you meant to.
After each small adjustment, write a few lines on plain paper before touching the nib again. If the pen still isn't getting better after a few careful tries, stop.
How to Use Brass Shims and Micromesh Safely
A thin brass shim can help clear dried ink or debris from the slit. Slide it through the channel gently to help restore ink flow. It may also loosen tines that are too tight, but think of that as a side effect, not the main aim. If flow gets only a little better, stop and test again before doing more.
For light smoothing, put 12,000-grit micromesh flat on a firm surface and hold the pen at your usual writing angle. Use only light pressure. Make 10–15 light figure-eight strokes, then test the pen on paper. Stop as soon as the scratchiness improves.
If these fixes don't solve the issue, the next step is knowing when to stop.
When to Stop, Get Help, or Use a Practice Nib
Signs That the Job Is No Longer Safe for Beginners
After cleaning, alignment, and light smoothing, keep an eye out for a few red flags. If you notice any of these, stop right away:
- The nib is visibly cracked, creased, or bent at the shoulders or near the breather hole
- Tines keep slipping out of alignment after gentle correction
- The pen writes worse after each adjustment, not better
- Scratchiness continues after light alignment work and minimal smoothing
- Ink flow is still too dry or skipping after a full flush and minor tuning
If scratchiness sticks around after alignment, the issue is often deeper than alignment alone. More bending usually won't fix it. When the tines are aligned and the nib still feels scratchy, check the tip with a loupe. Visible nicks, burrs, or other surface irregularities are a clear sign to contact the retailer or manufacturer for a replacement.
A good stopping rule is simple: if the nib doesn't improve after one or two careful attempts, stop. Pushing past that point often does more harm than the first problem ever did.
Practice on Affordable Nibs Before Touching a Favorite Pen
If a nib stops responding safely, switch to practice instead of pushing your luck. Start on a low-cost practice nib or spare nib unit before you touch a pen you care about. A cheap steel nib can teach you a lot: what too much pressure feels like, how a tiny tine shift changes ink flow and line width, and when a nib has gone past safe tuning - without putting a favorite pen at risk.
Fountain Pen Revolution offers affordable fountain pens and nibs, which makes it an easy place to pick up a practice pen or spare nib unit. Think of practice as skill-building, not repair. The goal is to learn what safe improvement looks like, not to force a perfect result.
Conclusion: The Safest Way to Start Nib Customization
The core idea behind safe nib work is simple: do the minimum needed. Start with cleaning, then make one small change at a time. Stop when the nib stops improving. If the nib is cracked, bent, or still scratchy after careful basic work, it's time to hand it off to a professional.
FAQs
What does nib customization mean?
Nib customization is the process of changing a fountain pen nib so it fits the way you write.
That can be as simple as adjusting the tines to improve ink flow or make the nib feel less scratchy. Or it can mean more advanced grinding, where the tipping material is reshaped to change the line on the page, like a stub or italic nib.
How do I know if my nib needs tuning?
Consider tuning if you notice scratchiness, skipping, hard starts, or uneven ink flow. Start by cleaning the pen with cool water to clear out dried ink or debris.
If the issue sticks around, inspect the nib with a 10x to 20x loupe. The tines should sit level and meet evenly. A light drag across a fingernail can help you spot snags from misalignment. Check alignment first, since it fixes about 80% of performance issues.
When should I stop and get professional help?
Stop as soon as you see things getting better. A lot of DIY nib damage happens when people keep going past that point. If you start to feel unsure, pause there.
It also makes sense to leave some jobs to a pro. That includes specialty grinds, flex adjustments, work on rare or high-value pens, and any major damage like cracks, bent tines, or chipped tipping.