

If your fountain pen nib is only slightly out of line, I can often fix it at home with a loupe, water, a 0.001-inch brass shim, and a very light touch. But if I see a sharp bend, a sprung nib, a crack, feed damage, or missing tipping, I stop and send it out.
Here’s the short version:
- I flush and inspect first
- I check the nib from the front, side, and underside
- I only correct small tine height issues
- I use a brass shim, not steel, to clear dried ink
- I test after every tiny change
- I stop if the nib gets worse, stays scratchy, or shows hard damage
A lot of nib problems that seem like bending are just dirt, dried ink, or tine misalignment. In many cases, a careful cleaning and one small adjustment are enough. But if I need force, I’m already doing too much.
| Issue | What I do |
|---|---|
| One tine sits a bit higher | Make one tiny adjustment and retest |
| Slit has dried ink or debris | Clean it with a brass shim |
| Nib is bent, twisted, cracked, or sprung | Stop and get repair help |
| Pen still skips after cleaning and alignment | Check feed, ink, and paper before doing anything else |
This guide is about safe at-home checks and small fixes - not forcing damaged metal back into shape.
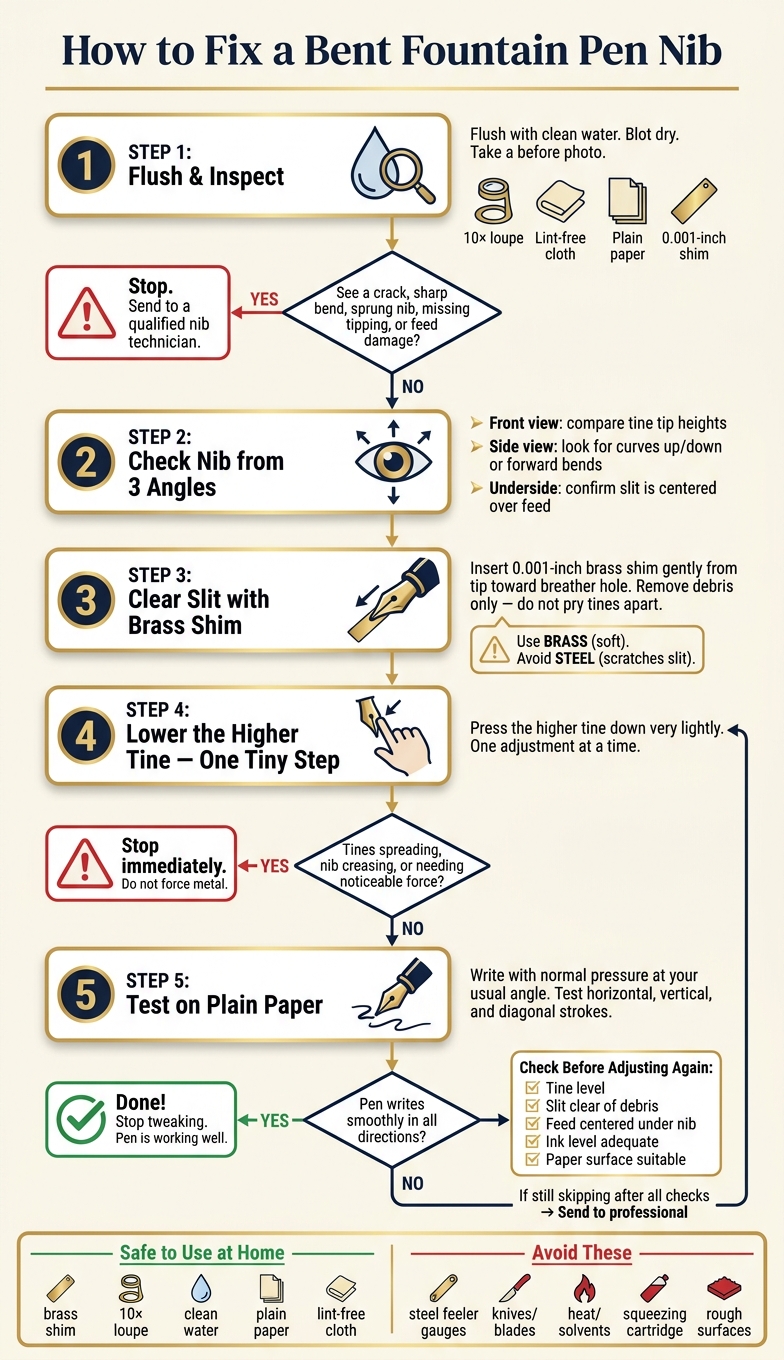
How to Fix a Bent Fountain Pen Nib: Step-by-Step Guide
Realigning a bent fountain pen nib, Twsbi Diamond 580 Rose Gold
sbb-itb-1dd4fe9
Inspect the nib and set up a safe work area
Start by flushing the pen with clean water. Then blot the nib and feed until they’re dry enough to see clearly. This step matters more than it seems. Dried ink, paper fibers, and shimmer particles can either look like tine misalignment or hide it, so cleaning is part of the diagnosis, not just prep.
Set up on a firm, flat surface with bright light. Rest the pen on a clean, lint-free cloth so it doesn’t roll or pick up scratches. Keep your tools close by:
- a 10× loupe
- water
- a thin brass shim, about 0.001 inch
- a sheet of plain paper for testing later
Before you touch anything, take a quick photo of the nib. If something shifts, you’ll have a clear before image to compare against.
Check the nib from the front, side, and underside
Use a loupe and inspect the nib from three angles.
- From the front, point the tip straight toward your eyes and compare the height and position of both tine tips.
- From the side, look for a tip that curves up, dips down, or bends forward.
- From the underside, check that the slit stays centered over the feed and that the feed itself looks intact.
Do all of this without applying pressure.
The slit should look narrow and straight. It should not be closed, spread, or off-center. If you spot a crack, a sharp fold, chipped tipping, a tine pulled away from the feed, or feed damage, stop there. That’s not a home fix. Take it to a qualified nib technician.
Tools to use and tools to avoid
Brass is the right choice for clearing debris from the slit because it’s softer than nib metal and much less likely to leave scratches. A brass shim around 0.001 inch thick can pass through with a light touch, without forcing the tines apart. Steel feeler gauges, knives, razor blades, and other hard tools can scratch the nib or spread the slit for good.
| Use this | Avoid this | Why it matters |
|---|---|---|
| 10× loupe or magnifier | Naked-eye inspection only | Magnification helps reveal misalignment |
| Clean lint-free cloth | Paper towels or rough fabric | Rough material can scratch the nib or section |
| 0.001-inch brass shim | Steel feeler gauges, knives, blades | Steel can scratch or spread the slit |
| Clean water for flushing | Heat or solvents | Heat can warp the feed or damage pen materials |
| Plain paper on a firm surface | Soft or padded surfaces | Unstable surfaces make precise control harder |
| Pliers or forceps | Directly gripping or bending the nib | Concentrated force can kink or crease the nib |
Once the nib is clean, easy to see, and well supported, you’re ready for small tine adjustments.
Make small tine adjustments and clear the slit
With the nib clean, make the smallest tine correction you can. After each tiny move, check the alignment again.
Lower the higher tine in very small steps
First, confirm which tine sits higher by looking straight at the tip under magnification. Once you know which one is high, press that tine down very lightly. Make one tiny adjustment, then stop and check the alignment again before you do anything else. Think of it like tuning a stringed instrument: small changes matter.
Stop right away if the tines spread, the nib creases or cracks, or you find yourself using noticeable force. Recheck the nib under magnification before you test ink flow.
Use a brass shim to remove dried ink or debris from the slit
A clogged slit can look a lot like misalignment, so it’s worth cleaning even when the tines seem level. Insert a brass shim at the tip of the nib, then guide it gently through the slit toward the breather hole, going only as far as it moves without resistance. The goal is to clear debris, not pry the tines apart.
If the slit still looks closed or misshapen after cleaning, stop and consider replacing the nib and feed or having it checked by a professional. If the slit is clear, test the pen on plain paper before making another adjustment.
Test ink flow after each adjustment
After each small nib tweak, test the pen before you touch the tines again. First, make sure the pen has a normal ink supply. Refill the converter or filling system, or swap out a low cartridge, then give the ink time to reach the feed on its own. Don’t squeeze the cartridge or prime the feed. That can flood the nib for a moment and make the adjustment seem better than it is.
Write on plain paper with normal pressure
Use plain paper and write at your normal angle with light pressure. A nib that’s set up well should write smoothly under its own weight. Then try horizontal, vertical, and diagonal strokes in both directions. That’s one of the easiest ways to spot tine misalignment that only shows up in certain movements.
If the pen starts without fuss, writes without skipping, and feels smooth in every direction, stop there. Don’t keep tweaking a nib that’s already working well.
If the pen still skips, check the feed and ink path before bending anything else.
Recheck tine level and feed position if skipping continues
Go through these checks one at a time before making another adjustment:
| What to check | Why it matters |
|---|---|
| Tine level | Uneven tines can cause skipping in certain stroke directions or make the nib feel scratchy |
| Slit clear | Dried ink or debris in the slit can block ink flow |
| Feed centered | A feed that sits off-center under the nib can interrupt steady ink delivery |
| Ink level | Low ink, or ink that isn’t feeding well after pauses, can lead to skips |
| Paper surface | Coated, rough, or oily paper can cause skipping even when the nib is fine |
If skipping still happens after all of those checks, stop bending the nib and have a qualified repairer inspect it.
When to stop and what to do next
If the nib still acts up after the last test, it’s time to stop adjusting and start figuring out what’s wrong. If a light tweak doesn’t help, don’t keep pushing. Home repair is fine for tine alignment, but it’s not the place for reshaping metal.
Stop if the nib is badly bent, sprung, cracked, or valuable
Stop right away if the nib is sharply creased, twisted, split, cracked, or missing a tine. Stop if the tipping is chipped, loose, asymmetrical, or missing. And if the pen still feels scratchy or keeps skipping after cleaning and alignment, that’s your sign to stop too.
A sprung nib needs professional repair. Cracked or missing tipping won’t be fixed with alignment or smoothing and usually calls for professional smoothing, retipping, or replacement.
Gold nibs, vintage pens, and pens that would cost a lot to replace should go to a professional first, even if the damage seems small.
Final recap and basic maintenance tip
Inspect the nib, clean the pen, make small adjustments, and test after each change. The goal is smooth ink flow, not tines that look perfect.
If professional repair costs too much, compare the price of the repair with what the pen is worth. If the math doesn’t work, look at the cost of a replacement nib or nib unit instead. Fountain Pen Revolution carries replacement nibs and nib units if you need that route. It also helps to flush the pen on a regular basis so dried ink doesn’t cause skips later.
FAQs
How can I tell if my nib is bent or just dirty?
A dirty nib can feel a lot like a bent or misaligned one. So start with the simple fix: flush the pen with room-temperature water to clear out dried ink, paper fibers, or other debris stuck in the slit and feed.
If the scratchiness is still there, switch to high-quality fountain pen paper. Cheap paper can make a nib seem rough when the nib itself is fine. After that, inspect the tines with a 10x to 20x loupe. If the nib is clean and the tines are aligned, the problem may be structural.
How much pressure is safe when adjusting a tine?
Use gentle, light pressure and make small nudges instead of one hard bend. Set your fingernail or tool about 2 to 3 mm behind the tipping material so you move the full tine, not just the tip.
Don’t press too hard. Too much force can tire the metal, cause cracks, or leave the nib damaged for good. If nothing gets better after two small adjustments, stop and test the nib after each change.
When should I stop and send the nib for repair?
Stop right away if you spot visible damage to the nib, such as bent or sprung tines, a damaged slit, cracks near the breather hole, or missing or chipped tipping material.
You should also stop if the nib is still scratchy, skips, or has uneven ink flow after basic cleaning and minor alignment. And if the pen is highly valuable or means a lot to you, professional repair is the safer move.