

Most scratchy nibs do not need sanding first. In many cases, I’d start with just 3 jobs: inspect the nib, clean the slit and feed, and test on smooth paper before I touch any abrasive.
Here’s the short answer:
- I’d buy a 10× loupe
- I’d keep a 0.001-inch brass shim
- I’d use 12,000-grit Micro-Mesh or polishing film only for light polishing
- I’d test with fountain pen ink + smooth paper
- I’d flush with clean water, a bulb syringe, and dry with a soft cloth
- I’d skip coarse abrasives, files, rotary tools, buffing compounds, feeler gauges, and tweezers at the start
That matters because a scratchy nib often comes from tine misalignment, dried ink, or paper fibers - not rough tipping. So if I polish too soon, I can remove tipping for no good reason. And once that material is gone, it’s gone.
A simple rule I’d follow: inspect, clean, test, then smooth. Not the other way around. If the nib improves after flushing, I stop. If it still catches in one direction, I check tine alignment under magnification. Only if cleaning and alignment don’t fix it would I make a few light passes on fine Micro-Mesh and test after each pass.
Quick comparison
| Tool | Buy now? | What I use it for | Main risk |
|---|---|---|---|
| 10× loupe | Yes | Check tines and tipping | Low |
| 0.001-inch brass shim | Yes | Clear debris from slit | Low if used gently |
| 12,000-grit Micro-Mesh | Yes | Light smoothing only | Over-polishing |
| Smooth paper + ink | Yes | Writing tests | Low |
| Water + bulb syringe + cloth | Yes | Flush and clean | Low |
| Mylar film | Later | Final polish | Too much polishing |
| Magnifying lamp | Later | Hands-free viewing | Added cost |
| Tweezers | No, not yet | Part handling | Bent or scratched tines |
| Feeler gauges | No, not yet | Tine spacing work | Can spread tines |
| Coarse abrasives / files / powered tools | No | Aggressive shaping | Fast material loss |
Bottom line: I’d keep the kit small, use the loupe before any abrasive, and stop smoothing as soon as the nib writes well.
How to smooth a scratchy fountain pen nib
sbb-itb-1dd4fe9
Core tools for a beginner nib smoothing kit
A beginner nib-smoothing kit doesn't need a big pile of gear. You only need a handful of tools to inspect the nib, clean it, and handle light smoothing.
| Tool | What It Does |
|---|---|
| 10× lighted loupe | Inspects tine alignment and the tipping surface before any abrasive touches the nib |
| 12,000 grit Micro-Mesh or polishing film | Smooths minor roughness with minimal material removal |
| Thin brass shim | Flosses the nib slit to clear debris, paper fibers, or dried ink |
| Fountain pen ink + smooth paper | Used for writing tests between short smoothing passes |
| Clean water + bulb syringe | Flushes ink residue and polishing particles from the nib and feed |
| Soft, lint-free cloth | Wipes the nib clean after flushing |
At the start, skip coarse abrasives and powered tools. They take off material too fast, and that's an easy way to turn a small fix into a ruined nib.
The basic workflow is simple: inspect, clean, test, then smooth.
Start with the 10× loupe. Check tine alignment and look closely at the tipping surface before you do anything else. Then clean the nib. If the slit looks clogged, run a thin brass shim through it before flushing. A few gentle passes can clear dried ink or paper fibers that may be causing the scratchy feel. After that, flush with clean water and a bulb syringe to wash out loosened debris.
Next, ink the pen and test it on smooth paper. This matters more than people think. Sometimes the issue isn't rough tipping at all - it's just buildup in the slit or feed.
Only use 12,000 grit Micro-Mesh after cleaning and confirming alignment. If the nib still catches, make a few very light passes, then stop and retest on smooth paper. Short rounds are the safer move here.
If you want a ready-made option, Fountain Pen Revolution's Tuning/Cleaning Kit bundles several of these basics.
Tools beginners can skip at first
Once you have the basic inspection and cleaning tools, it's smart to skip anything that adds risk before it fixes a problem. After the loupe, brass shim, and fine Micro-Mesh, most other tools can wait. Not every tool belongs in a first nib-smoothing kit. Stick with what handles common issues, and leave out anything unnecessary or too risky for a first setup.
A magnifying lamp gives you hands-free light and a larger view, but a handheld lighted loupe is usually enough when you're starting out. Mylar lapping film works as a finishing abrasive, but if you already have fine Micro-Mesh, it's not doing much for you yet. Add it later, once you understand how finer abrasives change tipping. Coarser abrasives are mostly for issues most beginners aren't trying to fix, so they're easy to skip when the goal is just making a nib feel less rough on paper.
It's also smart to hold off on tweezers and feeler gauges. Both call for more precision than beginner polishing, and both can throw tine alignment off if used carelessly.
Coarse abrasives, metal files, powered polishing equipment, buffing compounds, and rotary tools aren't just optional. They're high-risk. They remove tipping material far too fast to control by hand, and they don't belong in a first kit.
Optional tools versus high-risk tools: what to postpone
The list below separates tools that may be useful later from tools beginners should avoid.
| Tool | Primary Purpose | Main Risk |
|---|---|---|
| Coarser abrasives | Fast shaping or defect removal | Removes material too quickly for controlled smoothing |
| Mylar film | Fine finishing and polishing | Can encourage unnecessary polishing or uneven contact without proper diagnosis |
| Magnifying lamp | Enlarged, well-lit hands-free inspection | Higher cost; a handheld loupe is more portable and affordable |
| Tweezers | Handling parts or adjusting tines | Can scratch, bend, or misalign tines if used carelessly |
| Feeler gauges | Measuring or adjusting tine spacing | Incorrect insertion can spread tines and disrupt ink flow |
| Powered tools and buffing compounds | Rapid polishing, buffing, or high-speed grinding | Removes tipping rapidly, may generate damaging heat, and offers very limited correction time |
| Files | Aggressive metal removal or reshaping | Can create flat spots, sharp edges, and permanent geometry changes |
With the kit trimmed down, the next step is using it safely and stopping before you remove too much tipping.
How to inspect and smooth a nib safely
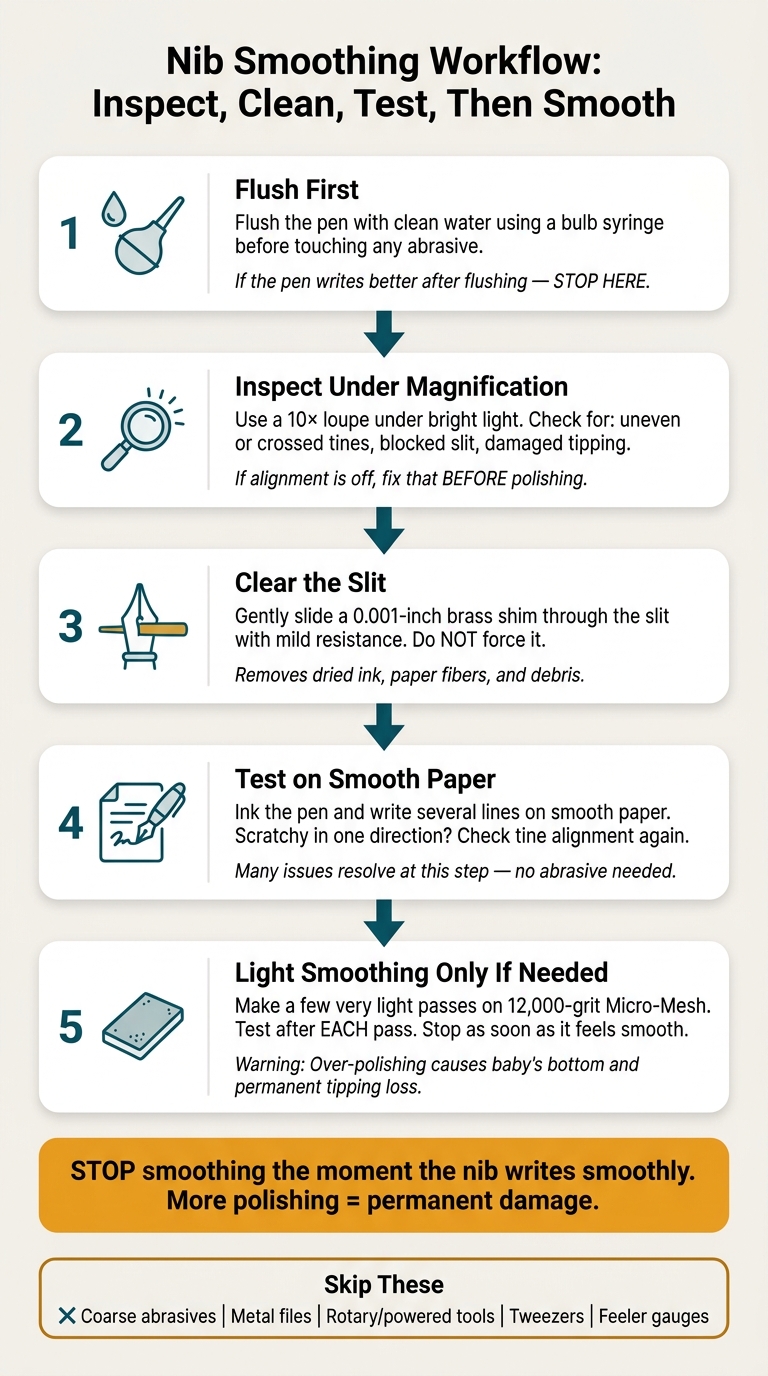
Nib Smoothing Workflow: Inspect, Clean, Test, Then Smooth
Start with the basic tools, and use them in order. Before you touch any abrasive, flush the pen first with a pen flush solution. Then ink it and write a few lines on smooth paper. If the pen writes better after flushing, stop there.
Next, grab your 10× loupe and check the nib under bright light. Look at it straight on and from the side. You’re looking for uneven or crossed tines, a blocked slit, or damaged tipping. If the alignment looks off, stop and fix that first before doing any polishing.
If the slit is blocked, or the tines are uneven, gently slide a 0.001-inch brass shim between them. It should move with mild resistance. Don’t force it.
Only after cleaning and alignment should you think about using an abrasive. Use fine Micro-Mesh with very light pressure and only a few strokes. Test the nib on paper after each pass. Stop as soon as it feels smooth.
When to stop and when not to attempt smoothing
Once a nib feels smooth, more polishing can do harm. It can cause baby's bottom, which means the tipping gets too rounded and the pen may become hard to start, especially on light strokes. It also removes tipping material for good.
Some nibs just aren’t good beginner projects. If the tipping is cracked, chipped, missing, or badly bent, polishing won’t fix the core issue, and it may make things worse. The same goes for valuable vintage or gold nibs. Those are better off being checked by a professional before you try to adjust them yourself.
Building a starter kit and key takeaways
Now that the workflow is clear, here’s the smallest kit that covers it.
A beginner kit doesn’t need to be big. You can start with just a 10× loupe, 12,000-grit Micro-Mesh or polishing film, a 0.001-inch brass shim, fountain-pen ink, smooth paper, clean water, a soft cloth, and bright light.
If you’d rather get the basics in one shot, Fountain Pen Revolution's Tuning/Cleaning Kit bundles the main items into a single purchase.
Starter kit: what to buy first
| Item | Start with now | Add later | Reason |
|---|---|---|---|
| 10× loupe | Yes | Higher-quality loupe or magnifying lamp | Main inspection tool. Check the nib before you adjust anything. |
| 12,000-grit Micro-Mesh or polishing film | Yes | Additional abrasive grades | Fine enough to start with and less likely to remove tipping too fast. |
| 0.001-inch brass shim | Yes | - | Helps clear the slit without removing metal. |
| Fountain-pen ink and smooth paper | Yes | Multiple paper types for comparison | You need both to test flow and smoothness in normal writing conditions. |
| Soft cloth and clean water | Yes | - | Enough for basic cleaning at the start. |
| Good lighting | Yes | - | Bright light makes loupe checks much easier. |
Keep the kit small. Test often, and stop as soon as the pen writes smoothly.
FAQs
How do I tell if my nib needs cleaning or smoothing?
Start with the simple stuff: clean the pen well with lukewarm water or pen flush. After that, test it on high-quality paper.
If it still feels scratchy, skips, or hard starts, take a closer look at the nib with a 10x to 20x loupe. Check for misaligned tines or an uneven gap. A quick fingertip test can help too. If the nib catches on one side of your fingertip, the tines are probably out of line.
Only move on to smoothing if the nib is clean and the tines are aligned.
What signs show I’m over-polishing a nib?
Signs of over-polishing include skipping, hard starts, uneven ink flow, and a nib that feels too glassy or slick on the page.
You might also notice tipping that's become too rounded, a concave dip called baby’s bottom, or flat spots on the tipping. If paper fibers start catching in the slit, stop right away - taking off too much tipping material is permanent.
When should I stop and send a nib to a professional?
Seek professional help for serious issues like cracked tipping material, major tine damage, or flow problems that keep showing up after basic cleaning and alignment.
If the pen is high-value, especially with a 14k gold nib, or your own alignment attempts aren’t working, it’s usually safer to consult a professional nibmeister. A small mistake can turn a fixable issue into permanent damage.