

If I want better handwriting with a fountain pen, I don’t need more tricks. I need the right 5 drills, done in the right order.
This article comes down to a simple plan: I practice ovals, loops, slant lines, pressure control, and full sentences. Each drill targets what judges tend to notice most - shape, spacing, angle, alignment, and line control. The routine is short too: 15 to 30 minutes a day, with 3 to 5 minutes per drill, can improve legibility and fluency within weeks.
Here’s the full idea in plain English:
- Oval drill: fixes round letter shape, spacing, and slant drift
- Loop drill: trains smooth linked strokes and even tall/low loops
- Slant line drill: keeps letter angle steady across the page
- Pressure control drill: teaches light upstrokes and heavier downstrokes
- Sentence practice: tests whether all of that still holds in actual writing
A few numbers matter:
- Lowercase oval height: 0.25 to 0.3 inches
- Slant line spacing: about 5 to 7 mm apart
- Pressure drill time: 3 to 5 minutes
- Paper: smooth 80 to 100 gsm
- Practice pace: 15 minutes a day, 5 days a week
The article also makes one point that’s easy to miss: choosing the right tools matters. If I keep switching pens, nibs, ink, or paper, or experimenting with different fountain pen nib sizes, it gets much harder to tell whether my handwriting changed or my tools did.
5 Handwriting Styles for your Fountain Pen Tutorial
sbb-itb-1dd4fe9
Quick Comparison
| Drill | Main job | What I watch for | Best place in session |
|---|---|---|---|
| Oval | Round letter shape | uneven size, flat curves, drifting slant | first |
| Loop | Connected loop motion | tangled loops, uneven height | after ovals |
| Slant Line | Steady angle | changing angle every few strokes | early to mid |
| Pressure Control | Line weight control | pressing too hard, rough strokes | mid to late |
| Sentence Practice | Full-line consistency | rushing, weak spacing, uneven rhythm | last |
The article ends with the part that matters most: I keep the setup the same, date my samples in U.S. format, and compare pages every 7 to 10 days to spot small gains.
Why These Drills Work for Contest Prep
Contest judges look for a few plain things: consistency, legibility, spacing, alignment, and stroke control. Each drill below goes after one of those scoring points.
Ovals help you train round letter shapes. Loops help you control ascenders and descenders. Slant lines help you hold a steady angle. Pressure practice helps even out line weight. And sentence practice brings all four together in actual text.
Best fountain pens for beginners make changes in pressure and angle easier to see, which means weak habits show up fast. Studies show measurable improvement in alignment, spacing, and letter forms within weeks. Start with the oval drill, then build from there.
1. Oval Drill
Start here. Ovals expose slant, spacing, and pressure problems fast.
Write a line of continuous ovals with a steady rightward slant of about 5 to 15 degrees. Keep each oval around 0.25 to 0.3 inches tall, so it matches your normal lowercase letter height. Leave a small, even gap between each one. Fill 1 to 2 full lines each session.
This drill helps you steady round letterforms and build the hand memory needed to repeat the same shape across a full page. And the nice part is that mistakes jump out right away. If the size shifts, the slant drifts, or the spacing starts to wobble, you can spot it at a glance and fix it sooner.
Use smooth paper that works well with fountain pens, along with a firm fine or medium nib. Once your ovals look even, move on to loops.
2. Loop Drill
After oval control, loops bring in connected movement without messing up the shape. Now it’s time to train loops for linked strokes and even height. Write continuous loop chains without lifting the pen, and repeat the motion in a steady rhythm across the line. That steady pattern keeps your strokes smooth and even, which is exactly what loop-heavy cursive calls for.
Loops help build the smooth, even strokes contest writing rewards. This drill gives you practice with letters that rely on loop strokes, including e, l, h, k, and f. Use a fine or extra-fine nib with smooth paper at 80 gsm or higher. Once your loops stay even, move to slant lines.
3. Slant Line Drill
After loops, work on a steady slant.
Fill a line with parallel downstrokes at the same angle. Keep each stroke close in length and spacing. Most guides suggest placing slant lines about 5–7 mm apart with a steady forward angle, usually in the 55–60 degree range from the baseline. The main goal is consistency. The exact degree matters less than keeping it the same from stroke to stroke.
This drill helps build muscle memory for a steady slant. And that pays off fast: your letters tend to look more even, especially when you're writing at speed in a scored or judged setting.
It helps most with letters like v, w, x, y, z, plus the diagonal parts of k, m, n, and r. Use smooth paper so the nib glides cleanly and any angle drift is easy to spot.
Once the angle stays steady, add pressure control.
4. Pressure Control Drill
Once your slant is steady, this drill helps you control stroke weight. The goal is to train stroke contrast - thin upstrokes and slightly heavier downstrokes - the pattern that gives contest handwriting its clean, even rhythm.
Stroke Family Trained
Set a timer for 3 to 5 minutes and use a simple pattern you can repeat without thinking too much about it. Start with slow vertical lines. Draw a very light upstroke from bottom to top, then follow it with a matching downstroke from top to bottom using a bit more pressure. Keep repeating that pair across the line until you fill the row.
Then move to light-and-heavy stroke pairs. Draw a light horizontal or diagonal stroke about 0.5 to 1 inch long. Just below it, repeat the same stroke with more pressure, keeping the shape the same. That’s the heart of the drill: same form, different pressure.
Contest-Prep Benefit
Pressure control is one of the clearest signs that a writer has command of the page. When downstrokes stay slightly heavier and upstrokes stay fine, the writing feels balanced, deliberate, and easier to read. You can spot that difference fast in connected letters and full words, where uneven pressure tends to stand out.
Common Letters Improved
This drill tends to help most with letters built from repeated downstrokes and connectors. Tall-stem letters like l, t, h, k, b, and f get cleaner when each downstroke matches the next. Mid-height letters like n, m, u, and y look better when each hump has the same weight and the connecting upstrokes stay light.
Curved letters like s, r, p, and g also improve, especially when the shift in pressure happens gradually instead of all at once.
5. Sentence Practice Drill
Sentence practice is the final test. After ovals, loops, slant lines, and pressure control, this is where you write full lines under real conditions. It brings shape, spacing, slant, and pressure together in a single line. Put simply: this drill shows whether your control still holds once the letters have to work as a group.
Contest-Prep Benefit
Judges score full lines of writing, not single letters. That’s why sentence practice matters so much. It trains rhythm, baseline alignment, and consistency across the line - things you only see when you’re writing actual words at a natural pace.
It also teaches error recovery. If one letter drifts a bit off, you learn to fix it with the next one without ruining the line. In a timed contest, that matters a lot. You usually can’t stop and erase, so you need to keep going without letting one small mistake snowball.
Use common words and a pangram to spot spacing and connection problems. A good choice is:
"The quick brown fox jumps over the lazy dog"
It includes every letter of the alphabet in one line, which makes weak spots easier to see.
For paper, use smooth, lined 80–100 gsm stock that resists feathering and bleed-through.
How to Structure a Practice Session
Once your drills are set, keep the session structure fixed. A simple 20 to 30 minute routine works well because it gives you a clean way to compare one session with the next.
Warm Up for 2 to 3 Minutes
Begin with slow, relaxed strokes before you touch any drill. A few large horizontal lines, vertical downstrokes, and loose ovals will do the job. The goal is simple: warm up your hand and get the ink moving before you shift into precise work.
Use the same smooth paper you'll use for the drills. That way, nothing changes once the timed work starts.
Spend 3 to 5 Minutes on Each Drill
Practice ovals, loops, slant lines, and pressure control in separate timed blocks. One skill per block. Don't blend them together.
Set a 3- or 5-minute timer for each drill. Write one short sample row first, then use the rest of the block for steady repetition. This keeps the work focused and makes it much easier to spot changes from day to day.
Finish With 1 to 2 Lines of Sentences
After the drill blocks, move from single strokes to full writing. Write one or two full lines at your normal contest pace.
This is your daily check. Do your spacing, rhythm, and slant stay steady once you're writing full sentences? Those sentence lines show whether the control you built in drills carries over to actual writing.
Use the Same Pen, Nib, and Paper Every Session
The last rule is the easiest one: don't switch tools from session to session. Changing pens, nibs, or paper means you're always adjusting to something new.
Stick with one pen, one nib, and one paper type every time. That consistency makes it easier to compare results and track progress over time.
Drill Comparison Table
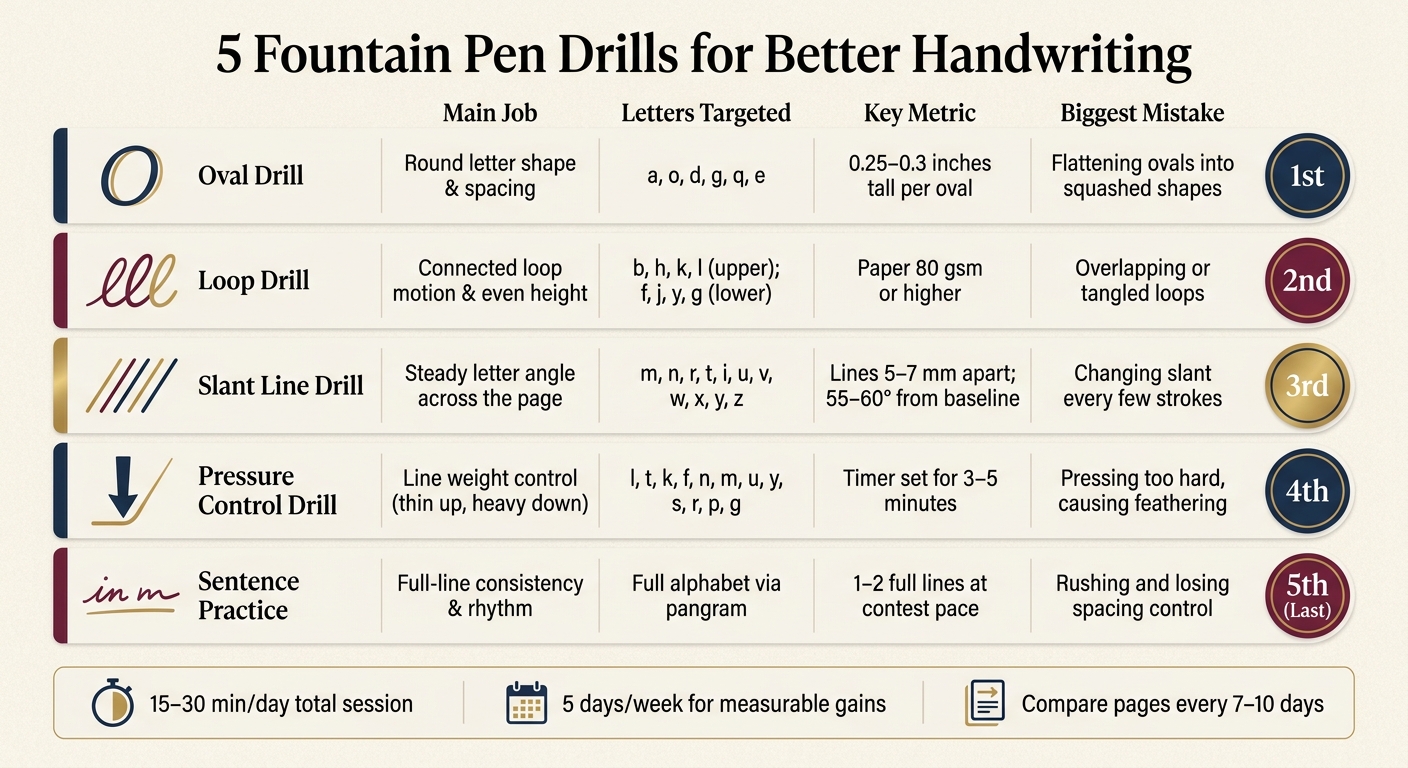
5 Fountain Pen Drills for Better Handwriting: Quick Reference Guide
Use this table as a quick reference during practice. It shows what each drill helps with, which letters get the most from it, the main mistake that can hold you back, and where it fits in your routine.
| Drill | What It Improves | Letters & Strokes | Biggest Mistake to Avoid | When to Use It |
|---|---|---|---|---|
| Oval | Smoother curves; consistent round letters; cleaner spacing inside letters | a, o, d, g, q, e; closed round shapes and circular joins | Flattening ovals into squashed or angular shapes | First focused drill after warm-up |
| Loop | Cleaner tall and low loops; more even line spacing; improved writing rhythm | b, h, k, l (upper loops); f, j, y, g (lower loops); ascenders and descenders | Overlapping or tangled loops that pool ink and hurt legibility | Mid-session, after ovals |
| Slant Line | Consistent slant angle; straighter downstrokes; more uniform style across words | m, n, r, t, i, u; diagonal entry and exit strokes at a steady rightward slant | Changing slant angle every few strokes, creating a jittery look | Early to mid-session |
| Pressure Control | Better line weight control; less nib scratch and ink blobs; more controlled strokes | l, t, k, f; long downstrokes and thin connecting upstrokes in cursive | Pressing too hard, which can spread tines and cause feathering on smooth paper | Mid- to late session |
| Sentence Practice | Real-world legibility; improved word spacing and alignment; contest-page readiness | Full alphabet through pangrams (e.g., "The quick brown fox jumps over the lazy dog.") | Rushing through lines and losing the spacing and forms built in earlier drills | Last, every session |
The mistakes below show how these drills break down when you put them to work on the page.
Fountain Pen Practice Mistakes to Avoid
These mistakes show up fast in fountain pen drills, and they can hide the progress you're actually making.
Pressing Too Hard
Pressing too hard can leave deep impressions in the page, make strokes feel rough, and even splay the nib. If you can see dents in the paper, that’s a clear sign you’re using too much pressure.
Aim for smooth, almost silent strokes. If the nib sounds scratchy, ease up and let the pen do more of the work.
Rotating the Nib While Writing
A small twist in the barrel can throw things off more than you'd think. It can lift one tine higher than the other, which breaks even contact with the page. The result? Lines that shift between thin, broken marks and wide, overly wet patches.
Keep the clip in the same position each session, and check nib alignment before longer practice sets.
Rushing Through Repetitions
Speed can wreck consistency. When you rush ovals, they start to lean or flatten out. When you rush slant lines, the angle starts to wander.
Treat each stroke as a separate job. Slow pages often teach you more than fast ones.
Using Paper That Feathers or Bleeds
Bad paper can make good practice look messy. When ink feathers into tiny veins around each stroke, even controlled lines start to look fuzzy and heavy. Bleed-through adds another problem by making the page harder to judge.
Use paper that keeps edges clean so you can see what your technique is doing.
Switching Pens Too Often
Each pen, nib, and ink combo has its own feel. If you keep changing tools between sessions, your hand has to adjust every time. That also makes it harder to tell whether line width changed because your skill changed or because the pen did.
For drills, stick with one pen, one nib, one ink, and one paper. Stable tools make practice pages much easier to compare.
Conclusion
Once your drills and session plan are set, progress comes from repetition over time. Better handwriting doesn't come from one long practice session the night before a contest. It comes from short, focused work done again and again. Research backs this up: explicit handwriting practice improves legibility and fluency. Programs with too few sessions or no handwriting practice did not work. Fifteen minutes a day, five days a week will do more for your hand than a single two-hour grind.
Each of the five drills trains a different part of the job: ovals, loops, slant lines, pressure control, and sentence practice. Put together, they help build shape, slant, pressure control, and spacing.
At the end of each session, test the same sentence again. Date each sample in U.S. format, then compare your pages every 7 to 10 days. That's where small changes start to show up: cleaner ovals, steadier slant, and more even spacing.
Stay consistent, and keep the same pen, nib, and paper in each session.
FAQs
How long until I see improvement?
Improvement takes time, but steady practice adds up. Aim for 10 to 20 minutes a day of focused drills instead of fixating on a set deadline.
To see your progress, compare photos or scans of your writing every one to two weeks. Small goals and a regular routine help build the muscle memory that leads to smoother, more noticeable results over time.
What nib size works best for these drills?
A medium nib is the best place to start with these drills. It gives you a nice balance of ink flow and control, so it’s easier to keep your spacing even and your strokes clean.
For pressure-control practice, a flex nib helps because it can make thinner upstrokes and thicker downstrokes. A stub nib can also add natural line variation, even if you don’t have advanced technique yet.
Can beginners follow this routine?
Yes. These drills - like ovals, loops, and simple stroke exercises - help build muscle memory and better control.
Start with short daily sessions of 5 to 10 minutes. Use a relaxed grip and light pressure so your hand doesn’t tense up. Over time, beginners can improve at a steady, comfortable pace, and Fountain Pen Revolution offers affordable starter pens to help you begin.