
Yes, you can blend fountain pen inks safely, but I’d only do it in tiny test batches, let the mix sit for 24 hours, and check for sludge before it ever goes into a pen. That’s the whole point of the article.
If I wanted the short version, it would be this:
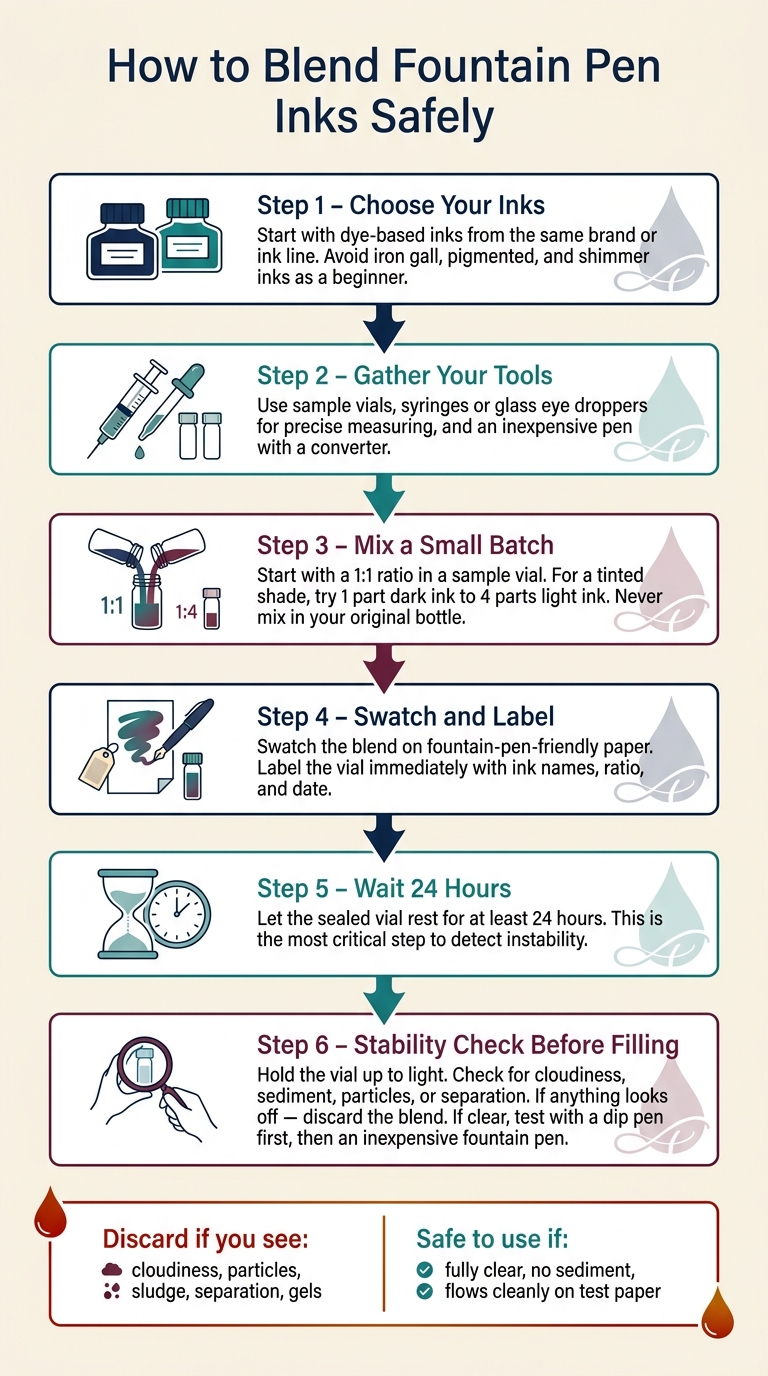
- I’d use dye-based inks first
- I’d stay within the same brand or ink line
- I’d test in a sample vial, not in the pen
- I’d watch for cloudiness, particles, or separation
- I’d avoid iron gall, pigmented, and shimmer inks at the start
- I’d test the mix with a dip pen or cheap fountain pen before a full fill
The article also makes a clear split between two ways to blend:
- On-page blending: mixing colors on paper for gradients and ombré
- In-vial mixing: combining drops in a vial when I want one repeatable custom color
One number matters most here: 24 hours. That rest time helps show whether the inks stay clear or turn into a clog risk. Another useful price point: De Atramentis Document Inks run about $20 to $22 for 45 mL, though those are not where I’d start as a beginner.
💛🩷🩵🖤 Mixing CMYK Private Reserve Fountain Pen Ink! Calm tutorial, tips & ratio mixing how to guides.
sbb-itb-1dd4fe9
Quick Comparison
| Method | Best for | Main risk | What I’d do |
|---|---|---|---|
| On-page blending | Gradient lettering and soft color shifts | Too much ink on paper, feathering | Test on scrap paper first |
| In-vial mixing | Repeatable custom colors | Bad ink chemistry, feed clogs | Mix small batches and wait 24 hours |
My takeaway: the article isn’t saying “mix anything you want.” It’s saying mix slowly, test first, and throw out any blend that looks off. That’s how I’d get color range without putting a pen at risk.
Tools, Inks, and Safe Setup
Basic Tools for Clean, Repeatable Ink Tests
Start small. That’s the whole game here.
Use sample vials first, not your main ink bottles. Small, clear vials keep your original bottles clean and make it much easier to spot sediment before it becomes a problem. For measuring, use syringes or glass eye droppers so you can track exact ratios and make the same color again later.
Paper matters too. Use fountain-pen-friendly paper when you check for feathering, sheen, and bleed. And before you put any new mix into a pen you care about, test it in an inexpensive pen under $50 with a replaceable converter. If something goes wrong, you’re not risking your best writer.
One more habit makes a big difference: label each vial right away. Write down the ink names, the ratio, and the date. It sounds simple, but it saves a lot of guesswork later.
Use this setup to test a small batch before you commit to a full fill. Once that’s in place, the next step is picking inks that are less likely to react badly.
| Tool | What It Does |
|---|---|
| Sample vials | Keeps original bottles clean; makes spotting sediment easy |
| Syringes or glass eye droppers | Measures precise ratios for repeatable results |
| Watercolor brush | Swatches color onto paper before filling a pen |
| Inexpensive pen + converter | Protects better pens during first fills of new mixes |
| Labels | Records the recipe so you can recreate the color later |
Which Inks Are Safest to Blend First
Keep your first tests simple. Start with dye-based inks from the same line and stay away from mixing different ink types at the beginning. They’re water-soluble, easier to flush out, and much less stressful to work with.
Some brands even sell inks made for blending, including Platinum Mix Free and De Atramentis Document Inks. De Atramentis Document Inks cost about $20 to $22 per 45 mL bottle.
Hold off on iron gall, pigmented, and shimmer inks until you’ve got some practice. Each one brings extra risk:
- Iron gall inks can form sludge when mixed with other types.
- Pigmented inks have particles that may settle and clog a feed.
- Shimmer inks can leave too much particulate behind in the feed.
"You shouldn't mix a Noodler's Baystate ink with anything but another Baystate." - Nathan Tardiff, Founder of Noodler's Ink
When you’re picking inks, look for ones that stay clear, flow well, and dry cleanly on test paper.
| Comparison | Pros | Cons | Best Use |
|---|---|---|---|
| Dye-based inks only | Lower risk, easier cleanup, better for first tests | Fewer specialty effects | Beginner blending and repeatable custom colors |
| Including pigmented, iron gall, or shimmer inks | More dramatic effects possible | Greater clogging risk | Advanced testing only in very small batches |
| Same brand and category | Better chance of compatibility | Less variety | Safer in-vial mixing |
How to Mix Fountain Pen Inks Safely
How to Blend Fountain Pen Inks Safely: Step-by-Step Guide
Step-by-Step In-Vial Mixing
Once your test setup is ready, mix small batches in a vial before you put anything into a pen. A 1:1 ratio is a good place to start, then tweak the mix in small steps. If you want a more tinted shade, try 1 part dark ink to 4 parts light ink.
After the ink is fully blended, swatch it on paper so you can see the color on the page, not just in the vial. Then label the vial with the final ratio and the date. That simple step can save a lot of guesswork later.
Give the vial some time to rest before you check whether the mix stays stable.
Stability Checks Before Filling a Pen
Before you fill a pen, make sure the mix still looks clear and clean. Let the vial sit for at least 24 hours, then hold it up to a light and check for sediment, clots, or cloudiness.
"Always scrutinize your ink mix for deposits, clots or solids, or semi-solids before using it in a fountain pen. Even small particles can clog a feed." - Moritz Pratt, Author
If anything looks wrong, throw the mix out. If it still looks fine, test it with a dip pen or glass pen first. After that, try it in a cheap pen with a converter.
Lettering Techniques for Blended Ink Effects
Gradient and Ombré Effects in Words and Strokes
After the mix passes its stability check, put it to work on the page. A small watercolor brush can pull two colors into each other while the ink is still wet, which gives you a softer ombré look than a nib on its own. Use smooth, fountain-pen-friendly paper to keep gradients crisp and cut down on feathering.
Once the blend looks clean on paper, nib choice and stroke speed will shape how dramatic the color shift feels.
Using Stub and Flex Nibs for Stronger Color Variation
Stub nibs make blended color shifts easier to spot across letterforms. Flex nibs add contrast between thin upstrokes and thick downstrokes, so the shift in color stands out more.
For a two-color effect, use a small secondary vial for the second ink instead of dipping into the original bottle. Bleed off extra ink on scrap paper before you start lettering. Then make the first stroke fast so the saturated nib doesn't pool.
Layering, Sheen, and Shimmer
If you plan to layer over your lettering, start with a waterproof or pigmented base ink so the strokes underneath don't smear. Test shimmer only after the base blend dries cleanly. Smooth, fountain-pen-friendly paper also makes sheen and shading easier to judge.
If the blend starts to look dull or begins to separate, the next section gets into the combinations and process mistakes that lead to muddy results.
Common Mistakes to Avoid and Final Takeaways
Risky Ink Combinations and Process Errors
Once you stop testing and start mixing, two things tend to cause trouble: ink chemistry and rushing the process.
The bigger problem isn't color. It's chemistry.
Mixing iron gall, pigmented, or shimmer inks with standard dye-based inks is where many issues begin. When ink formulas don't get along, they can create precipitates, gels, or sludge that are hard to flush from a pen.
"You should never mix fountain pen inks of different brands or different categories within the same brand. Precipitates or gels can form as chemicals in the ink interact." - Moritz Pratt
Even inks from the same brand can still react badly if the pH gap is too large. Acidic and alkaline inks may form insoluble salts, which can clog a pen fast. A safer approach is simple: let each new blend sit sealed for 24 hours before you test it. Then hold it up to the light and check for cloudiness, particles, or separation before it ever goes into a pen.
Lettering Problems: Muddy Colors and Feathering
When a mix goes wrong, the page usually tells you right away. You may see muddy color, feathering, bleed-through, or a pen that stops flowing the way it should.
Muddy color often happens when you mix complementary colors or throw in too many hues at once. It sounds fun in theory, but on paper it can turn into a brownish mess. Feathering and bleed-through usually point to absorbent paper or too much ink on the page. In many cases, the fix is pretty plain: test tiny batches, keep the palette tight, and use paper made for fountain pens.
| Problem | Likely Cause | Fix |
|---|---|---|
| Muddy blend | Overmixing complementary colors or using too many hues | Use related colors and limit the number of inks in the mix |
| Clogging or poor flow | Precipitates, gels, or sludge from incompatible ink chemistry | Flush the pen thoroughly and discard the blend |
| Feathering and bleed-through | Absorbent paper or too much ink | Use fountain-pen-friendly paper and lighten your application |
| Color separation or sludge | Incompatible ink formulas | Discard the mix and stick to small tests within the same brand and ink line |
Conclusion: A Safe Workflow for Better Ink Blends
A safe workflow is pretty straightforward: make small dye-based batches, measure with care, let the mix rest for 24 hours, and throw out anything cloudy or unstable. That way, the blends that make it onto the page stay clean, stable, and fit for lettering.
FAQs
Can all fountain pen inks be mixed?
No. Not all fountain pen inks are safe to mix. When you combine different brands or different ink types, you can end up with chemical reactions that form precipitates, gels, or sludge. And that mess can clog a pen’s feed or even corrode parts.
If you want to play it safe, test a small sample first in a vial with a syringe, then let it sit for a few days. It’s also smart to avoid mixing permanent, pigmented, or shimmer inks. And unless an ink is explicitly meant for blending, it’s better not to mix it at all.
How long should I wait before using a new ink blend?
Let the blend sit for at least 24 hours before you use it. That waiting period gives you a chance to spot delayed precipitation, cloudiness, or stray particulates that can point to an incompatibility.
If possible, let it rest a bit longer for added peace of mind. Once the mixture still looks stable, do one last trial with a dip pen or glass pen before moving it into a fountain pen.
What should I do if my ink mix turns cloudy or forms sludge?
If your ink mix turns cloudy, develops sludge, or shows visible particles, the inks are most likely chemically incompatible. Do not put that mix in a fountain pen. It can clog the pen or even damage the feed system for good.
Play it safe: test new blends in a separate vial first, let them sit for at least 24 hours, and do your first writing test with a dip pen or glass pen.