
Yes, I can swap a fountain pen nib in many cases - but only if the nib, feed, housing, and fit style all match. That’s the short answer.
If I want to avoid a bent nib, cracked section, bad ink flow, or a voided warranty, I need to check four things first:
- Nib system: screw-in unit or friction-fit
- Part fit: nib size, feed curve, housing shape, and attachment style
- Pen brand: some brands use their own parts only
- Removal method: screw-in units unscrew; friction-fit nibs pull straight out
Here’s the part many people miss: size alone is not enough. A #6 nib that looks right can still write badly if the feed curve or housing shape is off. And while JoWo #6 is one of the most common standard sizes in the market, many pens from Pilot, Sailor, Platinum, Pelikan, and Montblanc do not use open, mix-and-match parts.
A few numbers help frame it. Most swaps center on just 2 systems, and most standard nib shopping starts with #5 or #6 sizes. That sounds simple. But one wrong fit point can turn a low-cost nib change into pen damage.
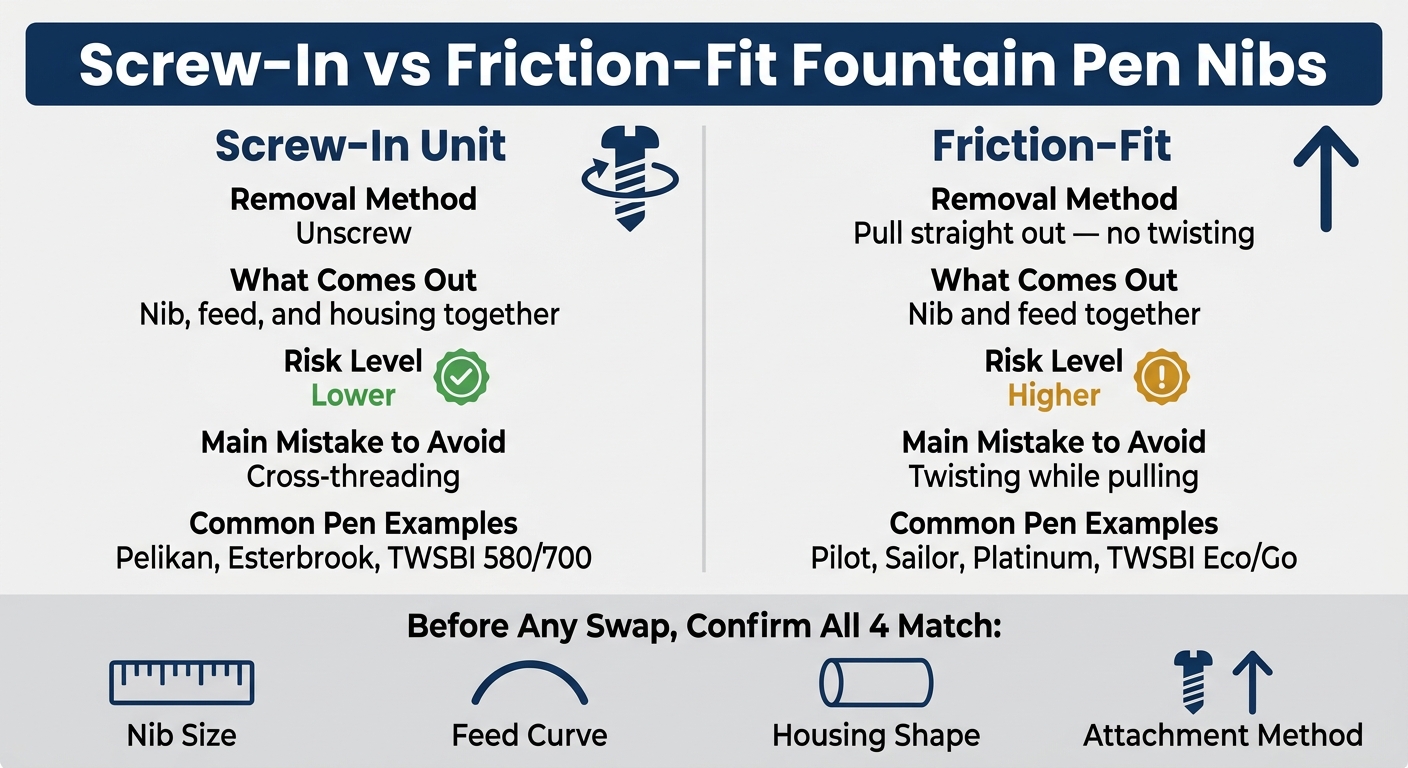
Screw-In vs Friction-Fit Fountain Pen Nibs: Key Differences
How To Change Fountain Pen Nibs
sbb-itb-1dd4fe9
Quick Comparison
| Item | Screw-In Unit | Friction-Fit |
|---|---|---|
| How I remove it | Unscrew | Pull straight out |
| What comes out | Nib, feed, and housing together | Nib and feed together |
| Risk level | Lower | Higher |
| Main mistake to avoid | Cross-threading | Twisting while pulling |
| Common pen examples | Pelikan, Esterbrook, TWSBI 580/700 | Pilot, Sailor, Platinum, TWSBI Eco/Go |
If you are looking for replacements for modern pens, many brands use JoWo compatible nib units which are designed for easy screw-in swapping.
Before I start, I also clean the pen, work over a soft towel, use cool or room-temperature water, and stop the second I feel hard resistance. That one habit alone can save a pen.
If I keep the swap simple, check fit first, and reinstall with care, nib swapping can cost far less than buying another pen just to get a different line on the page.
Nib Compatibility: Which Pens and Parts Can Be Swapped
Once you know if your pen uses a screw-in or friction-fit setup, pause before you buy a replacement nib. This is where a lot of people get tripped up.
Nib swaps depend on four things matching:
- nib size
- feed shape
- housing style
- attachment method
If even one is off, the nib may not fit. Worse, it might fit badly and damage the pen. Before you pull anything apart, check the maker’s guidance for your exact model.
How to Check Nib, Feed, and Housing Fit
Most replacement nibs come from JoWo, Bock, Schmidt, or a brand-specific system. Standard nibs are usually labeled by size, with #5 common on smaller pens and #6 common on full-size pens. JoWo #6 is currently the most common non-proprietary nib standard on the market.
But matching the size alone isn’t enough.
You also need to check the feed curvature. If the feed is flatter or more curved than the nib, ink flow can get inconsistent even when the nib looks like it should fit.
Then look for alignment rails or flats. A small detail like that can make or break the swap. Use a flashlight and inspect the section for flats, rails, or grooves in keyed sections before inserting the nib and feed.
Forcing a nib into a section without proper alignment can cause permanent damage to the housing.
If your pen uses a brand-specific design, skip ahead to the exception cases below before buying parts.
Pen-Specific Exceptions and Non-Standard Designs
Some pens don’t follow the usual compatibility rules. Pilot, Sailor, Platinum, and Montblanc use proprietary nibs. Pelikan uses proprietary screw-in nib units that swap within the brand, but not with standard parts.
Some designs are even less swap-friendly. Certain nibs have locking tabs on the nib shank that lock the nib and feed together, so separating them takes special tools. These are not intended for routine user swaps.
There’s another thing to watch: nib swapping may void the warranty. If the pen is expensive or still under warranty, it’s smart to contact the distributor about professional nib services before trying the swap yourself.
If you want the easy road, stick with a pen line built around matching replacement parts.
Swapping Nibs Within the Fountain Pen Revolution Lineup
Fountain Pen Revolution sells replacement nibs, ebonite feeds, and swap tutorials for its own pens.
How to Remove and Install a Nib Without Damaging Your Pen
Once you know which nib system your pen uses, go slow. The big rule is simple: stop as soon as you feel resistance.
Before touching the nib, empty the pen fully and remove the cartridge or converter. This cuts down on ink leaks and makes the inside parts easier to handle.
Removing and Reinstalling Screw-In Nib Units
After you've confirmed it's a screw-in unit, here's the right way to handle it.
Keep the nib unit steady with your dominant hand, then rotate the barrel or section with your other hand. That helps keep the nib from shifting on the feed while you remove it. Hold the nib on top and the feed underneath so you don't crush the fins.
If the unit feels stuck, soak the nib end in cool water or pen flush. In some cases, leave it overnight so dried ink can break down. Don't use hot water. It can warp plastic housings and ebonite flex feed combos.
When you reinstall the unit, thread it in slowly. If it doesn't catch right away, back it off first until the threads line up, then turn clockwise. Stop at finger-tight.
If there's an O-ring, move it to the replacement unit before reinstalling.
Removing and Reinstalling Friction-Fit Nibs
Friction-fit nibs come out in a different way, so the check before reinstalling is different too.
These nibs pull straight out - no twisting. Keep the nib and feed together as one piece during removal. Pinch them with your thumb on the feed and the side of your index finger on top of the nib. Then pull with slow, even pressure. A sudden yank or twist can bend the tines or break a feed fin.
Before putting the parts back in, use a flashlight to look for keyed flats, rails, or notches inside the grip section.
Slide the nib and feed back in together, lined up with those guide points, until they seat or return to their original depth. Depth matters here. Too shallow can weaken ink flow. Too deep can flood the nib.
A quick top-and-side photo before removal makes this much easier, since you can match the original seating depth when reinstalling.
If the pen still writes poorly after the swap, the next thing to check is cleaning and ink flow.
Cleaning and Preparing Your Pen Before a Nib Swap
Clean the pen before you do anything else. Leftover ink makes disassembly messier and harder than it needs to be. It can also lead to leaks, stuck parts, and nib alignment issues during the swap. When the pen is clean, removal and installation tend to go much more smoothly.
Flushing Ink and Soaking Dried Parts
Start by removing the cartridge or converter. Then hold the nib end under cool running water until the water runs clear. If the pen needs more than a rinse, submerge only the nib and feed in a cup of room-temperature water for 10 to 15 minutes. A small glass is handy for this because it lets you keep the nib pointed down without soaking the whole grip section.
This soak helps clear residue and cuts down on drag when you remove the nib. In most cases, water will dissolve dried fountain pen ink on its own. If residue is still hanging on, add a single drop of mild dish soap to the water. Need to loosen one tight spot? Use a syringe or eyedropper to send water right to the seam where the nib unit meets the section. Stick with cool or room-temperature water the whole time. And skip soaking parts made of wood or ebonite, since water can cause permanent damage.
Clean parts are easier to line up, and they’re also easier to check if the pen writes poorly after the swap by reviewing a fountain pen buying checklist.
Setting Up a Safe Work Area
Get your workspace ready before disassembly. It sounds basic, but this step saves a lot of grief.
"The number-one danger when performing any sort of work or maintenance on fountain pens is dropping a pen onto the floor and cracking the pen barrel and/or bending the nib, so make sure your pens are secure." - The Gentleman Stationer
A stable, well-lit surface helps prevent slips when you're handling small nib parts. Lay a soft towel flat on a bright desk or next to a sink. The towel keeps parts from rolling away and gives dropped pieces a softer landing. Good lighting also makes it much easier to spot small alignment grooves and feed fins.
A few simple items make the job easier:
- Soft towel - Stops parts from rolling and cushions drops
- Small glass - Lets you soak the nib end without wetting the full section
- Dish soap - Helps loosen dried ink residue
- Syringe or eyedropper - Sends water right to stuck joints
- Soft rubber pad - Gives you extra grip when pulling friction-fit nibs and feeds
With the pen clean and the work area set, you're ready for the swap itself.
Common Problems After a Nib Swap and How to Fix Them
If cleaning and reinstalling didn’t fix the pen, the issue usually comes down to fit or alignment. Most problems after a nib swap trace back to dried ink, misalignment, or parts that don’t sit together the way they should.
Nib Feels Stuck, Loose, or Misaligned
When a nib unit won’t move during removal, dried ink is often the reason. If it’s stuck, soak the nib end in room-temperature water or pen flush before you force anything. A little patience here can save you from cracking a housing or damaging the feed.
A loose nib usually points to a mismatch between parts, or a housing that has worn down over time. If the fit feels off, stop there and double-check the part sizes before you go any further. If something doesn’t feel right, it probably isn’t.
A crooked nib after a screw-in installation usually happens when the unit twists as you thread it in. If the nib looks twisted, don’t try to bend the metal back by hand. That can make things worse fast. Instead, remove the unit and reinstall it, making sure the nib and feed stay flat against each other the whole time.
If the nib is seated the way it should be but the pen still writes badly, the problem is less about fit and more about ink flow.
Poor Ink Flow or Scratchy Writing After Installation
A shifted nib or a feed that isn’t seated all the way can lead to scratchiness, dry writing, or flooding.
Use a magnifying glass to check two things:
- The tines are level
- The feed is centered and sitting flat
Flush the pen before testing it. Dried ink can cause hard starts and skipping.
Key Points to Check Before Your Next Swap
Before you try another swap, go through this quick checklist:
| Step | What to Do |
|---|---|
| Confirm fit | Make sure the nib, feed, and housing match before you start |
| Clean the pen | Flush out all ink so the parts move freely and leftover residue doesn’t create false problems |
| Align carefully on reinstall | Use the pinch technique to keep the nib and feed from twisting against each other |
| Test flow slowly | After the swap, ink the pen and write a few strokes before you assume it’s ready |