

If you use fountain pen ink on vellum, expect slower drying, more smearing, stronger shading, and a bigger gap between fountain pen nib sizes.
I’d sum it up like this: vellum keeps ink near the surface, so the line can stay wet for 30 seconds or more on slick sheets, and sometimes much longer in pooled spots. That changes four things fast: smear risk, skipping, shading, and dry time. Before I write a full letter, I’d always test the exact vellum, ink, and nib together.
Here’s the short version:
- Vellum is not one thing. It can mean animal skin or paper with a vellum finish.
- Surface feel matters more than the label. Slicker sheets tend to dry slower.
- Fine nibs usually give me more control and less smear risk.
- Broad nibs usually show more shading, but they stay wet longer.
- I’d check marks at 1, 5, and 10 minutes before using the setup for a full letter.
- A sheet can show transfer without bleed-through, so the back of the page matters too.
Quick Comparison
| Point | Fine Nib | Broad Nib |
|---|---|---|
| Ink on page | Less | More |
| Dry time | Often shorter | Often longer |
| Smear risk | Lower in many cases | Higher in many cases |
| Skipping | Can show more on slick spots | May feel smoother |
| Shading | Lighter | Stronger |
| Best use | Small writing, tight spacing | Large writing, open spacing |
In other words: if I want clean letter writing on vellum, I’d start with a fine nib, test for transfer, and only move to a broad nib if the sheet can handle the extra ink.
sbb-itb-1dd4fe9
How Vellum Affects Ink Performance
On vellum, ink tends to sit on top of the sheet instead of soaking in. That changes drying time, how the ink sticks, and the final look of each stroke. Once you know that, a lot of vellum behavior starts to make sense.
Slow Drying, Smearing, and Surface Transfer
A line on vellum can look dry before it’s safe to touch. That’s one of the easiest ways to get caught out.
On coated or slick vellum, ink may appear glossy and set while still being fully smearable. One specialist paper guide notes that wet inks on heavily coated surfaces may remain smearable for 30 seconds or more, with some shimmer inks taking even longer to set.
That matters most in the middle of writing a letter. Your hand can slide over a line you wrote a moment ago and drag ink across the page before you even notice. Tight line spacing makes this worse. More lines packed together means more chances for your palm or the side of your hand to cross fresh ink.
A scrap sheet under your writing hand helps a lot.
The same problem shows up after writing too. If you fold, stack, or slide the finished letter into an envelope too soon, the ink can transfer just as easily. Before handling the page, do a light touch test.
Skipping, Drag, and Uneven Ink Adhesion
Skipping happens when the nib stops making steady contact with the surface. Drag is that sticky, hesitant feel as the nib moves along the page.
On vellum, a slick patch or an area with uneven coating can interrupt ink flow and leave gaps in a stroke that should have looked smooth. In plain terms, some parts of vellum resist ink more than others.
Nib alignment, writing speed, and pressure matter too. A fast stroke can leave less ink behind, which may lead to a faint or broken line on a surface that isn’t pulling ink in. If you notice skipping, check the nib’s alignment and cleanliness first. Don’t try to fix it by pressing harder, especially on delicate vellum. That can damage both the nib and the sheet.
Nib width also affects how often this shows up.
Shading and Pooling on a Low-Absorbency Surface
Because the ink stays on the surface longer, shading - the natural shift in color depth across a stroke - usually stands out more on vellum than on absorbent paper. That can give handwriting a rich, expressive look, but only if it stays under control enough for correspondence.
This is where pauses can work against you. Slow turns, stops, and heavy downstrokes can turn shading into pooling.
Pooling shows up as a glossy bead or a thick patch, usually where you pause, retrace a stroke, or use extra pressure. It stays wet longer than the rest of the writing, and it can transfer or spread a letterform when touched.
To reduce buildup, use light pressure and keep the nib moving. Next, nib width changes how strongly these effects show up.
Fine vs. Broad Nibs on Vellum
Once you understand how vellum keeps ink near the surface, choosing the right nib width becomes the simplest way to shape the result. In plain terms, nib width changes how much ink sits out in the open at one time. That means you're usually balancing control against visual punch.
Fine Nibs: Narrower Lines and Less Ink on the Page
Fine nibs are usually the safer place to start if control is your main goal. Less ink on the page often means less smear risk and easier handling right after you write. That makes fine nibs a smart first pick for small lettering, tight line spacing, or vellum with a glossy or heavily coated finish.
There is a catch, though. A fine nib has a narrow contact point, so it has less room for changes in surface texture. On slick or uneven vellum, skipping can stand out more than it would with a broader nib. A light hand often helps. If you press harder, you add drag and may make the nib write wetter.
Broad nibs push those same effects in the other direction.
Broad Nibs: More Shading and Longer Dry Time
Broad nibs work well for writers who want stronger shading and don't mind slower drying. A broad nib puts down more ink with each stroke. On vellum, that extra ink can stay near the surface longer, which makes shading is easier to see. If you want visible shading or a bold, expressive line, a broad nib is usually the better fit.
The tradeoff is dry time. More ink tends to dry more slowly and pool more easily at endings, joins, and turns. Wide line spacing helps. When lines sit too close together, it's easier for your hand or sleeve to brush over ink that hasn't set yet.
Comparison Table: Fine and Broad Nibs on Vellum
The table below shows those tradeoffs side by side. The final result still depends on vellum finish, ink formulation, humidity, pen flow, writing speed, and pressure.
| Factor | Fine Nib | Broad Nib |
|---|---|---|
| Ink volume | Lower; less ink on the surface | Higher; wetter line |
| Drying behavior | Often quicker, but may remain wet on slick vellum | Often slower, especially in pooled areas |
| Smear risk | Usually lower, though not eliminated | Usually higher because more ink remains exposed |
| Shading | Often subtle; less ink can make shading less visible | Typically easier to see when ink and surface support shading |
| Pooling risk | Lower, but possible at pauses or joins | Higher, particularly at stroke endings and turns |
| Compact-letter suitability | Better for small writing and tight spacing | Better for larger writing with generous spacing |
| Best first test | Test first when control matters most | Test this when shading matters more than speed |
A Quick Pre-Letter Test You Can Run in Minutes
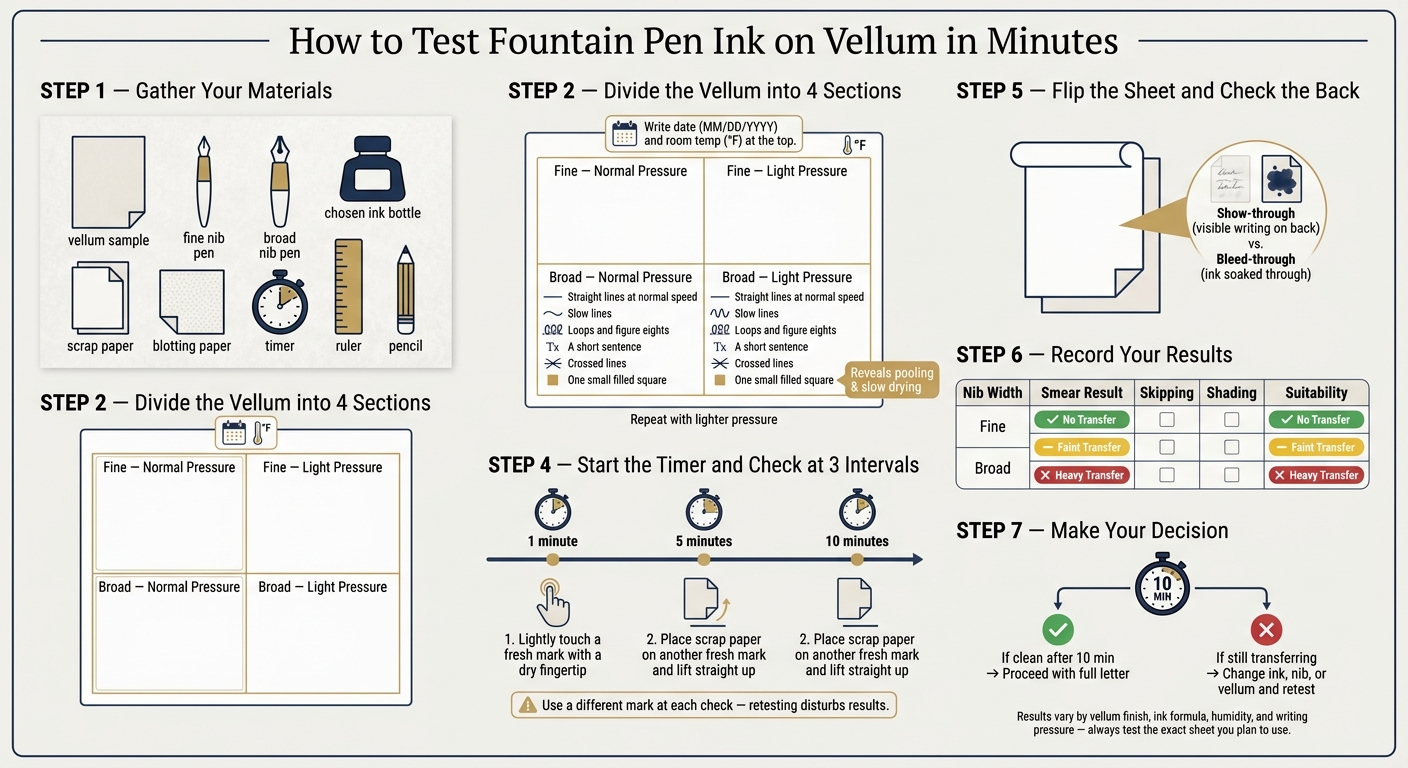
How to Test Fountain Pen Ink on Vellum Before Writing
Fine and broad nibs can act very differently on vellum. So before you settle on your setup, test both on the same sheet type first.
Use the exact vellum, ink, and nibs you plan to use for the letter, and run the test on a trimmed piece from that same sheet. You're looking for one simple thing: which nib dries cleanly without skipping, smearing, or pooling.
Materials to Gather from the Same Sheet Type
Gather these items:
- vellum sample
- fine nib
- broad nib
- chosen ink
- scrap paper
- blotting paper
- timer
- ruler
- pencil
Step-by-Step Test Procedure
Divide the vellum into four labeled sections: Fine - normal pressure, Fine - light pressure, Broad - normal pressure, and Broad - light pressure.
At the top, write the date in MM/DD/YYYY format and the room temperature in °F. That way, if you test again later, you can compare results under similar conditions.
In each section, write several straight lines at normal speed, a few slow lines, loops, figure eights, a short sentence, crossed lines, and one small filled square. That filled square matters more than it may seem. It puts extra ink in one spot, which makes pooling and slow drying much easier to spot. Then repeat a short sample using deliberately lighter pressure.
Start timing as soon as you finish each section. Check the results at 1, 5, and 10 minutes. At each check, lightly touch a fresh mark with a dry fingertip. Then place scrap paper on another fresh mark and lift it straight up to see if any ink transfers.
Use a different mark for each check. If you test the same mark at 1 minute, you've already disturbed it, which can throw off the 5- and 10-minute results.
Also flip the sheet over and note any show-through. In this case, that means writing is visible on the back, but there's no bleed-through.
Results Table: What to Record Before Writing the Letter
Record one row for each combination. Instead of a simple pass/fail, use "no transfer", "faint transfer," or "heavy transfer." That extra detail makes it much easier to adjust spacing, dry time, or nib choice without having to guess.
| Vellum type | Ink name | Nib width | Test date | Room temperature (°F) | Drying notes | Smear result | Skipping result | Shading | Suitability |
|---|
Add one row per test combination.
If a setup still transfers after 10 minutes, change one variable and test again before writing the letter.
Choosing the Right Setup and Final Takeaways
When to Use a Fine or Broad Nib for a Full Letter
Once your test shows which nib works best, stick with that setup for the full letter. Let the paper tell you what it can handle.
Use the fine nib if the line stayed clean, skipped very little, and dried within your planned wait time. That usually makes the most sense for compact letters, small handwriting, or lines that sit close together.
Use the broad nib only when it gives you clean edges, even shading, and no transfer after your set drying time. If the broad nib left wet spots, feathered edges, or ink that still transferred after the drying window you planned for, switch to the fine nib instead of hoping the full letter will somehow go better.
| Test result | Recommended decision |
|---|---|
| Fine is clean; broad smears or pools | Use the fine nib for the full letter |
| Both adhere cleanly; broad needs more drying time | Use the broad nib only if spacing and drying time are available |
| Broad shades cleanly | Use it for expressive letters, headings, or signatures |
| Either setup remains wet after the planned wait | Change the ink, nib, or vellum before writing the final letter |
Final Checklist Before You Start Writing
After you choose the nib, keep everything else the same and get the page ready.
Before writing, make sure the vellum is clean, flat, and free of oils. Use the exact pen, nib, and ink that passed your test. Keep a clean sheet under your writing hand so you don't smear fresh ink by accident. Let the page rest flat, and don't stack or fold it until the ink is fully dry.
Broad nibs and wetter inks usually need more time before folding or putting the letter into an envelope. Some specialty vellum stocks can take much longer to dry, so go by your timed test results, not guesswork. Vellum can vary from sheet to sheet, which is why your own test matters more than general advice.
FAQs
Does vellum work better with certain inks?
Yes. On vellum, ink performance comes down to how the ink’s flow and thickness work with the paper’s texture and absorbency.
A wetter ink can sit on the surface longer, which may lead to pooling or smudging on paper that doesn’t absorb much. A drier ink often works better on specialty papers because it can cut down on feathering and long dry times.
The simplest way to find a good match is to test a few ink formulas on your vellum and see how they behave.
How long should I wait before folding vellum?
Vellum has a coated, low-absorption surface, so ink tends to dry more slowly. Wait at least 30 seconds before you check for smudging. Then gently drag your finger across the writing.
Before you fold the sheet, give the ink more time than that first check suggests, especially if you're using broad nibs or wetter inks.
Why does ink look dry but still smear on vellum?
Ink can look dry on vellum and still smear. That happens because highly saturated or sheening inks can leave a slick layer of dye or particles on the surface even after the liquid part has dried.
Vellum is smooth and less absorbent, so that residue tends to sit on top instead of soaking in. Then later, a bit of pressure, skin oils, or simple friction can make it smear.