

My rule for flex writing: keep upstrokes light, add gentle pressure on downstrokes, and release before each turn. Start with 5–10 minutes of practice, aiming for steady line contrast - not maximum nib spread.
Here’s what I recommend:
- Set up: Use a flex nib, smooth fountain-pen paper, and a dry dye-based ink. Check that the nib glides without added pressure.
- Practice: Begin with separate straight strokes, then try ovals and loops once pressure release feels steady.
- Stop when needed: If the nib scratches, leaves two ink tracks, or stays spread, <u>don’t press harder</u>.
- Keep flow steady: Follow the maker’s cleaning instructions and rinse with lukewarm water.
The goal is control with a relaxed grip, not force.
Increase Ink Flow On Your FPR Flex Pen
sbb-itb-1dd4fe9
Choose Your Pen, Paper, and Ink
Once you understand pressure control, choose tools that work within that range. Gather a flex pen, smooth fountain-pen paper, dye-based ink, water for rinsing, and a soft cloth. Use a nib made for flex writing - standard nibs aren’t built for it. FPR’s flex nibs are rated to produce lines from 0.5 mm with no pressure to 2 mm when fully flexed.
Before practicing strokes, test how the nib meets the paper.
Fill the Pen and Check Nib Contact
Fill the pen, then check for smooth contact without adding pressure. Hold it at about a 45-degree angle, keeping the nib aligned with the stroke. Adjust the angle slightly if needed.
If the nib scratches or catches, stop and ease the pressure. If the tines are misaligned or slow to spring back, stop using the nib. Don’t press harder to fix it.
Once contact feels smooth, try controlled strokes on suitable paper.
Match Paper and Ink to Wet Strokes
Start with smooth, non-absorbent paper and a dry dye-based ink. This pairing helps keep thin strokes separate from broader downstrokes.
| Paper or ink characteristic | Beginner selection guidance |
|---|---|
| Smooth, non-absorbent paper | Best starting point for clean line variation; allow extra drying time |
| Rough, absorbent paper | Avoid: can cause feathering, bleed-through, and nib catching |
| Dry dye-based ink | Start here for controlled flow and thin lines; watch for skipping |
| Very wet or sheening ink | Less suitable at first: heavier deposits can blur line edges |
Feathering happens when ink spreads into the paper’s fibers. Bleed-through means ink reaches the back of the page. Test thin strokes and moderate downstrokes, changing only one variable at a time.
With your paper and ink selected, move on to pressure practice with basic strokes.
Use Safe Pressure for Basic Strokes
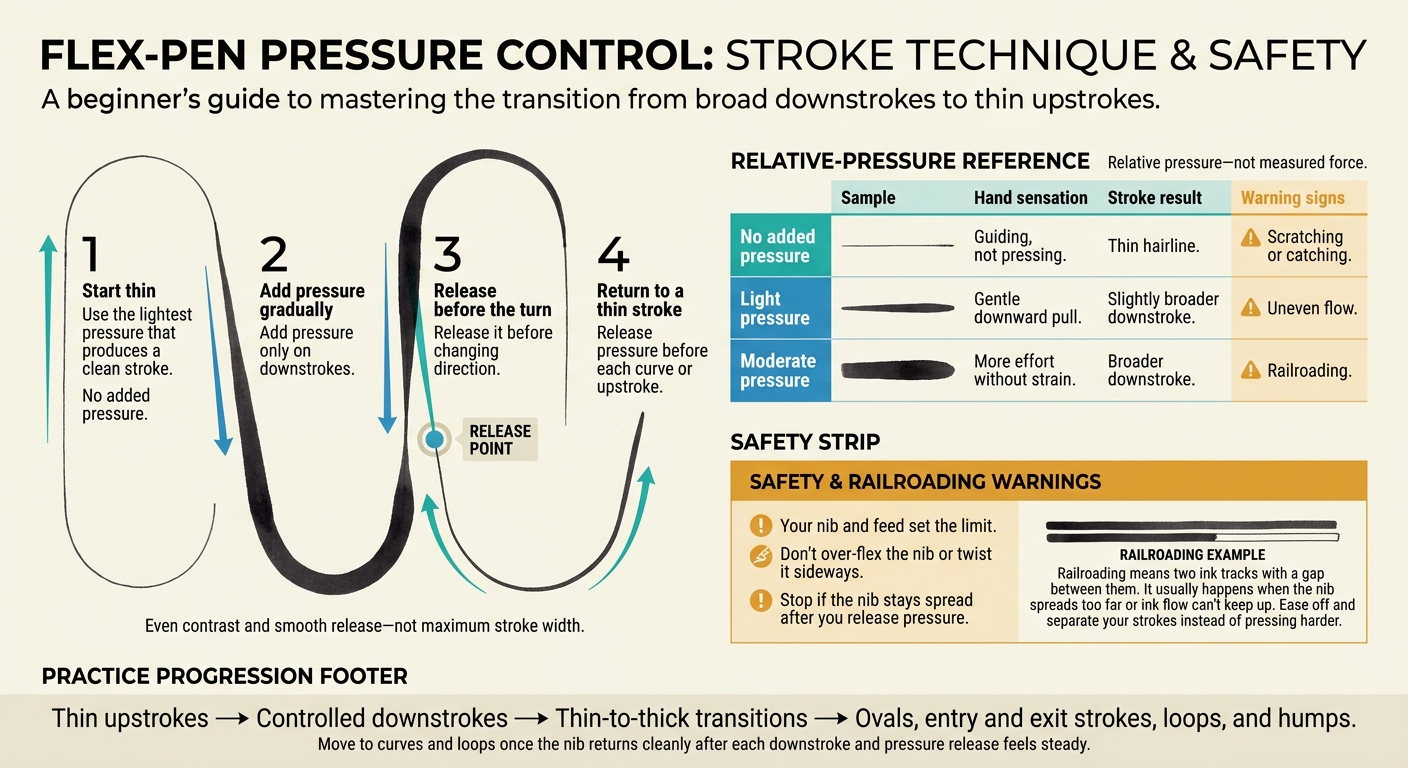
Flex Pen Pressure: Safe Stroke Guide
Start with a thin line, using the lightest pressure that produces a clean stroke. Your nib and feed set the limit - pressing harder doesn’t guarantee a better line.
Add Downstroke Pressure Gradually
Use the levels below as a relative guide. Add pressure only on downstrokes, and release it before changing direction. Don’t over-flex the nib or twist it sideways. Stop if the nib stays spread after you release pressure.
| Relative pressure level | Hand sensation | Stroke result | Warning signs |
|---|---|---|---|
| No added pressure | Guiding, not pressing | Thin hairline | Scratching or catching |
| Light pressure | Gentle downward pull | Slightly broader downstroke | Uneven flow |
| Moderate pressure | More effort without strain | Broader downstroke | Railroading |
Railroading means two ink tracks with a gap between them. It usually happens when the nib spreads too far or ink flow can’t keep up. Ease off and separate your strokes instead of pressing harder.
Once the nib returns cleanly after each downstroke, move on to curves and loops.
Move From Straight Strokes to Loops
Practice thin upstrokes, controlled downstrokes, and thin-to-thick transitions before trying continuous forms.
As you gain control over pressure release, work on ovals, entry and exit strokes, loops, and humps. Release pressure before each curve or upstroke. Judge your progress by even contrast and smooth release, not maximum stroke width.
Plan Practice and Care for Your Pen
Once you can release pressure steadily, keep practice sessions short. Cleaning the pen can also help you rule out ink-flow problems.
Set Your First Practice Goals
Practice for 5–10 minutes, stopping sooner if your hand tightens or the nib catches. Focus on even thin-to-thick strokes - not speed, swells, or flourishes.
Start with separate upstrokes and downstrokes. Move to ovals and loops only when you can release pressure consistently. If your grip tightens, put the pen down and relax your hand before checking the nib’s alignment again.
If the line feels rough or uneven, check the pen before adding pressure.
Clean the Pen and Check Flow Problems
Follow your pen’s care instructions when changing ink or clearing dried ink. Flush the filling system, nib, and feed with lukewarm water until the water runs clear. Wipe the outside, but don’t scrub the tines, press the nib, or take the pen apart unless the maker tells you to.
Let the pen dry completely before storing it long-term. Particle-heavy inks may require more frequent cleaning, so follow both the ink and pen care instructions.
If ink flow remains uneven after cleaning, check the ink level and flow through the feed before adding pressure.
Conclusion: Aim for Control, Not Maximum Flex
With your setup and pressure habits in place, focus on consistency, not maximum spread. Hold the flex nib with a relaxed grip. Keep upstrokes light, add pressure gradually on downstrokes, and release it before each turn so the nib closes cleanly.
Choose paper and ink that keep line contrast clean, and flush the pen regularly to maintain steady flow. Begin with normal writing, then practice short thin-to-thick strokes, staying well below the nib’s limit. Practice pressure control while protecting the nib, allowing line contrast to develop over time.
FAQs
How can I find my flex nib’s safe pressure limit?
Find the pressure that opens the nib to its widest safe spread while still allowing it to return to its original shape. Use a pressure gauge for accurate measurements.
If you’re a beginner, stay well below maximum flex until you develop control. Keep the spread at least 0.3 mm (about 0.012 in.) below the nib’s maximum. Don’t push it to extremes: over-flexing can permanently bend the tines [4].
How do I tell poor ink flow from over-flexing?
Railroading - when a stroke splits into two thin lines - means the feed can’t supply ink fast enough. Don’t add more pressure. You’ve reached the limit of your current ink and feed setup.
Over-flexing strains the nib. Watch for slow spring-back or tines that stay spread or bent at rest. Make slow strokes, and don’t force the tines to their maximum spread. If ink flow still falters under light pressure, check for clogs or improper nib alignment.
When am I ready to practice connected letters?
Practice connected letters only after you’ve mastered individual downstrokes and upstrokes. Before tackling full words, build muscle memory with vertical lines, figure-eights, and connected ovals. These drills help you smooth out pressure transitions and find your rhythm.
Keep your movements deliberate and repeatable. Speed and maximum line width aren’t the goal. Move on to connected letters once you can consistently control pressure and spacing in these drills.