

If your fountain pen has hard starts, skips, or puts down pale lines, I’d fix it in this order: clean the nib and feed, check the cartridge or converter, then make small tine checks only if the first two steps fail.
Most dry-writing pens are blocked by dried ink or have a simple ink-flow problem. In many cases, I can fix that at home with cool water, 15–60 minutes of soaking, 8–15 flush cycles, and 6–12 hours of drying. I’d leave nib bending for last, because that step has the most risk.
Here’s the short version:
- Spot the signs: hard starts, skipping, and weak-looking lines
- Clean first: flush the section and soak if dried ink is stuck
- Use cool water: about 68–77°F
- Dry fully: wait 6–12 hours before inking again
- Check ink supply: reseat the cartridge or converter and prime the feed
- Test the ink: some inks write drier than others
- Inspect the nib last: look for uneven tines or a slit that looks too tight
- Stop if it gets worse: scratchier writing, bent tines, or cracks mean it’s time to stop
Bottom line: I’d start with cleaning because that fixes a large share of dry nib problems without touching the metal. If the pen still writes dry after a full flush, a feed prime, and a basic ink check, then I’d inspect the nib and decide whether a small adjustment - or a replacement nibs - is the next step.
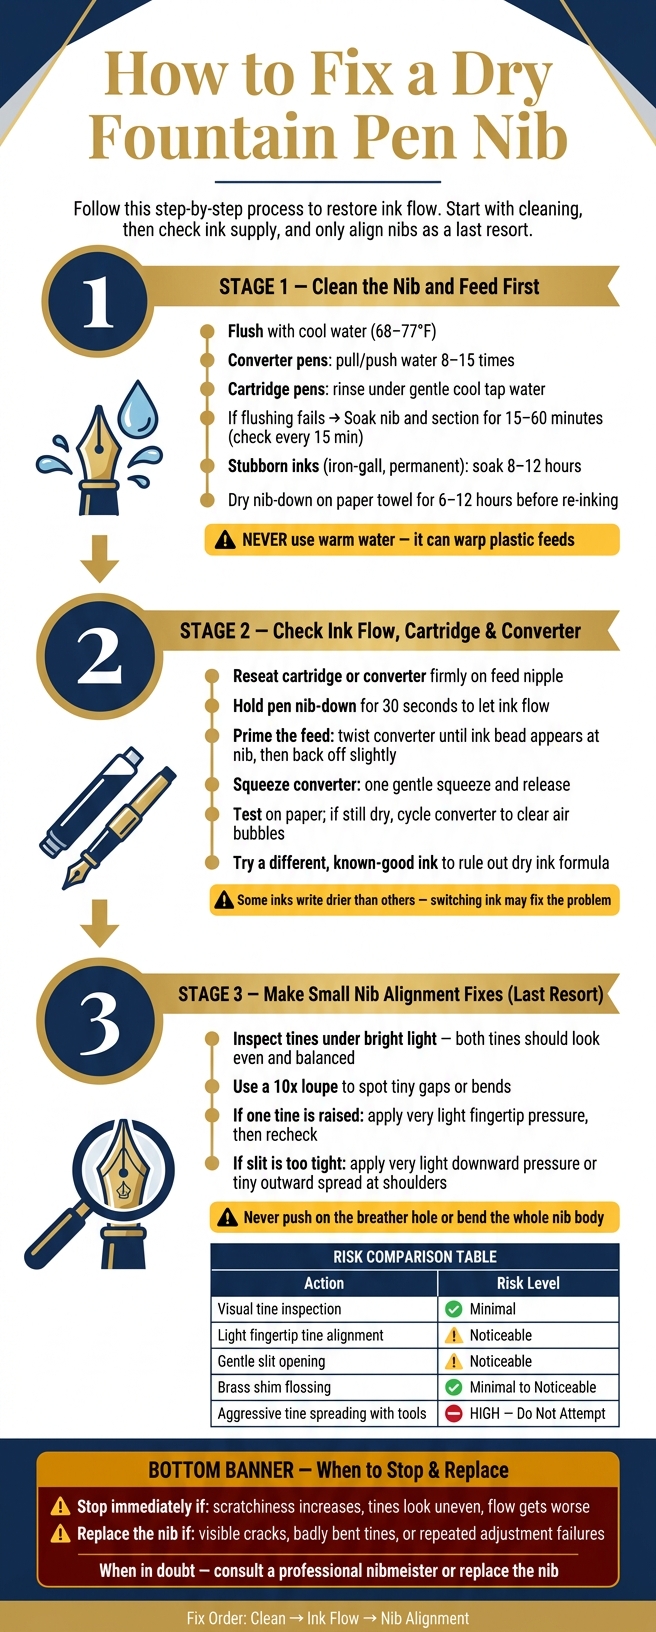
How to Fix a Dry Fountain Pen Nib: Step-by-Step Guide
Diagnosing and Fixing A Dry Fountain Pen
sbb-itb-1dd4fe9
Step 1: Clean the Nib and Feed First
Dried ink in the feed is one of the most common reasons a fountain pen writes dry. Before you touch the nib, clean the pen. A lot of “dry nib” issues stop right here. If the pen still writes dry after cleaning, move on and check for common nib issues and the ink supply.
Flush Dried Ink Out of the Section
First, unscrew the barrel from the grip section and remove the cartridge or converter.
For a converter pen, attach the empty converter again, place the nib in a cup of cool or room-temperature water, around 68–77°F, and use the converter to pull water in and push it back out. Do this 8–15 times. If the water gets dark, swap it out and keep going until the water coming out looks almost clear.
For a cartridge pen, rinse the nib and section under a gentle stream of cool tap water. Let the water run from the nib toward the cartridge opening. If you have a bulb syringe, attach it to the cartridge opening. That speeds things up and does a better job of clearing the feed.
How to Soak and Dry the Pen Correctly
If flushing doesn’t clear the feed, soak the nib and section in cool or room-temperature water. This helps a lot after long storage or when stubborn inks are involved. Put the nib and section in a small cup of water, with the converter removed, and use only enough water to cover the nib and feed. Soak for 15–60 minutes, check every 15 minutes, and replace the water if it gets heavily saturated.
Tough cases, like dried iron-gall or permanent ink, may need several hours or even overnight, about 8–12 hours.
Avoid warm water entirely. It can warp plastic feeds, stress adhesives, and change ink flow. Cool tap water is the right move every time. If your local water is very hard, do a final rinse with distilled water. You can buy it by the gallon at most U.S. grocery stores, and it helps stop mineral deposits from building up in the feed.
Blot the nib with a lint-free cloth. Then place the section nib-down on a paper towel in a ventilated spot at room temperature. Let it air-dry for at least 6–12 hours, or overnight if you can. Don’t re-ink the pen until the section is fully dry. If it still writes dry after that, check the cartridge or converter for other quick fixes next.
Step 2: Check Ink Flow, Cartridge, and Converter
If cleaning didn’t solve it, the next thing to check is simple: is ink actually reaching the feed? A pen can be clean and still write poorly if the ink path is interrupted.
Reseat the Cartridge or Converter and Prime the Feed
Take out the cartridge or converter, then reinstall it firmly on the feed nipple. Even a small gap can let air in, and that can mess with ink flow. After reseating it, hold the pen nib-down for about 30 seconds so the ink can move toward the feed.
Then prime the feed before you start writing. With a twist converter, turn the knob slowly until the feed darkens or a tiny bead of ink appears at the nib. Then back it off a bit. With a squeeze converter, one gentle squeeze and release is enough. Wipe off any extra ink with a lint-free tissue, then test the pen on paper.
If the pen writes dry after a few lines, an air bubble may be blocking the flow. In that case, cycle the converter fully, then prime one or two drops of ink into the feed.
Rule Out Dry Ink and Storage Conditions
Some inks write drier than others. That can make an otherwise healthy pen feel scratchy or leave faint lines. If the pen is clean, seated well, and primed but still feels off, try a known good ink. If the writing improves, the ink is likely the problem. In that case, switching inks may work better than making more mechanical changes.
Storage matters too. A capped pen stored nib-up in dry air can dry out at the nib and feed, which often leads to hard starts later. If the pen only acts up after sitting unused for a while, prime a small amount of ink into the feed before your next writing session.
If the pen still writes dry after these checks, move to nib alignment and tuning.
Step 3: Make Small Nib Alignment Fixes
If the pen still writes dry after cleaning and ink-flow checks, the nib may need a small fix. This step comes last on purpose. You’re bending metal, and even a tiny move can go wrong. Only do this after the earlier checks.
How to Check for Misaligned or Too-Tight Tines
If cleaning and ink checks didn’t solve it, inspect the nib under bright light. Hold the pen so the nib points toward you under steady, even light. The two tines should look even and form a smooth, balanced shape. If one tine sits higher, lower, or looks twisted, the nib may be out of line. That can lead to scratchiness, skipping, or faint lines.
Next, look down the slit toward the light. A healthy nib usually shows a narrow taper of light from the breather hole to the tip. If you see little or no light in the slit, the tines may be too tight, which can limit capillary flow. That often shows up as faint lines, hard starts, and a dry feel. A 10x loupe makes tiny gaps or bends at the tip much easier to spot.
To fix a slightly raised tine, use a thumb or fingertip and apply very light pressure to the raised side. Then let go and check again. If the slit looks too tight, use very light downward pressure on the tip or make a tiny outward spread at the shoulders, then test the pen again.
Never push on the breather hole or try to bend the whole nib body. That can warp the nib or crack the plating.
DIY Nib Adjustment Risk Table
Make very small changes, then test after each one. If anything gets worse - more scratchy, more skipping, or visibly bent tines - stop right away.
| Action | Risk to Nib | When to Stop |
|---|---|---|
| Visual tine inspection under bright light | Minimal | N/A - inspection only |
| Light fingertip tine alignment | Noticeable | If scratchiness increases or tines look uneven after adjustment |
| Gentle slit opening with very light pressure | Noticeable | After one or two attempts, or if flow doesn't improve |
| Flossing the slit with a thin brass shim | Minimal to Noticeable | If resistance increases or tines separate unevenly |
| Aggressive tine spreading with tools | High | Do not attempt - high risk of permanent damage |
Stop at once if any adjustment makes flow worse. Gold vs steel nibs, vintage pens, and specialty grinds are more easy to damage. If the nib has cracks, a badly bent tip, or keeps getting worse, stop and see a professional nibmeister or replace the nib.
Conclusion: Test the Pen and Know When to Replace a Nib
If cleaning, ink checks, and small tine adjustments don't fix the issue, the nib is probably the problem.
Follow this order: clean first, check ink flow second, adjust tines last. If the pen starts to feel scratchier or writes even drier, stop there.
When the nib has visible cracks, badly bent tines, or damaged tipping, it's time to replace it. And if cleaning and minor adjustments keep failing, replacement is the practical move.
Fountain Pen Revolution carries affordable replacement nibs in common sizes such as #5.5 and #6.
Before filling the pen again, do one last check. If replacement doesn't seem necessary yet, go through the basics once more:
- Nib and feed clean? Flushed with room-temperature water until clear, then fully air-dried.
- Cartridge or converter seated firmly? Feed primed with a small bead of ink at the tip.
- Ink suitable? A mid-flow dye ink like Diamine Writer's Blood helps rule out an ultra-dry formula.
- Tines even? No visible bends, cracks, or off-center slit under bright light.
- Adjustments minimal? One small change at a time, with a writing test after each.
If the pen still writes dry after these checks, replace the nib.
FAQs
Why does my pen still write dry after cleaning?
If your pen still writes dry after cleaning, the issue may be mechanical or tied to setup, not just leftover residue.
First, make sure the pen is fully dry. Any rinse water left inside can dilute the ink and lead to faint or broken lines. It sounds minor, but it can throw off how the pen writes.
Then check the converter. It should be fully seated and airtight. If it isn’t sitting in place the right way, ink flow can suffer.
It’s also worth inspecting the nib and feed for misalignment. If both look fine, the ink itself may be too dry for that nib. Another common cause is tines that are too tight, which can restrict ink flow and leave the pen writing thin or skipping lines.
Can the wrong ink make a fountain pen feel dry?
Yes. Some inks run drier than others, especially inks made for permanence, heavy saturation, shimmer, or sheen. That can lead to weaker flow and show up as faint lines, skipping, or hard starts.
If you think the ink is the problem, test a reliable standard ink first before you adjust the nib or feed.
When should I stop adjusting the nib myself?
Stop as soon as the nib writes smoothly and consistently. If the line width or ink flow changes all of a sudden, or you notice skipping or new scratchiness, stop right away. Pushing past that point can lead to over-adjustment or even damage the tines.
You should also stop if the tines look bent, the tipping material looks worn, or the pen is high-value or sentimental. If basic maintenance and small adjustments don’t fix the problem, it’s best to get professional help or look into a nib replacement.