

I use five steps to fill a fountain pen with shimmer ink: mix, clean, fill, clear, and test. Use only fountain-pen-safe ink, and follow your pen’s filling and care instructions.
- Mix the ink: Gently shake or roll the capped bottle to lift settled shimmer.
- Clean the pen: Empty it, flush with room-temperature water until clear, and let it drain and dry.
- Fill slowly: Keep the ink intake submerged so the pen draws ink, not air.
- Clear excess ink: Release a few drops if your pen’s instructions call for it, then blot with a lint-free cloth.
- Test the flow: Write several lines and check for skipping, flooding, and shimmer.
My rule: <u>don’t force a pen that won’t flow</u>. If you encounter issues, check these fountain pen quick fixes. Clean it before refilling, cap it during pauses, and gently roll - not shake - the capped pen when shimmer settles.
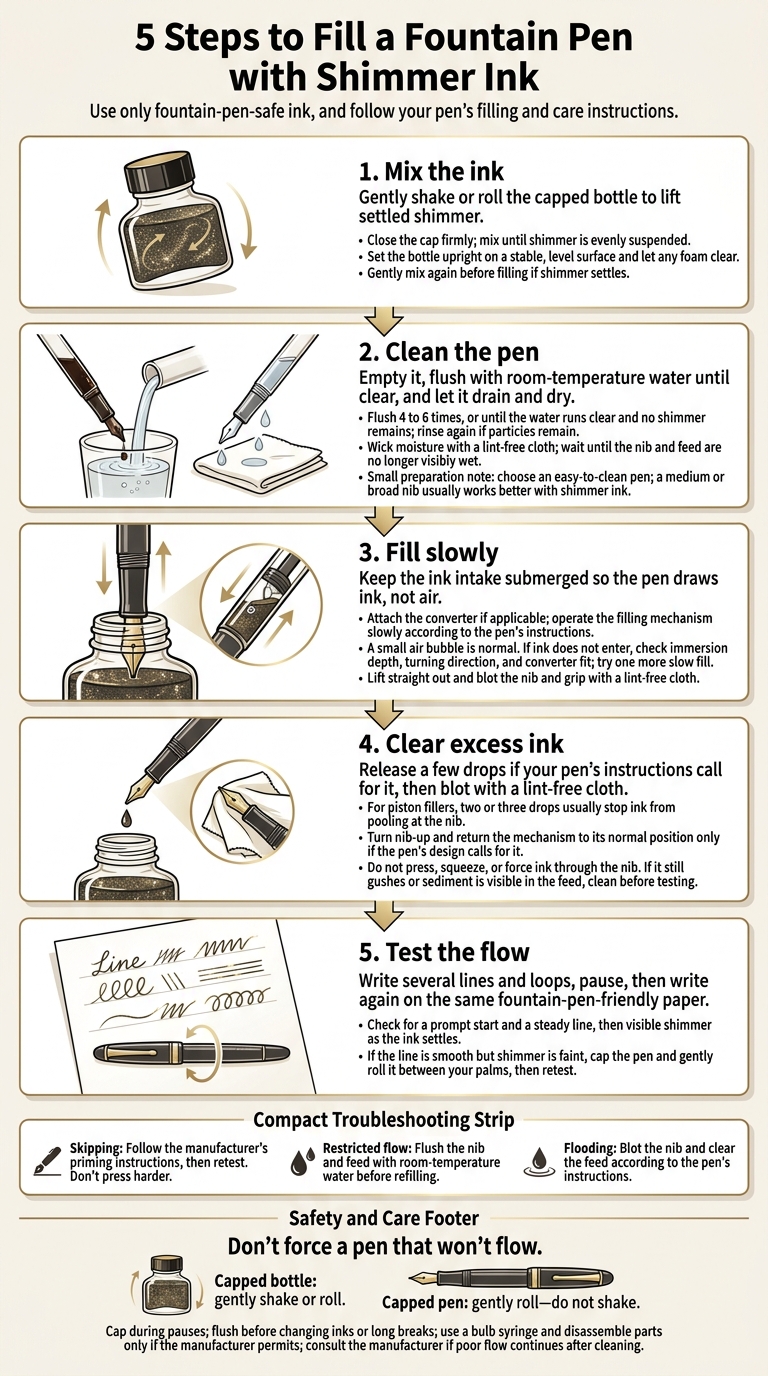
5 Steps to Fill a Fountain Pen with Shimmer Ink
Step 1: Shake the Bottle
Check the bottom of the bottle for settled shimmer. If you don’t mix it back into the ink, the pen may fill unevenly. This is especially true for high-shimmer options like Midas Touch gold shimmer ink.
Close the cap firmly, then gently shake or roll the bottle until the shimmer is evenly suspended. Place the bottle upright on a stable, level surface and let any foam clear. Bubbles can hide the ink level and affect filling.
If the shimmer settles again, gently mix it once more before filling. Then continue to Step 2.
sbb-itb-1dd4fe9
Step 2: Prepare the Pen
Choose an easy-to-clean pen with an accessible converter or removable filling unit. Before filling, check the manufacturer’s care instructions. A medium or broad nib usually works better with shimmer ink because narrow feeds clog more easily.
Make sure the reservoir is empty. Remove the old cartridge or empty the converter, if applicable. Then check for leftover ink or sediment.
Flush the pen with clean, room-temperature water 4 to 6 times, or until the water runs clear and no shimmer remains in the nib or feed. If you still see particles, rinse again.
Expel the rinse water, wick moisture from the nib with a lint-free cloth, and let the pen drain or air-dry according to the manufacturer’s instructions. Wait to fill until the nib and feed are no longer visibly wet.
Keep a lint-free cloth nearby on a protected surface. Skip tissues and paper towels - they can shed fibers into the nib slit or feed. Use a bulb syringe only if it’s compatible with your pen, and take parts apart only as far as the manufacturer permits. Once the pen is clean and dry, move to Step 3.
Step 3: Draw Ink into the Pen
Once the pen is clean and dry, fill the reservoir slowly.
If your pen uses a converter, attach it first. Set the piston or converter to its starting position according to the pen’s instructions. Don’t force it past its limit.
Lower the nib into the ink without touching the bottle. Submerge the nib and feed just deep enough to keep the intake covered throughout the fill.
Turn the piston or converter slowly - or press and release a squeeze converter - until the reservoir fills.
A small air bubble is normal. If ink doesn’t enter, check the immersion depth, turning direction, and converter fit. Then try one more slow fill.
Lift the pen straight out and hold it over the bottle to catch drips. Blot the nib and grip with a lint-free cloth. Don’t rub the tip or shake the pen. Next, clear excess ink from the feed.
Step 4: Clear Excess Ink from the Feed
Release just a few drops of ink over the bottle or a scrap surface. For piston fillers, two or three drops usually stop ink from pooling at the nib.
If your pen’s design calls for it, turn the pen nib-up. Then return the piston or converter to its normal position using slow, light pressure.
Wipe off any surface ink with a lint-free cloth, and clean the grip only if needed. Switch to a clean part of the cloth as it picks up ink. Don’t press, squeeze, or force ink through the nib.
If the pen still gushes or you can see shimmer sediment in the feed, clean it before testing the flow. If the feed is clear, move to Step 5: test the flow.
Step 5: Test Ink Flow
Once the feed is clear, write several lines and loops on fountain-pen-friendly paper. Pause, then start writing again. Check for a prompt start and a steady line, followed by visible shimmer as the ink settles. Use the same paper for each test so you can compare results.
Faint shimmer doesn’t always mean poor flow. If the line is smooth but the shimmer looks faint, cap the pen and gently roll it between your palms to redistribute settled particles. Then write another line. Do not shake the pen.
If the test fails, address common nib issues before trying again:
- Skipping: Follow the manufacturer’s priming instructions, then retest. Don’t press harder.
- Restricted flow: Flush the nib and feed with room-temperature water before refilling.
- Flooding: Blot the nib and clear the feed according to the pen’s instructions.
Keep Ink Flowing Between Uses
Cap the pen during pauses to keep the nib from drying out. If shimmer has settled before your next writing session, gently roll the capped pen.
Flush the nib and feed before changing inks. Use a bulb syringe only if the pen allows it, and let the pen drain and dry as directed before refilling. If poor flow continues after cleaning, consult the manufacturer rather than adjusting the nib yourself.
Conclusion: Repeat the 5 Steps
Use the same five steps for every fill: shake, prep, fill, clear, test. Keep the ink intake submerged the whole time so it draws ink instead of air.
Care after filling matters just as much. Clean the pen regularly to keep shimmer ink flowing, and flush it before long breaks.
FAQs
How can I tell if my pen handles shimmer ink?
Watch the line as you write. A steady, generous line points to wet flow, which helps keep shimmer particles suspended and moving through the feed. If the nib feels scratchy or the flow is uneven, the pen may be too dry.
A transparent demonstrator pen lets you see whether particles are moving or settling. Medium, broad, or stub nibs generally handle shimmer ink better than fine or extra-fine nibs.
How often should I clean a shimmer-filled pen?
Flush your pen every 1–2 weeks with water or a cleaning solution when using shimmer ink. This helps keep metallic or mica particles from settling in the feed and causing clogs. If ink flow becomes uneven or you notice a clog, clean the pen right away.
If you plan to leave your pen unused for more than 1–2 weeks, empty it and flush it thoroughly first. This helps prevent ink from drying in the feed.
Can I leave shimmer ink in my pen overnight?
You can generally leave shimmer ink in your pen overnight, as long as it doesn’t sit unused long enough for the ink to dry out in the feed. Store the pen horizontally or nib-up - not nib-down - to help keep shimmer particles away from the feed and prevent them from settling and hardening.
If you won’t use the pen for more than one to two weeks, empty it and flush it thoroughly to help prevent clogs.