
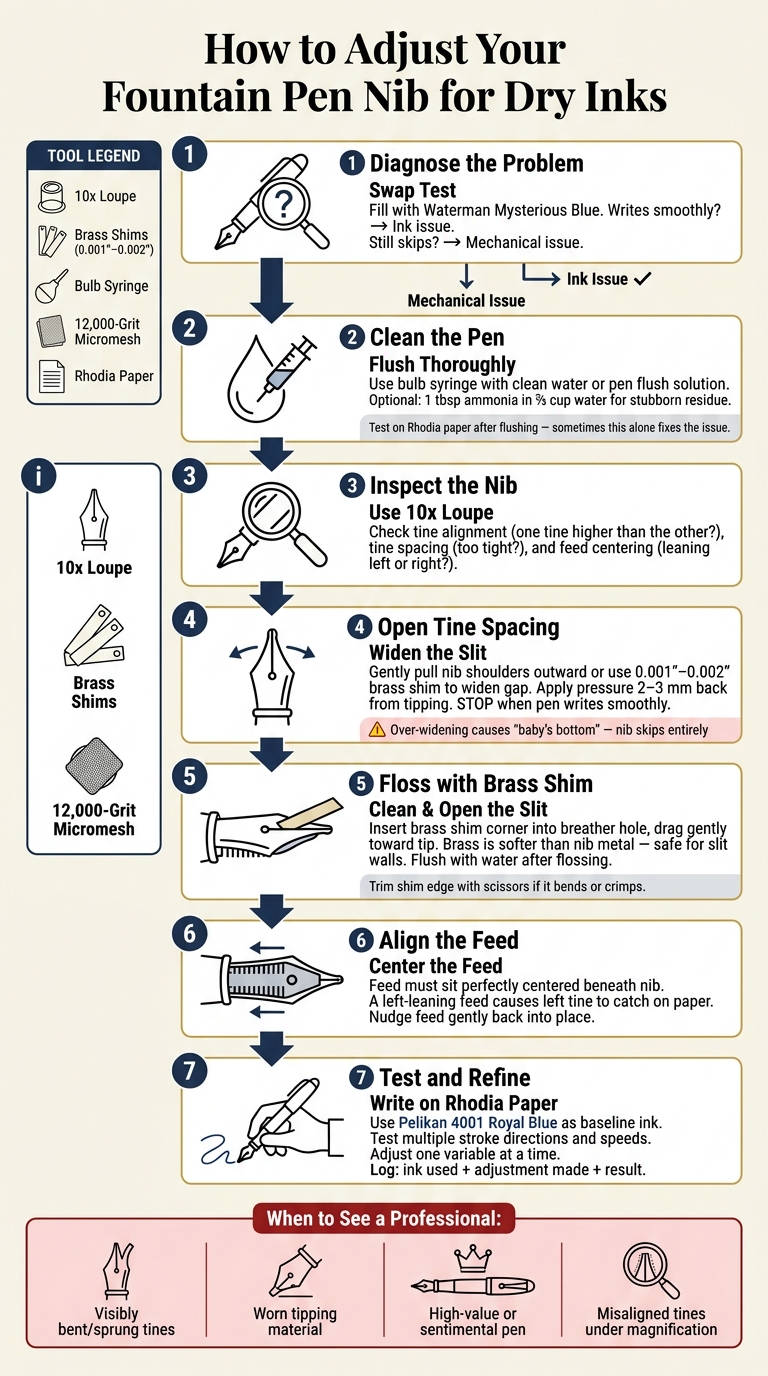
If your fountain pen is not writing correctly—skipping, scratching, or writing faintly with dry inks like iron gall or waterproof formulas, the issue might be your nib, not the ink. Dry inks have less lubrication and slower flow, often struggling with tight nib tines or misaligned feeds. Instead of switching inks, you can adjust your nib at home to improve performance. Here's a quick guide:
- Identify the Issue: Test with a standard ink to see if the problem is mechanical or ink-related.
- Clean the Pen: Flush with water or a cleaning solution to remove residue.
- Check Nib Alignment: Use a 10x loupe to inspect tine spacing and alignment.
- Adjust Tine Spacing: Gently widen the slit with brass shims if ink flow is restricted.
- Test and Refine: Write on smooth paper like Rhodia after every adjustment.
For valuable pens or severe damage (e.g., bent tines), consult a professional. Start with inexpensive nibs to practice, and always proceed carefully to avoid permanent damage.
Nib Tuning 101 - How to Troubleshoot and Fix your Nib*
sbb-itb-1dd4fe9
Ink Dryness and Pen Flow: What You Need to Know
Dry inks can cause frustrating flow issues, but how do you figure out if the problem lies with the ink or the mechanics of your pen? Here's a breakdown to help you diagnose and address the issue.
Is It the Ink or the Pen? How to Tell
The quickest way to determine the culprit is by doing a swap test. Use a reliable, standard ink like Waterman Mysterious Blue and write a few lines. If your pen flows smoothly with this ink, the problem likely lies with the dry ink. But if the pen still skips or drags, the issue is mechanical. This could mean tight tines, a dirty feed, or a nib-to-feed gap that's too wide.
A pen that starts writing well but then skips abruptly often points to feed starvation. This happens when the feed's air channels can't keep up with the ink flow from the reservoir. Dry inks exacerbate this problem because they lack the surface tension needed for smooth air-to-ink exchange.
This simple test helps you understand whether you're dealing with an ink issue or a mechanical flaw.
How Dry Inks Affect Pen Components
The nib's slit relies on capillary action to draw ink to the paper, which depends on proper contact between the nib and the feed. Dry inks can struggle in this process because they require precise mechanics. For example:
- If the tines are even slightly too tight, the ink won't flow properly.
- If the nib sits too far from the feed - more than the thickness of a sheet of paper - capillary action breaks down.
For new pens, flushing them with a cleaning solution (1 tablespoon of ammonia in ⅔ cup of water) can remove mold-release residue that might worsen flow problems.
When to Skip Home Adjustments
Before attempting any repairs, carefully assess your pen's condition. Some issues are better left to professionals, especially when dealing with valuable or sentimental pens. Here's a quick guide:
| Situation | Why to Avoid DIY |
|---|---|
| Tines are visibly bent or "sprung" | Realigning bent tines requires professional expertise. |
| Tipping material is worn down | DIY smoothing could remove the remaining tipping entirely. |
| High-value or sentimental fountain pen | The risk of permanent damage isn't worth it. |
| Misaligned tines under magnification | Adjusting flow on a misaligned nib can create sharp, uneven edges. |
As Richard Binder, a respected expert in pen repair, warns:
"Even the best technicians have to be careful not to destroy the slit - and they also have to know how to repair damaged slit walls if things go wrong... Sometimes, even the experts can't do it, so don't fool yourself into thinking that you can."
If your pen falls into any of these categories, it's better to practice nib adjustments on an inexpensive pen, like the Jinhao 992, before attempting anything on a pen you care about.
Tools and Setup for Nib Adjustments
Tools You Need for Nib Tuning
Before diving into nib adjustments, make sure you have the right tools. Skipping proper magnification or using unsuitable materials can lead to missed details or even damage during the process.
| Tool | Purpose |
|---|---|
| 10x Loupe | Helps inspect tine alignment and feed centering, both before and during adjustments. |
| Brass Shims (0.001"–0.002") | Used to "floss" the nib slit, clearing debris or gently widening the gap for improved ink flow. |
| Bulb Syringe | Provides high-pressure flushing to thoroughly clean the feed and nib unit. |
| 12,000-Grit Micromesh | Used sparingly to lightly polish the nib's tipping and reduce scratchiness. This should be a last-resort tool. |
| Rhodia Paper | Offers a smooth, consistent surface for testing the pen's performance after adjustments. |
| Tissues/Paper Towels | Useful for cleaning ink and protecting the nib during manual adjustments. |
A good-quality loupe or magnification tool can be purchased for under $30, making it a budget-friendly yet essential investment. Brass shims, often preferred for their softness, are gentle on the nib’s metal, ensuring no scoring or damage to the slit walls during adjustments.
How to Prepare Your Pen Before Adjusting
Start by thoroughly flushing the pen with clean tap water. This step removes dried ink residue and oils, which are common culprits behind flow issues. For stubborn residue, opt for a dedicated pen flush, as it’s more effective than water alone. A bulb syringe can make this process faster and more thorough by pushing water through the grip section with extra force.
Once cleaned, test the pen on Rhodia paper before making any adjustments. Sometimes, a simple flush is all it takes to restore proper ink flow. If issues persist, try using Pelikan 4001 Royal Blue ink as your baseline for testing. Nib tuning usually takes just 5 to 15 minutes, so there’s no need to rush through the process.
With your pen prepped and cleaned, follow proper safety measures to protect the nib during adjustments.
Safety Tips to Avoid Damage
Take small, incremental steps when adjusting the nib, and test the pen after each change. If you need to adjust a tine, always apply pressure at least 2–3 mm away from the tipping. This ensures you’re bending the entire tine rather than stressing the delicate tip. Custom pen maker Ken Cavers emphasizes this point:
"It is important that the point of contact with your nail be at least a couple of mm back from the tipping itself, so that you are bending the whole tine, not just the tip."
Gold nibs require extra care, as the metal is softer and more responsive to pressure compared to stainless steel. When using micromesh, work briefly and carefully. Over-polishing can create sharp edges where the tines meet, potentially making the nib scratchier instead of smoother. Stop as soon as the nib feels comfortable to write with.
With the right tools, preparation, and careful adjustments, you can effectively address common nib issues and improve your pen’s performance.
How to Adjust Your Nib for Dry Inks
How to Adjust Your Fountain Pen Nib for Dry Inks: Step-by-Step Guide
Once your pen is cleaned and your tools are ready, it’s time to start making adjustments. These steps, when done carefully and in order, can help restore proper ink flow and ensure your pen writes reliably. Take it slow, and test your pen after each small adjustment.
Opening Tine Spacing for Better Ink Flow
Start by examining the nib head-on with a 10x loupe. Check if one tine is higher than the other. Even a slight misalignment can restrict ink flow, and fixing this might solve the issue without further adjustments. To correct it, gently press to level the tines. Then, using a tissue to protect the nib, either pull the nib’s shoulders outward or use a brass shim to lightly widen the gap at the tip.
Stop as soon as your pen writes smoothly. Over-widening the tines can result in a pen that writes too wet or, worse, develops a "baby’s bottom" - a condition where the tines spread so far apart that the nib skips entirely.
Using Brass Shims to Clean and Open the Slit
If adjusting the tine spacing doesn’t do the trick, try cleaning the nib slit with a brass shim. This technique not only clears out debris like ink residue or paper fibers but can also slightly widen the slit if needed. Brian Goulet, co-founder of The Goulet Pen Company, emphasizes the importance of using brass:
"Brass is the ideal material used for flossing nibs because it's softer than any other metal used for making fountain pen nibs, so it won't cause your nibs functional harm."
Most brass shims are around 0.002" thick, making them thin enough to slide between the tines without causing damage. If the nib is still installed, insert the shim’s corner into the breather hole (the small hole at the center of the nib face) and drag it gently toward the tip. If the nib has been removed, insert the shim from the underside and pull it toward the tip in the same way.
After flossing, flush the pen thoroughly with clean water to remove any loosened debris. If the shim’s edge bends or crimps during use, simply trim a small piece off with scissors to create a clean edge.
Note: If your nib has a decorative coating like black or gold plating, be extra cautious. While brass won’t harm the base metal, it can scratch the coating.
Adjusting Nib-to-Feed Contact
If ink flow is still inconsistent, the problem might lie with the feed. The feed should sit perfectly centered beneath the nib - even a small misalignment can create uneven pressure on the tines, restricting ink flow. Jen, a nib tuner at LarryPOST, highlights a common issue:
"Avoid feed leftovers: It's a play on the perils of leftover food, but reminds you to avoid a left leaning feed. It causes the left tine (writer's POV) to sit closer to the page and will catch as the pen is moved left to write."
To check alignment, use your loupe or a high-resolution phone camera to look at the nib straight on. If the feed leans to one side, gently nudge it back into place. Often, this simple adjustment realigns the tines automatically. Make small adjustments and test the pen on Rhodia paper after each tweak to ensure the flow improves without introducing new problems.
Once you’ve completed these steps, test your pen again on Rhodia paper to confirm that the adjustments have resolved the issue. Then, you can move on to routine maintenance.
Testing and Maintaining Your Adjusted Nib
How to Test Nib Performance with Dry Inks
Start by testing your pen on Rhodia paper using Pelikan 4001 Royal Blue ink - a dependable low-flow ink that works well for evaluating nib performance under stress. Write in various stroke directions, then switch to your usual handwriting style. Watch for issues like hard starts or skipping, especially during quicker strokes. The goal is to ensure every stroke lays down a smooth, uninterrupted line. Once you're satisfied with the performance, you can move on to refining the nib and establishing a maintenance routine.
"Most improvements come from alignment, not smoothing." - Jen, Nib Tuner, LarryPOST
Making Gradual Adjustments for Different Inks
Different inks can interact with your nib in unique ways. A nib adjusted for one ink might need slight modifications when switching to another. Tackle one adjustment at a time, testing after each tweak. Keeping a simple log can help - note the ink used, the adjustment made, and how the pen performed. This record can be a helpful reference for future tuning.
"The accuracy of nib smoothing is inversely proportional to the speed at which tipping material is removed." - Richard Binder, Nib Specialist
Routine Maintenance for Adjusted Nibs
Once your nib is tuned, regular cleaning and upkeep are key to maintaining its performance. Flush the pen with lukewarm water using a bulb syringe until the water runs clear. Be sure to dry the nib and feed completely before refilling with ink. Consistent care helps keep your nib in top shape for dry ink use.
Regularly check the tines with a 10× loupe to ensure they remain aligned and evenly spaced. Everyday use can cause slight shifts, and catching these early allows for minor adjustments instead of a full retuning. Also, double-check that the cartridge or converter is securely in place - sometimes, a loose fit can mimic the symptoms of nib dryness.
Conclusion: Getting the Most from Your Nib with Dry Inks
To make your nib work well with dry inks, focus on precise adjustments and thorough testing. The key steps include aligning the tines, carefully widening the slit, and testing incrementally. Skipping steps - like smoothing before aligning - can actually hurt your nib's performance instead of improving it. By following these methods, you can ensure better reliability with dry inks.
When it comes to nib tuning, patience is your best tool. As Richard Binder wisely says:
"Practice this lots, and you'll get good at it... It takes practice. A lot of practice."
If you're just starting out, practice on affordable nibs to avoid costly mistakes. For example, Fountain Pen Revolution offers beginner-friendly sets starting at $35. Steel nibs, often found in entry-level pens, are durable enough to handle beginner errors and repeated adjustments.
"Thou Shalt Not Learn on Pens That Thou Carest About. Or That Anyone Else Does." - Richard Binder
Once you've mastered the basics on budget nibs, you can confidently apply those skills to higher-end pens. Core principles like tine alignment, slit adjustment, and feed contact apply to all nibs, no matter the price. Start small, take your time, and you'll soon enjoy smooth ink flow, even with dry inks.
FAQs
How do I know if it’s the ink or my nib?
To get your pen working smoothly, start by giving it a good cleaning. This helps clear out dried ink or debris, which are often the culprits behind flow problems. If that doesn’t solve it, try using a trusted ink brand to rule out ink-related issues. Still no luck? Test the pen on high-quality paper to eliminate paper as a factor.
If the problem persists, take a closer look at the nib. Use a 10x loupe to check for common issues like misaligned tines, blockages, or a "baby's bottom" on the tipping material that could be affecting ink flow.
How far can I open the tines before it’s too much?
Making small, gradual adjustments is key, and frequent testing helps prevent overcorrecting. Spreading the tines too wide can lead to excessive ink flow, flooding, or lines that are too broad. If you notice sudden shifts in line width or wetness, stop right away. Even tiny changes can have a big effect, so approach the process carefully and patiently to ensure a smooth and enjoyable writing experience.
What should I do if my pen still skips after flossing the slit?
If your pen continues to skip, it’s time to inspect for issues like misaligned tines, blockages in the feed, or poor contact between the nib and feed. Use a 10x loupe to closely examine the tines - if one is sitting higher than the other, gently adjust it. Also, check that the feed is properly aligned and sits flush with the nib to prevent any gaps. If the tines are too close together, carefully widen the gap to allow better ink flow.