

If you want the short answer: urushi takes the longest and needs the most control, epoxy sits in the middle, and UV resin cures the fastest. That one difference affects build time, shop setup, defect risk, and when a fountain pen can be used.
Here’s the article in plain terms:
- Urushi cures with humidity, warmth, and time
- Epoxy resin cures from a resin + hardener reaction
- UV resin cures under UV light, often in seconds to minutes
- Thin coats, dust control, and safe handling matter for all three
- The main tradeoff is simple: slower cure usually means more waiting, while faster cure means tighter process control
If I were comparing them for pen bodies and caps, I’d boil it down like this:
- Urushi: about 12–48 hours per coat, often days between coats, and months for top hardness
- Epoxy: usually 48–72 hours before handling and about 5–7 days for full cure
- UV resin: often 30–120 seconds for a thin coat under the right lamp, with same-day progress possible
What changes most for you? Lead time, room needs, and defect risk.
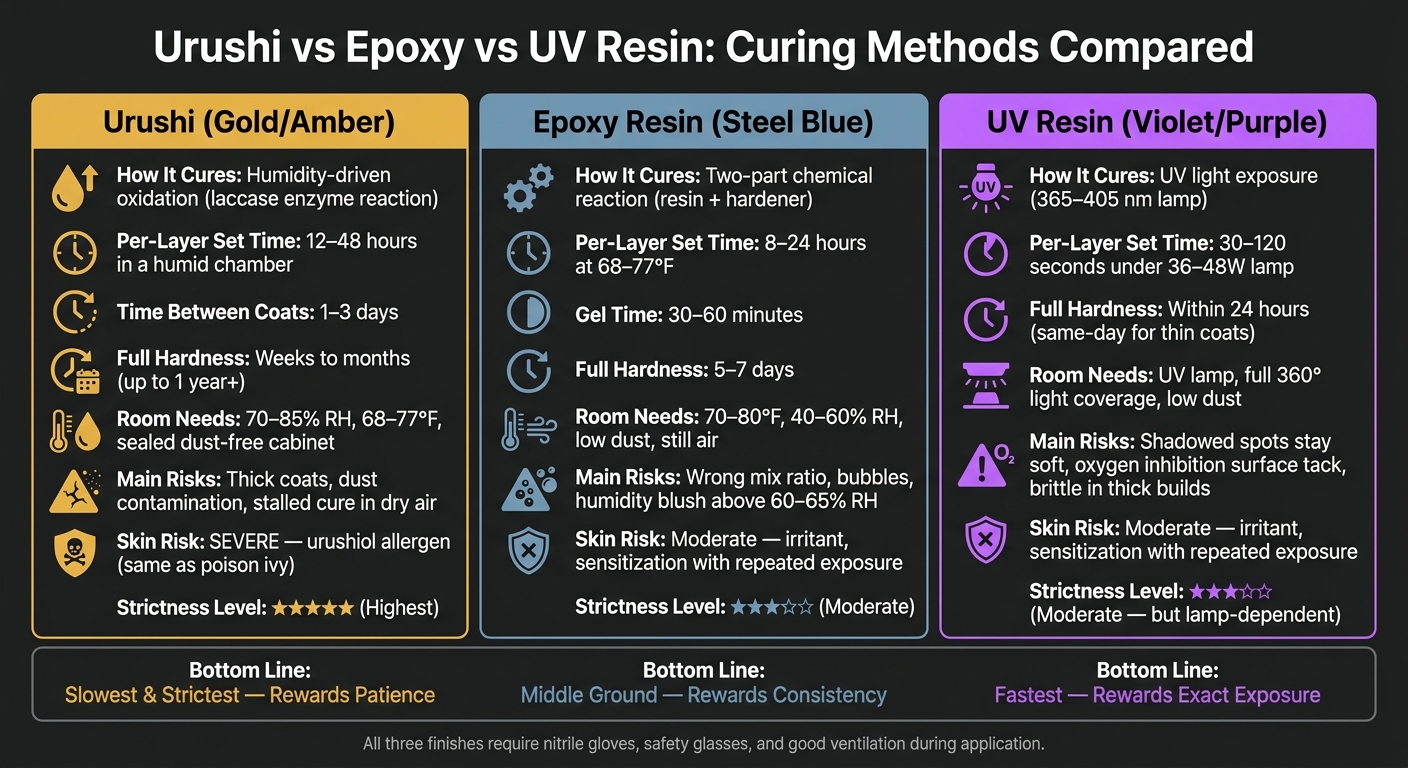
Urushi vs Epoxy vs UV Resin: Cure Time, Conditions & Risk Compared
Urushi-furo - how to cure urushi.
sbb-itb-1dd4fe9
Quick Comparison
| Finish | How it cures | Usual timeline | Main room needs | Main risk |
|---|---|---|---|---|
| Urushi | Humidity-driven oxidation | Days per layer; months total | 70%–85% RH, about 68°F–77°F | Thick coats, dust, stalled cure |
| Epoxy | Two-part chemical reaction | Hours to gel; days to full cure | About 70°F–80°F, low dust | Bad mix ratio, bubbles, blush |
| UV resin | UV light exposure | Seconds to minutes per coat | UV lamp, full light coverage, low dust | Shadowed spots, soft interior, surface tack |
So if you want the big takeaway before reading on: urushi is slow and strict, epoxy is more forgiving on setup, and UV resin is the fastest but needs full light exposure on every part of the pen.
How urushi cures: humidity, time, and gradual hardening
Urushi doesn’t dry like paint. It cures through a chemical reaction: in a warm, humid cabinet, laccase cross-links urushiol into a hard film. In dry air, that process slows down or can stop altogether. That’s why the curing chamber matters just as much as the lacquer itself.
A typical cabinet stays at 68°F–77°F with 70%–85% relative humidity. Fresh coats usually lose tack in about 12–48 hours. Most makers then wait 1–3 days between coats so each layer can harden before the next one goes on. Full hardness takes much longer - usually weeks to months. After cure, urushi should stay out of direct sun and away from very dry storage.
Room setup for urushi curing
The cure is controlled in the chamber, not on the open bench. Use a sealed, lightly ventilated furo or muro that can hold 68°F–77°F and 70%–85% RH while also keeping dust out.
Main risks when curing urushi
The biggest risk is putting the lacquer on too thick. A heavy coat can harden at the surface while the inside stays soft. That’s why artisans use very thin coats - often around 0.01 mm - and give each layer enough time before recoating.
Dust and lint are the other big problem. Tacky urushi grabs them and locks them in place for good.
Wet, uncured urushi can cause severe skin reactions, so wear nitrile gloves and keep it off your skin. That extra care is part of working with urushi. This meticulous process is why high-end Japanese pens, like the FPR Tanoshii Fountain Pen, are so highly valued for their finish.
How resin cures: epoxy and UV resin side by side
Resin finishes fall into two main systems: two-part epoxy and UV resin. That split shapes everything after that, from cure time to hardness to the kind of setup you need.
With epoxy, curing happens step by step. At 70–80°F (21–27°C), epoxy usually reaches gel in 30–60 minutes, handling hardness in 48–72 hours, and full hardness in 5–7 days. Most coating-grade formulas land in the 75–88 Shore D range.
UV resin moves much faster. A thin, clear layer - about 0.5–1.0 mm on a pen barrel - can cure in as little as 30–120 seconds under a 36–48 W lamp at 365–405 nm. That fast cure makes it a good fit for thin coats on barrels and caps, especially when you can rotate the piece fully between passes.
There is a catch, though. UV resin cures only where the light hits. So if you have a thicker pour, a shadowed recess, or an opaque layer, the outside may harden while the inside stays soft.
Room needs for epoxy and UV resin
Neither system needs a humidity cabinet. Both can cure in a normal work area, but they don't ask for the exact same conditions.
Epoxy does best in a steady room at 70–80°F (21–27°C) and 40–60% RH when you're working on pen bodies and caps. Once humidity climbs above about 60–65% RH, some amine-cured epoxies can develop blush or cloudiness. That can weaken adhesion and leave the surface looking dull.
UV resin is less affected by humidity, but it still does better in moderate RH and low-dust conditions. Clean benches, covered racks, and a dust-free curing area help keep glossy finishes clear. You also need enough space to rotate the pen and expose every side evenly under the lamp.
Main risks when curing resin
The most common epoxy problem is a tacky or soft surface. In most cases, that comes from the wrong mix ratio, a room that's too cool, or moving the piece before the gel stage finishes. Bubbles are another common headache. Stir too hard, and you trap air. Then those bubbles can rise and leave pits in the surface.
A few habits go a long way here:
- Measure carefully
- Mix slowly
- Leave the piece undisturbed during cure
UV resin has a different set of weak spots. Oxygen inhibition can leave a slightly tacky film on the outer surface even when the resin underneath is hard. The usual fixes are longer exposure, a stronger lamp, or curing under a UV-transparent film.
Thick or opaque layers can be tricky too. They may look cured on the outside while staying soft inside. That's why thin coats and full 360° rotation under the lamp are the safer approach.
Safety matters with both systems. Uncured epoxy and UV resin are skin irritants and can cause sensitization over time. Repeated skin contact can lead to allergic dermatitis, even if early exposure doesn't seem to cause any trouble. These risks stay in play until the finish is fully hardened.
Standard shop practice for both includes:
- Nitrile gloves
- Safety glasses
- Good ventilation
UV curing adds one more issue: avoid direct eye and skin exposure to the lamp, and keep the lamp shielded during use.
These differences stand out even more in the direct comparison below.
Direct comparison: cure time, hardness, room needs, and drying care
These three finishes live on totally different timelines.
Urushi moves slowly. Think days per layer and months to reach its hardest state. Epoxy sits in the middle, usually working on an hours-to-days schedule. UV resin is the sprinter of the group, often setting in seconds or minutes.
| Finish Type | Per-Layer Set Time | Handling Cure | Curing Conditions | Hardness |
|---|---|---|---|---|
| Urushi | ~12–48 hrs in a humid chamber at 68–77°F | 7–14 days for light use; months to maximum hardness | 70–85% RH, 68–77°F, low dust | Hardest after months |
| Epoxy Resin | ~8–24 hrs at 68–77°F | 3–7 days | 68–80°F, low to moderate humidity, low dust, still air | Shore D-level hard |
| UV Resin | Seconds–minutes under a 365–405 nm lamp | Within 24 hrs | UV lamp or curing box, moderate temp, low dust | Hard, but more brittle than epoxy |
The biggest practical difference is simple: urushi stays vulnerable much longer. It can go from soft to very hard over a span of weeks, so you have to leave it alone far longer than either resin system.
How drying care differs between urushi and resin pens
Cure speed is only part of the story. What matters just as much is how you treat the finish while it cures.
Urushi asks for the most patience. Don’t touch it until it is fully hard. Even a light brush of a fingertip can leave a print that never goes away. Sanding has to wait until the surface is evenly hard and no longer gives off the smell of uncured lacquer. In practice, that often means several days per layer, and at times more.
Epoxy needs a different kind of care. The first 12–24 hours are the danger zone. During that stretch, the part should stay level and still so the resin can self-level. Dust is the main nuisance here, which is why many pen makers use a simple plastic cover or DIY tent over the curing rack. Sand only when the surface is tack-free and firm enough that thumb pressure doesn’t leave a dent. If the sandpaper gums up, the epoxy is telling you it needs more time.
UV resin moves fast, but it still has an early stage that matters. The part needs to stay level until the first UV exposure gels the coat. After that, check the surface. If it still feels sticky, give it another pass under the lamp before you sand. A good rule of thumb: sand only when the finish turns to powder under abrasion and doesn’t dent under firm pressure.
Defect and safety risk comparison table
Because these finishes cure so differently, they also fail in different ways.
| Risk or Defect | Urushi | Epoxy Resin | UV Resin |
|---|---|---|---|
| Incomplete cure | Low humidity or temperature swings stall curing | Wrong mix ratio or cold room leaves the coat tacky | Shadowed or thick areas may need extra exposure |
| Dust contamination | High risk - slow cure means particles can embed over hours or days | Moderate risk during the first 12–24 hours; a tent or cover helps | Lower risk because cure is fast; an enclosed UV box helps further |
| Drips or runs | More likely with thick application or poor support | More likely if the piece isn't level during self-leveling | More likely if the part is moved before the first UV exposure gels the coat |
| Tackiness | Can persist if coats are too thick | Usually from wrong mix ratio or early disturbance | Surface tack can come from oxygen inhibition even when the bulk is hard |
| Bubbles | Less common; can show up if the lacquer is over-agitated | Common if resin is stirred too fast; bubbles rise and can leave pits | Less common in thin coats; more likely in thicker builds |
| Humidity sensitivity | Intrinsic - too dry stalls cure | High humidity can cause blush or cloudiness in some epoxy systems | Less sensitive to humidity |
| Skin exposure risk | Raw urushi can cause severe allergic dermatitis; the active compound is urushiol, the same allergen found in poison ivy | Uncured epoxy is a skin irritant and can sensitize with repeated exposure | Uncured UV resin is a skin irritant and can also cause sensitization with repeated exposure |
Raw urushi sits in a different risk class from resin. Urushiol is the same allergen found in poison ivy, and some people react badly even on first contact. Resin sensitization is serious too, but it usually builds after repeated exposure over time.
Conclusion: Which curing method is slower, stricter, or easier to manage
Taken together, the choice comes down to time, control, and setup. In plain terms, the split is simple: urushi is slowest, epoxy sits in the middle, and UV resin is fastest.
Urushi is the slowest and strictest for fountain pen bodies and caps. Each coat needs days in a controlled curing cabinet, and full hardness can take months. In some cases, it can take up to a year or more. That pace makes sense for dedicated artisans, not casual DIY work.
Epoxy lands in the middle. You can work with it in a normal home shop, with no humidity cabinet needed, and most formulas reach full cure in 5–7 days. It pays off when your process is steady and your mixing is exact, without calling for a specialized studio.
UV resin is the fastest option. With thin coats, it can harden the same day. But speed depends on lamp strength, wavelength, and layer thickness. If the pour is too thick, or if part of the surface sits in shadow, the top can harden while the material underneath stays soft. That’s where tacky patches and weak spots show up.
| Curing Method | Total Time to Full Hardness | Strictness | Easiest Aspect |
|---|---|---|---|
| Urushi | Months (up to a year or more) | Highest - humidity, temperature, dust, safety | Long-term durability once cured |
| Epoxy Resin | 3–7 days | Moderate - mixing ratio, temperature, dust | Flexible room setup |
| UV Resin | Hours (same day for thin coats) | Moderate - lamp exposure, layer thickness | Fastest turnaround |
Urushi rewards patience. Epoxy rewards consistency. UV resin rewards exact exposure. For pen finishes, the rule is pretty simple: the faster the cure, the more closely you need to manage the process.
FAQs
Which finish is best for beginners?
For beginners, plain urushi is usually the best starting point. Maki-e and raden look beautiful, but they cost more and need extra care to keep their delicate surface details safe.
Plain urushi gives you the main appeal of natural lacquer: a smooth, warm, durable finish that stands up well to water and daily wear.
How can I tell if a coat is fully cured?
It depends on the material.
For urushi, a fully cured coat is dry all the way through and hardened, not just dry on the surface. After repeated curing, sanding, and polishing, it develops a high-gloss finish. It should also leave behind a tough surface that can stand up to abrasion.
For resin, the coat should feel solid and stable, with no lingering tackiness once the exothermic polymerization process is complete.
What safety gear do I need?
The safety gear you need depends on the finish you’re using. If you plan to use finishes like cyanoacrylate (CA) or polyurethane, test them on a sample piece first. That gives you a quick read on how the finish reacts with your paints or other materials before you put it on the final piece.
Work in a well-ventilated area, go easy on the application, and protect both your skin and your work surface from the chemicals.