
Customizing your pen barrel is a simple way to make your writing tool more personal and functional. Whether you're adding decorative designs, engraving initials, or experimenting with materials like wood and resin, this guide covers everything you need to know. Here’s a quick summary:
- Why Customize? Improve comfort, reduce hand fatigue, and create a meaningful keepsake.
- Getting Started: Affordable options like Fountain Pen Revolution pens (starting at $18) are perfect for beginners.
- Tools for Beginners: Basic supplies include clear pens, decorative paper, adhesives, and sandpaper.
- Advanced Techniques: Explore pen turning, engraving, hydrographic printing, and resin-wood inlays for intricate designs.
- Finishing Touches: Use durable finishes like CA glue or polyurethane to protect your pen.
- Maintenance: Regular cleaning and occasional refinishing keep your pen looking great.
Whether you're a beginner or an experienced pen enthusiast, this guide helps you transform an ordinary pen into something special.
Tools and Materials for Pen Barrel Customization
Basic Supplies for Beginners
Getting started with pen barrel customization doesn’t require a big investment. For simple projects like wrapping pens with decorative paper, you’ll need a few essentials: clear pens with removable barrels, scissors, decorative paper, and adhesives. If the plastic barrel has a logo, a little hand sanitizer works well to remove it.
For beginner-friendly pen bases, Fountain Pen Revolution offers affordable options. These pens let you experiment without the fear of ruining something expensive.
If you’re ready to try basic pen turning with wood, the tools list expands slightly. You’ll need a lathe, a pen mandrel to hold the blank, bushings, and a drill bit that matches the size of your pen kit - commonly 7mm or 10mm. For adhesives, 5-minute epoxy is a beginner favorite since it gives you more time to adjust the fit compared to cyanoacrylate (CA) glue. Don’t forget safety gear like a face shield and a respirator or dust mask. To finish the project, you’ll need sandpaper in various grits (150 to 600 is a solid range) and a friction finish or wax to smooth and protect the barrel. As you gain confidence, more advanced tools can help you refine your skills and creativity.
Advanced Tools for Experienced Users
Once you’ve mastered the basics, you might want to explore "kitless" or bespoke pen making. This advanced approach involves crafting the barrel, cap, and section from raw materials, offering endless creative possibilities.
For precision work, advanced tools become essential. A mini or midi lathe is a must, along with a Beall collet chuck for accuracy and specialized tool rests like a 2-inch "shortie" rest for delicate shaping. For example, the WoodRiver Deluxe Self-Centering Vise costs $102.99, and the Easy Wood Tools Mini Carbide Turning Tool is priced at $104.99.
To customize pen barrels and caps, you’ll need multi-start tap and die sets, typically in sizes like 12mm or 14mm, along with taps for nib housings - 6.4mm or 7.9mm are common for Bock/Heritance feeds. For adding intricate designs, tools like heat presses, stamping kits, or laser printers can take your work to the next level. High-quality finishes require wet sanding up to 2,000 grit and polishing with compounds such as Novus #2 and #3.
As George Vondriska puts it:
Turning pens on your lathe is a blast... Spindle turning provides instant results.
Turning a Bespoke or Kitless Fountain Pen Barrel 2/5
Step-by-Step Customization Techniques
Advanced Pen Barrel Printing Techniques Comparison Chart
Simple Paper Wrapping for Beginners
Paper wrapping is a fun and straightforward way to give a clear pen barrel a personal touch. This method works especially well with demonstrator pens like the FPR Jaipur V2 Crystal Edition or the FPR Indus, where the transparent design lets your creativity shine. Start by taking apart your pen and removing the ink refill. If there’s a logo on the barrel, you can use a little hand sanitizer to remove it before starting.
Next, cut a strip of decorative paper slightly longer than the barrel. Wrap this strip tightly around a thin cylindrical object, like the ink refill or a slim straw, at an angle to form a neat coil. Once you’ve done that, straighten it out as you slide the paper into the clear barrel. Trim any excess so it fits perfectly, then rotate the paper so the seam is either hidden behind the clip or positioned in an inconspicuous spot. Reassemble your pen, and voilà - you’ve got a custom look! (Based on.)
Once you’ve mastered this method, you can experiment with more advanced techniques for a polished, long-lasting finish.
Advanced Printing Methods
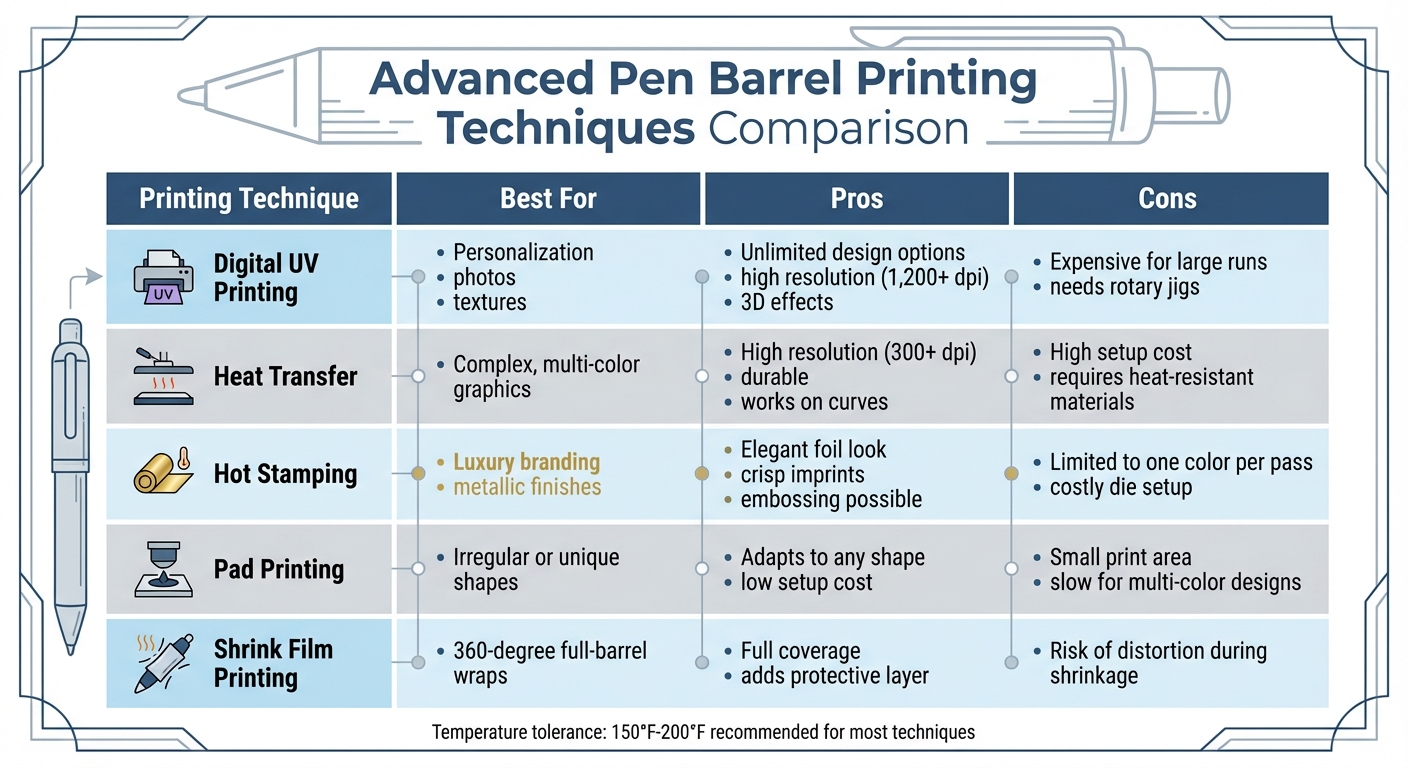
If you're ready to take pen customization to the next level, advanced printing techniques offer precision and durability that basic methods can't match. For instance, digital UV printing allows for full-color designs without needing plates or screens. It delivers ultra-high resolutions (over 1,200 dpi) and even creates 3D textured effects. To ensure perfect alignment on cylindrical pen barrels, a specialized rotary jig is highly recommended.
Another exciting option is hydrographic printing (or hydro dipping), which wraps intricate designs around 3D surfaces. The process involves floating a PVA film with your chosen pattern on water, activating it chemically, and then dipping the pen barrel to apply the design. As TWN Industries explains:
Hydro Dipping is a surface decorating technology that allows you to apply complex designs and artwork to 3-dimensional items.
Keep in mind, hydrographic printing requires some investment. Starter kits with equipment and training typically cost around $6,995, while certification alone is about $2,000. To maintain the quality of your PVA film, store it in a controlled environment - ideally at 68°F–77°F with 50%–60% humidity.
These advanced techniques open up even more creative possibilities for pen customization. Here’s a quick comparison of popular advanced printing methods:
| Printing Technique | Best For | Pros | Cons |
|---|---|---|---|
| Digital UV Printing | Personalization, photos, textures | Unlimited design options, high resolution, 3D effects | Expensive for large runs; needs rotary jigs |
| Heat Transfer | Complex, multi-color graphics | High resolution (300+ dpi), durable, works on curves | High setup cost; requires heat-resistant materials |
| Hot Stamping | Luxury branding, metallic finishes | Elegant foil look, crisp imprints, embossing possible | Limited to one color per pass; costly die setup |
| Pad Printing | Irregular or unique shapes | Adapts to any shape, low setup cost | Small print area; slow for multi-color designs |
| Shrink Film Printing | 360-degree full-barrel wraps | Full coverage, adds protective layer | Risk of distortion during shrinkage |
Premium Fountain Pen Revolution models like the Himalaya V2, Jaipur V2, and Ambassador are made from robust materials such as acrylics, ebonite, and metal. These materials work well with techniques like laser engraving or UV printing. Just make sure the pen can handle temperatures between 150°F and 200°F, and consider finishing with an automotive-grade clear coat for added protection against scratches and UV damage. (Based on and.)
sbb-itb-1dd4fe9
Decorative Inlays and Materials
Working with Beads, Resin, and Wood
Adding inlays to pen barrels turns an ordinary writing tool into a small masterpiece. Popular materials for inlays include synthetic mica powder, two-part epoxy resin, and exotic woods. Each offers its own distinct style and charm. Here's a closer look at how to work with these materials.
Mica powder inlays can create dazzling, metallic highlights on wooden barrels. To achieve this, start by carving narrow grooves into the wood using a carbide-tipped chisel. These grooves are then filled with a mix of mica powder and cyanoacrylate (CA) glue. The key is to apply the powder in thin layers, using a CA accelerator between coats to speed up curing and avoid clumping. The result? A tough, eye-catching finish with shimmering visual effects.
Resin-wood hybrids combine the natural beauty of wood with the versatility of resin. Begin by drying the wood to a moisture content of 5% - you can bake it at 220°F for about six hours to achieve this. Clean off any debris, then warm the two-part epoxy resin to improve its flow and reduce bubbles. Once poured, place the mold in a pressure pot set to around 60 psi. As woodturner and author Walter Hall notes:
Pressurizing the resin is essential for eliminating bubbles in the casting and forcing resin into all the cracks and crevices in the wood.
For added flair, you can embed decorative beads or small charms into the resin. Just ensure these additions don't interfere with the pen's functionality. Be mindful of time - Alumilite resin, for example, gives you only a 12-minute window to work after mixing.
Once you've added your decorative touches, it's time to focus on the structural details that make the pen functional. When customizing Fountain Pen Revolution barrels, ensure the internal diameters are correct for nib housing. Use a 6.4 mm tap for #5 nibs and a 7.9–8.4 mm tap for #6 nibs. To add strength, insert a brass tube into the wood or resin barrel for press-fit nib sections and end caps. Mill the brass tube until it's flush with the barrel, then sand it progressively from 100 to 1,000 grit. Finish with wet-sanding up to 12,000 grit to achieve a polished, glass-like shine.
Protecting and Maintaining Your Customized Pen
Sealing and Polishing Techniques
To keep your custom pen looking its best, applying a durable finish is key. The choice of finish affects how well your pen handles daily use and exposure to different conditions.
Cyanoacrylate (CA) glue is a standout option for durability. The process involves applying 7–10 thin layers of CA glue, curing each with an accelerator, and then wet-sanding with grits ranging from 1,500 to 12,000. Finally, buff the pen with a high-gloss compound for a polished, glass-like finish. As Craft Supplies USA explains:
A CA finish is made by building up many really thin layers of super glue on your pen, then polishing them to a high-gloss. It is the most durable finish I've found.
For the best results, use Micro-Mesh pads during wet-sanding and follow up with compounds like White Diamond or Hut Ultra Gloss. Before any touch-ups, clean the barrel with denatured alcohol to remove oils and residues.
Wipe-on polyurethane is another option, offering a simpler application process. Start with a 50/50 mix of polyurethane and mineral spirits for the first coat, then use a 75/25 mix for subsequent layers. However, avoid using polyurethane on oily woods like Cocobolo or Rosewood. Instead, opt for carnauba or Renaissance wax for these materials.
Padding lacquer can be applied either at high lathe speeds or by dipping the pen 2–3 times over 48 hours. Sanding lengthwise between grit changes helps eliminate circular scratches. When working with CA glue, use blue automotive shop towels instead of standard paper towels, which can leave fibers behind.
The choice of finish depends on your priorities - durability, ease of application, and compatibility with the material. Here's a quick comparison:
| Finish Type | Durability | Difficulty | Best For |
|---|---|---|---|
| CA Glue | Very High | High | Most woods, acrylics, and high-use pens |
| Polyurethane | High | Medium | General wood barrels; requires long drying times |
| Lacquer | Moderate | Medium | Small turnings; provides a "padding" effect |
| Wax (Carnauba) | Low | Easy | Oily woods where oils inhibit drying |
For a clean finish, sand the barrel ends with a 1,500-grit pad to remove any glue protrusions. Once the finish is in place, maintaining it ensures your pen stays in top condition.
Maintaining and Refreshing Custom Designs
Even the most durable finishes need care to retain their shine. Pens naturally collect oils and develop minor scratches over time, but most wear can be fixed with the right techniques.
For small surface scratches on CA or resin finishes, wet-sand the area with Micro-Surface pads as outlined earlier. Follow this with a plastic polish on a buffing wheel to bring back the high-gloss look. For wax-finished pens, a simple reapplication of Renaissance wax or TSW will refresh the protective layer and reduce fingerprints.
If a finish fails entirely - like polyurethane that won't cure on an oily wood - use mineral spirits to strip it off cleanly. Afterward, you can apply a more suitable finish, such as wax. For a complete design overhaul, CA finishes require sanding down to the base material, while polyurethane is easier to remove.
Bill Grumbine, a seasoned woodturner, shares a thoughtful perspective on how pens age:
If someone asks you if the finish is going to wear off, look them right in the eye and say 'Yes.' Then you tell them that like any fine piece of furniture, the pen will develop a patina that only comes with use.
This natural aging adds a unique charm, provided the pen has a durable topcoat. Without proper protection, wood can degrade to the point where the grain disappears entirely. As rherrell from the International Association of Penturners notes:
CA, lacquer and Enduro are three finishes that have been proven to work. ... Pens get alot of handling and a friction polish just won't cut it.
For deep scratches, start by leveling the surface with 220–400 grit sandpaper. Sand laterally until the surface is uniformly matte, then apply a fresh topcoat to restore the pen's original beauty.
Conclusion
Customizing your pen barrel adds a personal touch that makes your pen truly yours. As the Wood Fountain Pen Team puts it, "Customizing a fountain pen is like creating a piece of art. It allows you to express your personality and create something truly unique". Whether you’re wrapping it in decorative paper, engraving your initials, or experimenting with resin and wood inlays, the possibilities are endless - and approachable for anyone willing to give it a try.
This guide has covered a range of techniques, from simple beginner-friendly steps to more advanced methods. You don’t need high-end tools to start; basic supplies like sandpaper, adhesives, and sealants can help you achieve impressive results. As you gain confidence, you can explore more specialized tools to refine your craftsmanship and elevate the finish.
Earlier sections also highlighted how Fountain Pen Revolution makes customization affordable and accessible. Their pens, available in materials like ebonite, acrylic, plastic, and metal, offer a perfect starting point for various customization techniques. Their motto sums it up well: "Rediscover the joy of writing without breaking the bank".
A custom pen isn’t just a writing tool - it’s a blend of art and function. With proper care, such as regular cleaning, safe storage, and occasional refinishing, your pen can become a treasured keepsake, lasting for generations. The growing interest in personalized writing tools is reflected in the fountain pen market, which is projected to grow at a compound annual growth rate (CAGR) of 2.51% between 2023 and 2030.
Whether you’re crafting a pen for yourself or as a meaningful gift, the process ties you to a rich tradition of craftsmanship while allowing you to showcase your personal style. It’s a creative journey that turns a simple writing instrument into something truly special.
FAQs
What materials are best for customizing pen barrels?
The materials you choose for customizing pen barrels can make a big difference in terms of weight, durability, and overall appearance. Hardwoods like ebony and mahogany are often favored for their natural elegance and strength, making them a timeless option. If you're after a sleek, polished look, metals such as brass or other alloys are a fantastic choice. They not only look premium but also offer excellent durability, with the added bonus of customizable finishes.
For those seeking lightweight and colorful options, resins and plastics provide a lot of flexibility. They come in a huge range of colors and textures, making it easy to create unique designs. If you're into handcrafted styles, epoxy resin molds let you experiment with vibrant colors and intricate patterns. You can even mix different types of wood to create eye-catching contrasts. Your final choice will depend on what suits your style, the weight you prefer, and the customization methods you enjoy.
How can I care for the finish on my customized pen?
To keep your customized pen looking its best, start by gently wiping it with a soft, dry cloth to remove fingerprints and dust. Steer clear of abrasive materials or harsh chemicals, as these can harm the surface. If the finish requires more attention, you can lightly sand and buff it to restore its shine - but only attempt this if you're confident in handling such techniques.
For storage, use a soft-lined case to shield your pen from scratches. Keep it away from extreme temperatures, direct sunlight, and high humidity, as these conditions can wear down the finish over time. With a little care and proper storage, your pen's unique look can remain intact for many years.
What are some advanced techniques for customizing pen barrels?
Advanced pen barrel customization steps beyond the basics, opening the door to creating pens that feel entirely your own. A popular approach is modifying the pen’s structure, such as crafting custom or kitless pens. This involves removing standard components like centerbands, allowing you to design shapes and styles that fit your preferences. For those who want a more personal touch, adjusting the grip area can improve both comfort and aesthetics.
If you're more technically inclined, you can dive into customizing internal components. For example, you could craft your own threads, design unique nib holders, or even develop entirely new mechanisms. These advanced techniques demand a good grasp of pen mechanics and craftsmanship, but they offer endless possibilities for innovation.
On the decorative side, techniques like solvent-based screen printing let you add intricate designs or branding directly to the pen's surface. This method creates a polished look, giving your pen a professional, finished appearance.
Combining creativity with precision, these methods are perfect for enthusiasts ready to deepen their skills and create one-of-a-kind writing instruments.