
Keeping your fountain pen clean doesn’t have to cost a fortune. Homemade pen flush solutions can effectively remove dried ink and residue for just a few dollars. Here’s a quick breakdown of three easy-to-make formulas:
- Dish Soap Flush: Mix 10 drops of unscented dish soap per liter of distilled water. Ideal for light cleaning and safe for most modern pens. Cost: Less than $1 per gallon.
- Ammonia-Based Flush: Combine 1 part 5% household ammonia with 9 parts distilled water. Add a few drops of dish soap for extra cleaning power. Effective for stubborn ink but avoid using it on vintage or aluminum pens.
- All-Purpose Cleaner Flush: Mix 2 parts Formula 409 with 1 part Green Works Free and Clear dish soap. Strongest option for tough clogs but only suitable for modern pens.
Always rinse thoroughly with distilled water after cleaning to protect your pen’s components. These DIY solutions are affordable alternatives to commercial cleaners, which can cost $11–$18 for an 8oz bottle.
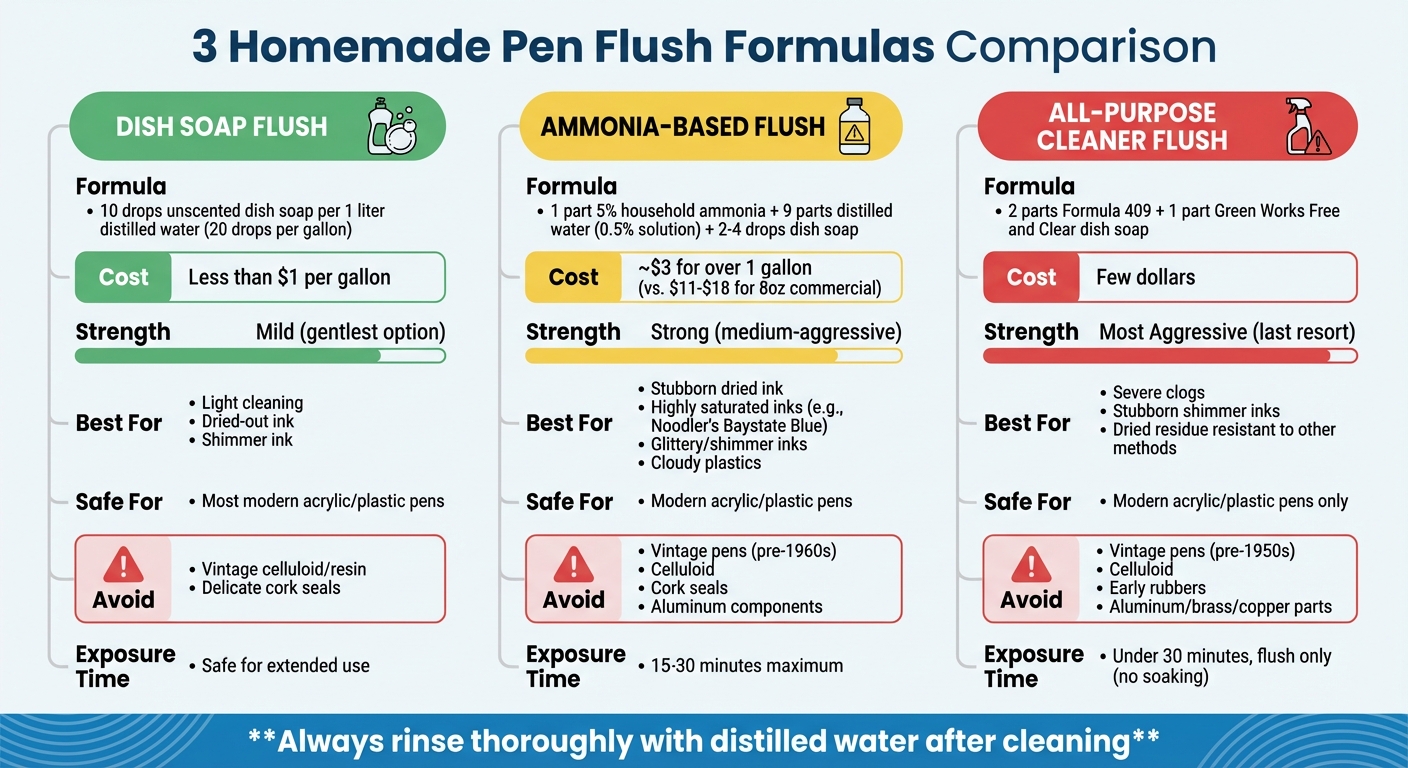
Homemade Fountain Pen Flush Formulas Comparison Chart
1. Dish Soap Pen Flush
Simple Preparation Using Household Items
Creating this pen flush is as straightforward as it gets. All you need are two common ingredients: distilled water and plain dish soap. To prepare, mix 10 drops of unscented dish soap per liter of distilled water (or 20 drops per gallon). The cost? Less than $1 per gallon.
Stick to unscented and basic dish soaps - avoid anything with added lotions, moisturizers, or citrus scents. These extras can leave behind oily residues or even harm your pen’s components. Once mixed, give it a gentle shake, and you’re ready to tackle ink buildup.
How It Cleans Ink Residue
This solution works by breaking down ink pigments. The dish soap reduces water's surface tension, helping to lift ink particles and dyes from the nib and feed. It’s particularly effective on dried-out or shimmering inks. Dromgoole's explains:
If you have a fountain pen with dried-out ink or shimmer ink, add a drop of dish soap to a glass of water... Usually, this is enough to clean stubborn inks.
While it’s not as strong as ammonia-based cleaners, this method is gentle and reliable. However, for severely clogged vintage pens, you might need to repeat the process a few times. Always follow up with a thorough rinse using clean distilled water to remove any lingering soap that could disrupt ink flow.
Safe for Most Pen Materials
Dish soap is one of the mildest cleaning agents available, making it safe for most modern pens crafted from acrylic or plastic. That said, vintage pens made of celluloid or resin require extra care. Even mild detergents can potentially harm these materials. If your pen features delicate components like cork seals, stick to distilled water unless absolutely necessary.
This method strikes a balance between gentleness and effectiveness, making it a go-to option for cleaning most modern fountain pens.
2. Ammonia-Based Pen Flush
Effectiveness in Cleaning Ink Residue
When dish soap doesn't cut it, ammonia can be a game-changer for removing stubborn, dried ink. It's particularly effective on highly saturated inks like Noodler's Baystate Blue and excels at clearing glittery or shimmering inks that leave behind tricky residue. Plus, ammonia has the added benefit of restoring plastics that have become cloudy over time.
As Unsharpen explains:
The ammonia will cut through dried ink better than other cleaning liquids and it will help clear up old plastics that have gone cloudy as well as stubborn old feeds.
Curious about how to make this solution? Let’s dive into the details.
Ease of Preparation with Household Ingredients
This flush is budget-friendly and easy to make at home. Compared to commercial cleaners that cost $11–$18 for an 8oz bottle, you can whip up your own for just a few dollars. Here's how: combine 1 part of 5% household ammonia with 9 parts distilled water to create a 0.5% ammonia solution. For an extra boost, add 2 to 4 drops of plain dish soap to help the mixture flow through your pen's feed.
One important note: check the concentration of your ammonia. Most household varieties are 5%, but if you’re using 10% ammonia, you’ll need to use half as much to maintain the correct 0.5% concentration. As One Pen Show highlights:
You want to make sure that your fountain pen flush contains 0.5% ammonia, no more.
Once your solution is ready, it’s crucial to follow proper safety precautions, especially when dealing with delicate pen materials.
Safety for Different Pen Materials
This solution is more robust than the dish soap flush, making it ideal for tough ink deposits. However, it’s not suitable for every pen. Modern acrylic and plastic pens can handle ammonia just fine, but vintage pens - especially those made before the 1960s - are at risk. Materials like celluloid, cork seals, and certain resins can be permanently damaged by ammonia. Additionally, ammonia should never be used on pens with aluminum components, as it can cause harmful chemical reactions.
To minimize risks, limit the exposure time to 15–30 minutes and always rinse thoroughly with distilled water afterward. For extra caution, start with a plain water rinse or even an overnight soak before using the ammonia flush. And if you’re unsure about your pen’s materials, the gentler dish soap method is always a safer bet.
3. All-Purpose Cleaner Pen Flush
Effectiveness in Cleaning Ink Residue
This flush is your go-to for tackling stubborn clogs, shimmering inks, and dried residue that water or ammonia can't handle. It’s a mix of 2 parts Formula 409 All-Purpose Cleaner and 1 part Clorox Green Works Free and Clear dishwashing liquid. Designed to mimic commercial cleaning solutions, this DIY formula is the most aggressive option for breaking down ink that resists other cleaning methods. The surfactants in these cleaners work hard to dissolve even the toughest residues.
Ease of Preparation with Household Ingredients
When ammonia-based flushes don’t cut it, this alternative is worth a try. Preparing it is simple: combine the two ingredients in the specified ratio and store the mixture in a labeled squeeze bottle for easy use. It’s budget-friendly, costing just a few dollars. However, it’s important to use this solution carefully. Never soak your pen in it - it’s strictly for flushing through the feed. Limit exposure to under 30 minutes, and always rinse thoroughly with distilled water afterward to remove any lingering chemicals.
Safety for Different Pen Materials
This powerful formula isn’t suitable for all pens. Avoid using it on vintage pens made before the 1950s, as materials like celluloid, early rubbers, and fragile seals can become brittle or suffer permanent damage. It’s also not safe for pens with aluminum, brass, or copper parts, as the chemicals can corrode these metals.
For modern pens made of acrylic or plastic, this flush is generally safe when used properly. That said, it should always be a last resort. Start with water, then progress to dish soap, and try ammonia for tougher stains. Save this cleaner for the most stubborn cases. Follow these steps carefully to ensure your pen stays in good condition.
sbb-itb-1dd4fe9
DIY Make Your Own Fountain Pen Wash / Flush
How to Clean Your Fountain Pen
Ready to bring your fountain pen back to life? With your homemade cleaning solution in hand, here’s a straightforward guide to get your pen performing like new.
Start by removing the ink cartridge or converter to avoid any messy spills. A 2-ounce bulb syringe (about $4.25) can make this process faster and more effective. Attach the syringe tip to the back of the grip section and gently squeeze water through the nib and feed until it runs clear. Pairing this with your cleaning solution helps tackle stubborn ink residue.
For the final rinse, always use distilled water. This prevents mineral deposits from tap water, which could clog the feed. Rinse thoroughly, repeating until the water is completely clear. This step ensures no leftover cleaning solution remains before refilling with ink.
If your pen needs a deeper clean, you may need to disassemble it. Determine whether the nib is friction-fit (pulls straight out) or screw-in (unscrews as one piece). A rubber jar opener pad (around $2.25) can provide extra grip without risking damage. Stick to room-temperature or cold water - hot water could warp delicate plastic parts.
Once cleaned, place the pen nib-down in a glass lined with a folded paper towel. This setup uses capillary action to draw out any lingering moisture. For a final check, lightly touch the nib to a clean paper towel - if any ink appears, rinse again. Don’t forget to rinse the cap too, as ink buildup inside can lead to unexpected color changes.
If the pen is severely clogged, you might consider an ultrasonic cleaner (priced around $40). While optional, it can be a helpful tool for tough cases. By following these steps and using your homemade flush, your fountain pen will stay in top condition.
Conclusion
Making your own pen flush gives you control over both quality and cost. For instance, a gallon of distilled water costs about $1.08, and a half-gallon of ammonia runs around $1.54. With these, you can whip up over a gallon of pen flush for less than $3 - much cheaper than the $11–$18 price tag for an 8oz commercial bottle. As Ana from The Well-Appointed Desk wisely points out:
That did not cost anywhere near the $10+ that most people charge for pen flush. Now, you can go spend that $10 on paper or ink or something else way more fun.
Homemade formulas offer the same cleaning effectiveness as store-bought versions, but with added flexibility. You can tweak the strength or skip ammonia altogether for pens that need gentler care. Plus, the low cost means you can mix up a fresh batch every time without a second thought.
This affordability and adaptability make regular pen maintenance easier to stick to. Cleaning your pens every four to eight weeks helps prevent dried ink, hard starts, and skipping issues. Think of it as a reset for your pen, clearing out clogs and restoring that smooth ink flow it had when new.
Pick the formula that works best for your needs: gentle dish soap for routine cleaning, ammonia-based flush for tough clogs, or a quick all-purpose solution for convenience. Just remember to rinse thoroughly with clean water after using any flush, and steer clear of ammonia for vintage pens or those with aluminum, brass, or copper parts.
Both your pens and your wallet will thank you.
FAQs
Is it safe to use homemade pen flush on vintage fountain pens?
Homemade pen flush solutions, especially those containing diluted ammonia, can be risky for vintage fountain pens if not handled correctly. They might lead to problems like stress corrosion on gold nibs or harm more fragile materials.
To reduce these risks, use such solutions sparingly and strictly follow instructions. Avoid soaking vintage pens for long periods. If you're uncertain, opt for gentler cleaning methods to help maintain your pen's condition.
What can I do if my homemade pen flush doesn’t fully clean the ink residue?
If your homemade pen flush isn’t fully clearing out ink residue, start by giving the pen a thorough rinse with clean water. For tougher stains, try soaking the nib in a mild mix of white vinegar and water. Alternatively, you can make a stronger cleaning solution by combining a small amount of ammonia with distilled water. Just be sure the solution is compatible with your pen’s materials to prevent any damage.
If stubborn residue remains, you may need to repeat the cleaning process or carefully disassemble the pen for a deeper clean. Handle your fountain pen gently and with patience to keep it in great condition.
How often should I clean my fountain pen with homemade pen flush solutions?
To keep your fountain pen working smoothly, it’s a good idea to clean it with a homemade pen flush solution when needed. This might be when you're switching ink colors, if the ink has dried out, or simply as part of routine maintenance. For most people, a cleaning every few weeks or after long periods of non-use helps maintain the pen’s performance.
Watch for signs like skipping, uneven ink flow, or residue on the nib - these are clear indicators that it’s time for a cleaning session.