

If ink shows up at a pen joint, I check the threads first. If the pen stays clean but hard-starts after sitting capped, I check the seal and maintenance needs.
That’s the short answer. In most cases, a leak at the barrel-section or nib unit-section joint points to a fit problem with worn, loose, or cracked threads. But if the pen writes dry after 1 to 2 days capped, or I find ink inside the cap with clean threads, the issue is more likely the inner cap or an O-ring.
Here’s the fast way I sort it out:
- Ink at the seam = thread fit problem is more likely
- Dry nib after storage = cap seal problem is more likely
- Clean cap + stained joint = check threads
- Ink inside cap + clean joint = check seal parts
- Water test for 30 to 60 minutes can help show a leak path
- A 10× loupe and angled light can help spot small cracks
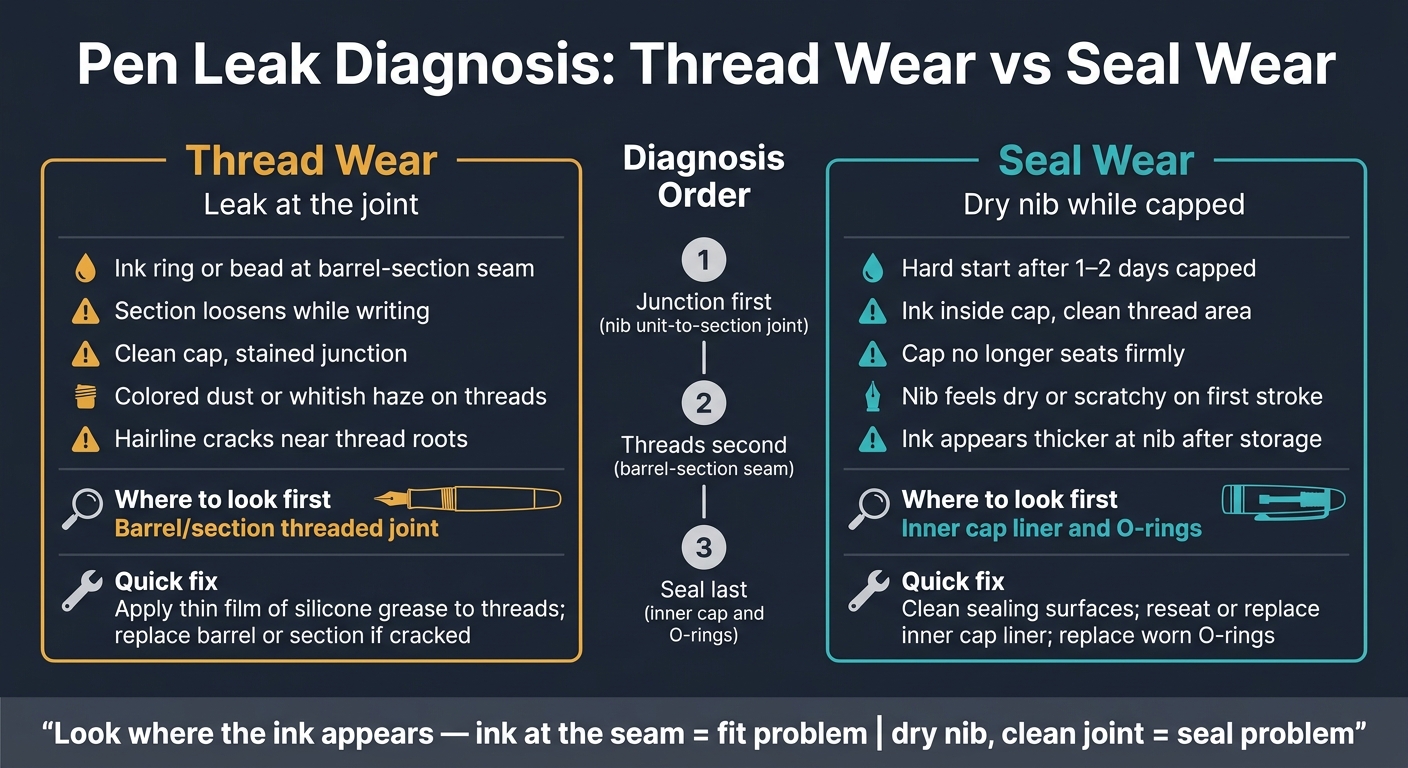
Pen Leak Diagnosis: Thread Wear vs Seal Wear at a Glance
Too Dry or Too Wet? The 3-Test Ink Flow Check Every Fountain Pen Owner Should Know
sbb-itb-1dd4fe9
Quick Comparison
| What I see | Most likely cause | Where I look first | Common next step |
|---|---|---|---|
| Ink ring at barrel-section seam | Thread wear or crack | Barrel/section threads | Clean, inspect, add a thin film of silicone grease |
| Section loosens while writing | Thread fit problem | Threaded joint | Check wear, play, or cracking |
| Hard starts after sitting capped | Seal wear | Inner cap, O-ring | Clean cap seal area, inspect liner and ring |
| Ink inside the cap | Seal issue or poor converter fit | Inner cap and converter fit | Clean, reseat, replace worn parts |
| Joint stays dry in water test | Seal issue is more likely | Cap side | Inspect inner cap and O-rings |
My rule of thumb is simple: junction first, threads second, seal last. That order cuts down guesswork and helps me avoid fixing the wrong part.
Thread Wear: Signs, Symptoms, and Where to Look First
When a leak starts at the joint, the threads usually tell the story.
On resin, acrylic, or plastic pens, thread wear often begins small. You may notice rounded thread peaks, a faint whitish haze in the thread roots, or colored dust from abrasion. That dust is a warning sign: material is getting scraped away each time you screw the pen together. As wear gets worse, you may see hairline cracks near the thread roots or at the shoulder where the threads meet the smooth barrel.
If you use the pen every day, it helps to take a close-up photo of the threads when the pen is new and compare it later. Factory marks tend to stay even. Wear does not. It shows up in patches, gets worse over time, and usually appears in the same stressed spots.
Once you know what worn threads look like, check whether the leak fits that pattern.
Leak Patterns That Point to Worn or Cracked Threads
Ink at the barrel-section junction - especially a thin ring or small bead - is a strong sign that the threads are the problem. If the section slowly loosens while you write, that also points to thread fit, not an issue inside the cap.
A clean cap paired with a stained junction is another clue. In plain English, the leak is likely happening right at the joint.
How to Inspect Threads for Leaks
The best way to check for a thread leak is with a controlled water test. Flush the pen with fountain pen cleaning solution, fill it with water, dry the outside, reassemble it snugly, and leave it lying flat on a dry paper towel for 30 to 60 minutes.
Then look at the paper towel under the barrel-section junction. If you see a damp spot or ring ONLY in that area, thread leakage is the likely cause. Next, inspect the threads under bright, angled light. An LED flashlight aimed at a shallow angle works well. A 10× loupe can help you spot hairline cracks at the thread roots.
If moisture shows up at the junction after the test, that confirms the leak path. At that point, the threads deserve attention before you start checking other parts.
Short-Term Fixes and When to Replace Parts
For a small leak with no visible crack, apply a thin film of silicone grease to the threads. You only need enough to leave a slight sheen. More than that can work its way into the feed.
If the section flexes, or if a crack extends into the ink chamber, replace the barrel or section.
If the threads look fine, the next area to inspect is the cap seal.
Seal Wear: Inner Cap, O-Rings, and Dry-Out Signs
If the thread junction stayed dry, check the cap side next. When the threads are dry but the pen still dries out while capped, the issue is usually seal wear, not thread wear. The inner cap liner forms a close-fit chamber around the nib tip and holds humid air in place, which slows evaporation between uses. O-rings at the section-to-barrel joint or converter connection add elastic pressure that helps close small gaps as parts age. When those seals stop doing their job, the nib can dry out even when the threads look normal.
Symptoms That Point to Seal Wear Rather Than Thread Wear
A little ink inside the cap, paired with a clean thread area, usually points to seal wear.
Another strong clue is a hard start after the pen sits for a day or two. Once the pen gets going, it writes fine, but that first stroke feels dry or scratchy. If the ink looks thicker at the nib after storage, that also suggests evaporation through a weak seal. A cap that no longer seats firmly can mean the inner cap or an O-ring has worn down. Put simply: a dry nib with a clean joint points to seal wear, while ink at the joint points to the threads.
That’s why the cap and O-rings are the first places to inspect.
Where to Inspect Inside the Cap and Section
Hold the cap under bright light and look inside the inner cap liner. Check for:
- Hairline cracks near the rim
- Looseness
- Dried ink crust around the opening
- Visible misalignment, where the liner sits off-center
Lightly touch the liner with a cotton swab. It should stay fixed in place. A magnifier can help you spot fine cracks or warping that are easy to miss at first glance.
On the section side, inspect the O-ring at the section-to-barrel joint. Look for flattening or a shiny, compressed surface. If the pen uses a cartridge or converter, make sure it seats snugly and doesn’t wobble. A poor fit there can push ink into the cap and make it look like the cap is leaking when the issue is somewhere else.
How to Fix Hard Starts and Cap Leaks Caused by Seal Wear
Start with the simplest step: clean the sealing surfaces. Use a water-dampened cotton swab to remove dried ink from the inner cap opening and the cap lip. Even a small amount of dried buildup can keep the cap from seating all the way, and a basic cleaning may fix a mild hard-start problem on its own.
If the inner cap liner is loose but not damaged, carefully press it back into place if the design allows it. If the liner is cracked or warped, replacement is the safer fix. Shimming or padding might seem like a shortcut, but it can distort the cap and throw off nib alignment.
For worn O-rings, match the original diameter and thickness as closely as you can. Silicone or nitrile (NBR) are good choices when they’re compatible with fountain pen ink. Size matters here: an O-ring that’s too thick can put extra stress on the cap or section. A thin coat of silicone grease on a new O-ring helps it seat smoothly and cuts wear. Use only a small amount, and keep it away from the feed fins and ink channel.
Thread Wear vs Seal Wear: How to Diagnose in the Right Order
Knowing where to look first saves time and keeps you from fixing the wrong thing. Once you know the symptom, follow this sequence to track down the leak: start at the nib unit-to-section joint, then check the barrel–section threads, and only then inspect the cap.
Check the Junction First, Then the Cap
Start with the nib unit-to-section joint. Clean off all visible ink, put the pen back together, and use it normally. After a few minutes, look for fresh ink at the nib unit or section joint. If moisture shows up there again, the issue is with fit: loose threads, a cracked section, or a loose nib unit.
If that area stays dry, check the barrel–section threads next. Clean the threads well, dry them, and reassemble the pen. Then use the pen as usual and see whether fresh ink appears at the seam or along the threads.
If the barrel joint also stays dry, move out to the cap seal. Cap the pen for several hours, then uncap it and inspect the nib and the inside of the cap, or troubleshoot why the pen is not writing properly. Ink pooled in the cap, or a dry nib with clean threads, points to seal wear.
When Ink at the Threads Points to a Fit Problem, Not a Seal Problem
Ink near the threads does not always mean the inner cap has failed. If the barrel keeps loosening on its own while you carry the pen, and ink appears at the seam, that points to a fit problem. The joint is opening during movement, so cap seal work won't solve it.
If the section has side-to-side or up-and-down play when the pen is assembled, the threads are no longer meshing cleanly. A thin ink ring at the seam, along with visible movement in the joint, points to a fit problem rather than the inner cap. In that case, fix the fit itself by cleaning the threads, tightening the pen the right way, or replacing the worn part.
Conclusion: How to Narrow Down a Pen Leak Quickly
Wear on threads tends to cause leaks at the joints. Wear on the seal usually shows up as a cap that lets the pen dry out. So the fastest way to sort it out is simple: look at where the ink appears.
A good way to check is this: junction first, threads second, seal last.
If ink shows up at a seam, the fit is likely the issue. If the pen stays clean but dries out while capped, the seal is the more likely cause.
FAQs
How can I tell if my pen leak is coming from the threads or the cap seal?
Check where the ink shows up. If you see ink inside the cap or on the grip, but the outside of the barrel stays clean, the problem usually comes from a seal or converter issue, not the threads.
If ink keeps showing up in the same spot on the barrel or threads after you clean it, look for fit issues or tiny cracks. If the body stays dry but ink gathers at a connection point, check the O-ring or converter fit first.
Can worn threads cause hard starts, or is that usually a seal problem?
Yes. Worn threads can cause hard starts if they let air into the system and throw off the pressure needed for steady ink flow. When that happens, you may also see skipping or little ink blobs.
Hard starts can also come from dried ink. If flushing doesn’t solve the problem, check the seals. And if a threaded connection seems to be pulling in air, a tiny amount of silicone grease may help tighten the seal.
When should I stop troubleshooting and replace the damaged part?
Stop troubleshooting and replace the part if reseating or lubrication doesn’t stop the leak, or if you find structural damage.
Replace parts right away if you see hairline cracks in the section, barrel, or clear plastic body. If a converter still wobbles, leaks, or fails a suction test after cleaning and reseating, replace it. If a leak comes back after a seal replacement, the pen body is likely compromised.