
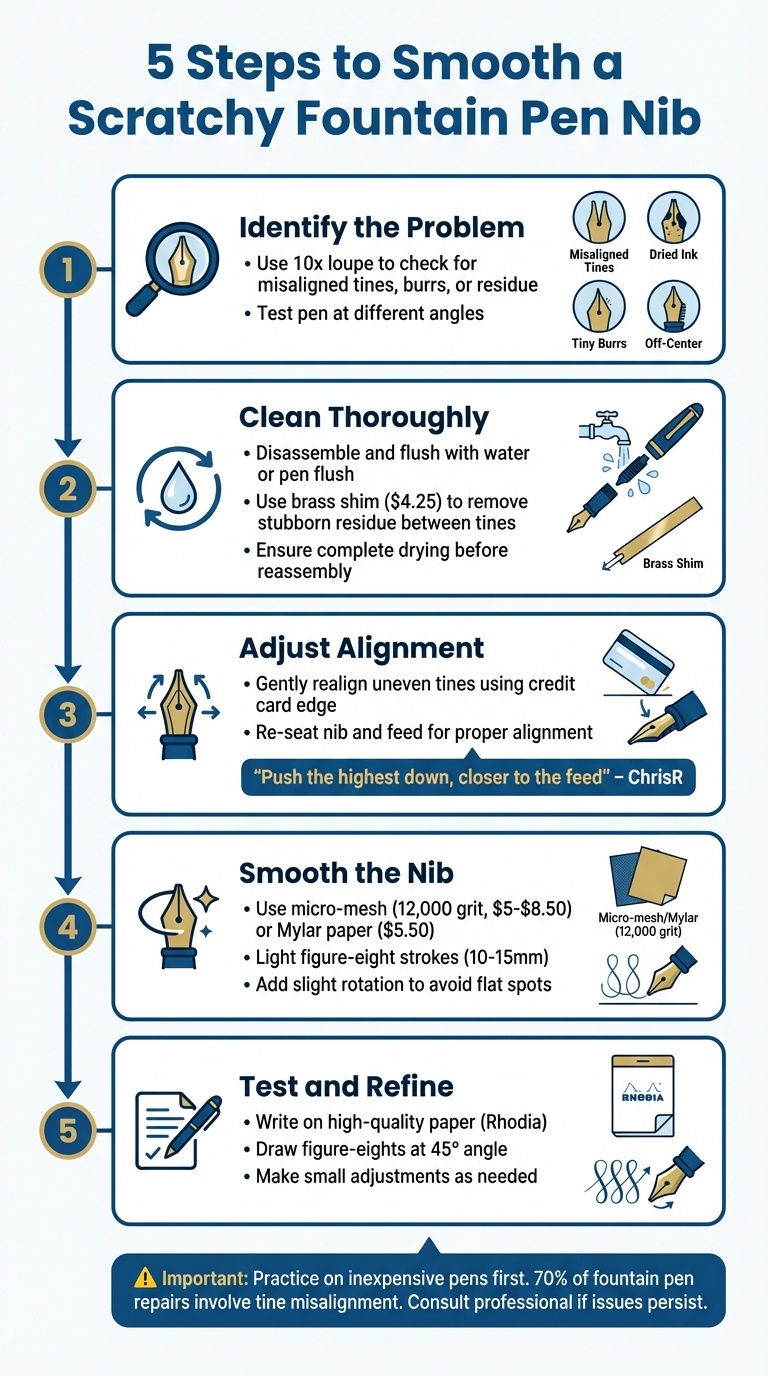
A scratchy fountain pen nib can ruin the joy of writing. The good news? You can fix it yourself with simple tools and techniques. The main culprits are usually misaligned tines, dried ink, or tiny imperfections on the nib. Here's a quick summary of the 5 steps to fix it:
- Identify the Problem: Use a 10x loupe to check for misaligned tines, burrs, or residue. Test your pen at different angles to troubleshoot the issue.
- Clean Thoroughly: Disassemble and flush the pen with water or pen flush. Use a brass shim to remove stubborn residue between the tines.
- Adjust Alignment: Gently realign uneven tines using a credit card edge or by reseating the nib and feed.
- Smooth the Nib: Use micro-mesh (12,000 grit) or Mylar paper to polish the nib with light figure-eight strokes.
- Test and Refine: Write on high-quality paper to check results. Make small adjustments as needed.
Important: Take it slow and practice on inexpensive pens first. If the issue persists or the nib is damaged, consult a professional.
These steps can restore your pen's smooth glide, making writing enjoyable again.
5-Step Process to Fix a Scratchy Fountain Pen Nib
How to smooth a scratchy fountain pen nib
sbb-itb-1dd4fe9
Step 1: Identify the Problem
Before making any adjustments to your fountain pen, it’s crucial to figure out what’s causing the scratchiness. Jumping straight into fixes like sanding or bending the tines without understanding the issue can lead to even more damage.
Examine the Nib with a Loupe
Start by inspecting the nib closely using a 10x magnification loupe (around $29.50) and bright lighting. Look for signs of misaligned tines, burrs, pits, or an off-center nib slit. Check the nib from multiple angles, especially where the tipping material meets the paper.
"When properly viewing a nib through a loupe... you will look across the writing surface to see the alignment of the nib's tines".
To check for misaligned tines, look head-on at the nib. If one tine sits higher than the other, the lower tine will drag and catch on the paper. Also, confirm that the nib slit is centered over the feed - an off-center slit can push one tine higher, causing uneven contact with the paper.
Once you've carefully examined the nib, move on to testing how the pen writes at different angles.
Test Different Writing Angles
After your close-up inspection, test how the pen performs on paper. Use high-quality paper like Rhodia and draw figure-eights or short strokes in various directions. If the scratchiness happens in only one direction, misalignment is likely the issue.
Also, watch how you’re holding the pen. Even a perfectly smooth nib can feel scratchy if you rotate the pen too far to one side while writing. Hold the pen at about a 45° angle with the nib tip pointing upward. If the scratchiness goes away when you adjust your grip, the issue isn’t with the nib - it’s with your writing angle.
Common Causes of Scratchiness
The most common reasons for scratchiness include:
- Misaligned tines: One tine sits higher than the other, causing uneven contact.
- Dried ink buildup: Residue in the feed or between the tines can create roughness.
- Tiny burrs: Small imperfections on the tipping material can drag on paper.
- Off-center nib positioning: The feed pushes the tines out of alignment.
These observations will help you pinpoint whether the scratchiness comes from alignment issues, residue, or wear, giving you a clear direction for your next steps.
Step 2: Clean the Pen Thoroughly
Once you've identified potential nib issues, the next step is cleaning. Dried ink or a clogged feed can often mimic a scratchy nib, and skipping this step could lead to further complications.
Cleaning clears out old ink and debris, helping you determine if the scratchiness stems from misalignment or just buildup between the tines. In many cases, a thorough cleaning alone can fix common fountain pen problems.
Take Apart and Rinse the Pen
Begin by carefully disassembling your pen. Hold the nib gently between your thumb and index finger, then pull it away from the pen body to access the nib unit and feed.
Use a bulb syringe (around $4.25) filled with cool water to flush the nib and feed thoroughly. The syringe's pressure can dislodge dried ink and particles that simple rinsing might miss. If the buildup persists, try a pen flush solution (approximately $12.00 for an 8oz bottle), which is more effective at breaking down stubborn ink residue than water alone.
Remove Stubborn Ink Residue
For ink residue that remains after rinsing, use a thin brass shim (about 0.001" thick, costing around $4.25 for a set of 2). Carefully slide the shim between the tines to loosen debris, but avoid applying too much pressure to prevent damaging the nib. To clean the nib's surface, wipe it gently with a soft, lint-free cloth dampened with water.
Reassemble and Test the Pen
Once everything is completely dry, reassemble the pen. Ensure the nib slit is properly aligned with the center of the feed.
Test the pen by drawing figure-eights and making short strokes in various directions. If the scratchiness is gone, the issue was likely due to dried ink. If the pen still feels scratchy, proceed to the next step to adjust the nib alignment.
Step 3: Adjust Tine and Nib Alignment
If cleaning didn't completely resolve the issue, misalignment might be the next thing to tackle. With your pen now clean, it's time to focus on aligning the tines and nib to bring back that smooth writing feel.
Check and Realign the Tines
Start by examining the nib under magnification to spot any unevenness. Look closely at the front of the nib and the "angle of attack" - the exact point where the tipping material meets the paper. Check for sharp edges on the inner surfaces of the tines that could be dragging on the paper.
If one tine is higher, gently lower it toward the feed. As ChrisR points out:
"We nearly always push the highest down, closer to the feed, because we want to keep the nib in close contact with it and pushing a tine up risks reducing that contact."
To do this, brace the feed with your finger and use the edge of an old credit card to nudge the higher tine downward. This method helps avoid scratching the nib while making precise adjustments.
Align the Nib and Feed
Sometimes, the nib and feed might not be perfectly centered in the pen's section. If the nib slit doesn’t line up with the feed’s center path, it can cause one tine to sit higher than the other. To fix this, carefully re-seat the nib and feed so the slit aligns properly with the feed's center. For slight misalignments, you can gently push the nib into place with your fingers.
Test After Every Adjustment
Take it slow and test your pen on smooth paper after each tweak. Use figure-eights or short strokes to see if the writing improves. Brian K. from The Goulet Pen Company emphasizes:
"Go slow, be gentle, and check often!"
If you notice any unexpected changes in ink flow or line width during testing, stop right away - this could mean you've over-adjusted. Continue making small, careful changes until the nib writes evenly and smoothly on the paper.
Step 4: Smooth the Nib Surface
Once the tines are properly aligned, it’s time to address any remaining roughness. This step is all about refining the nib's surface, not reshaping it, so patience and a delicate hand are key.
Choose the Right Smoothing Tools
For this process, you'll need the right materials to achieve a smooth writing experience:
-
Micro-mesh: This ultra-fine abrasive (usually 12,000 grit) is perfect for tackling scratchy fountain pen nibs. It’s affordable, costing between $5.00 and $8.50 per sheet. Brian Goulet, Founder of The Goulet Pen Company, emphasizes its utility:
"Micro-Mesh is an incredibly fine abrasive paper that will help to smooth out the tip of a scratchy nib. I view it as a repair tool."
- Mylar paper: Even finer than micro-mesh, Mylar paper is ideal for final polishing. A set of two sheets costs about $5.50 and is best used when the nib already writes smoothly but needs a polished finish.
- Brass shims: These thin shims (0.001" to 0.002") cost between $2.93 and $4.25 and are not for smoothing. Instead, they’re used to floss between the tines, clearing debris and ensuring proper tine alignment.
Once you’ve gathered the right materials, you’re ready to start polishing.
Polishing the Nib
To smooth the nib, lightly draw figure-eights (about 10–15 mm in size) on the micro-mesh. Apply minimal pressure - let the abrasive do the work. If the nib scratches in a specific direction, focus on smoothing along that angle.
Add a slight rotation to your strokes. As Fountain Pen Revolution advises:
"It is a good idea to rotate the pen just a bit while making the figure eight pattern to avoid grinding a flat spot onto the round ball tipping of the nib."
After every 2–3 figure-eights, test the nib on paper. For better results, wet the micro-mesh or load the pen with ink to provide lubrication during polishing.
Be Careful Not to Overdo It
If you notice changes in line width or ink flow, stop immediately - this could mean you’ve removed too much material.
It’s wise to practice on inexpensive pens, like Jinhao or Wing Sung models, before working on pens with higher value or sentimental importance. Keep in mind that using abrasives often voids manufacturer warranties. For nibs with visible damage under magnification or pens of great personal value, professional repair might be the safer route.
Step 5: Test and Decide Next Steps
With your nib polished and adjusted, it’s time to see how it performs. Testing is a crucial step to confirm that your adjustments have restored a smooth and consistent glide across the paper. This is where you’ll determine if the nib is truly fixed or if further tweaks are necessary.
For the best results, use high-quality, fountain-pen-friendly paper like Rhodia. Lower-quality paper can snag even a well-tuned nib, leading to inaccurate feedback.
Test on High-Quality Paper
Start by drawing figure-eights and long strokes in all directions at a steady 45° angle. This technique helps you detect whether the scratchiness is directional or consistent across all movements. Testing on several types of high-quality paper can also rule out issues caused by the paper’s texture. Keep notes on your findings to track any improvements or persistent issues.
If you notice irregularities during testing, it’s time to take a closer look at common nib issues and alignment.
Identify Remaining Issues
If the nib feels scratchy in only one direction, the problem is likely due to tine misalignment rather than surface roughness. At this point, use a 10× loupe to carefully inspect the nib. Focus on the angle where the tipping material meets the paper and look for any small burrs or uneven contact points that might have been missed earlier. Keep in mind that normal tactile feedback is different from true scratching.
Know When to Seek Professional Help
If your adjustments don’t resolve the issue, it may be time to consult a professional. Stop attempting DIY fixes if you notice changes in line width or ink flow, as this could mean too much tipping material has been removed. A nibmeister can address more complex problems, such as bent tines, missing or cracked tipping material, or persistent scratchiness despite cleaning and alignment efforts.
For pens with high sentimental or monetary value, professional repair is often the safest choice. It also helps maintain the pen’s warranty and collectible status. As Fountain Pen Revolution advises:
"Nib smoothing does take some practice and it is possible to damage a nib if done improperly... Note that nib smoothing will likely void a pen's warranty."
Conclusion
Fixing a scratchy nib takes a steady hand, patience, and a clear process. By working through these five steps - identifying the issue, cleaning thoroughly, aligning the tines, smoothing carefully, and testing - you can bring most fountain pens back to their smooth writing glory.
Experts emphasize the importance of alignment and cleaning before attempting any abrasive techniques. In fact, about 70% of fountain pen repairs are tied to tine misalignment, making these early steps crucial. As David Armstrong from Restorer's Art warns:
"Nib smoothing is one of the most challenging aspects of pen repair. It is easy to make the problem worse".
Preventative care is key to avoiding future issues. Regularly flushing your pen, checking tine alignment with a 10× loupe, and writing on quality paper can keep your nib performing well over time. Maintaining a consistent 45° writing angle can also help reduce wear and tear. If your efforts don’t fix the problem or you notice changes in ink flow or line width, it’s best to consult a professional. For pens with sentimental or monetary value, professional repair ensures both the pen’s longevity and its value remain intact.
With tools like a micro-mesh sheet, a 10× loupe, and brass shims, you can handle many minor nib issues yourself. Take your time, test frequently with small figure-eight strokes, and focus on polishing rather than removing material. When done carefully, these techniques will keep your pen writing smoothly, making every word feel effortless and satisfying.
FAQs
How do I know if it’s the nib or my writing angle?
Inspecting the cause of scratchiness starts with examining the nib's tines. Use a magnifier to check if they’re misaligned or bent - these are frequent culprits. If the tines appear fine, try experimenting with different writing angles. Sometimes, uneven contact with the paper can create that unpleasant scratchy feel. Another factor to consider is the paper itself. Switching to high-quality paper and adjusting your writing technique can help you pinpoint whether the issue is with the nib or your writing angle.
What’s the safest grit to start smoothing with?
To safely smooth a scratchy fountain pen nib, start with 12,000 grit micro-mesh. This ultra-fine abrasive surface ensures precise smoothing, minimizing the risk of removing too much material or causing damage. It's an excellent choice for both beginners and seasoned users, delivering effective results while keeping the nib intact.
When should I stop and use a nibmeister?
If your nib still feels scratchy even after using tools like a loupe or Micro-Mesh, it might be time to turn to a nibmeister. These professionals specialize in repairing nibs and can address issues like significant damage, bent tines, or uneven tipping that simple adjustments or cleaning can’t fix. Attempting to fix these problems on your own without proper expertise could make things worse and further impact the nib’s performance.