

Most Sheaffer gold nib problems should be checked in this order: clean, inspect, align, clear the slit, then test. If you see a crack, missing tipping, a sprung tine, an inlaid nib lifting from the section, or ink leaking at the seam, I would stop and get help instead of trying to bend anything at home.
Here’s the short version: many rough-writing nibs are just dirty or slightly out of line. A 10x loupe, clean water, a brass shim, and a soft touch are often enough for small fixes. But vintage gold is soft, and one hard push can turn a small issue into a dead nib.
What this guide covers:
- I check for minor tine spread
- I fix tine alignment
- I look at scratchiness
- I test for weak ink flow
- I separate safe home fixes from cases where replacement makes more sense
What I would not fix at home:
- Cracks in the gold
- Missing or chipped tipping
- Severely sprung tines
- Inlaid nib separation on models like the PFM or Targa
- Leaking at the nib-to-section seam
A good rule is simple: if the nib feels soft, loose, or bent out of shape, stop. In many pen repairs, the first 90% of the result comes from cleaning and inspection, not force. That’s the point of this guide: do the safe steps first, and know when to quit.
| Problem | Home fix? | First move |
|---|---|---|
| Dried ink or debris | Yes | Flush and inspect |
| Minor tine misalignment | Yes | Align in small steps |
| Scratchy feel | Sometimes | Check alignment before smoothing |
| Weak flow | Sometimes | Clean feed and check slit |
| Crack, lost tipping, bad spring | No | Replace or get help |
| Inlaid nib seam leak | No | Seal repair or section work |
If you want to keep a vintage Sheaffer writing well, small checks beat big adjustments every time.
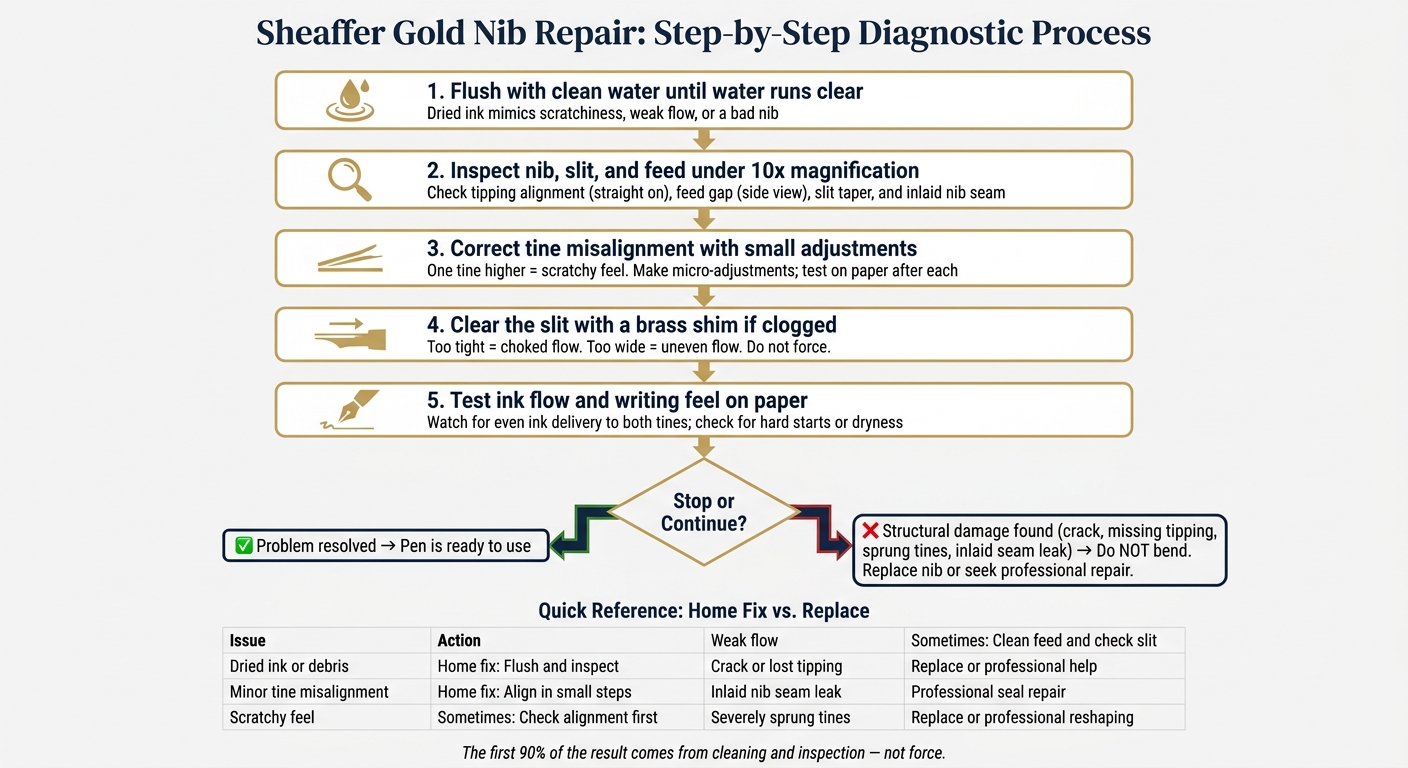
Sheaffer Gold Nib Repair: Step-by-Step Diagnostic Process
Sheaffer PFM leaking inlaid nib repair
sbb-itb-1dd4fe9
Before You Start: Diagnosis, Cleaning, and Safety Checks
Before you touch the nib, flush the pen with clean water until the water runs clear. That one step matters more than people think. Dried ink in the feed or slit can look like scratchiness, weak flow, or even a bad nib when the real problem is just old residue.
Inspect the nib, slit, and feed under magnification
After the pen is clean and dry, inspect the nib with a 10x loupe from a few angles. Straight on, look directly at the tipping. Both tipping points should meet evenly. If one tine sits a bit higher than the other, the pen will feel scratchy on the page.
Then check from the side. The feed should sit flush against the underside of the nib. If you can see a gap there, ink may not travel as it should, which can lead to intermittent flow or hard starts.
Look at the slit too. It should taper slightly, with a wider opening near the breather hole and a narrow gap at the tip. A pinched slit can choke ink flow. A wide gap at the tip can lead to hard starts.
For inlaid-nib models like the Sheaffer PFM (Pen For Men) or Targa, inspect the edge where the gold nib meets the plastic section. Ink showing at the inlay edge points to a failed seal, not a nib-tip issue.
If the nib and feed are clean and look right, you're likely dealing with a mechanical issue rather than leftover ink.
Set up a safe work area and basic tools
Use a stable, well-lit table and lay down a soft cloth to protect the pen’s finish. Keep a piece of test paper close by so you can check how the pen writes after each small change. Go slowly. Tiny adjustments can make a big difference.
Here’s what to keep on hand:
- 10x Loupe - check tine alignment, tip wear, and inlaid nib seals
- Clean Water - flush the reservoir and feed channels
- Soft Cloth - protect the finish and wipe the nib
- Brass Shim - clear dried ink or paper fibers from the slit
- Ultra-fine Smoothing Material - remove small burrs or smooth the tipping
If cleaning doesn’t solve the problem, move on to tine alignment and tine spread.
Fix Basic Tine Alignment and Mild Tine Spread
Once you've finished cleaning, check tine alignment first before you judge ink flow or scratchiness. That order matters. If the tines don't meet evenly, the nib can feel rough even when nothing else is wrong. Only smooth the nib after alignment is correct. If alignment doesn't fix the writing feel, then move on to tine spread.
Correct misaligned tines with small adjustments
Use your 10x loupe and look straight at the nib tip head-on. At this angle, you're checking whether one tine sits a little higher or lower than the other where the tipping meets.
If one tine is higher, ease it down. If one tine is lower, lift it a little. Make small adjustments, check again under magnification after each one, and test the nib on paper.
Tell the difference between minor tine spread and metal that is beyond repair
After alignment, inspect the slit to see if it has been forced open.
Mild tine spread usually shows up as:
- A slit that's wider than normal
- Hard starts
- Wetter flow
But there's a line you don't want to cross. If the tines have been pushed open so far that the gold loses its spring, that's not a home repair job. At that point, stop and replace the nib.
If the nib is aligned but still feels rough or writes dry, the issue is likely tip contact or an ink-path restriction.
Fix Scratchy Feel and Poor Ink Flow in the Right Order
If cleaning and alignment didn't fix the nib, work through common nib issues and quick fixes in this order.
Start with cleaning, then alignment, then clearing the slit. Smooth the tip only if you still need to. If you smooth too soon, you can remove tipping material for good.
Address scratchiness from debris, tine mismatch, or tip contact
Scratchiness usually comes from dried residue in the slit, tine misalignment, or uneven tipping contact. Use a 10x loupe and check the tip from a few angles: top-down, profile, and head-on. If the nib catches in only one stroke direction, that's usually a tipping contact issue, not debris.
If the slit looks clogged or you can see dried ink, run a brass shim through it gently. Don't force it. You're trying to clear the path, not make the slit wider. Do any smoothing only after cleaning and alignment, and use the lightest touch you can.
If the nib still feels rough after that, move on to flow.
Restore flow by checking the ink path and slit spacing
Flush the nib and feed well with room-temperature water. Then watch whether ink reaches both tines evenly. If it doesn't, or if the nib dries out right away, check the slit spacing next.
A slit that's too tight can choke off flow. A slit that's too wide can weaken tine contact and make flow uneven. On vintage Sheaffer inlaid-nib models - especially the PFM (Pen For Men) and the Imperial series - do not reshape the feed. If flushing and slit adjustment don't bring back even flow on an inlaid nib, inspect the nib-to-section seal next.
If flushing and slit checks still don't fix the flow, move to the repair-versus-replace decision.
When Replacement Makes More Sense Than Repair
If cleaning, alignment, and flow checks still don't fix the problem, it's time to stop repairing and start thinking about replacement. Pushing a nib past that point can make a bad situation worse.
Draw a hard line at structural damage. That includes a hairline crack at the breather hole or at the base of the nib, tines that stay sprung, or tipping material that's gone or badly chipped. Do not bend a cracked nib. The fracture can spread. If the tipping is missing, you're usually looking at retipping or a full replacement.
With Sheaffer inlaid nibs, ink seeping at the seam points to a failed seal. That's not a slit issue, and it's not a tine alignment issue either.
A simple repair-versus-replace checklist
Use this checklist to make the call fast:
| Issue | Repair at Home? | Replace or Get Help? |
|---|---|---|
| Minor tine misalignment | Yes | Repair |
| Dried ink or debris in slit | Yes | Repair |
| Missing tipping material | No | Replace nib or professional retipping |
| Cracked gold (stress cracks) | No | Replace or professional welding |
| Severely sprung nib | No | Replace or professional reshaping |
| Leaking inlaid nib seal | No | Professional sealing or replace section |
| Worn or corroded slit edges | No | Replace |
When the table points to replacement, stop forcing adjustments. Keep the barrel, cap, and filling system if you can. If you decide to start fresh, consult a fountain pen buying checklist to ensure your next choice meets your needs.
The main rule in this guide hasn't changed: work slowly, test after each adjustment, and protect the metal that's still there. A vintage Sheaffer nib is worth more intact than one that's been pushed past its limit in search of perfection.
FAQs
How can I tell if my Sheaffer gold nib is safe to adjust at home?
At-home adjustment is usually safe only for minor tine misalignment. In most cases, you’ll notice it as a scratchy feel in one direction. Use bright light and a 10× to 20× loupe to check whether the tines sit level.
If you spot bent or warped tines, chipped or missing tipping, or cracks in the nib, stop there and get professional repair. Gold nibs are softer than steel, so handle them with extra care.
What does a brass shim do in a nib slit?
A brass shim mostly helps with clearing blockages and adjusting ink flow in a nib slit. If you slide a 0.001 to 0.002 inch shim from the breather hole toward the tip, it can sweep out dried ink and other debris that often lead to skipping or uneven flow.
It can also gently widen the slit when the tines are too tight. On top of that, it helps you check whether the tines are making proper contact.
When should I replace a Sheaffer gold nib instead of repairing it?
Consider replacement if the nib has major structural damage. That includes a bent tip, creases in the nib body, or missing or chipped tipping material.
Replacement is also the better move if cleaning, alignment, and smoothing have been tried several times with no change. If the nib stays scratchy, skips over and over, or is badly misaligned, professional repair or replacement is the safer path to help prevent permanent damage.