
Replacing a pen sac in vintage fountain pens is a simple process that restores their ability to hold and dispense ink. Pen sacs, typically made of latex rubber, deteriorate over time, leading to leaks or ink flow issues. If you encounter other ink flow issues, there are several quick fixes to try. Here's a quick overview of the process:
- Key Tools: Hairdryer (for gentle heat), section pliers or rubber gloves, sharp scissors, and a flashlight.
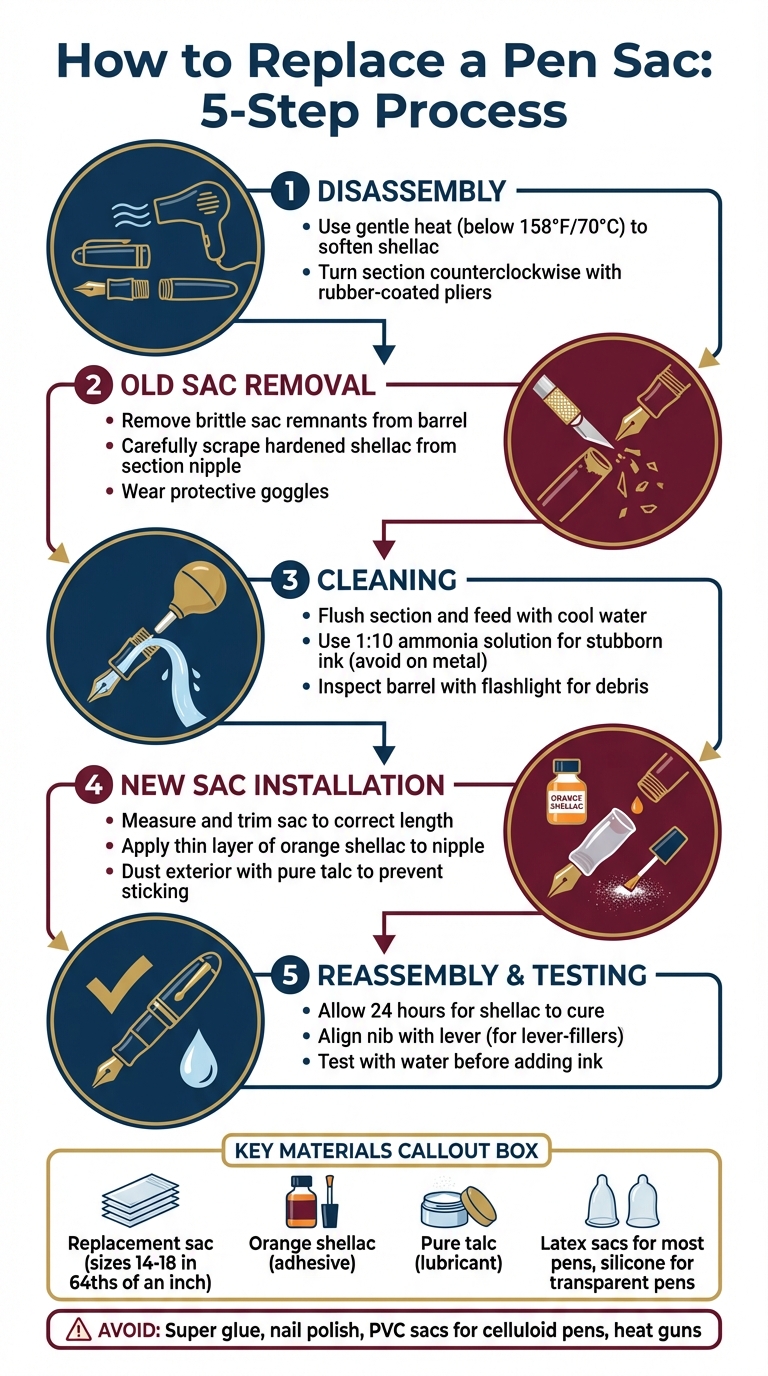
- Materials Needed: Replacement sac (measured in 64ths of an inch), orange shellac (adhesive), and pure talc (lubricant).
-
Steps:
- Disassembly: Use gentle heat to separate the pen barrel and section.
- Old Sac Removal: Remove brittle or crumbled sac remnants with tools like an X-Acto knife.
- Cleaning: Flush the section and inspect the barrel for debris.
- New Sac Installation: Trim the new sac to size, attach it with shellac, and dust with talc.
- Reassembly & Testing: Allow 24 hours for shellac to cure, then reassemble and test with water.
Avoid using super glue or nail polish, as they can damage pen components. Latex sacs are ideal for most cases, while silicone sacs are better for transparent pens but require specific adhesives. Proper care and precise measurements ensure a successful restoration.
For supplies like replacement sacs and shellac, check out vendors like Fountain Pen Revolution.
5-Step Process for Replacing a Fountain Pen Sac
Tools and Materials Needed
Basic Tools
Your main tool for softening old shellac during disassembly is a hairdryer. Keep the temperature below 158°F (70°C) to avoid damaging the delicate celluloid material. Heat guns are not recommended because they can quickly exceed safe temperatures and cause irreversible harm.
To separate the barrel from the section, use section pliers or rubber-coated spark-plug pliers. For smaller or more fragile sections, rubber gloves are a safer option to prevent damage to delicate components. To remove hardened sac remains, an X-Acto knife or a dental pick works well. Measuring the barrel’s internal diameter requires calipers or a fractional inch drill gauge, which helps you determine the correct sac size in 64ths of an inch. Sharp scissors are handy for trimming the new sac to the right length. A flashlight can help you inspect the barrel interior for any lingering debris.
When scraping out old, calcified sacs, always wear protective goggles. These brittle materials can splinter and pose a safety hazard.
Once you’ve gathered the right tools, it’s time to focus on the materials needed for a successful repair.
Supplies and Materials
A replacement sac is essential, and its size should match the barrel of your pen. Vintage pens typically use sac sizes ranging from 14 to 18 (measured in 64ths of an inch). The sac should slide easily into the barrel without binding against the pressure bar, as an oversized sac can lead to ink flow issues like blobbing.
For most vintage pens, latex sacs are a practical choice due to their durability and resistance to tearing. Silicone sacs, on the other hand, are ideal for transparent pens and work well with stronger inks. However, they allow more air transfer, which can cause ink to dry out faster, so pens with silicone sacs should always be stored nib-up. Avoid PVC (vinyl) sacs for celluloid pens, as the plasticizers in PVC can severely damage the barrel material.
Orange shellac is the go-to adhesive for attaching latex sacs to the section nipple. A pint of orange shellac can last through numerous repairs. For silicone sacs, use a silicone-specific adhesive like Devcon 12045 or Loctite 908570, as shellac doesn’t adhere well to silicone. To lubricate the sac’s exterior and prevent it from sticking to the barrel or pressure bar, use pure medical-grade talc or graphite powder. Apply the shellac with a toothpick or wooden dowel to minimize stray fibers.
If you’re looking for supplies, Fountain Pen Revolution offers a variety of replacement sacs, shellac, and other restoration materials for vintage pens.
Workspace Preparation
Having an organized workspace is key to a smooth repair process and helps prevent losing small components. Choose a clean, well-lit, and ventilated area. Protect the pen’s finish by laying down a clean towel or cloth, which also keeps small parts from rolling away. Store all components in a small, clear plastic container with a secure lid to avoid misplacing anything.
When heating the pen, rotate it continuously to ensure even warmth and avoid creating hotspots that could damage the celluloid. Also, take care not to inhale talc or graphite dust when applying it to the new sac.
sbb-itb-1dd4fe9
Disassembly and Old Sac Removal
Separating the Barrel and Section
Begin by applying gentle, even heat to soften the shellac that holds the section in place. Keep the heat consistent by rotating the pen to avoid creating hotspots, especially on celluloid material. Once the pen feels warm to the touch, use rubber-coated pliers or latex gloves for a secure grip, and carefully turn the section counterclockwise. Even if the section seems to be friction-fit, turning it counterclockwise will help determine if it is threaded, reducing the risk of cross-threading or cracking.
Avoid soaking vintage pens in water to loosen stuck sections, as this can discolor ebonite (causing a greenish hue) and damage other materials. If the section remains stuck after the first attempt, apply more gentle heat and try again. Keep the nib and feed in place during this process to maintain the section's structural integrity.
Removing the Old Sac
Once the barrel and section are separated, you’ll likely encounter the old sac in one of two conditions: it may have crumbled into small fragments or resemble dried glue or stiff chewing gum. For crumbly sacs, gently tap the barrel over a towel to dislodge the pieces. If any fragments cling stubbornly to the barrel walls, carefully thread a long screw into the debris and pull it out.
Pay close attention to the section nipple - the small peg where the sac attaches. Use an X-Acto knife or pocket knife to slowly scrape off any hardened shellac or rubber residue. Work cautiously to avoid damaging the nipple. As Pensink.org advises:
The often rock‐hard residues of the ink sac can splinter off and fly in all directions when the connector of the section is refurbished, so it is advisable to wear protective goggles.
Ensure the nipple is completely clean and smooth to ensure proper bonding when attaching the new sac.
Cleaning the Components
With the old sac removed, flush the section and feed thoroughly using cool water and a bulb syringe to clear out dried ink and any rubber particles . If stubborn ink buildup persists, try a cleaning solution made from 1 part ammonia and 10 parts water. However, avoid using this solution on aluminum, brass, or copper components, as ammonia can corrode these metals . For threads and other hard-to-reach areas, a soft toothbrush or nylon bristle brush works well .
Finally, inspect the inside of the barrel with a flashlight to ensure no debris remains. Any leftover fragments could interfere with the new sac’s ability to expand or cause it to stick to the barrel walls. Once all components are clean, let them air-dry completely. Moisture can compromise the adhesion of shellac, so ensure everything is dry before moving on to install the new sac.
Installing the New Sac
Measuring and Trimming the Sac
To start, take the new sac and either fully insert it into the barrel or align it alongside the barrel to estimate the maximum depth it can reach. However, don’t cut the sac based solely on this measurement. You’ll need to leave extra space to account for the section nipple that fits into the barrel.
Use chalk or a white pencil to mark where the section meets the barrel opening. Then, mark about ½ inch further back to allow for the portion of the section that fits inside the barrel. As Danny Watts from Fountain Pen Chronicles explains:
"The length of the sac is based on the inside length of the barrel less the portion of the section securing the barrel."
When trimming, always cut the sac at the open end (never the closed end) using a sharp X-Acto knife or scissors for a clean edge. After cutting, dry-fit the sac onto the section. If it feels too tight or binds, trim off an additional 5 mm until it fits freely without resistance.
Once the sac is trimmed to the correct length and fits properly, you’re ready to attach it securely.
Attaching the Sac with Shellac
With the sac prepared, apply a thin, even layer of orange shellac to the section nipple. Use a toothpick or a small wooden dowel for this step. Avoid Q-tips or brushes, as Ana from The Well-Appointed Desk explains:
"The reason we don't recommend a q-tip or brush is so that you don't get any stray fibers into the sac or nib unit."
While the shellac is still wet, carefully stretch the sac’s opening and slide it over the nipple until it sits flush against the section shoulder. After it’s attached, lightly dust the exterior of the sac with pure talcum powder or graphite. This prevents the sac from sticking to the inside of the barrel or the pressure bar.
Once everything is in place, allow the shellac to cure for a full 24 hours before reassembling and filling the pen. Taking this time ensures a secure and effective seal.
Reassembly and Testing
Reassembling the Pen
After allowing the shellac to cure for 24 hours, check the exterior of the sac to ensure it has a light coating of talc or graphite. As Goodwriterspens explains:
"Without a covering of talc the latex sac will stick to the pressure bar and it will shorten the sac's life considerably."
To reassemble the pen, slide the section back into the barrel. For lever-filler pens, make sure the nib aligns in a straight line with the lever to ensure proper operation. If you're working with a friction-fit section and find it too tight, gently apply heat - no hotter than 158°F - to the barrel to slightly expand it. For threaded sections, screw them together slowly, stopping immediately if you encounter resistance, as this could indicate the sac is misaligned.
If the joint feels loose after reassembly, you can apply shellac to the section tenon or threads to create a snug fit. Stick to shellac, as it allows for future disassembly if needed.
Once reassembled, proceed to test the pen's functionality before adding ink.
Testing and Troubleshooting
With the pen reassembled, it's time to test its performance. Before using ink, start with room-temperature water. Submerge the nib and feed in water, then cycle the filling mechanism. This will verify that the sac is expanding and contracting correctly and check for any leaks at the section joint. If the water fills and empties smoothly without leaks, your repair is good to go.
If you encounter issues during testing, refer to the troubleshooting guide below:
| Issue | Likely Cause | Recommended Solution |
|---|---|---|
| Leaking at the section joint | Loose friction fit or threads | Apply shellac to the section tenon for a tighter seal. |
| Poor filling or mechanism binding | Sac is twisted or contacting the pressure bar | Disassemble, re-dust the sac with talc, and ensure it is properly aligned. |
| Ink drops from the nib ("blobbing") | Sac is oversized, causing air expansion from body heat | Replace the sac with a smaller size. |
| Fills but won't write | Nib or feed misaligned during reassembly | Check and adjust nib/feed alignment and seating. |
Once the pen successfully passes the water test, you can fill it with ink and start writing. If you opted for a silicone sac instead of latex, remember to store the pen upright with the nib pointing up. Silicone sacs are more permeable to air, which can lead to gradual ink seepage if stored horizontally.
Fountain Pen Sac Repair - Basic Tutorial
Conclusion
Replacing a pen sac can be a simple task if you stick to the basic steps. Start by carefully disassembling the pen using gentle heat, clean the section nipple thoroughly, attach the appropriately sized sac using a light coat of orange shellac, dust it lightly with talc, and let it cure for 24 hours before putting everything back together.
Routine care is key to preserving vintage pens. As VintagePens.com notes:
when latex rubber breaks down, it releases highly reactive sulfur compounds that can permanently darken celluloid and other permeable plastics.
A deteriorating sac can do more than just tarnish the pen's appearance - it can lead to ink leaks that damage internal metal parts, causing rust and even mechanical failure. Taking this final step in your restoration process ensures your pen is not only functional but also protected for the long haul.
Using the right tools and techniques can significantly extend the life of your vintage pens. If you're new to this, practice on less expensive models like Wearevers or Esterbrooks before tackling pens with high monetary or sentimental value. This hands-on practice helps you build confidence and avoid costly errors.
For all your restoration needs, check out Fountain Pen Revolution. They stock replacement sacs in various sizes, orange shellac, pure talc, and a selection of quality fountain pen inks, making it a go-to source for both beginners and seasoned collectors.
FAQs
Why are latex sacs preferred over silicone sacs for vintage fountain pens?
Latex sacs are a popular choice for vintage fountain pens due to their flexibility, which makes them easier to install and promotes smoother ink flow. They also have lower gas permeability, helping to keep the ink sealed for longer periods and reducing the risk of the pen drying out during storage. Plus, latex was the material originally used in vintage pens, making it a fitting option for collectors who value authenticity in design and performance.
On the other hand, silicone sacs, while more chemically stable, are less flexible and tend to allow more air to pass through. This can result in faster ink evaporation, especially if the pen isn’t stored upright.
How do I ensure the replacement sac fits my fountain pen correctly?
To make sure the replacement sac fits your fountain pen correctly, start by picking the right size. Fountain pen sacs are typically measured in 64ths of an inch, so check the size of your pen’s barrel and choose a sac that closely matches. The sac should fit snugly onto the barrel nipple without requiring excessive force. If it feels overly tight, go for a slightly smaller size.
It’s always better to use a sac that’s a bit smaller rather than one that’s too large. Oversized sacs can lead to problems like ink leakage or difficulty in filling the pen. After installing the sac, test it by gently pressing the filler mechanism to confirm that it expands and contracts smoothly. A proper fit ensures steady ink flow and keeps your pen working as it should.
Why should I use orange shellac instead of other adhesives when replacing a pen sac?
When it comes to attaching a new sac to a fountain pen, orange shellac stands out as the go-to adhesive. It creates a durable, dependable bond while offering the added benefit of being reversible. This feature is crucial for fountain pens, as it allows for future repairs or adjustments without risking damage to the pen.
Another advantage of orange shellac is its resistance to ink and moisture. This ensures the sac remains securely attached, even with regular use. Opting for other adhesives could compromise the pen’s performance or make maintenance down the line unnecessarily complicated.