

If you polish the wrong pen material the wrong way, you can ruin it fast. I’d keep it simple: use the lightest abrasive that works, use very light pressure, and stop the moment the barrel feels warm.
Here’s the short version:
- Acrylic is the easiest to polish and takes a higher shine with less risk.
- Ebonite often needs oxidation removal more than scratch removal, and water contact should stay brief.
- Celluloid is the riskiest: it can soften at about 165°F (74°C) and is also flammable.
- A Micro-Mesh range from 1,500 to 12,000 covers most hand work, but many light marks start around 2,400 to 4,000.
- For ebonite, polishing sessions should stay short, often around 30–60 seconds per grit.
- For celluloid, passes should be even shorter, around 10–15 seconds at a time.
If I were doing this by hand, I’d follow the same basic order every time:
- Clean the barrel
- Mask trim and shallow imprints
- Start with the finest grit that still cuts the damage
- Change stroke direction between grits
- Pause often to control heat
- Finish with plastic polish or a thin wax coat, if the material allows
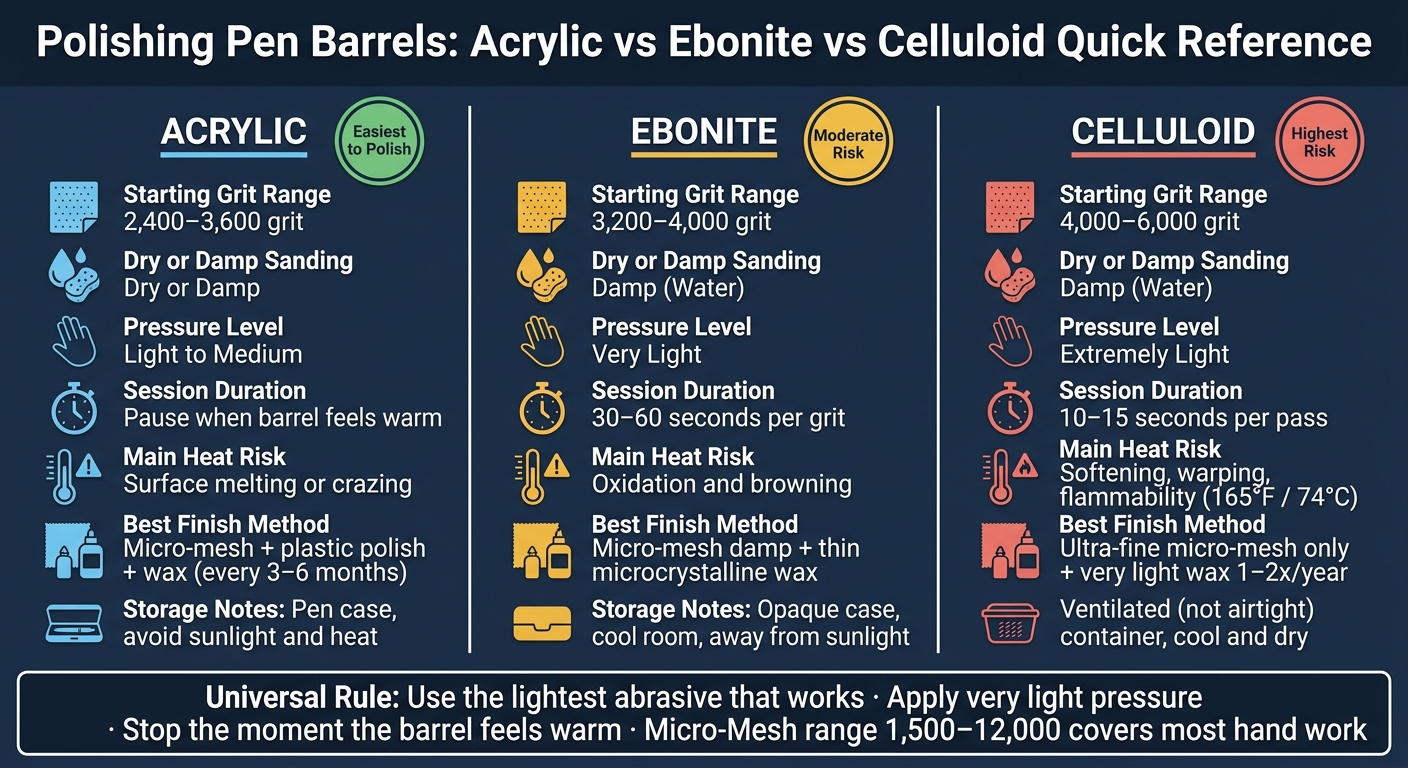
Acrylic vs Ebonite vs Celluloid: Pen Polishing Quick Reference Guide
How to Sand and Polish an Acrylic or Resin Pen Blank - Perfect Every Time - The Woodturning Store
Quick Comparison
| Material | Best Starting Point | Main Risk | Best Approach |
|---|---|---|---|
| Acrylic | 2,400–3,600 grit | Surface melting or crazing from heat | Light hand polishing, then polish and wax |
| Ebonite | 3,200–4,000 grit | Browning, oxidation, heat damage | Damp sanding, short sessions, thin wax |
| Celluloid | 4,000–6,000 grit | Softening, warping, fire risk | Ultra-light pressure, very short passes, stop early |
The main point: I’d treat polishing as surface correction, not heavy resurfacing. A little gloss gain is good. Chasing a perfect finish on old pen material often costs more than it gives back.
Tools, Cloths, and Surface Prep
Get the barrel ready before any abrasive goes near it.
Abrasives, Polishes, and Cloths for Barrel Work
Use micro-mesh pads, a plastic polish, microfiber cloths, and low-tack masking tape.
A 9-pad micro-mesh set, with grits from 1,500 to 12,000, is the backbone of a hand-polishing kit. Micro-mesh bends with curved barrels and cuts more evenly than stiff sandpaper.
For polishing compounds, Novus Plastic Polish is a practical pick. It comes in three grades: fine polish, scratch remover, and heavy scratch remover. For a final protective layer, Renaissance Microcrystalline Wax works well. Apply polish with soft cotton, then use a clean microfiber cloth for the final buff.
Your tool choice here shapes how gently you can begin.
Cleaning, Masking, and Protecting Trim and Imprints
Before any abrasive touches the barrel, disassemble the pen as far as the design allows. Remove the nib, feed, and filling parts when you can. That helps keep polish and water out of the pen's internal parts.
Wash the barrel with mild dish soap and lukewarm water to remove skin oils, old ink, and surface grime. If you're working with ebonite, dry it right away. Longer water exposure speeds oxidation and browning. Use a soft-bristled toothbrush to clear debris from threads, but never sand the threads themselves - even light abrasion can change how the cap fits.
Once the barrel is dry, inspect it closely, ideally with a jeweler's loupe. Check for hairline cracks, deep gouges, and the depth of any manufacturer imprints. Shallow imprints can vanish fast, even under fine abrasives. If an imprint looks shallow, mask it fully before you begin.
For masking, use delicate-surface painter's tape or Kapton tape. Both peel off cleanly and help protect trim. Cut the tape into strips about 2–3 mm wide so you can wrap thin cap bands or trim rings with care, without covering nearby barrel areas that still need polishing.
These prep steps decide how far you can go with acrylic, ebonite, and celluloid. Once the barrel is clean and masked, start with the lightest abrasive and the lowest pressure that will still cut the surface.
sbb-itb-1dd4fe9
The Basic Hand-Polishing Workflow and Heat Control
Once the barrel is clean and masked, the polishing itself is pretty simple: start with the finest grit that will still remove the damage, move step by step to finer grits, and work toward a high-gloss finish. The hard part isn't the sequence. It's control.
That means light pressure, steady movement, and as little heat as possible.
Grit Progression, Stroke Pattern, and Pressure Control
Start with the finest grit that still cuts the scratch. For most light surface marks, that usually means somewhere in the 2,400–4,000 range on the Micro-Mesh scale. From there, work through each finer pad until you reach 12,000.
As you polish, keep the barrel moving the whole time. Rotate it as you move the pad along its length. If you stop in one spot, you can flatten the surface, and that's exactly what you don't want.
It also helps to change your stroke direction each time you switch to a finer grit. Turn it by 90 degrees. This crosshatch pattern gives you a simple visual check. Once the new scratch pattern has fully replaced the old one, you're good to move on.
Pressure should stay light and even throughout. Pressing harder doesn't make the work go faster. It just cuts unevenly and builds friction heat. And heat is the main danger in hand polishing across all three materials.
Keeping the Barrel Cool While Polishing
Heat control is the main limit with acrylic, ebonite, and celluloid. Friction heat can melt acrylic, brown ebonite, and soften or warp celluloid.
A good habit is to stop often and check the barrel against the inside of your wrist. If it feels warm, stop. Set it aside and let it come back to room temperature before you continue.
Short passes work better than long, nonstop polishing. Do a little, pause, then let the barrel cool. For ebonite and celluloid, damp sanding with water helps cut friction and keeps the abrasive from clogging.
Material Comparison Table: Safe Starting Points for Acrylic, Ebonite, and Celluloid
| Material | Starting Grit Range | Dry or Damp | Pressure Level | Main Heat Risk |
|---|---|---|---|---|
| Acrylic | 2,400 – 3,600 | Dry or Damp | Light to Medium | Surface melting or crazing |
| Ebonite | 3,200 – 4,000 | Damp (Water) | Very Light | Oxidation and browning |
| Celluloid | 4,000 – 6,000 | Damp (Water) | Extremely Light | Softening, warping, or risk of ignition |
Treat these ranges as safe starting points, not hard rules. If a scratch is deeper, you may need a coarser grit. Still, it's smart to begin as fine as you can before getting into the material-specific steps below.
How to Polish Each Barrel Material by Hand
Use the grit ranges above as a starting point, then adjust based on the barrel material.
Acrylic: Removing Scratches and Restoring Gloss
Acrylic can handle the most direct polishing of the three.
Start by inspecting the barrel under bright light and rotating it slowly. That makes it much easier to see the scratch pattern. Begin with the finest grit that will still cut the scratch, then move up through the grits. Use 2,400 grit only for deeper marks, and only on the affected spot.
A common progression looks like this: 3,200 → 3,600 → 4,000 → 6,000 → 8,000 → 12,000. After each grit, wipe the barrel clean and make sure the earlier scratch pattern is completely gone before moving to the next step. If you skip that check, the old marks usually show up at the end.
Once sanding is done, apply a small amount of plastic polish to a soft cotton or microfiber cloth. Buff with light, overlapping strokes, then wipe the barrel clean. After that, add a thin coat of microcrystalline or carnauba-based wax.
| Finish Method | Appearance | Gloss Level | Protection |
|---|---|---|---|
| Micro-mesh only | Clear but slightly dry; faint haze may remain in strong light | High gloss | Good initial look; less resistance to fingerprints |
| Micro-mesh + polish + wax | Deeper, "wet" gloss with better color saturation | Very high gloss | Better short-term protection; wax layer can be renewed |
Ebonite calls for a different method because the surface oxidizes instead of only picking up scratches.
Ebonite: Removing Oxidation Without Heat Damage
Ebonite needs a gentler, damp polishing method because it oxidizes.
Oxidation usually shows up as a brown, olive, or dull gray cast on exposed parts of the barrel. It’s often easiest to spot when you compare those areas with sections that were protected under a cap band or trim ring. Oxidized spots also tend to feel rougher than the protected areas.
Because ebonite is softer and more heat-sensitive than acrylic, use lighter pressure and shorter sessions. Start with fine wet/dry paper around 2,000–3,000 grit, or a low-grit micro-mesh pad used damp, and sand gently along the length of the barrel. Then work upward through the micro-mesh range - 3,200 → 4,000 → 6,000 → 8,000 → 12,000. Keep each session to 30–60 seconds per grit, and let the barrel cool between passes. Finish with a thin coat of microcrystalline wax.
| Condition | Color / Appearance | Surface Gloss | Feel in Hand |
|---|---|---|---|
| Oxidized ebonite | Brownish, olive, or dull gray; uneven and dull | Matte to chalky | Slight grab, roughness, feels dry |
| Freshly polished | Original color; more uniform | Soft to high gloss | Smooth, pleasant grip; still warm compared to acrylic |
Keep the pen away from direct sunlight and hot environments to help slow re-oxidation.
Celluloid needs even less pressure and much shorter passes.
Celluloid: Polishing Gently and Working Safely
Celluloid needs the lightest touch of all.
It’s both heat-sensitive and flammable, so work in a cool, well-ventilated space away from flames or heat sources. This is not the material to push.
Use only very fine abrasives. Start at 4,000–6,000 grit micro-mesh and work upward. Apply ultra-light pressure, just enough to keep the pad touching the surface, and limit each pass to 10–15 seconds. Rotate the barrel constantly so the work stays even. The moment the gloss improves, stop. Trying to chase a perfect finish can thin the barrel or warp it near the threads or cap lip.
| Risk | What Causes It | Precaution |
|---|---|---|
| Warping | Localized heat from friction | Keep sessions short, use ultra-light pressure, and rest between passes |
| Too much material removal | Too many passes or too much pressure | Stop when gloss improves; accept minor age marks |
| Flammability | Nitrocellulose base; heat or flame exposure | Work away from heat sources in a ventilated space |
Use the least abrasive that gets the job done. Improve the finish where you can, but put barrel safety ahead of a flawless cosmetic result.
Finish Protection, Storage, and Key Takeaways
Wax, Wipe-Down Habits, and Storage by Material
Once you’ve polished a barrel, long-term care is pretty simple: wipe it down after use and store it well. Wax is optional. Use a small amount, and only when you want extra surface protection.
For acrylic, a dry or slightly damp microfiber cloth will take care of most fingerprints and skin oils. If the barrel has stubborn grime, use a drop of mild dish soap on a damp cloth, then dry it right away. If the pen gets handled often, you can apply a thin coat of microcrystalline wax every 3–6 months.
For ebonite, routine care should stay very gentle. A dry, soft cloth is usually enough. If you use any moisture at all, dry the barrel immediately. Some people also choose to wax ebonite from time to time, especially on pens that spend a lot of time in a pocket or get frequent skin contact. That can help slow visible oxidation.
For celluloid, less is more. In most cases, a very soft dry cloth after use is all it needs. If you decide to wax it, keep it light: a thin film once or twice a year is enough. Apply it by hand, and don’t buff hard. Store celluloid pens in ventilated containers instead of airtight ones so fumes can escape.
No matter the material, store pens in a case, roll, or drawer away from direct sunlight and heat sources. A room temperature of about 60–75°F with 40–60% relative humidity is a practical range for U.S. homes. Skip cars, attics, and windowsills.
Maintenance Comparison Table and Key Takeaways
Use the table below for a quick, material-by-material reference.
| Material | Maintenance Frequency | Preferred Cleaning Method | Polishing Aggressiveness | Storage Notes |
|---|---|---|---|---|
| Acrylic | Wipe after use; wax every few months if desired | Dry or slightly damp microfiber; mild soap for stubborn grime | Moderate; fine plastic polish; light pressure | Pen case or drawer; avoid direct sunlight and high heat |
| Ebonite | Wipe after use; inspect regularly; wax only if you choose to use it | Dry soft cloth; minimal damp cloth use; dry immediately | Very mild; ultra-fine abrasives; short sessions only | Opaque case; cool room; away from sunlight and heat sources |
| Celluloid | Gentle wipe after use; wax once or twice a year if used | Very soft dry cloth; avoid water and cleaners when possible | Minimal; very mild polish; infrequent use | Cool, dry, ventilated storage; never airtight |
Routine care doesn’t need to be complicated: clean lightly, store pens in a cool, dry place, and polish only when the finish actually needs it.
FAQs
How do I identify whether my pen barrel is acrylic, ebonite, or celluloid?
Use texture, odor, and appearance to tell them apart.
Celluloid often gives off a medicinal camphor smell when you rub it. It also tends to show patterned finishes like marble, jade, or lizard. Cellulose acetate is easy to mix up with celluloid, but it usually smells more like vinegar.
Ebonite tends to feel warm and a bit organic in the hand. When warmed, it may give off a rubber-like smell, and over time it can develop a brown or gray patina. Acrylic, by contrast, is odorless, smooth, and usually feels cooler and sleeker than ebonite.
When is a scratch too deep to polish safely by hand?
A scratch is too deep to polish safely by hand when removing it would mean taking off so much material that the pen’s strength or look starts to change.
Hand polishing works by removing a thin layer from the surface. That sounds simple, but there’s a catch: go too far, and you can wipe out imprints, chasing, or engravings. You can also change how the cap and barrel fit together.
So the rule is pretty plain. If fixing the scratch would cost the pen those details or throw off its dimensions, it’s past the point of safe hand polishing.
Should I polish the whole barrel or just the damaged area?
Focus on the damaged area, but feather your work into the surface around it. If you polish just one small spot, you can leave low areas or uneven patches behind. A gradual blend helps keep the barrel’s original shape intact.
Use a light touch, especially near imprints or chasing. Heavy polishing in one place can thin the metal or wipe out those details. When you can, work lightly and evenly across the area so the finish looks smooth and consistent.