

Most users say the same thing: start with plain water, add 1 drop of dish soap if needed, and use a diluted ammonia mix only for dried or stubborn ink. Across the reports, the pattern is simple: mild cleaning first, stronger mixes last, and rinse far more than you think you need to.
If I boil the article down, here’s what stands out:
- Plain water is usually enough for routine pen cleaning.
- Water + 1 drop of mild dish soap is the go-to next step for light residue or flow issues.
- Ammonia mixes are mostly for dried, saturated, or shimmer-heavy ink.
- Alcohol and window-cleaner mixes get mixed reviews and more warnings.
- Vintage pens and delicate materials are where many users draw the line.
- A common ammonia recipe is 1 part ammonia to 9–10 parts water, which works out to about 2 oz ammonia + 18 oz water.
- Some users report doing 10–15 flush cycles before a pen runs clear.
What I take from these reports is simple: the best homemade pen flush is the weakest one that still cleans the pen. For most pens, that means water first. If that fails, step up slowly. And if you use soap or ammonia, keep rinsing until there’s no smell, no suds, and no tint left.
| Mix | What users use it for | Main caution |
|---|---|---|
| Plain water | Day-to-day cleaning | Don’t use very hot water |
| Water + 1 drop dish soap | Minor residue, light flow issues | Rinse until no suds remain |
| Ammonia + water + dish soap | Dried or stubborn ink | Avoid on vintage or delicate pens |
| Alcohol or window-cleaner mix | Last-step clog cases | May harm plastics, seals, or finishes |
If you just want the short answer: water handles most jobs, dish soap helps with mild buildup, and ammonia is a last step for harder cases in many modern pens.
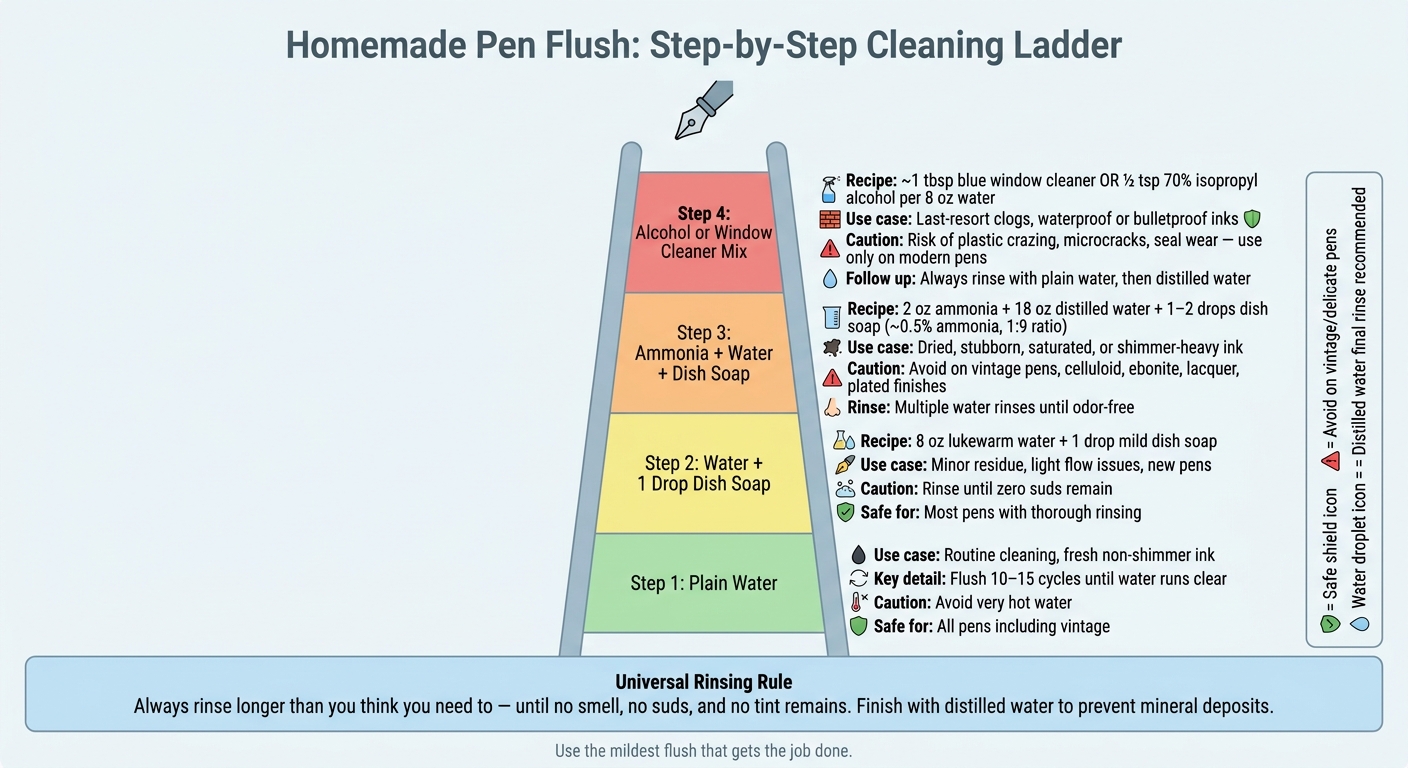
Homemade Pen Flush: Step-by-Step Cleaning Ladder
DIY Make Your Own Fountain Pen Wash / Flush
The Homemade Pen Flush Recipes Users Mention Most
Users tend to describe homemade pen flushes like a ladder: start with the mild stuff, then step up only if ink residue sticks around. In most cases, people mention three mixes. They usually begin with water and dish soap, then move to stronger options only for stubborn buildup.
Ammonia, Water, and Dish Soap
Users often bring up this mix for stubborn or dried ink. The ratio shared most often is about 1 part household ammonia to 9–10 parts water, plus 1–2 drops of mild dish soap.
In plain U.S. terms, that comes out to 2 oz of plain household ammonia mixed with 18 oz of distilled water, followed by 1–2 drops of mild dish soap. That mixture is roughly 0.5% ammonia, and users commonly mention it for many modern pens.
Making it is simple: add the ammonia to the water, stir gently, then add the soap drops.
Water with a Drop of Dish Soap
For routine maintenance, this is the one people mention most. The usual recipe is 1 cup (8 oz) of lukewarm tap or distilled water with a single drop of mild dish soap.
It’s easy to mix a batch fresh for one cleaning session, and users say it works well for normal ink residue and regular ink changes.
Cleaner- or Alcohol-Based Mixes
These come up less often, and usually with a warning attached. Some users mention diluting a blue window cleaner such as Windex at about 1 tablespoon per 1 cup (8 oz) of water, or adding about ½ teaspoon of 70% isopropyl alcohol per cup as a last resort for waterproof or bulletproof inks.
User feedback here is mixed. Common concerns include:
- Alcohol can dry out or craze some plastics.
- Cleaners may leave a film that affects ink flow.
- Dyes, fragrances, detergents, or solvents may harm trim or plated nibs.
Because of that, most users keep these mixes for last-resort clogs in modern pens made from tougher materials, then follow up with a thorough plain-water rinse.
The table below shows where each mix tends to fit in that ladder.
| Recipe | Typical U.S. Measurement | Best For | Ease of Prep |
|---|---|---|---|
| Ammonia + water + dish soap | 2 oz ammonia + 18 oz water + 1–2 drops dish soap | Stubborn or dried ink | Moderate |
| Water + dish soap | 8 oz water + 1 drop dish soap | Routine maintenance | Very easy |
| Cleaner- or alcohol-based mix | ~1 tbsp blue window cleaner or ½ tsp alcohol per 8 oz water | Last-resort clogs | Easy, but high caution |
What Users Report About Cleaning Results
These reports show how far each recipe usually gets people before they need to move up to something stronger.
Routine Cleaning: Water-First Methods
In user reports, plain water is often enough for fresh, regular ink. People usually keep flushing until the water runs clear. One step-by-step guide suggests 10–15 fill-and-empty cycles for piston-fill pens, and says to keep going until the water runs clear.
If plain water stops working, many users switch to water with a single drop of dish soap for new pens, minor flow problems, or stubborn residue. Users say that one drop can help when water alone still leaves ink behind. The main warning is simple: keep the mix lightly soapy, not full of suds, and rinse well afterward.
When water stalls, users usually try a drop of dish soap before moving to anything stronger.
Ammonia-Based Flushes for Stubborn Ink
Users usually save ammonia-based flushes for pens that sat inked for too long or for dried, very saturated, or shimmer-heavy inks. Reports often describe a brief soak in diluted ammonia, followed by repeated water rinses until both the smell and any remaining tint are gone.
Shimmer inks come up a lot in these reports. The particles can stick inside feeds and converters, so users often finish the job with a soft brush or brass shim.
That extra cleaning strength is also why careful rinsing matters even more in the safety section that follows.
Reported Effectiveness and Rinse Needs: A Comparison
The table below sums up the main patterns users report across the common recipe types.
| Recipe | When Users Use It | Reported Effectiveness | Rinse Needed Afterward |
|---|---|---|---|
| Plain water | Routine cleaning, fresh non-shimmer ink | Usually enough for standard inks | Flush until water runs clear |
| Water + a drop of dish soap | Minor residue, new pens, flow issues | Helpful when plain water stalls | Thorough rinsing until no suds |
| Heavily diluted ammonia mix | Dried, stubborn, very saturated, or shimmer-heavy ink | Better for difficult cleanup | Multiple water rinses until odor-free |
sbb-itb-1dd4fe9
Safety Warnings, Material Concerns, and Rinsing Practices
Stronger mixes may clean more aggressively, but users put material safety first. In practice, they lean toward heavy dilution, not harsh formulas. The mix that comes up again and again is 1:9 or 1:10 ammonia to water. One common recipe is 1 part ammonia to 9 parts water plus a few drops of dish soap. In other words, users treat it like a light cleaning mix, not a heavy-duty solvent.
That caution shows up even more with pen materials. Users avoid ammonia on vintage pens, celluloid, ebonite, lacquer, and plated finishes. The worry is simple: discoloration, oxidation, and extra wear on rubber parts and adhesives. So the rule of thumb is pretty clear. Modern cartridge/converter pens may get ammonia. Vintage pens usually do not.
Cautions Around Soap, Cleaners, and Alcohol
For soap, less is better. 1–2 drops of mild dish soap is the standard range. Add too much, and you can leave behind residue that affects ink flow.
Alcohol and stronger cleaners get even more pushback. Users say these mixes can damage plastics, seals, and sacs. The main risks they point to are plastic crazing, microcracks, and seal wear. Because of that, most people save these stronger options for exceptional cases only.
Rinsing Steps Users Consistently Follow
Once ammonia or soap is used, users tend to follow one habit almost without fail: rinse longer than feels necessary. After any ammonia or soap flush, they keep rinsing with plain water until the smell, tint, and residue are gone. Many also do a last rinse with distilled water to help avoid mineral deposits.
Here’s the quick decision guide by recipe:
| Recipe | Material Cautions | Vintage or Delicate Pens? |
|---|---|---|
| Plain water | Minimal; avoid very hot water | Yes |
| Water + 1–2 drops mild dish soap | Too much soap leaves residue | Generally yes, with thorough rinsing |
| Diluted ammonia + water + dish soap | Avoid on sensitive materials | Often not recommended |
| Stronger cleaners or alcohol-based mixes | Plastic crazing, seal wear, residue risk | Use with extra caution or avoid |
As the cleaning mix gets harsher, users add more plain-water rinses before putting ink back in the pen.
Conclusion: Main Patterns in User Reports
Taken together, the reports point to a simple rule: use the mildest flush that gets the job done.
In practice, that means matching the strength of the flush to the residue and the pen material. Water-resistant inks can leave buildup that plain water may not remove. When that happens, users often move to a stronger flush. For stubborn residue, people also report soaking the pen for hours or even days, then brushing the nib and feed.
Many users save homemade flushes for deep cleaning only. In other words, they treat them as an occasional clean-out method, not part of normal routine care.
Key Takeaways for Choosing a Recipe
Start with warm water. If the ink won’t budge, move up to diluted ammonia or a dedicated cleaner, and rinse well before refilling. Vintage and delicate pens need extra care at every step.
FAQs
When should I stop using plain water and try a stronger flush?
Use a stronger cleaning solution when plain water stops doing the job. If a clog won’t clear, ink still won’t flow right, or residue keeps hanging on, water alone usually isn’t enough.
A good sign? The water still looks tinted after several flushes. The same goes for stubborn shimmer ink, pigmented ink, or ink that has dried inside the pen. That’s when it makes sense to move to the next step.
Start simple: add one drop of mild dish soap to water. Keep ammonia-based flushes or commercial pen flushes for the hardest cases.
How long should I rinse a pen after using soap or ammonia?
After using a soap- or ammonia-based pen flush, rinse the pen well with distilled water until the water runs completely clear. If you want a deeper clean, some users suggest doing at least 10 rinses.
Make sure there's no residue left behind, since even a small amount can affect ink flow. Once you're done rinsing, let the parts air-dry for 12 to 24 hours before you put the pen back together.
Which pen materials are unsafe for homemade pen flushes?
Take extra care with vintage pens, especially models made before the 1960s. Materials like celluloid, early rubber, and delicate resin can turn brittle or suffer permanent damage if you flush them with ammonia-based cleaners or other harsh chemicals.
You should also keep ammonia away from pens with aluminum, brass, or copper parts because it can lead to corrosion. And steer clear of acetone, rubbing alcohol, and bleach. Those chemicals can permanently damage both the finish and the pen’s structure.