
Organizing fountain pen repair supplies is essential for efficiency, safety, and preserving your tools and pens. A cluttered workspace can lead to lost parts, damaged materials, or accidents involving sharp tools and chemicals. Here's a quick guide to get started:
- Sort Supplies by Function: Group items like cleaning tools, disassembly tools, nib work essentials, chemicals, finishing supplies, and replacement parts.
- Use Proper Storage: Clear plastic containers, small jars, custom wooden blocks, and foam-backed drawers are ideal for keeping items secure and accessible.
- Label Everything: Clear labels and color-coding help you quickly locate tools and supplies.
- Inspect Supplies Regularly: Check for damaged or expired items, such as thickened adhesives or worn tools.
- Set Up a Repair Station: Arrange tools by frequency of use, separate hazardous items, and organize by repair stages for a smoother workflow.
- Maintain Your System: Perform inventory checks and reset your workspace after each session to stay organized.
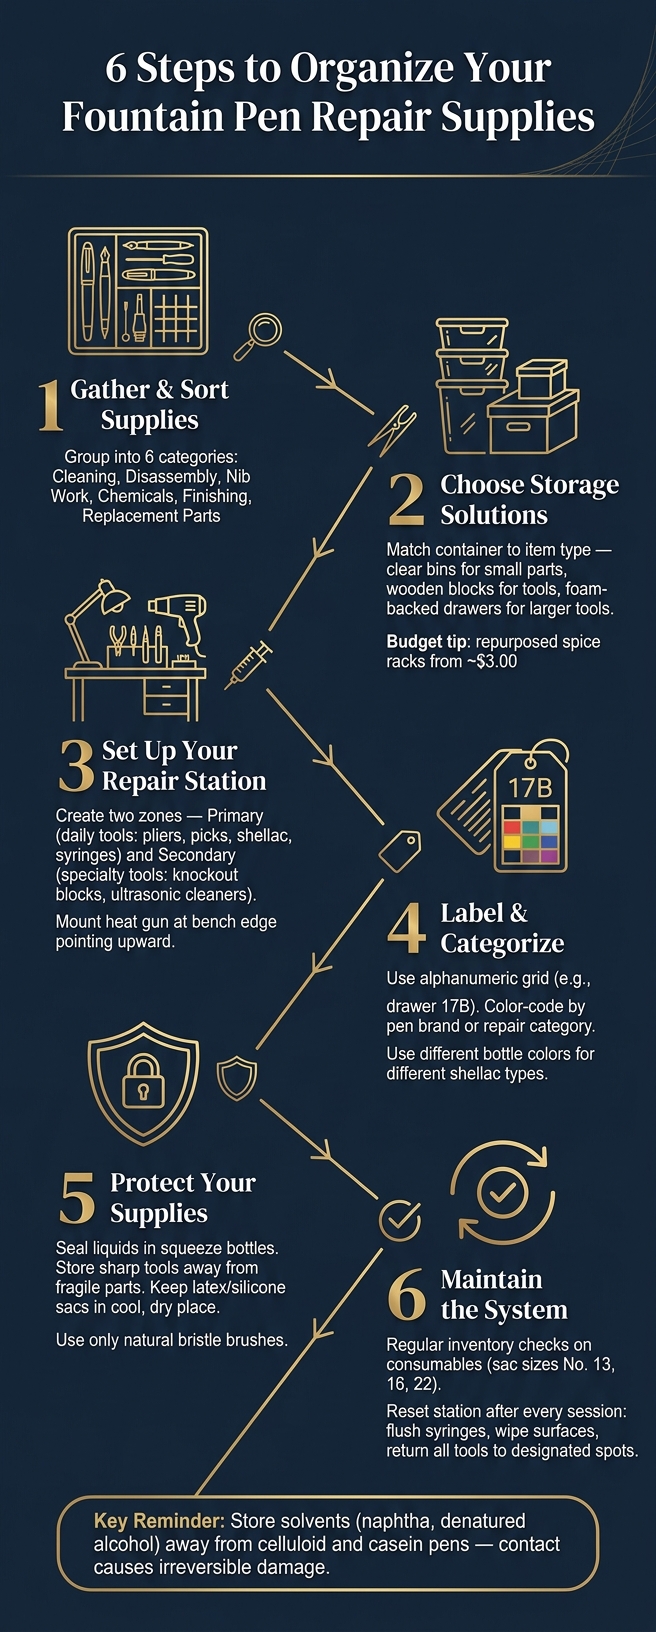
6-Step Fountain Pen Repair Station Setup Guide
Step 1: Gather and Sort Your Repair Supplies
Start by gathering all the tools, chemicals, spare parts, and polishing materials you'll need. Lay everything out on a clean surface - this makes it easier to see what you have and organize it effectively. Once you've done that, sort the items by their specific functions to streamline your repair process.
Group Supplies by Function
Organizing your supplies into functional categories can save you time and frustration during repairs. Here's a handy breakdown to guide you:
| Category | What Goes Here |
|---|---|
| Cleaning | Bulb syringes, blunt-tip syringes, pen flush, cotton swabs, natural bristle brushes |
| Disassembly | Heat gun, knockout block, knockout punches, gripper squares, forceps, dental picks |
| Nib Work | 10× triplet loupe, brass flossing sheets, micromesh (12,000 grit), nib block |
| Chemicals | Sac cement (shellac), silicone grease, which is essential for lubricating fountain pen pistons, talc powder, naphtha |
| Finishing | Simichrome or Flitz polish, Sunshine cloths, high-grit sandpaper (1,000–7,000 grit) |
| Replacement Parts | Latex or silicone sacs (sizes 13–22), J-bars, pressure bars, Vacumatic diaphragms |
To keep things neat, consider using a clear, latching plastic container as a "parts box" for all the components of a specific pen repair. This prevents tiny pieces like screws and jewels from getting lost.
Check for Damaged or Expired Items
After sorting, inspect your supplies to ensure everything is in working condition. Look for items that may need replacing or fixing:
-
Sac Cement: Over time, it can thicken. Thin it with denatured alcohol or replace it if it's unusable. As Richard Binder explains:
"You can use [denatured alcohol] to thin your sac cement when the cement has gotten too syrupy thick."
- Cleaning Fluids: Discard any that have developed sludge.
- Rubber Stoppers: Replace any that have hardened.
- Syringe Needles: Ensure they are ground flat; damaged needles can cause issues.
- Brushes: Stick to natural bristles, as synthetic ones can scratch delicate materials like celluloid or hard rubber.
- Metal Tools: Check punches and probes for burrs that could damage parts.
For items like shellac, buying smaller bottles can help avoid waste since larger quantities may go stale before you use them all. Taking the time to inspect your supplies now will save you headaches later.
sbb-itb-1dd4fe9
Step 2: Choose the Right Storage Solutions
Now that your supplies are sorted, it’s time to focus on storage. The goal? Affordable, practical solutions that protect your items and keep them accessible. Choosing the right containers is a key step toward creating an efficient repair station.
Match Containers to Item Types
The trick is to pair each item with a container suited to its size and purpose. For example, small plastic jars (costing around $0.40–$0.46 each) work perfectly for tiny parts like spare nibs, bushings, and springs. To stay organized, label these jars on both sides with the item name and part number.
For ongoing repairs, a clear latching plastic box (about $0.99) is a great choice for keeping all parts of a pen - caps, barrels, and more - together. Pen repair expert Danny Watts emphasizes the importance of this: consolidating parts in one place helps prevent loss.
For tools, consider a custom wooden block with holes drilled to match the diameter of each tool. This keeps picks, scrapers, and similar tools upright, separated, and easy to grab. Tyler Dahl, a pen repair specialist, even drilled a hole specifically for his shellac bottle:
"Say goodbye to spilled shellac! ... Fits the shellac bottle just perfectly!"
This simple modification solves a common problem - spilled shellac - and saves your carpet from disaster. For liquids like friction polish, Glue Bot bottles are a smart choice. They prevent caps from drying out and allow one-handed use.
Compare Storage Options Side by Side
When choosing storage, weigh the pros and cons of visibility, portability, and protection. Here’s a quick comparison:
| Container Type | Visibility | Portability | Protection | Best For |
|---|---|---|---|---|
| Clear bins / tackle boxes | High | Moderate | High | Small parts, nibs, bushings |
| Small jars / pill bottles | High | High | High | Tiny screws, springs, spare nibs |
| Custom wooden blocks | High | Low | Moderate | Frequently used tools and shellac |
| Drawers with foam backing | Moderate | Low | High | Larger tools like pliers and files |
| Wine boxes / large bins | Low | Moderate | Moderate | Bulk consumables like sacs and rags |
Foam-backed drawers deserve special mention for larger tools. The foam prevents delicate tips from sliding around or clashing with each other, keeping them safe. If you’re on a tight budget, don’t overlook thrift stores. A used revolving spice rack (often under $3.00) can be repurposed to organize nib units or small jars in a compact and efficient way.
Step 3: Set Up Your Repair Station
Get your workspace ready for smooth, uninterrupted repairs. A well-organized station saves you from scrambling for tools mid-task and keeps everything within easy reach.
Arrange Tools by Task and Frequency of Use
Divide your workspace into zones: one for tools you use all the time and another for those you need less often. For example, tools like section pliers, dental picks, shellac, forceps, and bulb syringes should live in your primary zone. As Deborah from Goodwriterspens's Blog explains:
"My most commonly used tools are contained in a large wine box. Less frequently used but still essential tools are distributed in various drawers and on shelves."
Items you don't use as often - knockout blocks, specialized vises, or ultrasonic cleaners - can be stored in drawers or on shelves nearby. To make things even smoother, group tools by the stage of the repair process. For example:
- Cleaning tools: pen flush, paper towels, cotton swabs
- Disassembly tools: heat sources, pliers
- Finishing tools: micromesh, polishing cloths
This way, you can move through each step without unnecessary backtracking.
If you use a heat gun, consider mounting it to the front edge of your workbench. This setup keeps the heat directed upwards and away from your hands and tools. Richard Binder from RichardsPens.com shares this tip:
"It's easier to use [a heat gun] that is mounted to the front edge of the bench... so that its blast points straight up. This keeps both the heat gun and your hands clear of other items that might be in the way on your workbench."
Separate Hazardous and Messy Items
Keep sharp tools, solvents, and adhesives away from pen components to avoid accidents or damage. For example, store syringes securely after deburring their tips to prevent injuries. Solvents like denatured alcohol or naphtha should be kept far from celluloid or casein pens, as contact can cause irreversible damage. If you're working with celluloid pens near heat sources, always have water nearby to quickly extinguish any accidental flames.
Once your tools are organized and hazards are safely managed, label and categorize your storage to complete your repair station setup.
Step 4: Label and Categorize Your Storage
With your supplies organized and safety measures in place, the next crucial step is proper labeling and categorization. This ensures that everything is easy to find and keeps your workflow smooth, especially when troubleshooting a pen that isn't writing.
Label Every Container Clearly
Adopt an alphanumeric grid system to keep your storage organized. Assign numbers to each drawer (1, 2, 3, and so on) and use letters for the internal compartments (a, b, c). For example, a small part like a bushing could be labeled as "17B." KMCloonan, a member of The International Association of Penturners, shares their approach:
"I label the drawers with a number 1-36, and the front compartment is 'a' and the rear compartment is 'b'. I keep bushings in small labeled ziplock bags. I write the bushing drawer/compartment on the bag, so I know which drawer to return it to."
To make identification even quicker, consider color-coding your labels based on pen brand or repair category. As egnald, another member of the same association, explains:
"I also color code my pen kit storage based on the type of kit it is... It really helps to find the bushings for a particular kit rather quickly."
For chemical storage, like shellac, use different colored bottles to avoid mix-ups. For example, orange bottles for standard shellac and clear bottles for blond shellac. For small tools, you can mark sizes directly on their handles with a permanent marker, sealing the markings with clear tape for durability.
Categorize by Repair Stage
Beyond labeling, grouping items by their repair stage can streamline your process. For active repairs, store all components - such as the cap, barrel, nib, and feed - together in a single clear, latching plastic box. The transparency of these boxes allows you to quickly check their contents without opening them, saving time and preventing the frustration of misplaced parts. This method also ensures you can easily pick up where you left off without missing a beat.
Step 5: Protect Your Supplies from Damage
Once your supplies are labeled and sorted, the next step is making sure they're safe from harm. Even the most organized workspace won’t help if your materials get ruined by moisture, dust, or physical damage.
Guard Against Moisture and Dust
To keep liquids like pen flush or cleaning solvents in good condition, store them in sealed squeeze bottles. This prevents exposure to air, which can cause degradation over time.
For adhesives like shellac, using small, sealed containers is a smart move. As pen restorer Richard Binder advises:
"Buying it [shellac] from a pen dealer gets you a handy small bottle that won't go stale before you use it up." - Richard Binder, Pen Restorer
This approach ensures that adhesives remain effective and don’t deteriorate before you’ve had a chance to use them. Additionally, clean rubber stoppers regularly with denatured alcohol to maintain their grip and functionality.
Store Sharp and Fragile Items Apart
Beyond chemicals, physical tools and materials also need careful handling. Sharp tools like bench knives, safety razors, and X-acto blades should always be stored separately from fragile items. A single slip can leave irreversible scratches on delicate materials like celluloid or hard rubber.
For sensitive components like latex sacs and silicone diaphragms, store them in a cool, dry place, well away from sharp objects. Similarly, when working with brushes and cleaning rags, stick to natural materials. Opt for natural bristle brushes and 100% pure soft cotton rags. Synthetic options, like nylon bristles, can actually damage pen materials. As Richard Binder warns:
"Never use brushes with bristles made of nylon or any other synthetic material; synthetic bristles can be harder than the materials you are working on... and they can make deep scratches." - Richard Binder, Pen Restorer and Author
Step 6: Keep Your Organization System Up to Date
Consistency is everything. Without regular upkeep, supplies can deteriorate, tools may go missing, and your carefully arranged workspace can quickly descend into chaos. By maintaining your setup, you ensure efficiency and safety remain intact over the long haul. Think of it as extending the benefits of your initial organization into your daily routine.
Do Regular Inventory Checks
Take time to inspect your chemicals and adhesives frequently. Pay special attention to consumables like latex and silicone sacs, particularly in common sizes like No. 13, 16, and 22, as these tend to run out faster than expected. Regularly check for wear and tear on tools - sprung alligator forceps or scissors that no longer make clean cuts can hinder your work. Keeping an eye on these details ensures you're always prepared.
Reset Your Station After Each Repair Session
Once you've checked your inventory, make it a habit to reset your workspace after every session. Flush syringes and bulb syringes with water or cleaning solution to prevent residue from hardening. Wipe down your work surface and polish any tools, like pen exteriors, to remove fingerprints or ink smudges. Return everything to its rightful place - micromesh sheets, brass flossing sheets, loupes, and rubber grips all belong somewhere specific. If you used a small vial of pen flush, refill it from your main reserve so it’s ready for next time. This quick five-minute routine keeps your tools organized and your station ready for action.
"The most important tool in every repairer's toolbox is patience." - Richard Binder, Pen Restorer and Author
That patience isn’t just for the repair itself - it’s also for the maintenance. Spending a few extra minutes to reset and restock after each session will save you time and frustration when you sit down to work again.
Conclusion: Start Organizing Your Repair Supplies Today
Keeping your repair station organized can save you from the frustration of losing parts and protect the quality of your work. A messy workspace increases the risk of tiny components disappearing - just as Danny Watts put it, "Parts get lost easily and accidents happen." Something as simple as a latching box, which you can grab for under a dollar at a craft store, can make all the difference.
An organized setup also gives you a confidence boost. Colt R.'s comment sums it up perfectly:
"This kit makes me feel more competent than I really am... I think I'm going to get a lot of use out of the kit!"
Having a tidy and well-prepared station helps you stay focused and careful. Start with some essentials like a jeweler's loupe, a blunt-tip syringe, and a few labeled containers. If you'd rather skip the hassle of gathering supplies individually, a pre-assembled tuning and cleaning kit is a great option to cover the basics.
Every small effort you make adds up. Sort your tools, pick the right storage solutions, set up your workspace, label your items, and keep everything in good condition. These steps ensure faster, safer, and more satisfying repairs. With a well-organized station, you'll be ready to tackle any project with ease and confidence.
FAQs
What are the must-have repair supplies to organize first?
To get started, make sure you have the right tools for cleaning and maintaining nibs. Some must-haves include a lighted loupe, bulb syringe, brass shims, micro-mesh, microfiber cloths, silicone grease, and blunt-tip syringes. You can also repurpose common household items like glass jars or tiered boxes for storing these tools. Keeping everything organized and within reach will make your repair station much more efficient.
How should I store shellac, solvents, and other chemicals safely?
Store shellac, solvents, and other chemicals in clear, sealable plastic containers to minimize the risk of spills. Place these containers in a clean, well-lit, and ventilated workspace, keeping them far from heat tools or open flames. To maintain safety and avoid contamination, keep chemicals separate from pens and parts. Additionally, ensure that cleaned parts are completely air-dried before reassembling them.
What’s the easiest labeling system for tiny pen parts?
The easiest way to organize and label small pen parts, such as nibs or repair components, is by using a multi-part system. Start with a bead storage box that has compartments, and label each section. To keep things flexible, place tape under the lids so you can update labels as needed. For more permanent categories, stick with durable labels, but for projects that might change, use removable overlays like vinyl labels. You can also add color-coded labels based on part type or nibmeister, making it quicker to identify items during repairs.