
Struggling with skipping, dry writing, or ink flow issues in your fountain pen? Feed modification might be the solution. The feed, located beneath the nib, regulates ink delivery. If it’s not performing well, problems like railroading or inconsistent flow can occur - especially with flex nibs or high-demand writing styles.
Here’s what you need to know:
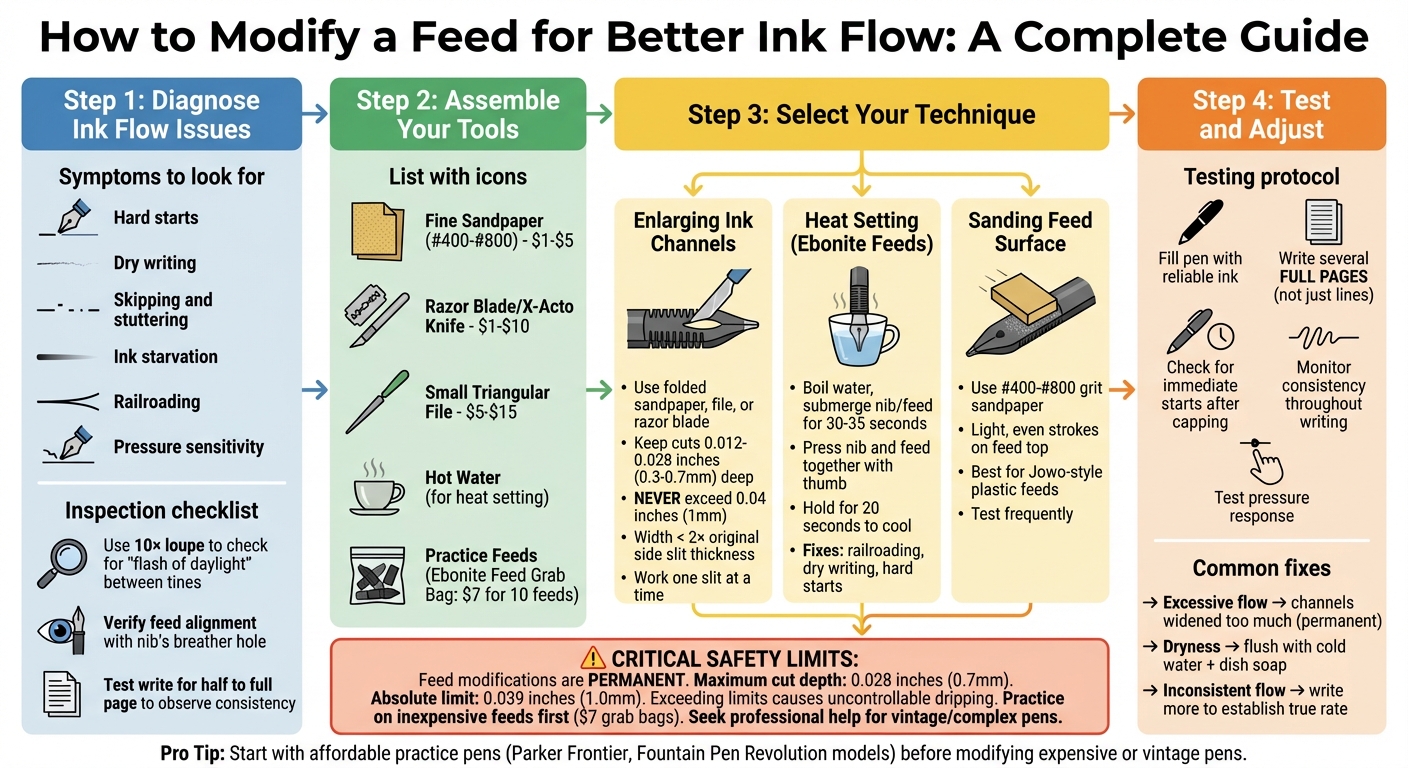
- Common Problems: Hard starts, skipping, faint ink, or railroading often point to feed issues.
- Tools You’ll Need: Fine sandpaper, razor blades, small files, and hot water for reshaping ebonite feeds.
- Key Techniques: Widen ink channels, heat-set the feed for better nib alignment, and test ink flow thoroughly.
Pro Tip: Practice on inexpensive ebonite feeds before modifying a pen you rely on. Brands like Fountain Pen Revolution offer affordable feed grab bags for beginners.
Caution: Feed modifications are permanent. Work slowly and test frequently to avoid over-adjusting and causing uncontrollable ink flow.
Whether you're fixing a dry pen or optimizing for a flex nib, this guide walks you through safe and effective feed adjustments.
Step-by-Step Guide to Fountain Pen Feed Modification
Tools and Materials Needed
Basic Tools
To modify feeds, you won't need anything fancy - just a few simple tools you can pick up at home or at a hardware store. Start with fine sandpaper (grit #400 to #800), which is perfect for carefully widening ink channels. Folding the sandpaper gives you more control over how much material you remove.
A razor blade or X-Acto knife is another handy tool, especially for compressing or cutting ebonite to adjust slits. Keep in mind, though, that this method isn't as lasting as sanding or filing. For more precision, a small triangular file is a great choice. It allows you to focus on specific areas without disturbing the rest of the feed. You'll also need hot water to heat and reshape ebonite feeds as needed.
| Tool | Purpose | Estimated Cost |
|---|---|---|
| Fine Sandpaper (#400-#800) | Widening ink channels | $1.00 - $5.00 |
| Razor Blade / X-Acto Knife | Compressing or cutting channels | $1.00 - $10.00 |
| Small Triangular File | Precision grinding | $5.00 - $15.00 |
Lastly, having a few spare feeds on hand can be a lifesaver, especially as you're learning and refining your technique.
Additional Supplies
If you're just starting out, it's a good idea to practice on replacement feeds before modifying a feed you rely on. These practice feeds are available in various sizes and are ideal for experimenting because ebonite is easy to work with using tools like sandpaper and files.
A great option for beginners is the Ebonite Feed Grab Bag (priced at $7.00 for 10 feeds). This affordable set gives you the freedom to try different techniques without worrying about ruining an important feed. If you're planning to upgrade to a flex nib that requires higher ink flow, consider pre-paired nib and feed combos. These are already designed for compatibility and range in price from $8.00 to $20.00.
sbb-itb-1dd4fe9
Identifying Ink Flow Problems
Signs of Ink Flow Problems
Before diving into feed modifications, it’s crucial to understand the specific issue you’re addressing. Here are some common signs of ink flow problems:
- Hard starts: The pen doesn’t write immediately and may require extra effort to get the ink flowing.
- Dry writing: If your ink appears faint or undersaturated and doesn’t smudge when touched a few seconds after writing, the flow may be insufficient.
- Skipping and stuttering: Breaks in the ink line during writing often point to feed or nib alignment issues.
- Ink starvation: The pen might start strong but fade as you write, signaling the feed isn’t keeping up with demand.
- Railroading: Downstrokes under pressure may cause the ink to split or skip, showing the feed isn’t supplying enough ink.
- Pressure sensitivity: If the pen only writes when pressed hard, it suggests the ink isn’t flowing under its own weight.
- Clogging: For clogged feeds, soaking the nib and feed in a mix of water, ammonia, and dish soap for 12–24 hours can help.
These issues have been thoroughly discussed in fountain pen literature.
"If you can't see a flash of daylight between the tines, they might be too tight to let ink through."
- Anthony, Editor, UK Fountain Pens
Understanding these signs helps you pinpoint the root cause of your pen’s ink flow issues.
How to Inspect Your Pen
To properly inspect your pen, use a 10× loupe to check for a "flash of daylight" between the tines. If the tines are touching, ink flow may be restricted. Ensure the feed’s ink channel is aligned with the nib’s breather hole and that the nib sits flush against the feed. Proper alignment between these components is essential for smooth ink flow.
As Anthony from UK Fountain Pens explains:
"Does the line stay consistently saturated and flow evenly even after half a page? Or does it start to dry up and grow fainter? Do you need to prime the feed by advancing the piston or converter to get it to flow again?"
- Anthony, Editor, UK Fountain Pens
To test for ink flow issues, write continuously for half a page to a full page. If the ink starts strong but fades, it could mean the feed isn’t replenishing ink from the reservoir. Also, check that the nib and feed are securely seated in the pen’s section; any wobbling or clicking can disrupt the flow. Testing with reliable ink and paper - ones that have worked well in other pens - can eliminate external factors and provide clearer insight into the problem.
| Symptom | Potential Feed/Nib Cause |
|---|---|
| Hard Starts | Tines too tight, feed not primed, or "baby's bottom" on tipping |
| Skipping/Stuttering | Poor nib-feed contact or misaligned tines |
| Fading Line (Starvation) | Feed failing to replenish ink or air-exchange blockage |
| Railroading (during flex) | Feed cannot keep up with ink demand for spread tines |
| Leaking/Dripping | Air leak in the reservoir or feed channel too wide |
How To: Widen Feed Channels
Before modifying your feed, ensure you clean and maintain your fountain pen to rule out simple clogs as the cause of poor flow.
Feed Modification Methods
Once you've identified your ink flow issue, it's time to fine-tune your feed with precision techniques. Even small changes can have a big impact, so work carefully and methodically.
Enlarging Ink Channels
Widening the ink channels in your feed can help more ink reach the nib, especially with ebonite feeds that have multiple slits (also known as "valves"). To tackle this, you'll need tools like a razor blade, a micro triangular file, or #400–800 grit sandpaper folded into a V-shape.
Take it slow and steady. For ebonite feeds, adjust one slit at a time, testing as you go. Keep your cuts between 0.012 inches and 0.028 inches (0.3mm–0.7mm), and never exceed 0.04 inches (1mm). Going beyond these limits can cause uncontrollable ink leakage. Also, the width of the cut should stay under twice the thickness of the side rib slits. These careful adjustments can significantly improve ink delivery.
Using a razor blade compresses the ebonite instead of removing material, making the change semi-permanent. On the other hand, files and sandpaper remove material, resulting in a permanent modification. Apply gentle pressure to avoid accidental damage.
"There's no going back once the valve is widened, so please make your decision carefully."
- Eureka_Admin, Eureka Fountain Pens
When widening, avoid fully connecting the new path to the side rib slits - only partially widen the area starting from the main air channel. Make sure the feed is completely dry before you begin to prevent tool slippage. After modifying, write extensively to use up any residual ink and observe the final flow rate.
Reshaping Feeds with Heat
Heat setting is a technique for ensuring the nib and feed fit snugly together, which is crucial for steady ink flow. This method works best on ebonite feeds, which become pliable when heated and hold their new shape as they cool. Heat setting can address problems like railroading, dry writing, hard starts, dripping, and blobbing.
Stick to the hot water method - avoid open flames. Boil water, pour it into a container, and submerge the nib and feed (up to the section) for 30–35 seconds. Keep the pen's section and barrel out of the water - older black ebonite barrels, for instance, can turn green if exposed to water.
"Avoid using an open flame to heat a feed. Vintage celluloid pens are highly flammable and there is a much safer alternative."
- Danny Watts, Author, Chronicles of a Fountain Pen
After heating, use your thumb to gently press the feed and nib together. Hold them in place for about 20 seconds to allow the ebonite to cool and set. Ink the pen and test the flow. If the fit isn't tight enough, you can repeat this process. For vintage pens, it’s a good idea to remove the section from the barrel before heating to prevent water exposure.
Sanding the Feed Surface
Sanding the top surface of the feed can improve ink flow to the nib, especially for Jowo-style plastic feeds. These feeds are often coated during manufacturing to aid ink movement, and sanding alters this coating to adjust flow characteristics.
This permanent modification calls for fine-grit sandpaper (#400–800). Work slowly and use light, even strokes along the area where the feed meets the nib. Test frequently as you go - you can always sand more, but you can’t replace material once it’s removed. Since plastic feeds don’t respond well to heat compared to ebonite, sanding is a practical way to improve ink flow. Try these adjustments and test your results in the next section.
Testing and Fixing Issues
After making adjustments to your pen's feed, it's crucial to test thoroughly. Initial results can sometimes be misleading, so take the time to ensure everything is functioning as expected.
How to Test Ink Flow
Start by filling your pen with a reliable ink. Brands like Fountain Pen Revolution offer consistent inks that are great for testing. Once the pen is filled, write several full pages of text - not just a few lines. This step is essential because the first strokes might show an artificially high ink flow due to ink that pooled during the filling process.
"each time you test for the increased flow, you want to use up a lot of ink, to ensure you don't get the false ink flow readings (due to welled up ink, etc.)." - Eureka_Admin, Administrator, Eureka Fountain Pens
Pay close attention to how the pen behaves. Does it start writing immediately after being capped? Is the ink flow consistent throughout your writing session? Does the pen handle changes in pressure smoothly? If you notice any issues, you'll need to make adjustments as described below.
Fixing Common Problems
Here are some specific fixes for issues that might arise after adjusting your feed:
- Excessive Ink Flow: If too much ink is flowing from the nib, this usually means the feed channels were widened too much. Unfortunately, this is a permanent modification. To avoid this problem in the future, limit your adjustments to no more than two valves on an ebonite feed and keep the depth between 0.012 inches and 0.028 inches (0.3mm–0.7mm).
- Dryness: If the pen feels dry, try flushing the section with cold water mixed with a drop of dish detergent. Use an ear syringe to clear out any debris or ebonite shavings that might be clogging the feed. Also, ensure the nib is fully seated so the feed stud is visible inside the cartridge nipple, and check that the breather hole aligns with the feed channels. If dryness occurs only after the pen has been capped for a while, inspect the cap seal. Air leaks at the threads or finial can cause evaporation in the feed channels.
- Inconsistent Flow: Often, this resolves itself after writing enough to establish the modified feed’s true flow rate. If hard starts persist, the problem might not lie with the feed but with the cap seal or the nib itself. A "baby bottom" on the nib tipping could be the culprit. To rule out ink-related issues, test with a high-quality ink like Waterman Serenity Blue or Pelikan 4001.
Safety Tips and Warnings
Modifying a fountain pen's feed is a one-way street. As Eureka_Admin from Eureka Fountain Pens emphasizes:
The effects of increasing the flow is permanent, and there's no going back. Proceed with caution.
- Eureka_Admin, Eureka Fountain Pens
The biggest risk? Uncontrolled ink flow. If all four valves are widened excessively, ink can start dripping uncontrollably from the nib. Eureka_Admin explains:
In extreme cases, ink will simply drip out of the pen.
- Eureka_Admin, Eureka Fountain Pens
This happens when too much material is removed or cuts go too deep. To avoid this, keep feed cuts between 0.012 and 0.028 inches (0.3–0.7 mm) deep, and never exceed 0.039 inches (1.0 mm). Additionally, the width of the cut should remain less than twice the original thickness of the side slit. These measurements are critical for safe modifications.
Start with Inexpensive Pens
Before experimenting on a cherished or expensive pen, practice on affordable models. Mercian recommends starting with pens like the Parker Frontier, which has a nib/feed unit that unscrews easily for cleaning. Similarly, Fountain Pen Revolution offers beginner-friendly pens that are simple to disassemble, clean, and maintain. These low-cost options are perfect for learning without risking significant damage.
When to Get Professional Help
Some situations require a professional touch instead of DIY efforts. For example, vintage pens like the Pelikan 400 or 520 or pens with intricate filling systems (e.g., plunger or vacuum fillers) should be entrusted to experts, especially if they show signs of rattling or looseness. Attempting to fix these on your own could lead to irreversible damage.
If you're unable to control the depth and width of your cuts precisely, you risk exceeding safe limits and damaging the feed. It’s also worth noting that many ink flow issues stem from simpler problems, such as dried ink, leftover manufacturing debris, or cap seal issues. Thorough cleaning often resolves these issues without the need for permanent modifications. Following these precautions will help protect your pen and ensure it functions smoothly for years to come.
Conclusion
To achieve success with feed modification, it's essential to approach the process with careful diagnosis and gradual adjustments. Before diving into permanent changes, take the time to thoroughly investigate ink flow issues - problems like dried ink or debris are often resolved with a simple cleaning.
When modifications are necessary, focus on making small, precise changes and test the results after each adjustment. Always prioritize modifying the feed rather than the nib to avoid creating long-term problems like hard starts or "baby bottoms". If you're new to this, start with affordable pens to build your confidence and skills. Brands like Fountain Pen Revolution offer beginner-friendly options, including modular designs, ebonite feeds, and starter sets priced at $35 - perfect for practice.
If challenges persist even after following these methods, revisit earlier sections on troubleshooting and testing solutions. For vintage or particularly complex pens, professional assistance might be your best bet.
FAQs
How do I know it’s the feed - not the nib or ink?
If your pen skips, stops writing, or shows uneven ink flow even after ensuring the nib is clean and the ink is appropriate, the issue might lie with the feed. Start by cleaning the nib, trying different inks, or tweaking the nib settings. However, if the problem continues or the pen consistently writes too wet or too dry regardless of the ink used, it’s likely due to the feed’s alignment or overall condition.
Can I undo a feed modification if it goes wrong?
Yes, many feed modifications can be reversed, though it depends on the type of adjustment. Simple changes, like adding a plastic post, are usually easy to undo. However, more permanent alterations can be much harder to reverse. To minimize potential issues, take a careful approach, keep detailed notes of your steps, and regularly review your progress. This way, you’ll have a better chance of restoring the original setup if necessary.
Will these methods work on plastic feeds too?
Techniques like deepening or widening the feed channel are typically designed for plastic feeds made from materials such as ABS. While these methods could potentially be applied to rubber or ebonite feeds, the differences in material properties mean adjustments need to be approached carefully. What works for plastic may not always translate seamlessly to these other materials.