

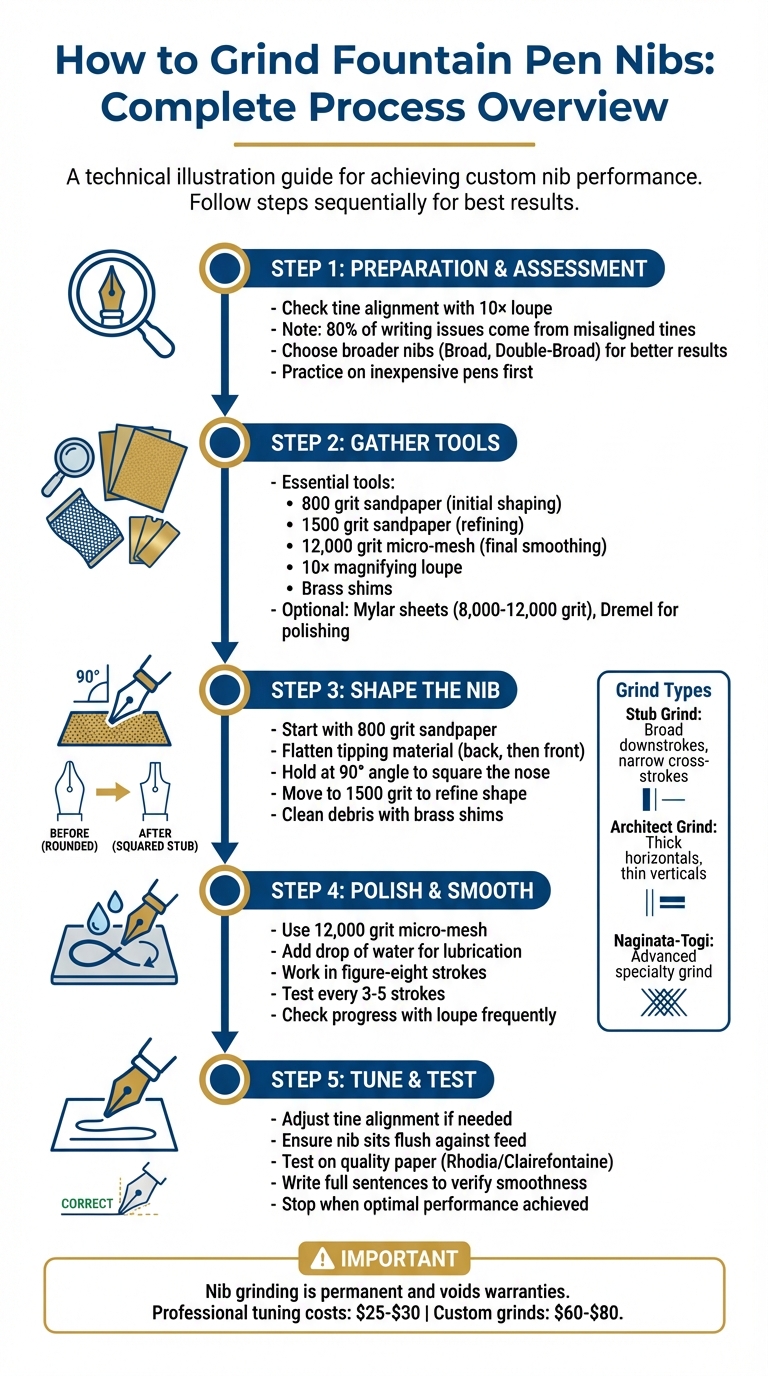
Grinding a fountain pen nib allows you to customize your writing experience by creating variations in line thickness. This technique can transform a standard nib into a tool for expressive handwriting or calligraphy. Whether you're aiming for a stub grind (broad downstrokes, narrow cross-strokes) or an architect grind (thick horizontals, thin verticals), the process requires patience, precision, and the right tools. Here's a quick overview:
- Why grind nibs? To fix issues like scratchiness, improve ink flow, or understand the differences between custom and standard nibs for artistic effects.
- Preparation: Inspect the nib with a magnifying loupe, ensure alignment, and set up a stable workspace with proper lighting and tools.
- Tools needed: Sandpaper (800–12,000 grit), a 10× loupe, brass shims, and optionally Mylar sheets or a Dremel for advanced smoothing.
- Safety note: Nib grinding is permanent and voids warranties, so practice on inexpensive pens first.
The process involves shaping the nib with sandpaper, refining it with finer abrasives, and testing frequently to avoid over-grinding. Once complete, post-grinding adjustments like smoothing and tine alignment ensure optimal performance. With care and practice, you can achieve beautiful line variation tailored to your style.
Step-by-Step Guide to Grinding Fountain Pen Nibs
Step-by-step DIY Nib Grind
sbb-itb-1dd4fe9
Preparing to Grind Your Fountain Pen Nib
Getting ready to grind a fountain pen nib requires thoughtful preparation. This step is essential for protecting your pen and achieving the desired custom result. It involves evaluating your nib carefully and organizing a workspace that promotes precision and safety.
Assessing Your Nib for Grinding
Start by inspecting your nib closely with a 10× loupe and good lighting. Look at the nib straight on - are the tines perfectly level? Misaligned tines are a common culprit behind writing issues, accounting for about 80% of such problems. If you spot uneven tines, gently adjust the higher one with your fingernail until they align.
"Grinding a nib with misaligned tines could result in permanent damage to the nib, essentially rendering the pen or nib unit useless."
– Arlo Palmer, Nibmeister
The width of your nib plays a big role in what you can achieve. Broader nibs, like Broad, Double-Broad, or specialty designs such as Sailor Zoom and Platinum Coarse, offer more tipping material, making them better suited for dramatic line variation. The material of the nib also matters - gold nibs are softer and easier to shape, while steel nibs are harder but more durable.
Before jumping into grinding, clearly define your goal. Are you correcting a flaw, improving ink flow, or aiming for a specific shape like a stub or architect grind? Sometimes, addressing common nib issues and quick fixes like thorough cleaning or testing with different inks and papers might solve the issue without grinding. If you’re new to this, practice on affordable pens or nibs, such as those from TWSBI ECO or TWSBI 580 models, instead of risking expensive or rare pens. Keep in mind that professional nib tuning costs about $25–$30, while custom grinds range from $60–$80.
Properly aligned nibs don’t just improve line variation - they also ensure the feed system works efficiently. This connection between nib alignment and ink flow is crucial for a successful grind.
Understanding Feed Systems and Ink Flow
Once you’ve assessed your nib, it’s important to understand how the feed system interacts with it. The feed controls how ink flows to the nib tip, and any changes to the nib can disrupt this balance. For example, broader grinds like stubs demand more ink to cover the larger surface area. If the feed doesn’t supply enough ink, you might end up with uneven lines. Additionally, the way you hold and angle the pen matters - grinds like the architect rely on a steady hand to create their signature effect of thin vertical strokes and thicker horizontals.
To maintain smooth ink flow after grinding, ensure the nib sits flush against the feed, right up to the tip. This alignment is key to avoiding inconsistent performance.
Safety Precautions and Workspace Setup
Keep in mind, nib modifications are permanent and will void your pen’s warranty.
"Be warned that going through the actions described below may very well void the warranty of whatever pen you decide to use for this project."
– Arlo Palmer, Nibmeister
Set up a stable, well-lit workspace where you can keep your tools organized. You’ll need micro-abrasive papers or Mylar sheets in grits ranging from 3,000 to 12,000. Add a drop of water to the abrasive surface for lubrication. Have your 10× loupe ready for frequent inspections and keep brass shims on hand to clear debris from between the tines after each grinding session.
A tidy, organized workspace encourages a careful and methodical approach. Work slowly, inspecting your nib and testing it on paper frequently. This step-by-step process helps you avoid the common mistake of removing too much material, which can ruin the nib’s tipping. Patience and precision are your best tools for a successful grind.
Tools and Materials for Nib Grinding
Having the right tools can mean the difference between a perfectly ground nib and one that's irreparably damaged. Start with a basic set of essentials and gradually explore more advanced equipment as you gain confidence.
Basic Tools for Beginners
For beginners, 800 grit sandpaper is a great starting point. It helps shape the nib's tipping material and square off the "nose" for a stub profile. Once the initial shaping is complete, move on to 1500 grit sandpaper to refine the shape and begin the polishing process.
"Repeating the steps with the 1500 grit sandpaper will start the polishing process, helping to prepare the nib for tuning and smoothing."
– Arlo Palmer, Nibmeister
A 10× magnifying loupe is indispensable for closely monitoring your progress, while brass shims are useful for clearing debris from the nib slit. For the final smoothing stage, use 12,000 grit micro-mesh, which removes any remaining scratchiness and leaves the nib with a polished, smooth finish.
Broader nib sizes are often easier to work with because they provide more tipping material, making line variation more prominent and offering a bit more room for error. Once you’ve mastered the basics, you can explore advanced tools to further refine your technique.
Advanced Equipment Options
When you’re comfortable with manual grinding, consider adding a rotary tool like a Dremel to your toolkit. Use the Dremel only for final polishing, working at very low speeds with a soft cloth. It’s not suitable for shaping, as it can remove material too quickly and unpredictably.
Another advanced option is Mylar sheets in 8,000–12,000 grit. These are excellent for smoothing, especially when used with a small drop of water. The water not only enhances the smoothing process but also prevents heat buildup during use.
Where to Source Quality Tools
Once you know what tools you need, sourcing high-quality options ensures better results and durability. For instance, Fountain Pen Revolution offers a 12,000 grit Micro-Mesh Nib Smoothing Sheet for $5.00. This sheet measures 3″ × 4″ and is designed to last through hundreds of nib smoothing sessions. It has earned a 4.2/5 rating from 10 reviews, with users praising its ability to eliminate scratchiness.
For a more comprehensive setup, the Fountain Pen Tuning/Cleaning Kit is a solid choice. At $31.00, it includes everything you need: 12,000 grit micro-mesh, a lighted magnifying loupe, brass flossing sheets (also available separately for $3.25), a rubber grip, silicone grease, and a bulb syringe (individually priced at $3.50). This kit has a perfect 5.0/5 rating from 9 reviews, with customers appreciating its thoroughness and convenience.
Investing in durable, high-quality tools not only makes the process more enjoyable but also ensures you’re equipped for countless nib modifications. Essentials like the micro-mesh are a cost-effective way to achieve professional results, whether you’re a beginner or an experienced enthusiast. With the right tools in hand, you’ll be ready to dive into the art of nib grinding and create beautiful line variations with confidence.
Step-by-Step Nib Grinding Techniques
Now that your tools are ready, it's time to start transforming your nib into a personalized writing instrument. Follow these techniques to create both basic and advanced grinds.
Creating a Stub Grind
Once you've confirmed the nib alignment, start shaping with 800 grit sandpaper. Begin by flattening the tipping material on the back of the nib, keeping the pen completely flat against the sandpaper. Then repeat the process on the front, or writing side. To create the stub's square profile, hold the pen at a 90-degree angle to the abrasive surface and gently grind the nib's nose. This will help produce thinner side strokes.
After achieving the initial shape, move to 1500 grit sandpaper to refine and polish the grind. Repeat the flattening and squaring steps, and to soften sharp corners, roll the pen upward while dragging it across the sandpaper. This step adjusts the "crispness" of the stub. Once the shaping is complete, use brass shims to clean out any metal debris from the nib slit.
Finish the process with 12,000 grit micro-mesh. Use figure-eight strokes at different angles, working in short bursts of 3–5 strokes, and test the nib frequently on paper. Check your progress under a loupe to avoid over-polishing, which can cause issues. Adding a drop of water to the micro-mesh can help achieve smoother results and prevent heat buildup during tuning.
Once your basic stub grind is complete, you can experiment with advanced techniques to create even more dramatic line variations.
Advanced Grinds: Architect and Naginata-Togi
After mastering the stub grind, you can try advanced methods to achieve unique line dynamics. The architect grind (sometimes called a Hebrew or Arabic grind) flips the usual line variation, producing thin vertical strokes and thick horizontal strokes. Unlike the balanced lines of a stub, this grind creates a striking contrast by forming a contact patch that is narrow vertically and wide horizontally. Achieving this effect involves three main cuts: a flat face at your natural writing angle and two angled side cuts.
Start by holding the pen at your natural writing angle and making horizontal strokes on 600 grit sandpaper to form the flat surface that determines the horizontal line width. Next, shape the sides of the tipping into a "V" parallel to the slit. Be careful not to grind to a sharp point - leave a small flat area to maintain both ink flow and smoothness. Use 3200 to 12,000 grit micro-mesh pads to clean up the sides, as the slight flexibility of the pads helps smooth out any sharp edges that could cause scratchiness.
Architect grinds are highly sensitive to writing angles. The flat grind must make full contact with the paper to work properly.
"With architect grinds, there's more area of inner tine touching the paper compared to something like a stub, so any roughness there is more apparent" – Josh, nibbedinthebud
This makes precision and thorough smoothing essential.
For grinds like the Naginata-Togi, the techniques become even more intricate. These specialized grinds are best attempted after you've gained confidence with stub and architect styles.
Tips for Consistency During Grinding
Regardless of the grind type, maintaining consistency is key. Three factors play a crucial role: angle, pressure, and symmetry. Always grind at the same angle you naturally hold the pen while writing to ensure the nib performs as intended. Use light, steady pressure - too much force can damage the nib or remove material too quickly.
"Never grind continuously without checking" – Filip, Follow My Pen
Work in figure-eights or short vertical and horizontal strokes to mimic real writing patterns. This approach helps you identify rough spots or inconsistencies early, before they become permanent. Remember, it's better to remove material gradually - you can't put it back once it's gone.
Post-Grinding Tuning and Optimization
Finishing the grind is just the beginning - post-grinding adjustments are where the magic happens. These steps ensure your nib delivers a smooth and consistent writing experience tailored to your style.
Smoothing and Polishing the Nib
Start with ultra-fine abrasives, like 8,000 to 12,000 grit micro-mesh or Mylar sheets. These minimize material removal while refining the nib. Add a drop of water to the surface to reduce friction and heat buildup. Work at your natural writing angle, using small figure-eight motions (3–5 strokes at a time). After each session, test the nib on high-quality, fountain pen–friendly paper, such as Rhodia or Clairefontaine, to gauge progress. Stop polishing as soon as the writing feels smoother - overdoing it can create a "baby's bottom" effect that disrupts ink flow.
For a final touch, use a Dremel at a low speed with a soft cloth attachment. This step is purely for achieving a uniform shine and should never involve further shaping or material removal.
Once polished, the nib's alignment and slit spacing become the focus.
Adjusting Tine Alignment and Slit Spacing
Using a loupe, examine the nib head-on to check for uneven tines. If one tine sits higher than the other, gently press the raised tine with your finger or nail until both are level. Gold vs steel nibs differ in flexibility; gold is softer and easier to adjust, while steel requires more effort and precision. Make adjustments gradually, testing frequently to avoid overcorrecting.
Ensure the nib sits flush against the feed all the way to the tip. This alignment is essential for steady ink flow and consistent line quality.
Testing and Troubleshooting
After each adjustment, write full sentences to assess ink flow, start-up reliability, and overall smoothness. If the nib skips or struggles to start, revisit tine alignment before making further changes. Scratchiness in certain strokes often signals misaligned tines rather than an issue with smoothness. Work methodically, using fountain pen–friendly paper to get accurate feedback. Once the nib writes smoothly and starts reliably, stop making adjustments - any material removed during the process is permanent.
Conclusion
Grinding your nib tailors it to match your writing style and grip. It’s a process that requires patience and precision: aligning the tines, carefully removing material with 800–1,500 grit sandpaper, and finishing with ultra-fine micro-mesh. As Filip from Follow My Pen wisely advises, "Without a clear goal, do not grind". Before starting, decide on the exact line variation you’re aiming for - whether it’s a 1mm stub nib for everyday use or a sharp italic for artistic calligraphy.
Because grinding is permanent, practice is critical. Test your progress frequently to avoid removing too much material. Keep in mind that DIY modifications often void the manufacturer's warranty, so the responsibility for the outcome rests entirely on you.
Custom grinding offers more than just a functional upgrade - it can repair flaws, enhance your handwriting, and save you the expense of professional nib tuning. Start with inexpensive fountain pen nibs, proceed gradually, and handle the nib with care. The process not only improves your skills but also deepens your appreciation for fountain pens. Once you achieve the line variation you’ve envisioned, you’ll understand why so many enthusiasts enjoy this hands-on approach to customization.
FAQs
Which nib sizes are best for grinding?
Broader nibs - like Medium, Broad, Double-Broad, Stub, Italic, or Oblique - are perfect for grinding because they provide more material to work with and allow for noticeable line variation. On the other hand, finer nibs, such as Extra Fine or Fine, aren't as ideal. They have less material to modify, and the results tend to be more subtle. Choosing a broader nib gives you more flexibility and makes it easier to achieve custom line variations.
How do I avoid the “baby’s bottom” problem?
To address the "baby's bottom" problem - when nibs are too rounded, leading to skipping - it's essential to smooth the nib with care. Use fine abrasives like micro-mesh pads and proceed slowly and deliberately. If you're hesitant or inexperienced, it might be better to replace the nib or seek help from a professional nibmeister. Additionally, regular cleaning and gentle use can help prevent this issue from recurring.
When should I pay a nibmeister instead of DIY grinding?
When dealing with high-value pens or serious damage - like cracks or sprung tines - it’s wise to consider hiring a nibmeister. These professionals have the skills needed for repairs that go beyond basic fixes. The same goes for intricate custom grinds, such as flex, oblique, or architect nibs, which require expertise to execute properly.
For minor tweaks, like aligning tines or smoothing a nib, you can often handle these with simple DIY tools. However, if the modification is complex or the pen is particularly valuable, it’s best to trust a professional to ensure the job is done right.