

Yes: I clean pen threads with cool or lukewarm water, a soft swab or brush, and I let every part dry all the way before reassembly. In most cases, that’s enough to clear ink, lint, skin oil, and dust without harming the grooves that help the pen seal.
If I want the short version, it’s this:
- Start gentle: use a damp cotton swab, soft brush, or lint-free cloth
- Use plain water first: add a little mild dish soap only if water doesn’t work
- Use pen flush sparingly: mainly for dried ink on modern pens
- Keep caps from holding water: clean cap threads with a barely damp swab
- Dry fully: air-dry for 2 to 4 hours, or overnight after deeper cleaning
- Reassemble lightly: stop at snug, and use a slight back-turn first to help avoid cross-threading
A small habit like thread cleaning at each ink change can cut down on gritty feel, leaks, and inky fingers. If dried ink is stuck, I let a damp swab sit on it for 30 to 60 seconds instead of scrubbing hard.
This comes down to three rules: clean gently, dry fully, and don’t over-tighten.
How to Clean and Maintain A Fountain Pen - Cartridge, Converter, Piston and Vacuum Fillers
sbb-itb-1dd4fe9
Safe tools and cleaning liquids for pen threads
You don't need a fountain pen cleaning kit to clean pen threads well. A few soft tools handle most jobs just fine. In most cases, a cotton swab, soft toothbrush, lint-free cloth, paper towel, and small soft brush are enough to clear residue from the grooves without scratching or warping the threads.
A cotton swab or soft brush can get into the thread grooves where grime likes to sit. That's the whole goal here: remove buildup without damaging the grooves that help the threads seal. When the threads are clean, the pen screws together more smoothly and seals the way it should.
For routine grime, start with cool or lukewarm water. If plain water doesn't do the job, use a drop of mild dish soap mixed into a little water, then rinse well so no soap stays behind in the grooves. It's better to use a damp swab or cloth than to soak the part.
Pen flush comes into play when ink has dried and hardened in the threads and water or soap hasn't helped. Even then, keep it for modern pens only. Older pens, vintage plastics, celluloid, and special finishes can react badly to stronger cleaning liquids, so water is the safer choice for anything delicate.
Some things are best avoided completely: hot water, alcohol, acetone, abrasive cleaners, and metal picks. Hot water can soften some plastics. Alcohol can dry out or weaken parts and finishes. Acetone is harsh enough to damage plastic and resin outright. And metal picks? They can nick the thread profile, which makes later cleaning harder because residue starts catching on those rough spots.
Which tools work best for plastic, resin, and metal threads
The same soft tools work on plastic, resin, and metal threads, but the pressure matters. Plastic and resin threads scratch and deform more easily, so start gently. A damp cotton swab or lint-free cloth is usually the safest first move. Metal threads can take a bit more, but harsh cleaning can still dull the finish or push debris deeper into the grooves.
No matter the material, the aim is the same: lift residue out, don't scrape it off.
Use light pressure on all materials.
| Tool | Best Use | Material Compatibility |
|---|---|---|
| Cotton swab | Wiping thread valleys and tight curves | Plastic, resin, metal |
| Soft toothbrush | Loosening dried ink from grooves | Plastic, resin, metal |
| Small soft brush | Reaching deep or narrow grooves a swab misses | Plastic, resin, metal |
| Lint-free cloth | Wiping residue and moisture | Plastic, resin, metal |
| Paper towel | Blotting larger areas after rinsing | Plastic, resin, metal |
When to use water, soap, or pen flush
It helps to think of these as a simple progression. Start with cool or lukewarm water since it's the safest first step for everyday thread grime. If that falls short, add a little mild dish soap diluted in water to loosen oily residue. Use pen flush only when you're dealing with dried ink that water and soap won't remove, and only on pens made from modern materials.
Fountain Pen Revolution recommends cool or lukewarm water and avoiding hot water, alcohol, and strong solvents.
With the cleaner chosen, the next step is cleaning each thread type.
How to clean barrel, section, and cap threads step by step
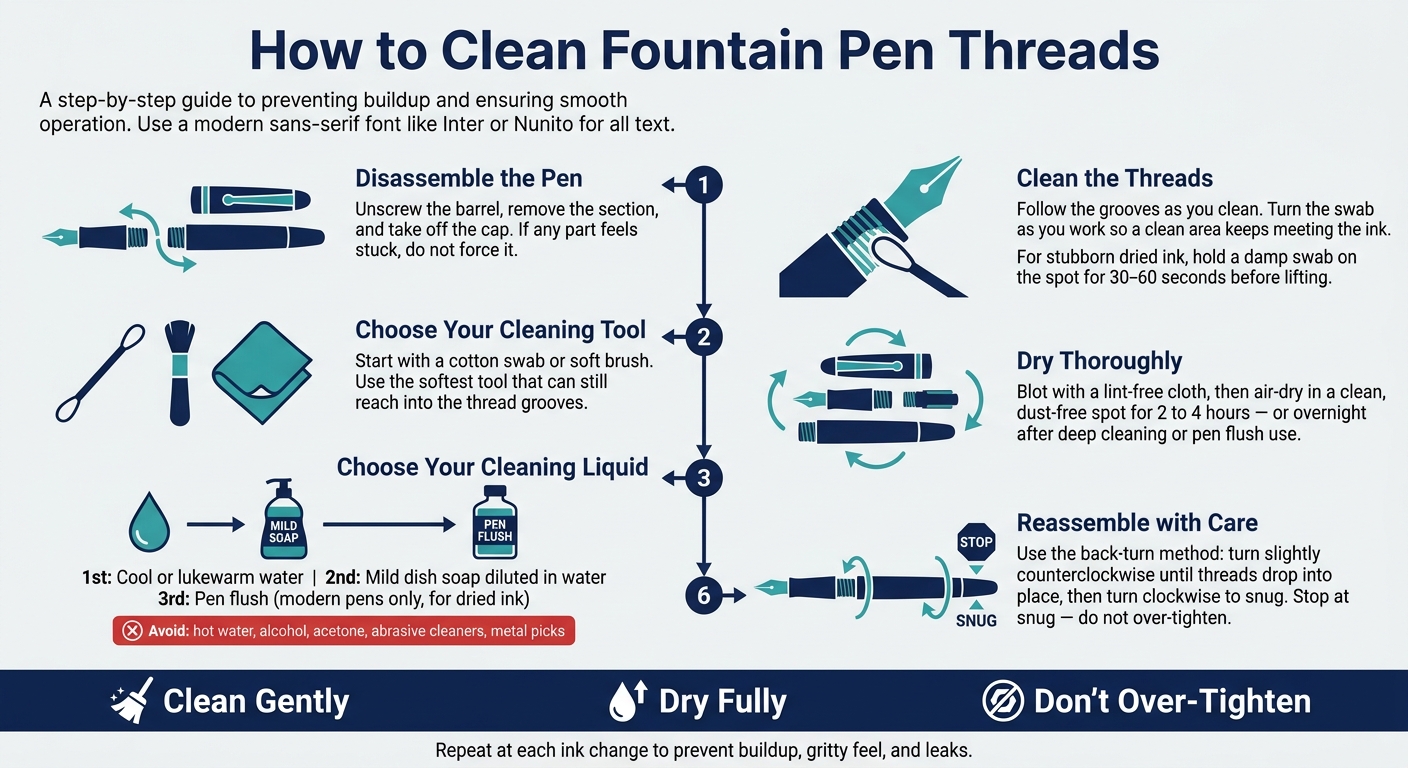
How to Clean Fountain Pen Threads: Step-by-Step Guide
Start with a pen that's completely dry, then take it apart with care. Unscrew the barrel, remove the section, and take off the cap. If any part feels stuck, don't force it. That’s where cross-threading or cracks can start.
With your tools ready, clean each thread type in the same basic sequence. First, wipe away any loose ink. Then lift residue out of the grooves. Use the softest tool that can still reach into the threads, and follow the grooves as you clean. The goal is to pull residue out, not shove it deeper. Turn the swab as you work so a clean area keeps meeting the ink, and blot loosened ink with a paper towel along the way.
How to clean cap threads without trapping moisture
Cap threads tend to collect ink seepage and lint. Use a barely damp swab and trace the grooves to lift the ink out. Don’t run the cap under water unless the pen is made for that. Extra water can pool behind inner caps or liners and stay there long after the outside feels dry.
If ink has moved inside the cap near the threads, spot-clean it with a barely damp brush and keep the inside as dry as you can. For stubborn deposits, use a swab with a small amount of diluted mild dish soap or pen flush. Then go back over the area with a plain-water swab to clear any residue. Finish with a dry swab to remove leftover moisture. While the cap dries, keep it open-end down so trapped moisture can work its way out.
How to clean barrel and section threads near filling areas
For an empty pen, remove the converter or cartridge, then clean or rinse the threads with a damp swab or a cool-water rinse. If the pen is still inked, skip the rinse. Clean only the exposed threads with a damp swab and blot as you go. Keep the nib pointed downward so any loosened ink moves toward the writing end instead of back into the barrel. Don’t put the pen back together until every threaded surface is fully dry.
For Fountain Pen Revolution cartridge/converter pens, the process is simple: remove the converter, clean the section threads with a damp swab, and keep moisture away from the ink chamber.
How to handle stubborn residue and thread sealant
If you’re dealing with dried ink, hold a damp swab on the spot for 30 to 60 seconds before lifting it away. That small pause often helps more than extra scrubbing. If the mark still won’t budge, use a fresh swab with a small amount of diluted mild dish soap or pen flush and treat only the stained threads. Skip metal picks or stiff tools. Once the residue is gone, dry the area right away so hidden moisture doesn’t hang around.
If the threads are greased, wipe off visible ink before you disturb the grease. Only remove the grease if it’s visibly contaminated. After cleaning and drying, apply a thin film of pure silicone grease to the sealing surfaces. More is not better here. Too much can migrate into the ink chamber or collect dust.
Once the threads are clean, dry them completely before reassembly.
How to dry threads and prevent wear
After cleaning, dry each threaded surface all the way before you put the pen back together. Any moisture left behind can thin out ink, pull in debris, and, on metal threads, lead to corrosion.
Drying methods that cut down on lint and hidden moisture
Blot each threaded surface with a lint-free cloth or microfiber cloth. Wrap the cloth around the threaded area and twist gently. Don’t scrub. Facial tissues and fluffy household towels are a bad bet here because they can leave fibers behind in the threads.
Then blot again and let the parts air-dry in a clean, dust-free spot. Fountain Pen Revolution's guide suggests letting parts air-dry completely, often for 2 to 4 hours or, even better, overnight, especially after a deep cleaning or after using a pen flush.
If you're drying glossy resin or clear demonstrator parts, keep them away from dust. A quick visual check before reassembly helps. So does one last light wipe with a dry microfiber cloth to catch any stray lint.
Habits that help threads last longer
Once the threads are dry, the next problem is wear from over-tightening and cross-threading.
Over-tightening is a common reason threads get damaged. Plastic and resin threads take the hit first. If you tighten them too much again and again, the thread peaks slowly flatten out, and the joint can start to feel loose or rough over time. Tighten only until the cap or barrel feels snug. Then stop.
When you reassemble the pen, use the back-turn alignment method: turn the cap or barrel slightly counterclockwise until you feel the threads drop into place, then turn clockwise to close. It’s a small move, but it helps avoid cross-threading, which can permanently deform the first few thread grooves. Clean and maintain your fountain pen at each ink change too, so dried ink doesn’t grind against the grooves.
Use these habits every time you reassemble the pen.
Conclusion: Clean gently, dry fully, and avoid over-tightening the threads
Once cleaning and drying are done, it all comes back to one simple idea: start with the gentlest method that removes the residue, then rinse well and let everything dry all the way. After that, put the pen back together with a light touch.
That approach works for most modern fountain pens.
Final checks before reassembly
Before you reassemble one of the best fountain pens for beginners, run through these four checks:
- No visible ink in the grooves - look closely at the threads under good light and make sure the grooves are clean
- No trapped moisture - the cap interior, barrel threads, and section threads should all look and feel dry
- Smooth threading - screw the parts together once and stop right away if you feel resistance
- Silicone grease only where the design calls for it - use a very thin film only in the spots the pen design specifies
FAQs
How often should I clean pen threads?
Clean your fountain pen threads and other parts every 2 to 4 weeks, and any time you switch ink colors. If a pen sits in storage, flush it with water at least every 1 to 2 months.
That said, don’t go overboard. Too much cleaning can add extra wear. Save deep cleaning for times when you notice ink flow issues or can see dried ink building up.
Can I clean pen threads while the pen is still inked?
No. To clean pen threads the right way, first empty the pen and take it apart. That includes removing the converter or cartridge and separating the grip from the barrel.
If ink is still inside, it can lead to clogs and make trapped moisture harder to remove. That can leave you with diluted ink or uneven flow.
What should I do if the threads still feel rough after cleaning?
Avoid force. It can strip or crack the threads.
Start by clearing away any dried ink or debris, since leftover residue can make the threads bind. A soft-bristled toothbrush works well for cleaning those hard-to-reach areas.
If the threads are clean but still feel stiff, apply a very small amount of silicone grease. If the parts still don’t fit as they should, check for misalignment or thread damage before reassembling.