
Custom filling mechanisms in fountain pens solve a common issue: limited ink capacity. Unlike disposable cartridges or converters, these systems use the pen barrel as the ink reservoir, often holding 2ml or more - double the capacity of standard options. Whether you prefer piston fillers, vacuum fillers, or eyedropper conversions, these designs offer more ink storage, access to bottled ink, and reduce plastic waste.
Here’s a quick breakdown of how these mechanisms work:
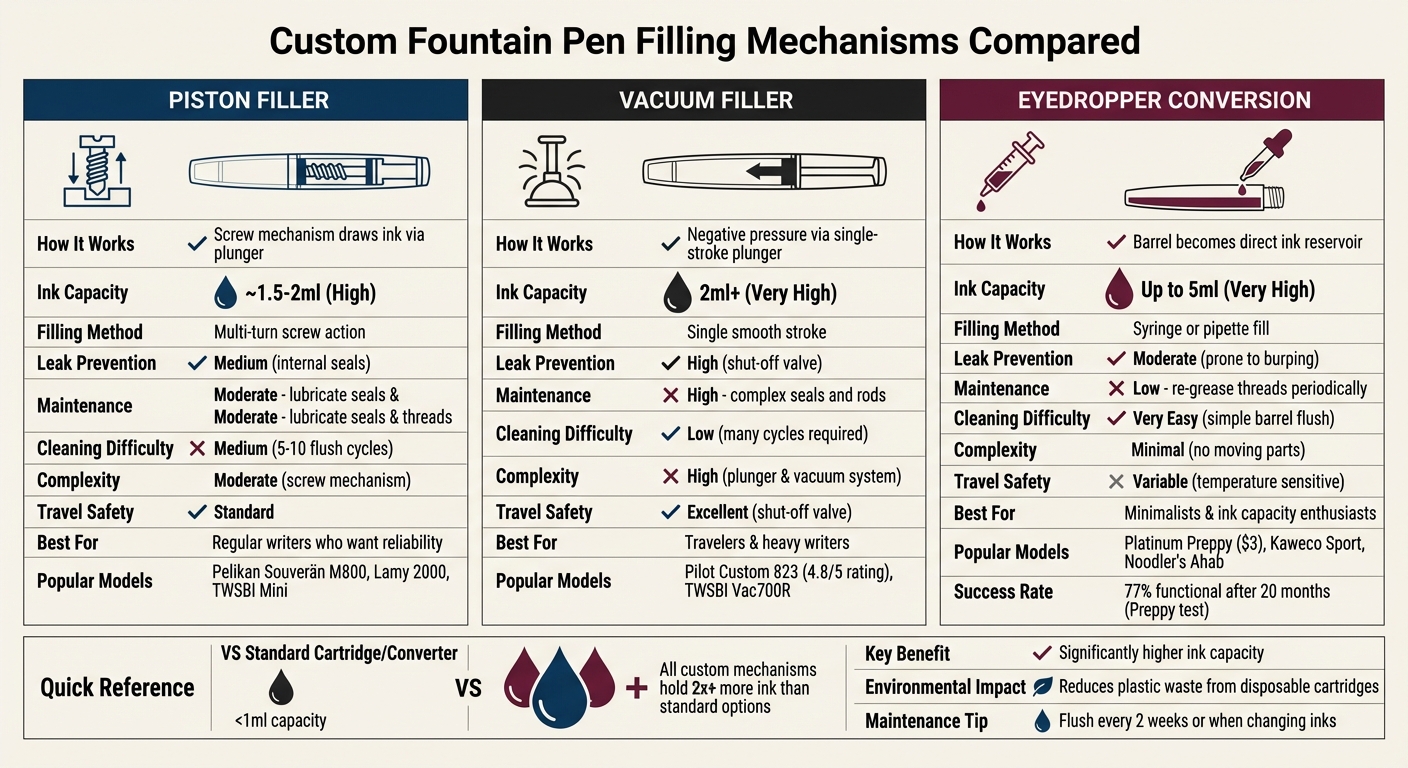
- Piston Fillers: Use a screw mechanism to draw ink into the barrel. Reliable and holds ~2ml of ink.
- Vacuum Fillers: Use negative pressure for a single-stroke fill. High capacity (2ml+) and leak-resistant.
- Eyedropper Conversions: Simplest design, turning the barrel into a reservoir. Holds up to 5ml but requires careful sealing.
Each system has unique features and maintenance needs, but all offer a smoother, longer writing experience compared to cartridges. Regular cleaning and proper maintenance ensure longevity and prevent issues like leaks or clogging. Whether you prioritize capacity, ease of use, or minimal parts, there’s a filling system to match your writing habits.
Fountain Pen Filling Mechanisms Comparison: Capacity, Maintenance & Features
Fountain Pen Filling Mechanisms
sbb-itb-1dd4fe9
Piston Filling Mechanisms
A piston filler uses the pen barrel itself as the ink reservoir. To fill it, you twist the knob at the end of the pen, which moves an internal plunger to draw ink into the chamber .
"A piston-filler is essentially a large syringe, where you twist the back of the pen to pull up the inner plunger/piston, which draws up ink." - Wonder Pens
Pens like the Pelikan Souverän M800 and Lamy 2000 are often praised for their smooth and dependable piston systems. Meanwhile, the TWSBI Mini White Rosegold stands out with its transparent barrel, letting you see the ink level as you write.
How Piston Fillers Work
The piston mechanism relies on a screw system. Turning the knob counterclockwise pushes the piston toward the nib, forcing air out of the barrel. Twisting it clockwise pulls the piston back, creating suction that draws ink into the chamber . Since the barrel itself serves as the ink reservoir, piston fillers typically hold more ink than pens with cartridges or converters. Some older models use left-hand threads, meaning you turn the knob clockwise to expel air.
Step-by-Step Filling Instructions
- Uncap the pen and prepare your ink bottle.
- Twist the piston knob to push the plunger all the way down, expelling any air.
- Submerge the nib and part of the grip section in the ink.
- Twist the knob in reverse to draw ink into the barrel.
- Expel some ink back into the bottle to remove any air bubbles, then clean the nib and grip with a soft cloth.
- If your pen has a clear barrel, you can easily monitor the ink level during the process .
Maintenance and Cleaning Tips
Cleaning a piston filler is simple. Repeatedly draw clean water (or distilled water if your tap water is hard) into the barrel and expel it until the water runs clear. For stubborn ink stains - especially from darker or shimmer inks - fill the barrel with water and let it sit overnight before flushing it thoroughly .
"If a piston-filler has been put away for a long time... it is possible that the piston will be stuck. Do not force a stuck piston, as it can damage the screw mechanism or tear the seal." - Vintage Pens
If the piston sticks after long-term storage, avoid forcing it. This can damage the screw mechanism or tear the seal. Sometimes, the O‑ring may stick to the barrel walls - a condition called "stiction." Moving the piston slowly can safely release this friction. Regular flushing between refills helps maintain the pen's performance and extends its lifespan. Up next, we'll dive into various fountain pen filling systems to broaden your options.
Vacuum Filling Mechanisms
A vacuum filler uses negative pressure to turn the pen barrel into an ink reservoir. When you push the plunger rod down through the barrel, a rubber gasket creates a vacuum behind it. Once the gasket reaches a flared section at the bottom, the seal breaks, and ink rushes into the chamber.
Most vacuum fillers come with a shut-off valve that seals the reservoir from the feed when the blind knob is fully tightened. This design makes them leak-resistant during air travel and prevents ink from escaping due to temperature changes. Popular models like the Pilot Custom 823 and TWSBI Vac700R use this mechanism, with the TWSBI featuring a clear barrel so you can watch the plunger in action.
How Vacuum Fillers Work
The mechanism uses a plunger rod with a rubber gasket that moves through the barrel. As you press the rod down, air is forced out, creating a vacuum behind the gasket. When the gasket reaches the flared portion at the barrel's base, the vacuum seal releases, and atmospheric pressure pushes ink into the chamber. Unlike piston fillers, which rely on a screw-driven system, vacuum fillers work with a single stroke, making the filling process smoother.
"A properly working Vacuum Filler will have very smooth and low effort plunger action and will fill nearly full in a single stroke." - Jim Mamoulides, PenHero.com
Vacuum fillers often hold more ink than other systems. However, for longer writing sessions, you’ll need to unscrew the blind knob slightly - about 2mm - to disengage the safety seal and allow ink to flow from the reservoir to the feed.
Filling Process and Best Practices
To fill a vacuum pen:
- Uncap the pen and unscrew the filler knob counterclockwise until it moves freely.
- Pull the plunger rod to its full extension.
- Submerge the nib and part of the grip section - including the filler hole - into your ink bottle.
- Push the rod down in one smooth motion. You’ll hear a snap as the vacuum releases and ink is drawn in.
- Hold the pen in the ink for a few seconds to ensure the chamber fills completely.
For a full fill, you can repeat the downstroke two or three times while keeping the nib submerged. Afterward, remove the pen, wipe the nib and grip with a lint-free cloth, and tighten the filler knob to seal the reservoir. Using one hand to hold the ink bottle and the other to operate the plunger prevents accidents if the rod sticks.
When cleaning, flush the pen by drawing in and expelling clean water repeatedly until the water runs clear. Use gentle pressure to avoid damaging the internal seals.
Advantages and Drawbacks
| Feature | Vacuum Filler | Piston Filler | Cartridge/Converter |
|---|---|---|---|
| Ink Capacity | Very High (2ml+) | High (~1.5ml - 2ml) | Low (<1ml) |
| Leak Prevention | High (Shut-off valve) | Medium | Medium |
| Ease of Cleaning | Low (Many cycles) | Medium | High (Flushable) |
| Travel Safety | Excellent | Standard | Variable |
| Mechanism Complexity | Complex | Moderate | Simple |
Vacuum fillers stand out for their large ink capacity and strong leak prevention, though they require more effort to clean compared to piston fillers. Despite the added complexity, enthusiasts often praise models like the Pilot Custom 823 for their reliability and ink capacity, with users rating it 4.8/5.
Next, we’ll dive into eyedropper conversions, which share some similarities with how to fill an eyedropper pen, offering even more options for customizing your pen’s filling system.
Eyedropper Conversions
Eyedropper conversions provide a straightforward alternative to piston and vacuum systems, offering unmatched ink capacity. By turning the pen's barrel into a direct ink reservoir, this method eliminates internal mechanisms, allowing for an ink capacity of up to 5ml - far surpassing the less-than-1ml capacity of a standard cartridge. However, ensuring a proper seal is critical to avoid leaks.
How to Convert a Pen to an Eyedropper Filler
To start, choose a pen with a plastic or resin body and threaded sections. Avoid pens with metal components, as constant ink exposure can cause corrosion.
"If there is any metal that would come in contact with the ink, then you can't eyedropper convert it. Most likely, the metal will corrode due to constant ink exposure." - Goldspot Pens
Inspect the pen barrel for small breather holes or openings from manufacturing. Some pens, like the Pilot Kakuno and Kaweco Perkeo, have these holes, which must be sealed with two-part epoxy. Let the epoxy cure for 24 hours, then test the seal by filling the barrel with water. Allow it to sit for another 24 hours to ensure it's watertight.
Next, apply a thin layer of 100% silicone grease to the threads using a cotton swab. Add a rubber O-ring (9mm OD, 7mm ID) at the base of the threads to act as a mechanical stop, preventing the section from unscrewing.
Affordable beginner fountain pens like the Platinum Preppy (around $3.00), Pilot Petit1, Kaweco Sport (plastic versions), and Noodler's Ahab are popular choices for eyedropper conversion. Between Spring 2018 and December 2019, the reviewer "Unsharpen" tested 13 Platinum Preppy pens converted to eyedroppers. After about 20 months, 10 pens were still functional (a 77% success rate), while 3 failed due to cracking or leaks.
Filling and Sealing Instructions
Use a blunt-tip syringe or pipette to fill the barrel with ink. Avoid sharp needles, as they can damage the pen. Fill only to the bottom of the threads, leaving enough room for the grip section to prevent overflow.
When reassembling, keep the pen upright with the nib facing up. Screw the section back on securely, but don’t overtighten - this could crack the threads. The combination of silicone grease and the O-ring ensures a snug seal without excessive force.
To prevent "burping" - when air expansion forces ink through the feed - keep the pen at least one-third to one-half full of ink. This occurs when warmth from your hand heats the air inside the barrel, causing it to expand.
"The warmth in your hand can change the temperature inside the barrel, causing the air to expand and forcing too much ink into the feed. Keeping your pen at least ⅓ full can prevent this from happening." - Mackenzie, Writer, Must Have Stationery
It's essential to use only fountain pen ink. Avoid India ink, calligraphy ink, or drawing ink, as these contain binders that can clog the feed. Also, be cautious of sudden temperature or pressure changes, such as during air travel, as these can also lead to burping.
This method simplifies the process compared to more complex filling systems while offering a high ink capacity.
Comparison with Other Mechanisms
| Feature | Eyedropper Filler | Piston Filler | Vacuum Filler |
|---|---|---|---|
| Ink Capacity | Very High (up to 5ml) | High (~1.5ml - 2ml) | Very High (2ml+) |
| Maintenance | Low (re-grease threads periodically) | Moderate (lubricate internal seals) | High (complex seals and rods) |
| Leak Risk | Moderate (prone to burping) | Low (secure internal seals) | Low (shut-off valve) |
| Complexity | Minimal (no moving parts) | Moderate (screw mechanism) | High (plunger and vacuum system) |
| Ease of Cleaning | Very Easy (simple barrel flush) | Medium | Low (many cycles required) |
Eyedropper conversions stand out for their simplicity and high ink capacity, though they require careful attention to filling levels and temperature changes. Cleaning is a breeze - just flush the barrel with water until it runs clear. While piston and vacuum systems have their advantages, the minimal design of an eyedropper conversion offers a hassle-free experience for those who value simplicity and ink capacity.
General Maintenance for Custom Filling Mechanisms
Taking care of custom filling mechanisms boils down to basic fountain pen maintenance. Many common pen problems arise from misunderstandings about how these mechanisms work. Whether you’re using a piston, vacuum, or eyedropper system, regular cleaning and proper handling can keep your pen in great shape and performing smoothly.
Cleaning and Flushing Methods
To keep your pen clean, flush it with cool water whenever you change inks or if it hasn’t been used for two weeks. For piston and vacuum fillers, draw water into the mechanism just as you would with ink, then expel it. Repeat this process 5 to 10 times until the water runs clear. With eyedropper conversions, simply unscrew the section and rinse the barrel under running water.
If ink has dried inside the pen, soak the disassembled parts overnight in cool water. Avoid using hot water, as it can damage seals and O-rings. After soaking, flush the parts again with fresh water. For stubborn residue, adding a drop of dish soap to the water can help loosen the ink, but make sure to rinse thoroughly to remove any soap traces.
Disassemble your pen only when absolutely necessary. Most custom filling systems don’t need frequent disassembly. However, if ink flow decreases or the mechanism feels stiff, you may need to inspect the internal parts. For piston fillers, unscrew the piston knob to check the seal and apply a small amount of silicone grease to both the piston seal and threads. Vacuum fillers, which have more intricate internal components, should be handled according to the manufacturer’s instructions.
Once your pen is cleaned, you can move on to troubleshooting common fountain pen issues like ink flow or leaks.
Troubleshooting Common Issues
If cleaning doesn’t resolve a problem, try these troubleshooting steps.
When ink flow is poor, it’s often due to a clogged feed or dried ink inside the mechanism. Start with a thorough flush as described earlier. If that doesn’t help, check that the nib and feed are properly seated in the section. Remove them, clean them, and reinsert them firmly. For piston and vacuum fillers, make sure the mechanism is drawing ink fully; partial fills can create air gaps that disrupt ink flow.
Leaks are usually caused by dried-out seals. For piston and vacuum systems, inspect the seals for cracks or hardening, and reapply silicone grease to restore their flexibility. In eyedropper conversions, leaks often happen at the threads - reapply grease and ensure the O-ring is seated correctly at the base.
If the mechanism feels stiff, lubrication can help. For piston fillers, grease the threads and piston seal. For vacuum fillers, apply grease to the plunger rod where it contacts the internal seals. Avoid forcing a stuck mechanism, as this can lead to damage. If the mechanism won’t budge, soak the pen to loosen any dried ink before trying again.
Understanding how the individual parts work and the mechanics behind the filling system is crucial for effective troubleshooting when your pen isn’t performing as it should.
Conclusion
Custom filling mechanisms can transform your fountain pen experience by offering more ink capacity, convenience, and functionality. For example, piston fillers hold approximately 2 mL of ink - about twice the capacity of standard converters - and eliminate the need for disposable cartridges. Vacuum fillers take it a step further with even larger capacities, a single-stroke filling process, and shutoff valves to prevent leaks during travel. Meanwhile, eyedropper conversions maximize ink capacity by utilizing the entire barrel as a reservoir, letting you visually track your ink levels.
"There isn't a single 'best' filling system - just a best match for how you actually write." – Bottle and Plume
Each system caters to different writing preferences. If you write extensively, piston or vacuum fillers may be ideal. For those who frequently switch inks, a system that's easier to clean could be more practical. Travelers might favor vacuum fillers with shutoff valves for their reliability, while minimalists often enjoy the straightforward design of eyedropper conversions.
"Going from converter to piston/vac can feel like upgrading from a teacup to a canteen." – Bottle and Plume
Ultimately, the appeal of these mechanisms lies in finding the one that aligns with your writing habits and lifestyle. Whether you value ink capacity, ease of use, or mechanical intricacy, there's a filling system to suit your needs. With proper care - like regular cleaning, occasional lubrication, and mindful handling - these systems can deliver dependable performance for years, elevating your fountain pen experience.
FAQs
Which filling system fits my writing style?
Choosing the best filling system comes down to what matters most to you - ease of use, ink capacity, or maintenance. Cartridges and converters are simple and perfect if you like switching inks often. For those who need more ink for extended writing, piston or vacuum fillers offer larger reservoirs but demand a bit more care. If ink capacity is your top priority, eyedroppers can hold the most but need cautious handling to prevent leaks.
How do I avoid leaks or burping?
To avoid leaks or unwanted burping with custom filling mechanisms, focus on proper sealing and careful handling during the filling process. Regularly check seals, gaskets, and O-rings for wear or misalignment, as these can lead to problems. When filling, go slowly to minimize air bubbles and prevent excess pressure buildup. After cleaning, reassemble everything carefully, ensuring gaskets and O-rings are positioned correctly to keep things leak-free.
What inks should I avoid in these pens?
When it comes to fountain pens, choosing the right ink is crucial. Always opt for inks specifically made for fountain pens, as these are designed to flow smoothly without causing damage. Steer clear of inks with additives or dyes that aren't formulated for fountain pen use - they can lead to clogs or disrupt the pen's performance. If you're uncertain about an ink, test it first. Any signs of clogging or inconsistent flow are red flags. Using the proper ink not only keeps your pen working seamlessly but also protects its delicate mechanism over time.