
Using a fountain pen the right way can transform your writing experience. Unlike ballpoint pens, fountain pens rely on light pressure and proper technique for smooth, effortless strokes. Here's what you need to know:
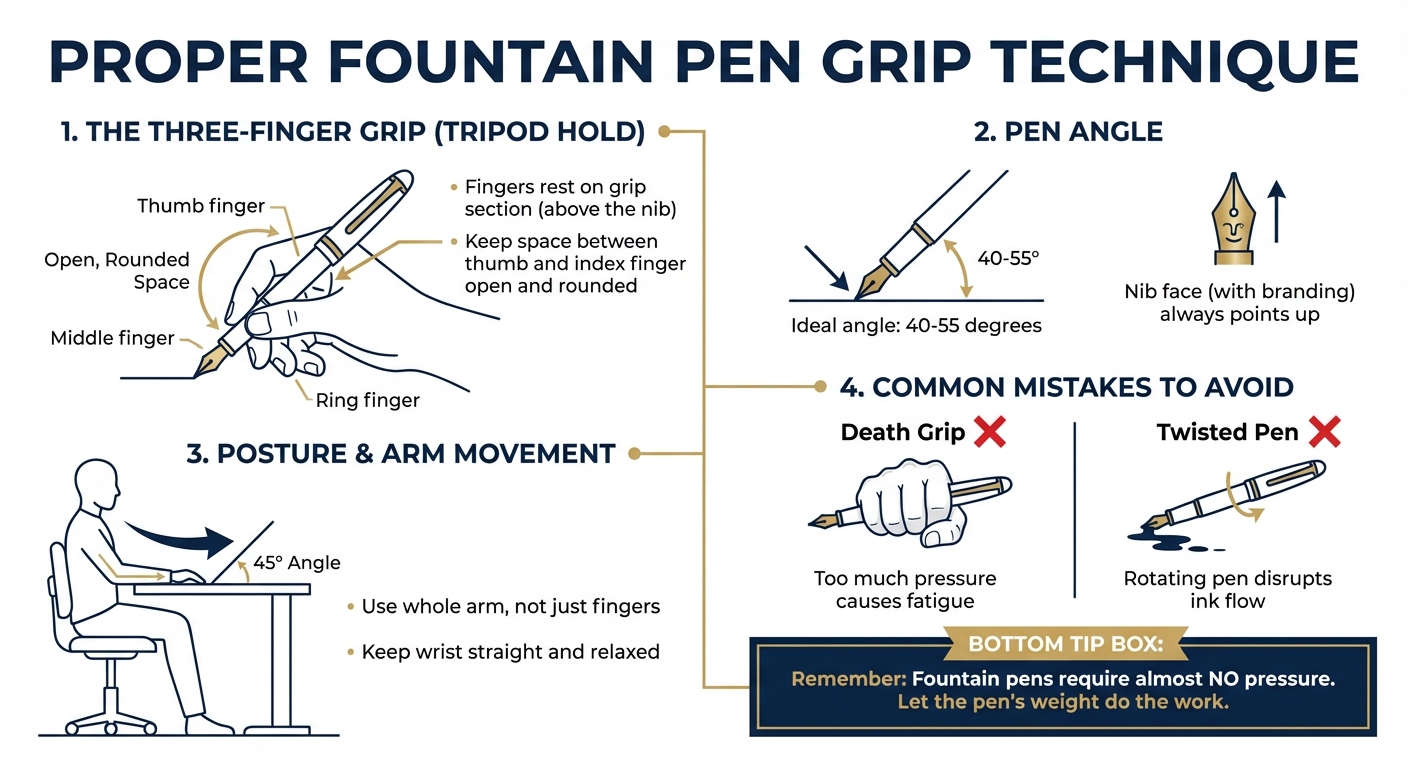
- Grip: Use a three-finger grip (tripod hold) by pinching the pen lightly between your thumb and index finger, with the middle finger supporting the pen.
- Angle: Hold the pen at a 40–55° angle to the paper for consistent ink flow and avoid pressing down hard.
- Posture: Sit upright, use your whole arm to guide the pen, and keep your wrist relaxed.
- Common Mistakes: Avoid gripping too tightly, twisting the pen, or applying excessive pressure, as these can cause discomfort and damage the nib.
Mastering these basics ensures comfortable, fluid writing while protecting your pen from unnecessary wear. Keep your touch light, adjust your hand and arm alignment, and let the pen’s weight do the work.
Proper Fountain Pen Grip Technique: Step-by-Step Guide
How To Hold a Fountain Pen
The Three-Finger Grip
The three-finger grip, often called the tripod hold, is the cornerstone of proper fountain pen technique. To achieve this, lightly pinch the pen between your thumb and index finger, while your middle finger provides a steady base. This creates a stable yet flexible hold. Now, let’s break down exactly how to position your fingers.
Where to Place Your Fingers
Your fingers should rest on the grip section, which is the slightly thicker area just above the nib, designed specifically for holding. The back of the pen should rest comfortably in the web between your thumb and index finger. Meanwhile, your ring finger and pinky should curl inward slightly, touching the paper gently for added support, but without applying extra pressure.
To avoid mess, keep your fingers above the nib - this prevents ink stains. Also, ensure the space between your thumb and index finger stays open and rounded, not pinched. This open positioning allows for smoother, more controlled movements as you write.
Once your fingers are properly placed, the next step is maintaining a relaxed grip to ensure fluid and comfortable writing.
Keeping Your Grip Relaxed
One of the most common beginner mistakes is the "death grip" - gripping the pen too tightly, as if it might slip away. Fountain pens require almost no pressure to write, so squeezing the pen only leads to hand fatigue and can even disrupt ink flow.
"Squeezing on the grip section may cause pain and fatigue in your hand and wrist, so do your best to hold your pen in a relaxed position." - Stephanie, Guide Author, JetPens
If you notice tension in your hand, pause and shake out your hand to loosen up. Instead of relying solely on finger movements, try using your forearm and shoulder to guide the pen across the page. This approach helps you maintain a light, stable three-finger grip, even during extended writing sessions. Pair this relaxed grip with the ideal 40–55° pen angle for smooth, effortless writing.
Pen Angle and Nib Contact
A relaxed grip lays the groundwork for smooth writing, but the pen angle is what truly seals the deal. Get this right, and your writing will flow effortlessly. Get it wrong, and you might find yourself battling scratchy lines and skipped ink.
The 40–55 Degree Writing Angle
When using a fountain pen, aim to hold it at a 40 to 55-degree angle to the paper - this is a bit lower than the angle most people use with a ballpoint pen. This positioning allows the nib tines to spread properly, which is essential for maintaining a steady ink flow.
"Hold the pen so the nib is at about a 45 degree angle to the paper. This is generally lower than how you would hold a ballpoint or gel pen." - Stephanie, JetPens
If the pen is held too upright, the iridium ball at the nib's tip may not fully contact the paper. This can cause ink to skip or flow inconsistently. Start with a 45-degree angle and make small adjustments until the nib feels like it's gliding effortlessly. The position of your fingers plays a key role here: gripping closer to the nib increases the angle, while holding further back flattens it.
Now that the angle is sorted, let’s take a closer look at how the nib should interact with the paper.
How the Nib Should Touch the Paper
For optimal performance, the face of the nib - where the brand name or nib size is engraved - should always face directly upward. Both nib tines need to touch the paper evenly. If the pen is rotated, the ink slit between the tines might lose proper contact with the paper, which can lead to scratching or interrupted ink flow.
Unlike ballpoint pens, fountain pens don’t require much pressure. In fact, the pen’s weight alone is enough to initiate ink flow, thanks to capillary action.
"Pressing too hard on the nib could cause the tines to 'spring,' a serious, often irreparable form of damage where the tines splay out and do not return to their original shape." - JetPens
If you notice skipping or scratching, double-check that the pen’s barrel hasn’t rotated out of position. And remember, smooth writing comes from moving the pen with your arm and shoulder rather than relying solely on your fingers.
Posture and Arm Movement
Your grip and pen angle are important, but writing comfortably for extended periods also depends on how you sit and move your arm. Proper body alignment plays a big role in reducing fatigue and staying comfortable.
Hand and Arm Alignment
Here’s a simple tip for smoother writing: use your whole arm, not just your fingers. Instead of putting all the work on the small muscles in your fingers and wrist, let your shoulder and forearm guide the pen across the page.
"Using the larger muscles of your arm over your fingers gives you more control, leading to more consistently reliable penmanship." - Goldspot Pens
Keep your wrist straight and relaxed - don’t bend or lock it. Rest your forearm (the area between your wrist and elbow) flat on the desk to create a stable base. If your forearm feels stuck or drags as you write, try placing a piece of paper or even a playing card underneath to help it glide more easily.
Another key adjustment: angle your paper. If you’re right-handed, rotate the paper slightly to the left; if you’re left-handed, rotate it to the right. This keeps your wrist in a neutral, comfortable position and allows your arm to move naturally across the page. It’s all about setting up the writing area to match your arm’s natural movement.
Once your arm is properly aligned and your wrist is relaxed, it’s time to focus on how you sit.
Staying Comfortable While Writing
Good arm alignment is just one piece of the puzzle - your sitting posture also plays a big role in preventing fatigue. Sit toward the front edge of your chair, keeping your back straight and both feet flat on the floor. If you need to lean in closer to your work, bend at your hips instead of hunching your shoulders or rounding your spine. Poor posture can lead to strain in your neck, shoulders, and back over time.
As you write, adjust the paper often to keep your hand in a natural, comfortable position. Use your non-writing hand to steady and reposition the paper, but avoid leaning your body weight onto it - this helps keep your spine free and your movements fluid.
"Every 30-45 minutes, stretch and move around. If possible, walk around for a few minutes. Stretching and getting the blood flowing is good for you." - Crossroads Calligraphy
Taking short breaks every 30 to 45 minutes can make a big difference. Stand up, stretch, and shake out your hands to improve circulation. Between breaks, take a moment to lift your collarbones as you inhale, then release any tension in your neck and shoulders as you exhale. When your whole body is aligned and relaxed, writing becomes smoother and more enjoyable.
sbb-itb-1dd4fe9
Common Grip Mistakes to Avoid
Getting your grip right is just as important as maintaining proper posture when writing. Even with a good posture, certain grip mistakes can lead to discomfort and even damage your pen. Many of these habits come from using ballpoint pens, which require more pressure than fountain pens. By identifying and correcting these common errors, you can improve both your comfort and your pen's performance.
Gripping Too Tightly
One of the most frequent issues, especially for beginners, is the "death grip." This overly tight hold often develops from using ballpoint pens, which demand more pressure to write. A tight grip can strain the muscles in your hand and wrist, causing fatigue and even pain during extended writing sessions. You might notice discomfort in the muscles between your thumb and index finger or between your first and middle finger.
"If any of your fingertips change color as you're holding the pen, you might be holding it too tightly." - Crossroads Calligraphy
A quick way to test your grip is to observe your fingertips while writing. If they turn white or red, you're likely gripping the pen too hard. This excessive pressure can also harm your pen, potentially "springing" the tines, where the metal tips splay out permanently - a problem that often requires professional repair.
To fix this, relax your grip and let the pen rest lightly in your hand. Fountain pens are designed to write with minimal pressure, relying on capillary action. The pen's weight alone is usually sufficient to produce a smooth line. If you feel tension creeping in, take a break and shake out your hand to reset. Now, let’s look at another common mistake - finger placement.
Wrong Finger Placement
Incorrect finger positioning can cause just as much trouble as gripping too tightly. A common issue is unintentionally rotating the pen clockwise or counterclockwise while writing, a habit often carried over from using pencils. This twisting motion can disrupt the ink flow, causing the pen to skip or stop writing altogether.
Another mistake is holding the pen too vertically. When the nib isn’t angled correctly, it can’t hit its "sweet spot", leading to scratchy or uneven writing. For fountain pens, the nib’s face (the side with the branding or engraving) should always point straight up toward the ceiling. Holding the pen too low on the barrel can lead to ink stains, while gripping it too far up makes it hard to maintain the ideal 45-degree writing angle.
The solution? Use the tripod grip: position your thumb and index finger on opposite sides of the barrel and let the pen rest lightly on your middle finger. Keep the nib face up and avoid twisting the pen as you write. Instead of relying solely on your fingers, use your entire arm to guide your movements for smoother, more consistent writing.
Practice Exercises for Your Grip
Writing Drills
Building muscle memory takes consistent, focused effort. Once you've got the basics of your grip down, these exercises can help you fine-tune it for smoother, more precise writing. A great place to start is with Spencerian drills. These break handwriting into simple, repeatable strokes, helping you develop control and accuracy. Plus, they allow you to discover that "sweet spot" - the perfect nib angle for smooth ink flow and effortless movement across the page.
"If you're struggling to write with a fountain pen, getting better at Spencerian handwriting will help you write clearly and precisely." - Wood Fountain Pens
Another useful tool is tracing worksheets. Place these guides under your paper to keep your letters uniform in size, shape, and slant while you practice. This method allows you to focus on the essentials - like stroke order and pen angle - without worrying about forming the letters perfectly. Pay attention to how your entire arm moves as you trace. Engaging your shoulder and elbow for longer strokes, instead of relying only on your fingers, can reduce fatigue and improve fluidity.
You can also incorporate your fountain pen into everyday tasks like journaling, writing notes, or sending letters. These small, regular habits reinforce your grip naturally. Try varying your writing speed during these activities to see how it affects ink flow and nib contact. This can reveal subtle adjustments that might improve your technique.
Small Adjustments to Try
Once you've got a rhythm with your drills, making small tweaks can enhance both comfort and control. For instance, experiment with finger placement. Moving your grip closer to the nib increases the writing angle, while holding it farther back lowers the angle. Find the position that helps you maintain a consistent nib angle effortlessly.
Another tip: rotate your paper about 45° to align it with your forearm. This small change encourages natural arm movement and reduces wrist twisting. Adding a glide sheet - like a spare piece of paper or a playing card - under your writing hand can make movements smoother and more fluid.
You might also test writing with the pen cap posted (attached to the back of the pen) and unposted to see which balance feels better in your hand. And remember, a light touch is key. If you catch yourself pressing down too hard, pause to shake out your hand and reset your grip. Check your fingertips occasionally - if they start to change color, it’s a sign you’re gripping too tightly. Relax your hold and let the pen do the work for you.
Conclusion
Mastering the fountain pen grip boils down to a few key principles: keep your touch light, let your arm provide support rather than relying solely on your fingers, and hold the nib at the correct angle. These steps encourage smooth, natural movement and help reduce hand fatigue. This approach ties back to earlier advice on proper finger placement, pen angle, and maintaining a relaxed posture.
"The ideal writing experience with a fountain pen is smooth, fluid, and effortless. It shouldn't feel as if you have to exert extra force or struggle to keep control of the pen." - Wood Fountain Pens
Unlike ballpoint pens, which demand constant pressure, fountain pens work through capillary action, allowing for a more relaxed and extended writing experience. Once you’ve embraced this lighter touch and trained your arm to glide across the page, writing transforms from a mundane task into an enjoyable activity.
FAQs
What makes a fountain pen better than a ballpoint pen?
Fountain pens provide a writing experience that's in a league of its own. Unlike ballpoint pens, their metal nibs and liquid ink glide effortlessly across the page, creating smooth, expressive lines that feel almost effortless. Writing with a fountain pen can turn even the simplest note into something elegant.
What sets fountain pens apart is the ability to personalize your writing tool. With a variety of nib sizes and styles available, you can find one that perfectly matches your handwriting and preferences. Plus, they’re a more sustainable choice - refillable ink cartridges mean fewer disposable pens ending up in landfills.
Another bonus? Fountain pens are easier on your hand during long writing sessions. Since they require less pressure to write, they can help reduce hand fatigue, making them ideal for everything from note-taking to letter writing. A fountain pen doesn’t just write - it elevates the entire experience.
How can I avoid hand fatigue when using a fountain pen?
To prevent hand fatigue when using a fountain pen, start by adopting a light, relaxed grip. Let your thumb and index finger gently support the pen while your other fingers provide stability. Avoid gripping too tightly or pressing down too hard, as this can quickly lead to cramps or discomfort.
Pay attention to your posture as well. Sit up straight, allowing your arm and shoulder to guide the pen's movement instead of relying solely on your fingers. This approach reduces strain and encourages smoother, more comfortable writing. You might also want to try different grip styles, such as the tripod or four-finger grip, to discover what feels most natural during longer writing sessions.
Why does my fountain pen skip or scratch when I write, and how can I fix it?
If your fountain pen is skipping or scratching as you write, the issue often comes down to nib alignment, grip, or the angle you're using. Start by holding the pen gently at around a 45-degree angle to the paper. Avoid pressing too hard - excessive pressure can damage the nib or interfere with ink flow, causing these problems.
Check that the nib is clean and free of dried ink or debris, as buildup can also lead to skipping or scratching. Ensure the nib is angled slightly upward, and use a light, steady touch to encourage smooth ink flow. Adjust your grip and writing angle until the pen moves effortlessly across the page.