
Hand-painted fountain pens combine functionality with artistry, offering one-of-a-kind designs that collectors and writers cherish. These pens are crafted through a detailed process that includes selecting durable materials, shaping the pen body, applying intricate designs, and finishing with protective coatings. Each pen can take 8–15 hours to paint, while traditional Japanese techniques like Maki-e may require months of work and up to 130 layers of lacquer.
Key details include:
- Materials: Ebonite, celluloid, acrylic resin, or metal for pen bodies; gold or stainless steel for nibs.
- Techniques: Freehand painting, airbrushing, engraving, or Maki-e methods.
- Finishing: Protective coatings like cyanoacrylate or urushi lacquer ensure durability and a polished look.
- Price Range: Typically $480–$620, with some high-end models priced higher.
These pens are more than writing tools - they're functional art pieces that reflect craftsmanship and individuality.
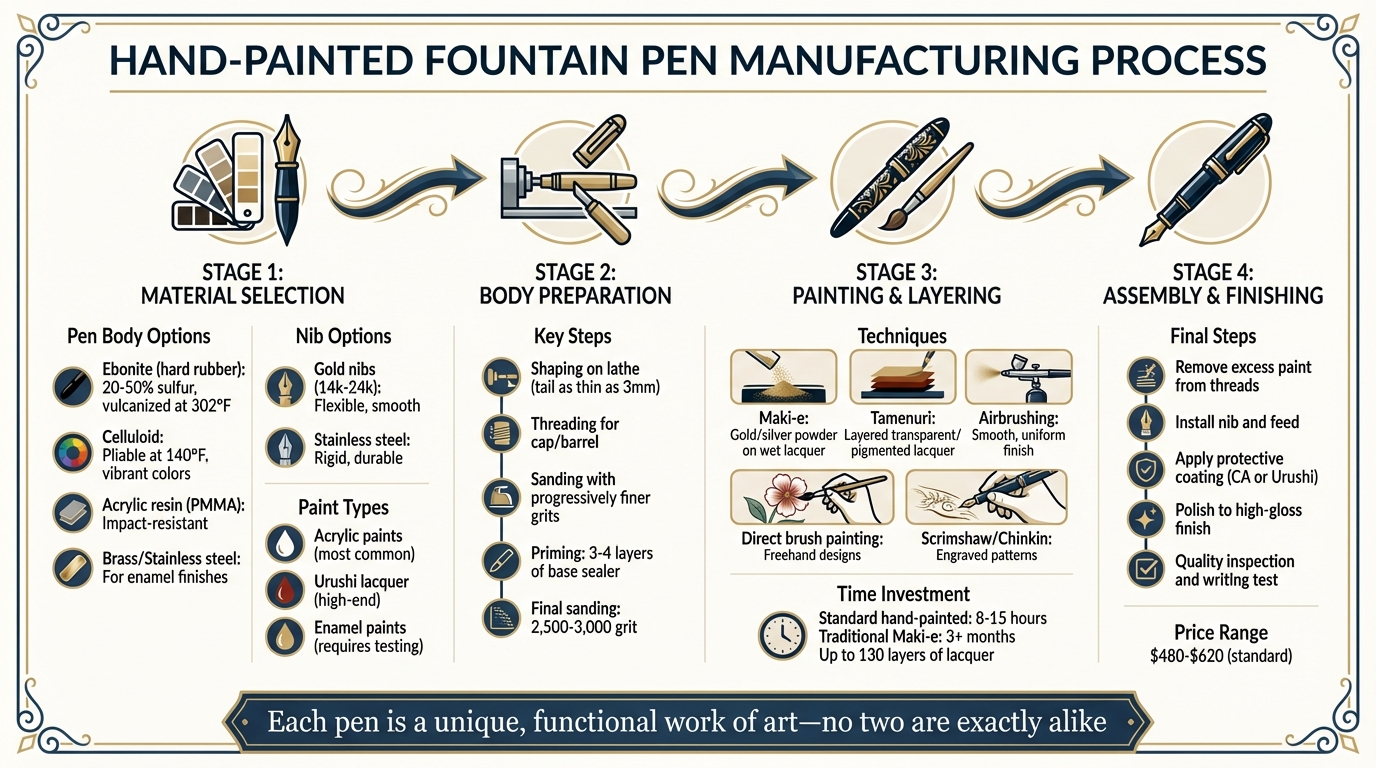
Hand-Painted Fountain Pen Manufacturing Process: 4 Key Stages
FIRST CUSTOM FOUNTAIN PENS | Custom painted Kaweco Sports - 1000 subscriber bonus video
sbb-itb-1dd4fe9
Selecting Materials for Hand-Painted Pens
The heart of any hand-painted fountain pen lies in the materials chosen. These pens aren't just tools - they're works of art, meant to endure both the painting process and years of regular use. Unlike mass-produced pens, artisan pens demand materials that securely hold paint, resist ink-induced chemical reactions, and remain durable over time. As FountainPen.it aptly puts it, "The fountain pen history cannot be separated from an analysis of the main materials that were used in their construction over the more than 100 years of life of this object". Let’s break down the key considerations for selecting each component.
Choosing the Pen Body Material
The body of a hand-painted pen is its canvas, so the material must be carefully selected.
- Ebonite (hard rubber) is a top choice, particularly for pens featuring Japanese Urushi lacquer. Made through vulcanization using 20% to 50% sulfur at around 302°F, ebonite offers excellent paint adhesion and resists moisture interference. It also has a warm, tactile feel that users love. However, it can discolor if exposed to too much sunlight over time.
- Celluloid stands out for its elasticity, shatterproof qualities, and vibrant colors and patterns. It becomes pliable at roughly 140°F, allowing for precise shaping. However, it requires long curing times to prevent issues like warping or crystallization, adding to its complexity.
- Acrylic resin (such as Lucite or PMMA) is a modern alternative that’s impact-resistant and compatible with various coatings.
- For pens with enamel finishes, brass or stainless steel bodies are ideal. These metals offer impressive durability and a satisfying weight, but they need proper priming to ensure the paint adheres well.
Selecting Nibs and Hardware
The nib is the soul of the pen, defining the writing experience, while the hardware brings the design together.
- Gold nibs (ranging from 14k to 24k) are prized for their flexibility and smooth writing. For instance, the Pilot Custom 74 with a 14k gold nib costs around $216.00, while the Platinum #3776 Century, another gold-nibbed favorite, is priced at about $344.00.
- Stainless steel nibs are more rigid and durable, making them a practical, budget-friendly option for everyday use.
When it comes to hardware, aesthetics and functionality go hand in hand. Bronze accents can pair beautifully with a volcanic lava body, while rhodium trim complements cooler-toned designs. Gold-plated hardware works well with warmer palettes. One thing to keep in mind: the layers of paint and protective coatings can affect how hardware fits. To ensure a seamless finish, the pen body may need to be slightly turned down to accommodate these layers.
Choosing Paints and Pigments
The choice of paint can make or break the final look of the pen.
- Acrylic paints are a go-to for most pen makers. They work well with protective finishes like cyanoacrylate (CA) and lacquer, providing vibrant, fade-resistant colors. As DCBluesman from Penturners.org explains, "I think you will find that most of us who have painted pens use acrylic paints. Both CA and lacquer can be used over acrylic".
- For high-end pens, Urushi lacquer is unmatched in its depth and durability.
- While enamel paints are popular in other crafts, they can be tricky here. They often smear when coated with CA or certain finishes. The solution? Always test your paint and finish on a sample piece before applying it to the actual pen body.
Preparing the Pen Body
Once the materials are selected, the raw components are transformed into precise, functional pen parts. This stage demands incredible precision - every cut, measurement, and surface treatment plays a role in shaping how the final pen looks, feels, and performs.
Shaping the Barrel, Cap, and Section
The process begins with preparing the raw materials. For example, woods like Padauk or Rosewood must be cured and stabilized to prevent cracking or warping down the line. Resins, on the other hand, are thoroughly dried to remove moisture before being molded. When it comes to artisanal pens, craftspeople often mount the material on a lathe, using chisels to shape it into the required dimensions and achieve the perfect balance. Pen artisan Dao Huy Hoang describes this meticulous process:
"I turn with chisels and sand till it gets very thin tail and the shape I need. It takes hours to do in this step, which is called 'making pen bone'".
Some artisans even turn the tail section down to as thin as 3mm in diameter, showcasing the level of precision involved.
Threading is another critical step, as it secures the cap and barrel together. Threads are carefully cut into the components, and grooves are added to accommodate the section and any decorative features. Many modern pen makers now rely on 3D modeling and high-resolution SLA printers (capable of 25-micron resolution) to prototype and ensure proper thread engagement before working with expensive materials. Additionally, pen bodies are often turned slightly undersized to account for the thickness of paint layers, ensuring the final product doesn’t appear oversized or out of proportion with its hardware.
Once the components are shaped to perfection, the focus shifts to surface preparation to ensure flawless paint adhesion.
Sanding and Priming
After shaping, the components undergo meticulous sanding and priming to create a foundation for durable and vibrant finishes. Proper surface preparation is essential for ensuring that paint adheres well and stands the test of time.
The shaped parts are sanded with progressively finer grits to remove any imperfections. For porous materials like wood, artisans apply 3 to 4 layers of a base sealer - such as raw urushi or water-based polyurethane - to completely fill the pores. Each layer is carefully applied, wiped off, and cured before moving on to the next.
In August 2021, artisan Michal at Pen Venture showcased this process while crafting a series of ebonite fountain pens using the Tamenuri technique. He began by applying 3 to 4 layers of raw urushi to the ebonite bodies, wiping off and curing each layer to ensure all pores were filled. Next, the pens were sanded with high-grit sandpaper and coated with two thin layers of nakaturi lacquer. Each layer was cured and sanded again before applying four layers of pigmented urushi and five layers of transparent topcoat. As Michal explains:
"This procedure makes sure that all pores are filled with usushi. After the fountain pens were lightly sanded with a higher grit and lacquered with nakaturi lacquer thinly, in two layers, each layer was cured and sanded with a higher grit, making the fountain pens ready for color".
For the smoothest finishes, artisans often use ultra-fine sandpaper with grits ranging from 2,500 to 3,000 between layers. This ensures a perfectly flat surface that's strong, smooth, and chemically stable - ready to serve as the canvas for the artistic painting that follows.
Painting the Fountain Pen
Once the pen's surface has been carefully sanded and primed, it becomes the perfect foundation for artistic expression. From this point, skilled artisans transform the prepared surface into a functional piece of art. This stage demands patience, precision, and often months of work, especially when traditional methods are used.
Painting Techniques and Tools
Different painting techniques offer a variety of results, relying on precise tools and high-quality materials. One notable traditional method is the Japanese art of Maki-e, where metal powders like gold or silver are sprinkled onto wet lacquer using a bamboo tool called a "Funzutsu." As Pilot-Namiki explains:
"The undercoat of Maki-e fountain pens is black lacquer. This is lacquered to the body".
There are several variations of Maki-e, each offering unique effects:
- Hira Maki-e: Produces flat designs with burnished lacquer.
- Togidashi Maki-e: Covers the design entirely with lacquer, later revealed through burnishing with charcoal.
- Taka Maki-e: Creates raised designs using a mix of lacquer and charcoal powder for a textured, high-relief appearance.
Another technique, Tamenuri, achieves depth by layering transparent and pigmented lacquers. As Michal from Pen Venture describes:
"Tamenuri comes from the words 'tame' – lake/pond and 'nuri' – painting/lacquering. The technique always consists of two distinct layers – the middle one – pigmented urushi – solid color and the top layer – a transparent urushi".
In Tamenuri, the underlying color becomes visible where sanding thins the transparent top layer, creating a striking effect.
Other methods include direct brush painting, where freehand designs are applied with fine brushes and sealed with clear resin for protection. For instance, Stanford Pen Studio offers intricate models like "Heads, Hands, Hearts", priced at approximately $449.16. Pen turner ken69912001 mentions:
"Acrylic paint works well with CA finish".
Airbrushing uses compressed air to evenly distribute paint, achieving a smooth, glossy finish. Subtractive techniques like Scrimshaw involve engraving patterns into resin and filling the lines with ink, while Chinkin uses chisels to engrave designs, which are then filled with lacquer and gold.
| Technique | Primary Materials | Key Characteristic | Process Type |
|---|---|---|---|
| Maki-e | Gold/silver powder, Urushi, Funzutsu | Metallic powder sprinkled on wet lacquer | Additive |
| Tamenuri | Pigmented & transparent Urushi | Depth created by translucent layers | Additive |
| Direct Brush Painting | Acrylic paints, fine brushes | Freehand designs sealed in clear resin | Additive |
| Airbrushing | Compressed air, specialized paint | Smooth, uniform finish | Additive |
| Scrimshaw | Sharp cutter, ink | Engraved lines filled with ink | Subtractive |
| Chinkin | Special chisels, gold leaf/powder | Engraved patterns inlaid with gold | Subtractive |
These techniques provide a wide range of artistic possibilities, setting the stage for intricate and meaningful designs.
Common Design Themes
Hand-painted fountain pens often feature a variety of artistic styles. Many designs are inspired by nature, showcasing motifs like goldfish, cherry blossoms, bamboo forests, and flowing water. These themes reflect traditional Japanese aesthetics while also embracing modern influences. Geometric patterns offer a sleek, contemporary look, while historical and artistic references tie the designs to timeless traditions. Celestial themes, such as "Moonlight Sonata", bring a dramatic flair to the artwork. Prestigious brands like Visconti and Namiki are known for their highly detailed, limited-edition hand-painted pens.
After painting, the next stage involves layering and curing to enhance both the depth and durability of the design.
Drying and Layering
To build depth and ensure durability, artisans apply multiple thin layers of paint, allowing each layer to cure properly. For Maki-e pens, this process can take over three months, with cycles of lacquering, drawing, sprinkling, and polishing repeated up to 130 times. As Namiki explains:
"The more the lacquer is applied, the deeper the colour becomes and the more the gold and silver powder glows".
Urushi lacquer requires specific environmental conditions to cure, with some pigmented layers needing very low humidity. The "Uwazuri" finishing process involves applying raw urushi, wiping it off completely, and curing it for 24 hours - a cycle repeated to achieve a rich, polished appearance. Between layers, artisans sand the surface with high-grit crystal stones and polish it using oil-mixed powders to create smooth transitions. Completing a hand-painted pen can take between eight and fifteen hours for the design and painting phases alone, excluding the curing time. Artist A.A. Vacharat highlights the importance of sealing:
"The varnish helps to prevent flaking and removal of the acrylic paint".
This sealing process ensures the artwork remains intact and vibrant for years to come.
Assembly and Final Finishing
After months of careful painting and curing, the pen reaches the assembly stage. This step is where all the meticulous preparation comes together. Before the reassembly process begins, artisans remove any excess paint from internal threads and the nib/feed housing. This ensures a secure fit and smooth operation, setting the stage for precise hardware installation and the preservation of the pen’s artistry.
Installing the Nib and Feed
Installing the nib and feed is a delicate process that demands precision. The painting process adds layers to the pen body, increasing its thickness. If the pen body wasn’t slightly under-turned before painting, these additional layers can cause misalignment during assembly. For materials like ebonite, artisans apply base layers first to create a stable, smooth foundation that won’t react during lacquering. As Pen Venture explains:
"The goal of the base layers was to make sure the substrate is strong, smooth, and will not react to the lacquering later".
Reassembly only begins after protective coatings have fully cured, surface imperfections like bubbles are removed, and the pen achieves a high-gloss polish.
Applying Protective Coatings
Protective coatings are essential for preserving the pen's artwork and ensuring durability. Cyanoacrylate (CA) forms a hard, clear shell that works well with acrylic paints. However, it requires careful application, as it can smear enamel-based paints if applied too aggressively. As DCBluesman from Penturners.org notes:
"I think you will find that most of us who have painted pens use acrylic paints. Both CA and lacquer can be used over acrylic".
Urushi lacquer, a traditional Japanese resin, offers exceptional durability and acid resistance. Once hardened, it creates a protective and visually striking finish. Truphae highlights its benefits:
"The urushi lacquer forms a protective coating against the surface on which it's applied. It's both durable and aesthetically-pleasing".
The "uwazuri" process involves applying raw urushi, wiping it off, and curing for 24 hours. This step is repeated six or more times to achieve a deep, polished luster. For a simpler alternative, wipe-on polyurethane is often used. Applied in two to three thin coats with a lint-free cloth, it provides reliable protection. Once cured, artisans polish the surface using high-grit crystal stones and specialized powders mixed with oil, creating a mirror-like finish.
Testing and Final Inspection
Once assembly is complete, the pen undergoes rigorous quality checks to ensure both its appearance and functionality meet high standards. Inspectors carefully examine the surface for any trapped bubbles or imperfections in the varnish, ensuring a flawless, smooth finish. They also verify that the pen body aligns perfectly with its metal components. For traditional Maki-e pens, the design is burnished with charcoal to enhance clarity and achieve a uniform luster.
Writing performance is tested to confirm smooth ink flow and proper nib alignment. Artist A.A. Vacharat underscores the importance of this step:
"Pens must be varnished/lacquered as they are meant to be handled and used. The varnish helps to prevent flaking and removal of the acrylic paint".
High-end pens, like those from Pilot Namiki, exemplify the dedication to craftsmanship. These pieces can take over three months to complete, with the lacquering and polishing process repeated up to 130 times.
Conclusion
Hand-painted fountain pens blend functionality with a touch of artistry. From the selection of premium materials to the meticulous preparation, detailed painting, and protective lacquering, every stage reflects the dedication of skilled artisans. As Stanford Pen Studio puts it, "The end product is a portable, functional, unique work of art". These pens do more than write - they tell their own story through every intricate detail.
Creating these masterpieces is no small feat. Artist-painted pens require 8–15 hours of work, while traditional Maki-e models demand over three months of effort, involving up to 130 layers of lacquer. This painstaking process ensures that no two pens are exactly alike, making each one a true one-of-a-kind creation. Such individuality appeals strongly to collectors who value craftsmanship and originality.
For those looking to start or expand their collection, Fountain Pen Revolution offers options at various price points. The FPR Triveni Acrylic Handmade pen begins at $79.00, while the Tanoshii Urushi Art Fountain Pen, crafted using traditional Japanese methods, is available for around $373.50. With over 54,600 satisfied customers, their commitment to quality and artistry is evident in every pen they offer.
FAQs
How do I care for a hand-painted fountain pen?
To keep a hand-painted fountain pen in great condition, treat it with care and steer clear of harsh chemicals like acetone or alcohol that could damage the paint. Regularly clean the nib to ensure smooth writing, and when applying protective finishes like polyurethane, do so with precision to safeguard the artwork. If you’re considering finishes such as CA glue, always test them on a sample first - this is especially important when working with enamel paints to avoid smearing. Taking the time to clean and finish the pen carefully will help preserve its beauty for years to come.
Will the paint wear off with daily use?
The paint on hand-painted fountain pens can gradually wear away with regular use unless protected with strong finishes like CA glue or lacquer. Applying these finishes, however, demands precision - any mistakes during the sealing process could smear or harm the artwork. A well-executed finish is key to safeguarding the design and extending its lifespan.
What makes Maki-e pens take so long to finish?
Maki-e pens are crafted through a painstaking process that demands precision and patience. It begins with detailed design planning, followed by the careful transfer of the artwork onto the pen. Multiple layers of urushi lacquer are then applied, with each layer requiring months to fully cure. After curing, each layer is delicately burnished to achieve the flawless finish that defines these pens. This meticulous approach ensures the breathtaking and durable designs that make Maki-e pens so distinctive.