
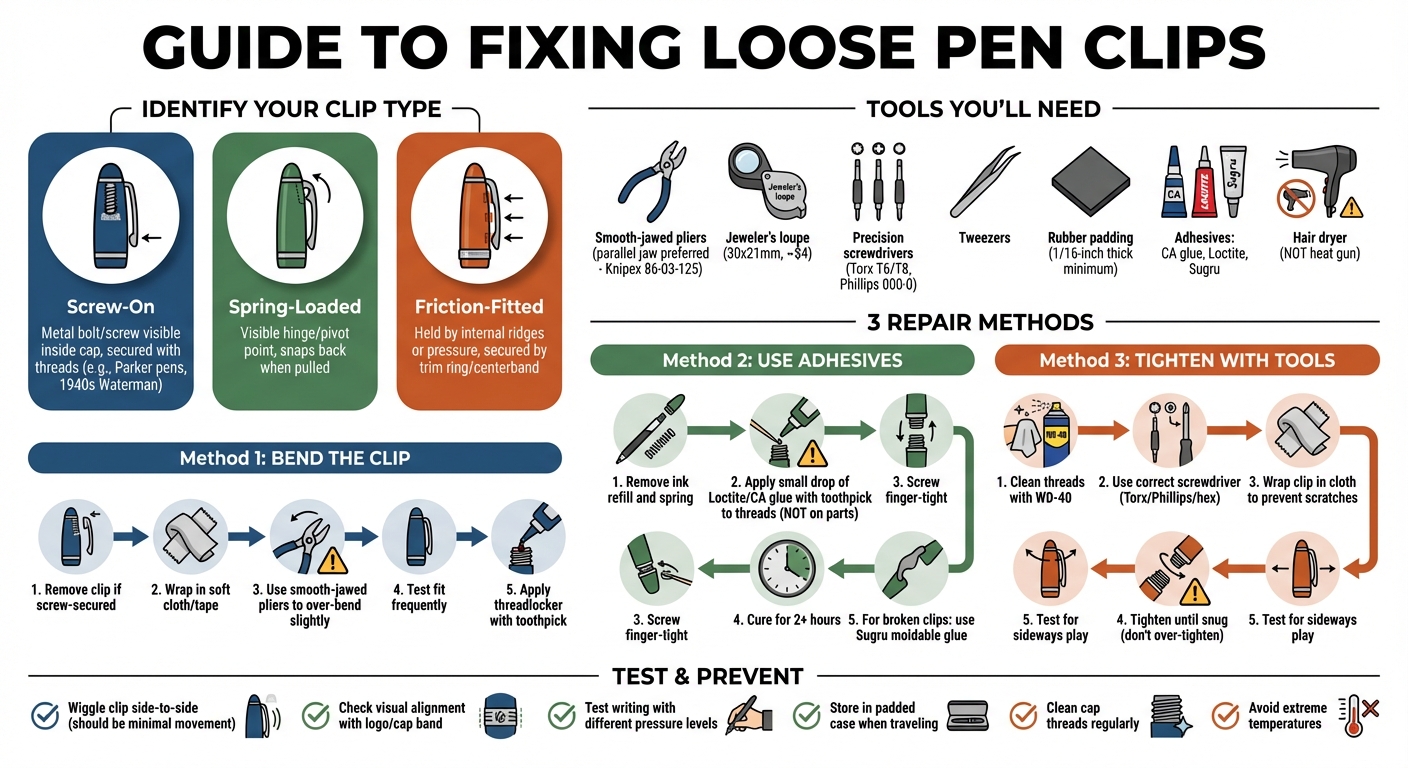
When your pen clip becomes loose, it can lead to practical and aesthetic issues, like the pen slipping out of your pocket or ink pooling in fountain pens. Fixing it involves identifying the clip type - screw-on, spring-loaded, or friction-fitted - and using the right tools and methods. Here's a quick summary of how to handle it:
- Tools You'll Need: Smooth-jawed pliers, jeweler's loupe, precision screwdrivers, tweezers, rubber padding, and adhesives like Loctite or Sugru.
-
Clip Types:
- Screw-On: Secured with threads, often visible inside the cap.
- Spring-Loaded: Features a hinge and spring mechanism.
- Friction-Fitted: Held by pressure or internal ridges.
-
Fixing Methods:
- Bend the Clip: Use pliers to restore tension.
- Apply Adhesives: For broken or loose clips, use CA glue or Sugru.
- Tighten Screws: Use appropriate screwdrivers or pliers for a snug fit.
After fixing, reassemble the pen carefully and test the clip for stability. Regular maintenance, like cleaning caps and avoiding impacts, helps keep the clip secure over time. A well-maintained clip ensures your pen stays functional and stylish.
How to Fix a Loose Pen Clip: 3-Step Repair Guide
How To Fix A Lamy 2000 Clip
Tools and Materials You'll Need
Before diving into repairs, make sure you have all the necessary tools and materials ready. This will save time and help you protect your pen's finish during the process.
Basic Tools for Clip Adjustment
Your primary tool will be pliers, but not just any kind. Parallel jaw pliers, such as the Knipex 86-03-125, are ideal because they apply even pressure and won't damage your pen's surface. Make sure to use smooth-jawed or soft-grip pliers and avoid serrated ones. As Tactile Turn Support advises:
"Please do not use pliers with teeth as that can scratch the bolts. Parallel jawed pliers are preferred, but any smooth jawed or soft grip style pliers will work".
For close inspection of the clip attachment, a jeweler's loupe (30x21mm) is incredibly handy and costs around $4. If you're dealing with screw-on clips, you'll need small precision screwdrivers. For spring-loaded clips, tweezers are essential for handling tiny springs. A hair dryer is useful for softening adhesives without risking damage to your pen - avoid using a heat gun for this purpose.
To protect your pen's finish, use materials like latex gloves or rubber padding. Options include rubber bicycle inner tubing or 5/8-inch thick-walled automotive fuel line hose, both of which provide cushioning and grip. Ensure the rubber padding is at least 1/16-inch thick, as standard tape won't offer enough protection.
Depending on the type of repair, you may need additional materials.
Additional Materials for Repairs
For fixing threads permanently, a small amount of Super Glue (CA glue) or Loctite, applied with a toothpick, works well. If you're working on traditional fountain pens, shellac is a great option and costs about $8 for a small bottle with a brush.
To rebuild broken plastic clips or secure DIY wire clips, try Sugru moldable glue. For bonding elastic to metal clips in custom projects, E6000 is a reliable choice. For detailed cleaning, a dental pick set (available for under $7) can help clear debris from tight spaces. Use brass shims to adjust clip tension without risking scratches. Finally, keep 100% pure silicone grease on hand for lubricating spring-loaded clips. Avoid greases with petroleum distillates, as they can damage plastic components.
With these tools and materials, you'll be well-equipped to tackle a variety of pen repairs.
Identifying Your Clip Type
Before diving into pen repairs, it's important to figure out what type of clip your pen has. The way the clip is attached determines which repair techniques will work - and which might cause damage. Pen clips generally fall into three categories: screw-on, spring-loaded, or friction-fitted.
Start by taking a close look at the finial - the decorative top piece of your pen cap. Try rotating it counterclockwise. If it unscrews, your pen likely has a screw-on clip system. To confirm, use a flashlight to inspect the open end of the cap. If you see a metal bolt or screw head at the bottom, it’s definitely a screw-on design. These clips are secured with a threaded fastener and are commonly found on pens like Parker models and certain 1940s Waterman designs.
For a spring-loaded clip, gently pull the clip away from the cap. If it moves on a visible hinge or pivot point and snaps back into place, it’s spring-loaded. These clips rely on a mechanical hinge and an internal spring. If the clip feels loose or doesn’t spring back, the internal spring or clutch mechanism may be broken.
Friction-fitted clips, also called snap-fit clips, don’t use screws or hinges. Instead, they’re held in place by internal ridges or pressure. These clips are often secured by a trim ring or centerband. If the clip bends or flexes without any visible fasteners, it’s likely friction-fitted. Look closely for any gaps between the clip and the cap body - this could indicate that the internal ridges are worn down or damaged from repeated use.
As pen repair expert Arthur Twydle once said:
"In spite of all variations, I have always found the clip to be the weak spot on any pen".
Correctly identifying your pen’s clip type is crucial. It helps you avoid causing further damage to this delicate component during repairs. Once you’ve determined the clip type, you can move on to the appropriate repair methods to get your pen back in working order.
3 Methods to Fix Loose Pen Clips
Now that you’ve identified your pen’s clip type, it’s time to dive into the repair process. Each method works best for specific situations, so choose the one that aligns with your pen’s design and the extent of the issue.
Method 1: Bending the Clip for Better Tension
This approach works well for spring-loaded or friction-fitted clips that have lost their grip. The goal here is to restore the clip's tension so it holds tightly against the pen body.
If your clip is secured with screws, start by removing it to avoid damaging the pen body or threads. To protect the clip’s finish, wrap it in a soft cloth or masking tape. Then, use smooth-jawed or soft-grip pliers - avoid pliers with teeth, as they can scratch the metal.
The trick is to slightly over-bend the clip. As kennethsime, an Instructables contributor, explains:
"The key to re-bending a clip is to over-bend it. ...for the clip to properly secure your knife [or pen] it has to be engaged when it's installed, springing against the handle."
Apply steady, gradual pressure rather than quick, forceful motions. Make small adjustments, testing the fit frequently by temporarily reinstalling the clip. It should snap back firmly into place with a bit of resistance. Once the tension feels right, add a tiny drop of threadlocker (like Loctite) to the screws using a toothpick. This helps keep them secure over time.
Method 2: Using Adhesives
If bending doesn’t solve the problem, adhesives can provide a more lasting fix. Options include cyanoacrylate (CA) glue, threadlockers like Loctite, or moldable adhesives such as Sugru.
Paul in OKC, a member of The International Association of Penturners, shares this tip:
"I put a drop with a toothpick inside the tube before assembly. I don't put the CA on the parts because of the possibility of squeeze out on to the finish."
For screw-on clips, start by removing the ink refill and spring to relieve internal tension. Then, carefully apply a small drop of Loctite to the threads using a toothpick. Screw the clip in finger-tight and allow it to cure for at least two hours. Tactile Turn Support warns:
"Be careful not to use too much and let it leak out into the pen. This will cause the mechanism to become glued in place."
For friction-fitted clips or broken plastic ones, moldable adhesives like Sugru can rebuild the attachment point. A single 5g packet is usually enough for one repair. To match the pen’s finish, you can texture the adhesive with a craft knife before it sets.
Method 3: Tightening with Tools
For screw-on clips, using the right screwdriver is key. Most modern pens use Torx screws (T6 and T8 are common), while older models might require Phillips (sizes 000–0) or small hex screws. A basic Torx multi-driver or jeweler’s screwdriver set is affordable, often costing around $6.00.
Before tightening, clean the threads with a small amount of WD-40 to ensure a snug fit. To avoid scratches, wrap the clip or tool in a cloth. Smooth, soft-grip pliers or parallel-jawed pliers are ideal. As Tactile Turn Support advises:
"Please do not use pliers with teeth as that can scratch the bolts [or clips]. Parallel jawed pliers are preferred, but any smooth jawed or soft grip style pliers will work."
For decorative caps or "tassies" without slots, use a rubber friction pad or a tap washer attached to a stick to grip and turn the part. If worn threads are the issue, trimming the inner cap slightly can expose a fresh section of threading.
Once tightened, reassemble your pen and test the clip to ensure it feels secure.
sbb-itb-1dd4fe9
Reassembly and Testing
To get your pen back in working order, reassemble it by reversing the steps you took to disassemble it. Make sure all the internal parts are properly seated. If your pen uses a piston mechanism, align the tab at the top of the converter with its matching slot. For screws removed earlier, apply a tiny drop of threadlocker with a toothpick - just a little goes a long way. Using too much can cause it to seep into the pen and potentially glue the mechanism in place. Tighten everything until it feels snug, but avoid over-tightening, as this could crack the barrel or strip the threads.
Once reassembled, check that all components are stable. Joshua Danley from The Pelikan's Perch advises:
"Once snugged tightly, the clip should not have any significant sideways play. If this is not the case, your alignment is off and you will need to reseat the clip".
Gently wiggle the clip from side to side - it should feel solid with only minimal movement. Additionally, check that the clip is visually aligned with the pen's logo or cap band. Once you're satisfied with the clip's alignment, move on to testing the pen's overall functionality.
Try writing with the pen, applying different levels of pressure to ensure the adjustments are holding up. If your pen has a click mechanism, test it multiple times to confirm smooth operation. The clip should securely grip a pocket and keep the pen upright without slipping.
If the clip still feels loose, remove and reseat it, paying close attention to its alignment. Often, a quick adjustment is all that's needed to secure it properly.
How to Prevent Loose Clips
After fixing your pen's clip, it's important to take steps to keep it secure and in good condition moving forward.
Proper Handling and Use
Pen clips endure a lot of wear and tear, but being mindful of how you handle your pen can help reduce potential damage. For instance, impacts or letting your pen move freely in a bag can harm the clip or its attachment.
To avoid this, store your pen in a case or pouch when you're on the go. If you're carrying it in a larger bag, place it in an internal compartment to keep it secure. A padded pencil case is especially effective, as it absorbs the shock from accidental drops, which could otherwise loosen the clip or damage internal parts. Be cautious of extreme temperatures too, as they can cause materials to expand or contract, potentially loosening the clip.
Regular Maintenance
A little routine care goes a long way in preventing small issues from turning into big problems. For example, you can use a pin to clear dust from the air holes in the cap, which prevents excess suction. Also, clean and thoroughly dry the cap and barrel threads to avoid corrosion and ensure they fit properly.
Joshua Danley from The Pelikan's Perch emphasizes the importance of cleaning caps:
"I find that a lot of people don't regularly clean caps as part of their pen maintenance routine. They can really get cruddy over time".
Dried ink and debris can interfere with how the clip assembly fits. If your pen has hardware like bolt-action or screw-on clips, check them periodically for looseness. Tighten them gently using parallel-jawed pliers to avoid scratching the surface. And remember, never recap the pen while the cap is wet - moisture can lead to degradation over time. Regular maintenance not only keeps your pen looking and working great but also helps extend its lifespan.
Conclusion
A loose pen clip doesn’t just affect your pen’s appearance - it compromises its ability to stay securely in your pocket, notebook, or case. Rachel Goulet of Goulet Pens emphasizes the importance of the clip, noting that it helps prevent your pen from rolling off surfaces and potentially landing nib-first, which could cause damage.
Maintaining your fountain pen regularly ensures it performs at its best. As Brian Goulet from The Goulet Pen Company explains:
"Proper fountain pen maintenance is a very important, yet often overlooked aspect to getting the most enjoyment from your pens".
For detailed guidance on upkeep, refer to the maintenance section above. By addressing a loose clip and following the outlined steps, you protect your pen’s longevity and ensure all its parts work seamlessly together. Taking care of the clip doesn’t just fix a minor issue - it helps preserve your dependable writing tool for years to come.
If you’re looking for additional support, Fountain Pen Revolution offers affordable fountain pens designed for easy maintenance. They also provide accessories and educational resources to help keep your pens in peak condition. Plus, with free shipping on U.S. orders over $65, you can explore their range of pens, nibs, and cases to enhance your writing experience.
FAQs
How do I identify the type of clip on my pen?
To figure out the type of clip on your pen, take a closer look at how it's attached and its overall design. Pen clips generally fall into two main categories: removable or fixed. A removable clip can usually be unscrewed or snapped off, while a fixed clip is built directly into the cap and can't be taken off.
Next, examine the mounting style. Some pens use a washer clip, where a metal washer holds the clip securely in place. Other pens have a flat-top or peaked-top design, with the clip riveted or glued into small holes on the cap. Older pens often have clips that are permanently riveted, while many modern pens make it easier to remove or adjust the clip.
By studying these features, you’ll know what type of clip you’re working with and how to tighten or adjust it if needed. Fountain Pen Revolution offers a range of pens with these classic clip designs, perfect for both beginners and experienced collectors.
What tools do I need to fix a loose pen clip?
To fix or adjust a loose pen clip, you’ll need a few basic tools that are perfect for handling delicate repairs:
- Small drill bit or similar tool: Use the smooth end as an anvil by inserting it into the pen cap or barrel. This creates a stable surface for your adjustments.
- Precision punch or thin rod: Ideal for repositioning the clip’s rivet without damaging it. Wrapping the tool in tape can help avoid scratches.
- Soft-jaw clamp or gripper: Holds the pen barrel securely in place while preventing marks or damage.
- Small hammer or jeweler’s mallet: For precise, gentle tapping to tweak the clip’s tension without overdoing it.
With these tools, you can carefully adjust the clip while keeping your pen in excellent condition.
How can I keep my pen clip from becoming loose again?
To keep your pen clip from becoming loose, ensure it's properly tightened and consider using a tiny bit of thread-locking adhesive for added stability. When adjusting, use smooth-jaw pliers to avoid scratching the metal. Tighten the screw until it's snug but not overly tight - overdoing it can damage the threads or the clip itself.
For a longer-lasting solution, remove the clip screw, apply a small drop of thread-locking adhesive (like Loctite), and carefully reassemble the clip. Allow the adhesive to set for a few hours before testing. Make it a habit to check the clip every few months to catch any looseness early, keeping it secure and functional.
Tip: Fountain Pen Revolution offers handy tools like smooth-jaw pliers and thread-locking adhesive to make pen maintenance simple and stress-free.