

If your fountain pen skips, writes dry, or leaks, the feed is likely the problem. Fixing a friction fit feed is a common repair that beginners can handle with care. Here's what you need to know:
- What is a friction fit feed? It stays in place through pressure, not screws or collars, allowing adjustments to ink flow.
- Common problems: Clogging, misalignment, or loose feeds can cause dry writing, ink leaks, or hard starts.
- When to seek help: Issues like cracks, frozen feeds, or delicate vintage materials may need professional repair.
- Tools you’ll need: Rubber grips, section pliers, pen flush, and a bulb syringe are key for cleaning and adjustments.
- Steps to restore: Soak parts, clean ink channels, align the nib and feed, and reassemble carefully.
A clean workspace, proper tools, and patience are essential for a successful restoration. Regular maintenance can keep your pen writing smoothly.
Tools and Work Area Setup
Tools and Materials Checklist
You don’t need a ton of tools to restore a friction fit feed, but having the right ones can make the job much easier. Here's a quick checklist:
| Tool | Purpose | Approx. Cost |
|---|---|---|
| Rubber grip material | Helps you grip the feed and nib securely without slipping | $2–$5 |
| Section pliers (padded) | Holds sections firmly without damaging the finish | $15–$25 |
| Brass shims (0.001"–0.002") | Cleans dried ink from feed channels and nib slits | $5–$10 |
| Bulb syringe | Flushes water or cleaning solution through the section | $4–$8 |
| Knock-out block | Safely removes stuck feeds from the section | $25–$45 |
| Microfiber cloth | Dries and polishes parts gently without scratching | Low cost |
| Pen flush | Breaks down stubborn dried ink; you can DIY it with distilled water, a drop of dish soap, and a small amount of ammonia (10:1 ratio) | $12–$20 |
You can find a bulb syringe at most pharmacies for under $8, and rubber grip material is readily available at hardware stores for just a few dollars.
Shellac is another item to consider. It’s useful for re-securing a loose friction fit assembly, but it’s not typically required for basic restorations. If you do need it, a little goes a long way.
How to Set Up Your Work Area
A clean and organized workspace is key to avoiding accidents or losing small parts. Start by laying down a light-colored microfiber towel or silicone mat on your table. This creates a soft surface to protect delicate components and makes dark-colored parts, like ebonite feeds, easier to see. To keep everything contained, place the mat inside a shallow tray with a raised edge - this way, if a nib or feed slips out of your hands, it won’t roll away.
Lighting is just as important. Use a bright, adjustable task lamp to clearly see the fine details, like the feed’s capillary channels or the alignment of the nib. Small glass or plastic jars are handy for soaking parts. If you’re working on multiple pens, label the jars to keep components from getting mixed up.
Before disassembling anything, take a photo of the nib and feed alignment. This simple step can save you a lot of frustration when it’s time to reassemble. Also, keep all parts organized and labeled to maintain order throughout the process.
Handling Pen Components Safely
Always start with soaking before attempting to disassemble. Dried ink can act like glue, making it tricky to remove parts. Soaking the nib and section in room-temperature water or pen flush for at least 24 hours softens the residue, reducing the risk of damaging delicate components like the feed fins.
Ebonite feeds require extra caution. They’re prone to becoming brittle with age, and exposure to boiling water can warp or discolor them. Stick to room-temperature or lukewarm water to avoid issues. For gold nibs - especially 14k or 18k - remember that they’re soft and can bend easily under pressure. Always use a rubber buffer between any tools and the nib surface to prevent damage. When pulling out a feed, apply steady, straight pressure to avoid misaligning the nib tines or snapping the feed tail.
sbb-itb-1dd4fe9
Diagnosing Common Problems
Symptoms and Their Causes
When it comes to friction fit feed issues, most problems fall into a few recognizable patterns:
- Skipping or dry writing: This often happens when the ink channels are clogged or the feed is seated too deeply, restricting ink flow.
- Ink flooding or "burping": If a blob of ink suddenly drops onto your paper, it’s usually caused by an air leak, often due to the feed not being firmly seated in the section.
- Hard starts: If your pen refuses to write right after uncapping, there’s likely a gap between the nib and the feed. This gap disrupts the capillary action needed to pull ink forward.
Other issues are easier to spot visually. For example, if the nib appears off-center or tilted relative to the feed’s ink channel, it’s a case of physical misalignment. Similarly, if the nib or feed moves when touched, the friction fit may have loosened over time.
Here’s a quick reference table to help identify problems and their solutions:
| Symptom | Likely Cause | Recommended Action |
|---|---|---|
| Dry writing / skipping | Clogged channels or feed seated too deep | Flush the pen; check alignment; pull feed forward |
| Ink blobs / leaking | Air leak or feed not seated deep enough | Push feed firmly into the section; inspect for cracks |
| Hard starts | Gap between nib and feed | Adjust feed seating; consider heat-setting if ebonite |
| Scratchiness | Misaligned nib tines | Align tines; ensure the feed is centered under the nib |
These clues can guide your inspection process. Once you’ve identified the issue, follow a systematic troubleshooting process to resolve it.
How to Inspect and Troubleshoot
Start by flushing the pen with soapy water. Use room-temperature water and a bulb syringe to flush the section thoroughly before disassembling anything. This step clears out dried ink or debris and minimizes wear on the section walls from repeated disassembly.
If flushing doesn’t solve the issue, move on to a visual inspection. Hold the nib and feed up to a bright light for the daylight test. If you see light passing between the nib and feed, they aren’t making proper contact and need adjustment. For more precision, use a 10x jeweler’s loupe to check whether the feed’s ink channel aligns perfectly with the nib slit. Even a tiny misalignment can disrupt ink flow.
After making adjustments, always test with a consistent, reliable ink to ensure you’re diagnosing the pen itself, not an ink-paper mismatch. As nib expert Richard Binder advises:
"Choose a good, reliable, non-funky ink - I recommend Waterman Mysterious Blue or Serenity Blue - and a good middle-ground paper, and stick with them. Always."
Building a Simple Diagnosis Checklist
A structured approach can help you troubleshoot effectively without missing steps. Here’s a straightforward checklist to guide you:
- Flush first. Use soapy water and a bulb syringe to clean the section before making any adjustments.
- Run the daylight test. Check for gaps between the nib and feed by holding them up to a light source.
- Inspect with a loupe. Look closely at the alignment of the feed channel and nib slit, and check for debris or dried ink.
- Test with control materials. Use smooth, neutral paper and a reliable ink to rule out external factors.
- Decide on disassembly. Only disassemble the pen if flushing and visual checks fail to resolve the issue.
One critical rule: never attempt to smooth or adjust the nib until you’ve confirmed the tines are properly aligned. As Binder warns, "Thou Shalt Not Attempt to Smooth a Misaligned Nib." Smoothing a misaligned nib can result in uneven material removal, causing permanent damage. Always prioritize alignment before any smoothing.
Fountain pen feeders 🖋️ - Problems / Adjustment 🛠️
Step-by-Step Restoration Guide
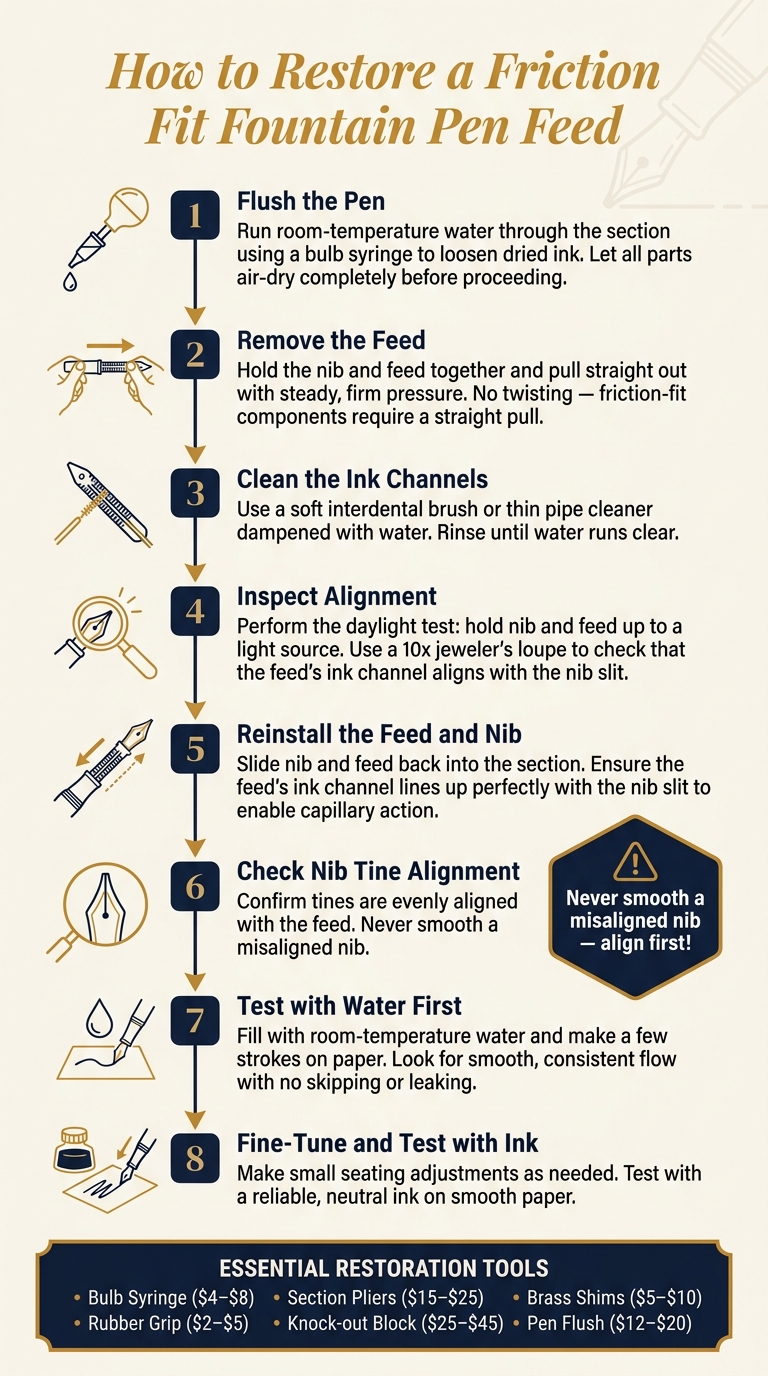
How to Restore a Friction Fit Fountain Pen Feed: Step-by-Step Guide
Preparing and Cleaning the Pen
Start by flushing the pen thoroughly before taking it apart. Remove any leftover ink by running room-temperature water through the section with a bulb syringe. This will help loosen any dried ink stuck in the channels. Once you've flushed it, let all the parts air-dry completely. Working with a damp section can make it tough to assess how well the pieces fit and align during reassembly. Once the pen is clean and dry, you can carefully move on to removing the feed.
Removing and Cleaning the Feed
After the pen is dry, hold the nib and feed together and pull them straight out with steady, firm pressure. Avoid twisting or pulling at an angle, as friction-fit components are meant to come out in a straight line. Twisting could scratch the section walls or even bend the nib.
With the feed removed, focus on cleaning the ink channels underneath. Use a soft interdental brush or a thin pipe cleaner dampened with water to clean each channel thoroughly. Rinse until the water runs clear. If you're new to this, it’s a good idea to practice on an inexpensive pen, like the Jinhao 992, before attempting this process on a valuable pen.
Reinstalling and Aligning the Feed and Nib
Once the feed is clean, it’s time to put everything back together. Slide the nib and feed back into the section, ensuring they’re seated properly. The key here is to ensure the feed’s ink channel lines up perfectly with the nib slit. This connection is what enables capillary action to keep the ink flowing smoothly.
Before wrapping up, double-check that the nib tines are evenly aligned with the feed. As nib expert Richard Binder advises:
"Thou Shalt Not Attempt to Smooth a Misaligned Nib."
When testing ink flow, avoid applying too much pressure to the nib. Excessive force can bend the tines beyond their ability to spring back, often requiring professional repairs to fix.
Testing and Maintenance Tips
After restoring your pen, proper testing and consistent upkeep are key to keeping it in excellent working condition.
How to Test the Pen After Restoration
Once you've reassembled your pen, start by testing it with room-temperature water before adding ink. Fill the pen with water, then make a few strokes on paper. You’re looking for a smooth, consistent flow without any skipping or leaking. If the flow seems uneven, remove the nib and feed, re-seat them carefully, and ensure the feed's ink channel lines up with the nib slit. Test again. If problems persist, revisit your earlier diagnosis checklist to identify and fix the issue.
Sometimes, the water test might reveal problems with flow or alignment that require minor adjustments.
Making Small Adjustments to Improve Writing
Fine-tuning your pen often involves adjusting how the nib and feed sit together. If the feed isn’t fully inserted, you might notice dry or scratchy writing. Push it too far, and you could end up with ink flooding. Make small adjustments, testing after each one, until the flow feels just right. Additionally, check that the nib tines are even and aligned - uneven tines can cause the nib to catch on the paper. For a step-by-step guide, you might find instructional videos from Fountain Pen Revolution incredibly helpful.
Once your pen is writing smoothly, regular maintenance will help keep it that way.
Long-Term Care and Cleaning
To prevent clogging and ink buildup, flush your pen every 4–6 weeks. This routine cleaning removes residue and keeps the pen performing well. Fountain Pen Revolution offers affordable supplies for cleaning and maintenance, and they even provide free shipping within the US on orders over $65, making it easier to keep your pen in top shape.
For more detailed instructions on these techniques, check out the resources available from Fountain Pen Revolution.
Conclusion and Key Takeaways
Restoring a friction fit feed requires a steady hand, patience, and attention to detail. The process involves careful disassembly, thorough cleaning with essential fountain pen accessories, aligning the nib and feed precisely, and reassembling everything with care. With time and practice, this process becomes second nature.
For those just starting out, it’s smart to practice on affordable pens. Consider modern, budget-friendly options like those from Fountain Pen Revolution, which start at just $35. These pens offer a great way to build confidence and develop the necessary skills before moving on to vintage or rare models.
Visual instruction can also make a big difference. Watching tutorials tailored to specific pen models helps you understand the correct grip and pressure needed for disassembly. This step-by-step approach aligns perfectly with the methodical nature of working with friction-fit components, which require a straight pull rather than twisting.
As you complete more restorations, the process begins to feel more natural. Each successful attempt prepares you to handle more intricate and challenging repairs down the line.
FAQs
How do I know if my pen’s feed is friction fit?
If you want to check whether your pen's feed is friction fit, see if it fits securely in the pen's section without any wobbling or looseness. A well-fitted friction feed will line up perfectly with the nib and ink channel. Try gently wiggling the feed - if it shifts too easily or feels loose, it might need some adjustment to maintain proper ink flow and ensure smooth writing.
What should I do if the nib and feed won’t pull out?
If the nib and feed refuse to budge, try gently heating the section to loosen any factory sealant. This can make the process smoother and help prevent damage. For added grip, use a non-marring tool like a rubber strap wrench or wrap painter’s tape around the section. When pulling, avoid twisting - pull straight out. Also, take note of how the nib and feed are positioned before removing them to make reassembly easier.
How can I tell if I pushed the feed in too far (or not far enough)?
When checking your fountain pen for issues, pay close attention to the alignment and fit of the nib and feed. If the feed is inserted too far, it can lead to misalignment or even block the ink flow. On the other hand, if it isn’t pushed in far enough, you may notice looseness or small gaps that affect performance. Using a magnifying tool can help you inspect this closely, ensuring the feed sits securely against the nib, with the ink channels properly aligned for smooth writing.