
A scratchy fountain pen nib can ruin your writing experience, but polishing it correctly can restore its smoothness. This guide walks you through a simple five-step process to fix surface-level flaws in fountain pen nibs. Here's what you'll need to do:
- Inspect and Align the Nib: Use a magnifying loupe to check for misaligned tines and correct them gently.
- Clean and Prepare: Flush the nib to remove ink residue and prepare it for polishing.
- Polish with Controlled Motions: Use 12,000-grit micro-mesh sheets and figure-eight motions to smooth the nib.
- Test and Refine: Write on high-quality paper to check progress and adjust as needed.
- Final Polishing: Use ultra-fine abrasives for a smooth, polished finish.
Polishing requires patience and care. Overdoing it can damage the nib permanently, so inspect and test frequently. For severe damage, consider seeking professional help. Keep your tools ready and follow these steps to enjoy a smoother writing experience.
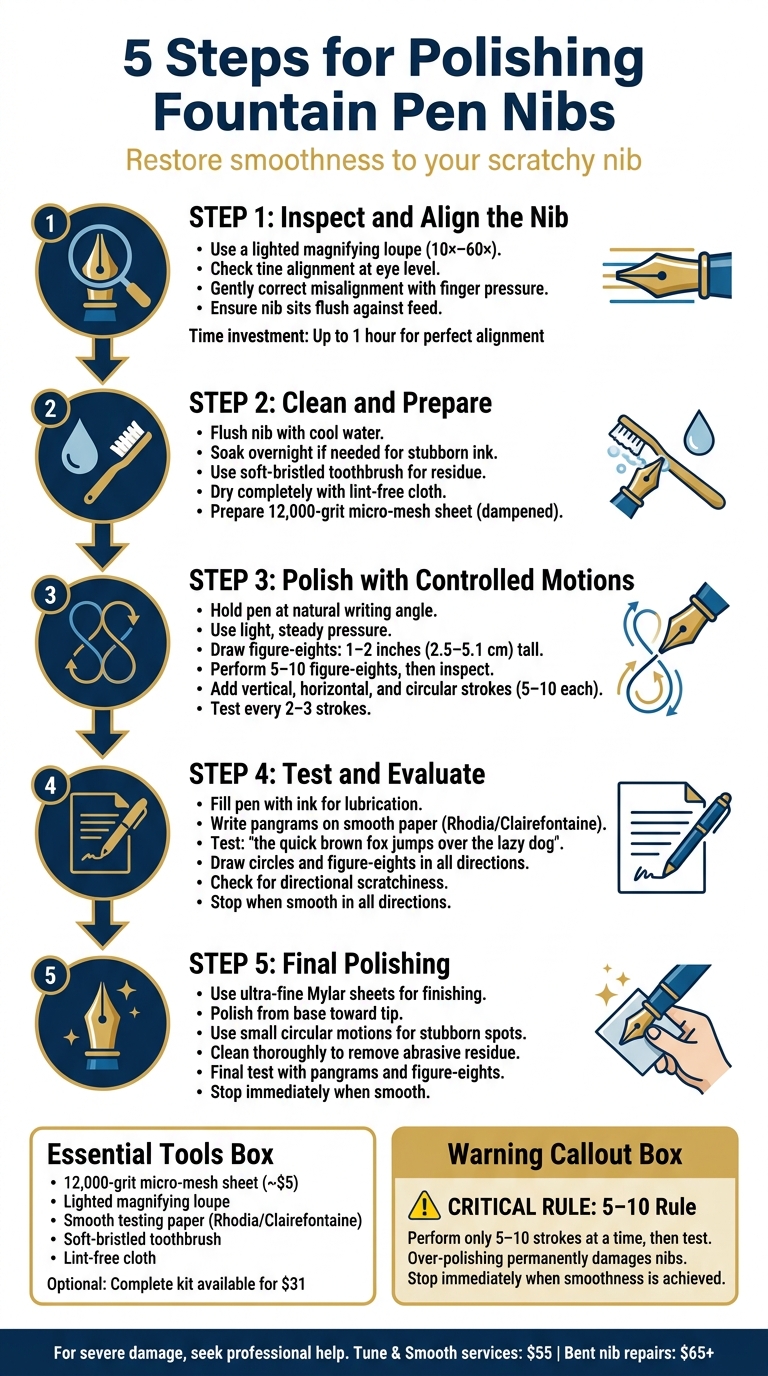
5-Step Process for Polishing Fountain Pen Nibs
How to smooth a scratchy fountain pen nib
sbb-itb-1dd4fe9
Tools and Materials You'll Need
Before diving into polishing, it's important to have the right tools on hand. Using the wrong materials can cause permanent damage to your nib, so preparation is key. The good news? Most of these tools are budget-friendly and reusable, making them excellent investments for maintaining your pens.
Micro-mesh sheets are the go-to tool for polishing. Specifically, 12,000 grit micro-mesh is ideal for removing scratchiness without stripping away too much of the nib’s tipping material. A single 3" x 4" sheet, priced at around $5, can handle hundreds of nibs. As Fountain Pen Revolution explains:
Micro-mesh is most effective when wet though can also be used dry.
For lubrication, you can either dampen the micro-mesh with water or use the ink from your pen.
A lighted magnifying loupe is another must-have. This tool helps you inspect tine alignment, a crucial step before polishing. Misaligned tines can cause scratchiness, and correcting this issue often resolves most problems. Filip from Follow My Pen advises:
Inspect the nib head-on with a loupe. If one tine sits higher, gently correct it using finger or nail pressure. This is not grinding and can solve up to 80% of problems.
Keep a close eye on your progress, checking the nib after every few strokes to avoid over-polishing.
Testing is just as important as polishing. Use high-quality, smooth paper like Rhodia or Clairefontaine to check for any lingering scratchiness. After a few figure-eight motions on the micro-mesh, test the nib immediately to see how it performs.
If you're looking for a comprehensive setup, Fountain Pen Revolution offers a Tuning/Cleaning Kit for $31.00. This kit includes essentials like a loupe, 12,000 grit micro-mesh, brass flossing sheets, and more. It’s received glowing reviews, with an average rating of 5.0/5 from 11 customers.
Step 1: Inspect and Align the Nib
Before diving into polishing, take a close look at the nib using a loupe. This isn't just a suggestion - it's a critical step for ensuring success. Misaligned tines can cause writing problems, and polishing without addressing this can make things worse.
How to Check Nib Alignment
Start by holding the pen at eye level and looking directly at the nib. Use a loupe and strong lighting to carefully inspect where the two tines meet. You're looking for any unevenness - if one tine sits even slightly higher than the other, it can lead to scratchy writing or inconsistent ink flow.
Another key detail is ensuring the nib sits flush against the feed all the way to the tip. As Filip from Follow My Pen emphasizes:
The most important thing is to ensure that the nib sits flush against the feed all the way to the tip, and that both tines are perfectly aligned where the nib is split.
If your pen is inked, clean it first. This allows you to clearly see the tipping material through the loupe.
Correcting Minor Misalignments
If you notice one tine is slightly out of place, you can fix this with gentle pressure using your fingers or nails. Make small, careful adjustments and recheck frequently. This isn't about grinding or removing material - just aligning the metal properly. Often, this simple step can resolve many nib issues.
Patience is key here. Achieving perfect alignment might take some time, even up to an hour of small adjustments and testing. But once the nib writes smoothly, you’ll know it was worth the effort. With alignment complete, you’re ready to move on to cleaning and preparing the nib in Step 2.
Step 2: Clean and Prepare the Nib
Before polishing, it's crucial to remove all ink residue from the nib. Any leftover ink can interfere with the abrasive's ability to make proper contact with the metal. Start by flushing the grip section with cool water to wash away excess ink. If some ink remains stubborn, soak the nib in water overnight to loosen the residue.
Ink Removal Process
For a more thorough cleaning, disassemble the pen by removing the nib and feed from the section. To make handling easier, use tape or a rubber nib grip to secure the nib and feed. If water alone doesn’t do the trick, using a pen flush, gently scrub the nib with a soft-bristled toothbrush:
If there are stubborn bits of ink or shimmer that the water won't wash away, then you may use a soft bristled toothbrush to gently scrub the nib.
Once cleaned, dry all parts completely with a clean, lint-free cloth. Lay the nib, feed, and section on a soft surface to protect them from accidental damage while drying. After everything is dry, you're ready to prepare your polishing surface.
Preparing the Polishing Surface
Use a 12,000-grit micro-mesh sheet (available from Fountain Pen Revolution for $5.00) dampened with water. This reduces friction and enhances the polishing process. If you prefer to polish without water, keep the pen ink-filled for lubrication and to allow for immediate testing. With your nib clean and the polishing surface ready, move on to Step 3 for polishing.
Step 3: Polish the Nib Using Controlled Motions
After cleaning and aligning your nib, the next step is polishing. Start by holding the pen at your natural writing angle - just as you would when writing. This approach ensures you're smoothing the part of the nib that actually touches the paper. Use light, steady pressure, allowing the pen's weight and the micro-mesh to do the work. Avoid pressing too hard, as this can remove too much material and potentially damage the nib. With this setup, you're ready to move on to precise polishing techniques.
Figure-Eight Motion Technique
Use a dampened micro-mesh sheet to draw figure-eight patterns, keeping each figure roughly 1 to 2 inches (2.5 to 5.1 cm) tall. This motion is particularly effective because it evenly smooths the entire nib tip, addressing any tiny imperfections that might cause scratchiness. Complete 5–10 figure-eights, then take a moment to inspect the nib.
In addition to figure-eights, try a mix of vertical, horizontal, and circular strokes (both clockwise and counterclockwise). Aim for 5–10 strokes in each direction to ensure all surfaces of the nib are evenly polished. If you notice scratchiness in a specific direction, focus more on that area using the abrasive sheet. Remember to rotate the pen slightly during these motions to avoid creating a flat spot on the nib's rounded tip.
Frequent Inspection During Polishing
Pause every 2–3 strokes to test the nib on smooth paper. Write a pangram like "the quick brown fox jumps over the lazy dog" to check for scratchiness from different angles. Since this sentence uses every letter of the alphabet, it forces the nib through a variety of writing positions. The moment the scratchy sensation disappears, stop polishing - overdoing it can lead to a problem called "baby's bottom", where the nib fails to deliver ink properly.
If you're using multiple grits, begin with a coarser grit such as 2,400 for initial smoothing. Gradually move to finer grits, going up to 12,000 or higher. Each grit level only requires a few strokes before testing. If the nib still feels scratchy after reaching the finest grit, it could be physically damaged. In that case, replacing the nib might be a better option than continuing to polish.
Step 4: Test and Evaluate the Results
Once you've finished polishing, it's time to test your pen. Start by filling it with ink to lubricate the nib, then test its smoothness on paper. Be gentle - using too much pressure can hide any remaining scratchiness.
Writing Test on Smooth Paper
Grab some high-quality paper, like Rhodia or Clairefontaine, and write a pangram. A pangram is a sentence that includes every letter of the alphabet, making it a great way to spot any rough areas on the nib. Pay attention to how the nib feels - tactile feedback or audible scraping can signal issues.
If you notice the nib catching or dragging, take note of when it happens. Does it occur during upstrokes, side-strokes, or on specific letters? This directional feedback can help pinpoint which part of the nib might still need work. However, if the scratchiness continues even after careful polishing, it might be a sign of a common nib issues or damaged tipping material that polishing alone can't fix.
Multi-Directional Testing
Next, test the nib by drawing straight lines, circles, and figure-eights. This ensures you're covering all nib contact points and testing its performance in every direction. If the pen writes smoothly in one direction but scratches in another, the issue is likely with the tine alignment - not the polishing. In this case, further grinding won't help.
"If you feel any scratchiness, turn the nib tip in the direction of the scratchiness. Draw a few more circles, then test." - Charles Ackerman, Ackerman Pens
When the nib moves smoothly in all directions without catching, stop testing. Over-polishing after achieving smoothness can cause permanent damage to the nib. Once you're confident the nib is smooth, you're ready to move on to the final polishing and refinement in Step 5.
Step 5: Final Polishing and Refinement
Your nib has passed all the essential tests, and now it’s time for the finishing touches. The goal here is to eliminate any remaining surface dullness while avoiding unnecessary metal removal. This step ensures a smooth, polished finish that’s both functional and visually appealing.
Using the Finest Grit or Mylar Sheets
Ultra-fine Mylar sheets are your best friend for this stage. They’re perfect for erasing microscopic roughness without stripping away too much metal. However, if you’re working with a gold-plated nib, handle it with care. Understanding the differences between gold vs steel nibs can help you determine how much pressure to apply during this process. Over-polishing can wear away the thin gold layer, exposing the base metal beneath.
"It is important to note that while this compound will not damage golden fountain pen nibs, it can rub off gold-plated nibs and expose the metal underneath." - EndlessPens
For the safest method, keep the polishing sheet stationary and gently move the nib across it. This reduces the risk of dropping the pen or applying uneven pressure. To further protect your nib, work over a soft surface, like a carpet or couch. For stubborn spots, use small circular motions, and always polish from the nib’s base toward its tip.
"Be most careful when polishing the tip of the nib as you don't want to damage it." - EndlessPens
Final Testing and Verification
After polishing, it’s time to check that everything is in top shape. First, clean the nib thoroughly to remove any leftover abrasive residue or fibers that could clog the ink flow. Then, fill the pen with ink and test it. Write pangrams, draw circles, and practice figure-eights on smooth paper. The nib should glide effortlessly in all directions.
If you notice any lingering scratchiness, you can make a final pass with the finest abrasive material. However, stop polishing as soon as the nib feels smooth. Overdoing it at this stage can damage the tipping material, leaving the nib permanently compromised.
Common Mistakes to Avoid
Nib polishing can go south quickly if you're not careful. Rushing or skipping important steps can harm your pen and derail your results. Here’s what to watch out for:
Over-Polishing the Nib
Too much polishing can permanently damage the nib by removing its tipping material. Lori, a pen enthusiast and writer at Mionai, puts it plainly:
The removal of tipping material on the nib is inherently permanent... You cannot put material back once it is removed.
Excessive polishing can flatten the nib's tip, ruining its smooth glide across paper. To avoid this, stick to the 5–10 Rule: perform only 5 to 10 figure-eight motions at a time, then test the nib on high-quality paper like Rhodia or Clairefontaine. If the scratchiness is gone, stop right there. Going further risks unnecessary wear. Also, make sure your nib is properly aligned before you even start polishing.
Skipping Nib Alignment
Skipping nib alignment is another big mistake. Polishing a misaligned nib doesn’t fix the problem - it just masks it temporarily. Before polishing, inspect the nib under a magnifier (10×–60×) to check its alignment. (Step 1 in your process should cover alignment techniques.) This small but crucial step saves you time and prevents unnecessary damage to your pen.
When to Seek Professional Help
While minor nib issues can often be handled at home with some careful attention, more serious problems require the expertise of a professional. If your nib is severely bent, has significant tine misalignment, or shows damage that goes beyond what an 8×–10× loupe can assess, it’s time to call in the experts. As Josh, the author of Nibbed in the Bud, cautions:
When you start grinding, you increase your ability to destroy a nib beyond repair.
Nib grinding, which involves altering the shape of the nib, is a delicate process best left to skilled professionals.
Gold-plated nibs are another case where professional help is crucial. Abrasive polishing compounds can easily wear away the thin gold layer, exposing the base metal underneath. If gentle polishing doesn’t remove tarnish, it might be better to embrace the pen’s aged appearance. As EndlessPens advises:
Rather than trying to get it to look perfect and brand new again, we can also accept that the pen has lived through plenty and appreciate it for the writing it can provide.
When DIY efforts don’t cut it, professional services step in as a reliable solution. Skilled nib technicians offer services like "Tune & Smooth" and more specialized adjustments, such as "Binderizing." For instance, as of November 2025, Daniel Smith at The Nibsmith provides basic tune and smooth services with a turnaround time of 3–5 business days, while more complex customizations may take 7–9 weeks. Similarly, in February 2025, Indy Pen Dance listed nib smoothing services at $55 and repairs for bent nibs starting at $65. They also offer a one-year guarantee on their work, with a minimum service fee of $20 for any repair order. Linda, who runs the service, trained extensively under Richard Binder and is known for transforming pens into "a joy to write with, not a hassle."
Before committing, check the technician’s credentials and confirm their current wait times. Many professionals operate on a limited schedule, so subscribing to newsletters like Pacific Pen Works can help you stay updated on when they’re accepting new work.
Conclusion
Transforming a scratchy fountain pen nib into a smooth and reliable writing tool can be incredibly satisfying. By following the five-step process - inspecting and aligning the nib, cleaning and preparing, polishing with controlled motions, testing thoroughly, and final refinement - you can address the common causes of poor performance without risking any lasting damage.
Each step requires careful attention to detail. After polishing, it's crucial to clean the nib thoroughly to remove any leftover abrasive residue or metal particles before re-inking. This ensures your pen is ready to perform at its best.
As EndlessPens wisely notes:
Fountain pens may last a lifetime and beyond if they are well-maintained...
Regular maintenance is key to preserving your pen's performance for years to come.
For more severe issues or if you're unsure about tackling the process yourself, seeking help from a professional is always a good idea. However, for minor scratches or alignment tweaks, these steps empower you to restore your pen's smooth writing quality at home. If the damage is too extensive, you may need to replace the fountain pen nib entirely. With the right care, your fountain pen can produce flawless, consistent lines every time it touches the page.
FAQs
How do I know polishing is safe for my nib?
Polishing can be done safely as long as you stick to the right methods and avoid overdoing it. For minor imperfections, use micro-mesh sheets with a grit of 12,000. Regularly test your progress by writing on paper and closely examine the nib with a 10x loupe to catch problems like misalignments early. It's best to practice on inexpensive pens first, take your time, and make small, careful adjustments to prevent any damage. If you're uncertain, it's always a good idea to seek help from a professional nibmeister.
What grit should I start with for a scratchy nib?
To fix a scratchy nib, begin with a 12,000-grit micro-mesh sheet. This ultra-fine grit works well for smoothing out rough nibs while preserving their shape. Use gentle pressure during the process and test the nib often to ensure you don’t overdo it. This careful approach improves both the writing feel and overall performance.
How can I avoid “baby’s bottom” while smoothing?
When smoothing your fountain pen nib and trying to prevent the dreaded “baby’s bottom” effect, it’s all about using gentle, controlled strokes. Stick to light figure-eight motions with 12,000-grit micro-mesh or Mylar paper for the best results. Test your progress frequently on paper to ensure smoothness without overdoing it. Avoid applying too much pressure, as it can easily lead to over-smoothing. If you’re new to this, practice on inexpensive pens first - this helps you build confidence and refine your technique without risking damage to a pricier nib.