

Most celluloid pen cracks are fixable only if the pen is stable and the crack is small. If I see crazing, crumbling, missing material, or damage at threads or the section, I stop and send it to a pen repair specialist.
Here’s the short version:
- Celluloid pens are often 50 to 100 years old
- Celluloid can soften at about 160°F (70°C)
- MEK and acetone can weld small cracks, but super glue should not be the final fix
- Cap-lip hairlines are often the best home repair jobs
- Thread cracks, section cracks, and missing pieces usually need more than a surface repair
- After repair, curing can take 2 to 3 weeks
- I test in this order: dry handling → water → ink
- I store repaired celluloid in a cool, ventilated space, not sealed in plastic
If you want the plain answer, it’s this: use the least aggressive repair that will hold, keep heat and flame far away, and do not try to force a DIY fix on a pen that is already breaking down.
This guide walks through how I check the pen, decide if home repair makes sense, pick the right repair path, and test the pen before I trust it again.
Full Restoration of Cracked Montblanc 142 Vintage Fountain Pen

sbb-itb-1dd4fe9
Assess the Pen Before You Start
Before you touch a tool, give the pen a close look. A few careful minutes here can keep a small crack from turning into lasting damage.
Confirm the Pen Is Celluloid and Check for Instability
Celluloid usually feels warm in the hand and may give off a camphor smell when rubbed or handled. You’ll also often see it in marbled finishes, Jade Green, and web/lizard patterns.
After you confirm the material, check whether it’s starting to break down. Look at the cap top and the barrel end first. Those areas tend to show trouble early. If you see a transparent patch at either end, that points to active breakdown.
If you notice crumbling, crazing, transparency at the ends, or a sharp chemical smell, stop right there. The celluloid is actively breaking down. Keep the pen away from your other pens at once, because deteriorating celluloid can release gases that may affect nearby pieces.
If everything looks stable, you can move on and classify the crack.
Identify the Crack Type and Repair Goal
Once you know the material is stable, sort out the crack by location and depth.
A hairline crack at the cap lip is usually the most forgiving. A crack near the barrel threads or at the barrel mouth is a different story, since that area takes stress every time you cap or uncap the pen. Section cracks are harder to deal with because the section stays under steady pressure from the nib and feed, so solvent welding often fails. If the damage goes all the way through or material is missing, the repair needs a matching celluloid patch made from donor material.
When to Hand the Pen Off to a Professional
Some pens just aren’t good home-repair projects. Cracks in threaded areas, missing material, and fragile high-value pens should go to a specialist. Threaded cracks usually need an internal reinforcement sleeve, not just adhesive. Missing material calls for a color-matched celluloid patch, which means donor stock and welding experience.
"If you refrain from trying to glue cracks, it greatly increases the chances that I can fix them properly." - Rick, The Southern Scribe, Professional Pen Restorer
Skip household glue. A clean, untouched crack is much easier for a restorer to fix the right way.
Once the pen is stable and you know what kind of crack you’re dealing with, gather your fountain pen maintenance tools and materials.
Tools, Materials, and Safe Workspace Setup
Once you know what kind of crack you're dealing with, gather only the supplies that fit that repair.
Set Up a Ventilated Workspace with No Open Flames
Celluloid and repair solvents can catch fire fast, so you need strong airflow and zero open flames. Some specialty cements have flash points as low as about 54°F (12°C), which means ventilation isn't optional.
Set up in a steady work area with strong airflow, ideally with a blower that exhausts straight outdoors. If you're working inside, use a dedicated exhaust system. Wear solvent-resistant gloves and eye protection when handling MEK or acetone. It also helps to cover the bench with a towel or cardboard so tiny parts don't roll off and disappear.
Choose Solvents, Adhesives, and Hand Tools Carefully
For solvent welding, experienced repairers use MEK or acetone with a fine applicator, like a pin tip or small eyedropper. A loupe or 4X magnification makes it much easier to track the crack line. For finish work, fine abrasives such as Micro-Mesh up to 12,000 grit are useful. Rubber bands or small clamps can also help hold the crack shut while the repair sets.
Use MEK or acetone for solvent welding. Do not use super glue or general-purpose epoxy for the final repair. Also skip harsh household cleaners, since they can harm pen plastics or metal parts.
Disassemble, Clean, Dry, and Mark the Crack
Take the pen apart slowly, and don't twist weak sections. If you need to remove an inner cap, use a proper inner-cap removal tool instead of making do with whatever is nearby. If a joint won't budge, a drop of naphtha may help loosen it, but keep in mind that naphtha is flammable too.
Clean off all ink residue before you start the repair. Wipe away ink with a damp cloth, and do not soak celluloid. Then let every part dry all the way, since trapped moisture can interfere with solvent welding.
Use bright light and magnification to trace the full crack line before doing anything else. Hairline cracks often look smaller than they are, and any part left unsealed can keep spreading. Put low-tack tape around the crack to help protect the original finish from stray solvent.
When the crack is exposed, move straight to the repair method that fits its depth and location.
Step-by-Step Repair Methods for Common Celluloid Cracks
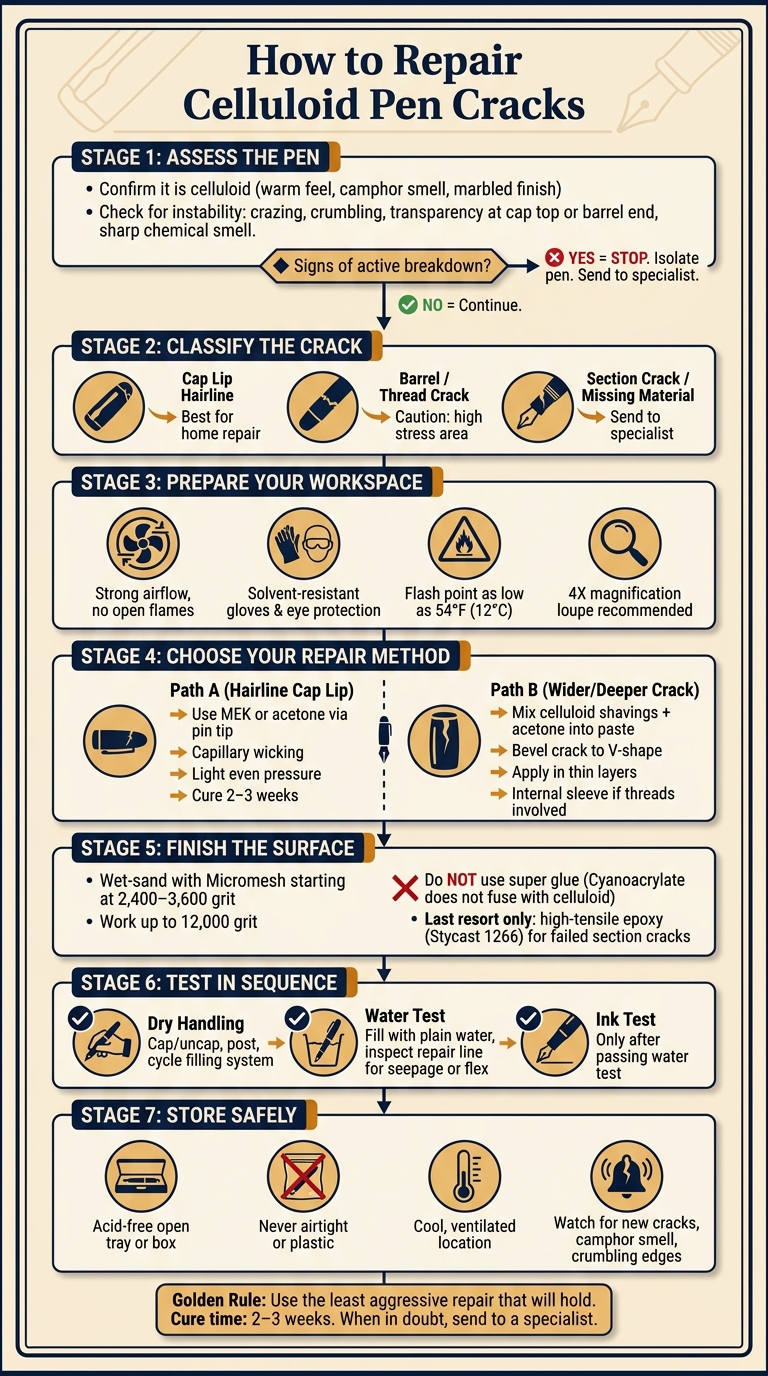
How to Repair Celluloid Pen Cracks: Step-by-Step Visual Guide
Once you know what kind of crack you're dealing with, you can match it to the right repair method. That's the whole game here: use the least aggressive fix that will still hold.
Fix Hairline Cap Lip Cracks with Solvent Welding
Use solvent welding for stable hairline cap-lip cracks. Let a thin solvent like MEK or acetone wick into the crack through capillary action. Then keep the cap round with light, even pressure while the joint cures. After that, leave it alone for 2–3 weeks.
If the crack opens up, runs deeper, or sits in a high-stress spot, solvent alone usually isn't enough. In that case, move to filler or reinforcement.
Handle Barrel, Section, and Through-Cracks
For wider or deeper cracks, shift from plain solvent to filler or reinforcement.
A tight hairline crack on a barrel can sometimes close with solvent alone. But if you can see a gap, you need filler material, not just solvent. Solvent welding can also leave a slight depression as the material shrinks.
To fill a gap, mix fine matching celluloid shavings with acetone to make a paste. Work that paste into the crack in thin layers. Before filling, bevel the crack into a shallow V so the repair has more surface to grip.
Sections and barrel threads are under constant mechanical stress, so a simple surface weld often doesn't last. These areas may need internal reinforcement, such as a brass or plastic sleeve fitted inside the barrel. That added support can restore usable strength.
Finish and Use Adhesive Only as a Last Resort
After the repair has fully cured, level any raised filler or slight depression with Micromesh wet-sanding. Start at 2,400 or 3,600 grit and work up to 12,000 grit.
For most hairline repairs, solvent welding is the endpoint. Avoid cyanoacrylate (super glue) completely. It doesn't fuse with celluloid, and it can leave an acrylic residue that's hard to remove.
If solvent welding fails on a section crack, use a high-tensile epoxy such as Stycast 1266.
Test the Repair, Store the Pen Safely, and Protect It Long Term
Test with Dry Handling First, Then Water Before Ink
After the repair has fully cured, test the pen in steps. Start with dry handling. Cap and uncap it gently, and post it if that’s how you normally use it. Move the filling system through its full range, but don’t force anything.
If that feels solid, fill the pen with plain water and inspect the repair line closely for seepage or flex. If you see any leak, dampness on the section or threads, or movement under light pressure, the repair still isn’t sealed. Let it cure longer, then test again.
If it passes the water test, move straight to safe storage.
Store Repaired Celluloid in Cool, Ventilated Conditions
Celluloid can off-gas as it ages. When those fumes get trapped, the material can break down faster. Store a repaired celluloid pen in an acid-free open tray or box, never in a plastic bag or airtight case. Keep it cool and away from heat.
Watch for warning signs. If a repaired pen starts showing new hairline cracks, a strong camphor smell, or a crumbling texture around the edges, isolate it from the rest of your collection right away. That’s not normal surface wear. It points to active instability.
Go easy on threaded parts too. Over-tightening can make a repaired area split again under pressure.
Conclusion: Preserve Vintage Celluloid and Use Modern Pens for Daily Writing
Match the repair to the damage, then give it time to cure all the way. Before you use the pen, make sure it’s stable. Test it in stages: dry handling first, then water, then ink. Store repaired celluloid where air can circulate, and check it from time to time for new cracks, smell changes, or other signs of breakdown.
Use restored celluloid sparingly. For daily writing, keep a modern pen like the FPR Tanoshii in rotation.
FAQs
How do I know if a crack is safe to repair at home?
It mostly comes down to where the crack is and how bad it is.
Small hairline cracks around the cap lip are often something you can handle at home. But cracks in high-stress spots - like the barrel mouth or the piston threads - are a different story. Those areas take more force in normal use, which makes repair much harder.
If the celluloid is crumbling or shows widespread rot, do not try to fix it yourself. Set the pen aside and isolate it to help protect the rest of your collection.
What should I do if the celluloid is already breaking down?
If your celluloid pen starts to break down - crumbling, crazing, crystallizing, or turning oddly transparent - take it out of your collection right away.
True celluloid decomposition gets worse over time, can't be reversed, and is not repairable. A simple crack can sometimes be sealed or welded. But a pen that's decomposing should be isolated to help protect your other celluloid pens.
How long should I wait before using the pen again?
It depends on the repair method.
With a dissolved celluloid paste repair, let the pen cure for three weeks after the initial fill. If you add more material later to finish the crack, wait another three weeks.
For a solvent weld using MEK, wait about two weeks before setting the feed and nib.