

Changing ink without flushing first can leave old color in the feed, dilute the new fill, and throw off your first few lines. I fix that with a simple routine: empty the pen, flush with cool or room-temperature water until it runs clear, blot it, then let it dry before refilling.
Here’s the short version:
- I empty the old ink over a sink or waste cup
- I remove the filling part based on the pen type:
- Cartridge: remove the cartridge
- Converter: remove and rinse the converter
- Piston: keep the pen assembled and expel the ink
- I flush the nib and feed with clean cool water
- I keep cycling water through until it’s clear
- I blot the pen and let it dry nib-down
- If I refill right away, the first few lines may look slightly lighter
- I never use hot water, alcohol, or household cleaners
A normal ink change is often a short job, but dark, shimmer, or heavily saturated inks can take several extra rinse cycles. In most cases, plain water is enough.
| Pen type | What I remove | How I flush it | Main thing to watch |
|---|---|---|---|
| Cartridge | Cartridge | Converter or bulb syringe through the feed (using a bulb syringe makes this faster) | Don’t leave the old cartridge attached |
| Converter | Converter first | Rinse converter, then cycle water through nib and feed | Clean the converter on its own before reattaching |
| Piston | Nothing | Use the piston to draw in and expel water | Don’t force or take apart the piston |
Bottom line: if the water runs clear and the section blots clean, the pen is usually ready for new ink.
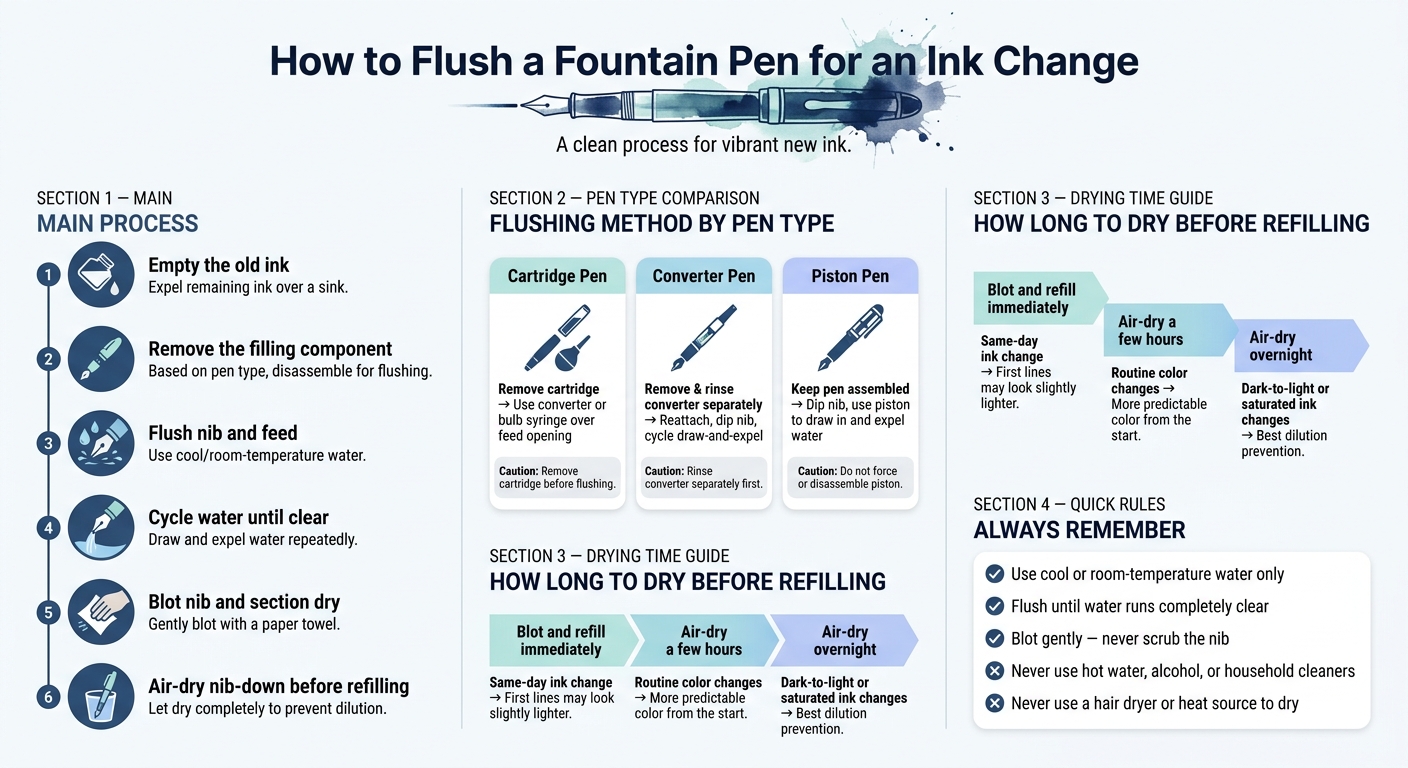
How to Flush a Fountain Pen for an Ink Change
Pilot Custom 823 - How to Clean and Change Inks
sbb-itb-1dd4fe9
Step 1: Empty the old ink and prepare the pen
Start by emptying the pen. Do this over a sink, and keep paper towels close by. Fountain pen ink stains fast, so a little setup saves a lot of hassle. Set the cap aside, and keep any separate barrel dry.
To take the pen apart, hold the front section firmly and gently unscrew the barrel. As the barrel comes off, keep the nib pointed upward to help cut down on drips. Don’t twist the nib, and don’t force anything. If a part doesn’t move with light pressure, stop and check the manufacturer’s instructions or buying guide before going any further.
Once the barrel is off, wipe the nib, feed, and grip section with a paper towel or lint-free cloth. Blot gently, do not scrub, and don’t stick anything into the feed channels. You’re just removing surface ink before rinsing.
For leftover ink, don’t pour it back into the bottle unless it never touched the nib or feed. Ink that has touched those parts can contaminate the bottle. If you’re not sure, send it into the sink or a separate waste container.
How to remove the filling part based on pen type
At this point, remove the filling part that fits your pen type:
- Cartridge pens: Pull the used cartridge straight off the feed post with steady pressure. It may feel snug because the post pierces the cartridge, so don’t rock it side to side. Take the cartridge out first so water can reach the feed.
- Converter pens: Pull or twist the converter off the feed post, based on how your pen is made. Empty any ink left inside into the sink or a waste container, then set the converter aside so you can rinse it on its own. This makes it easier to flush the feed.
- Piston pens: Don’t take apart the filling system unless the manufacturer’s instructions clearly say it’s okay. Point the nib toward the sink and use the piston to push out the old ink. The pen stays assembled, and the piston handles the job.
Next, flush the nib and feed with cool water.
Step 2: Flush the nib and feed with cool water
Now that the old ink is out, rinse the nib and feed. Hold the nib, feed, and grip under a gentle stream of cool water. As you rinse, rotate the section so water reaches the underside of the nib and feed too.
After you rinse the outside, flush water through the inside of the pen. Keep cycling clean water through until it runs nearly clear. A simple setup helps a lot: use one cup with clean cool water and another to catch the dirty water. That way, you can actually watch the rinse water get clearer with each pass. If the clean-water cup starts looking heavily tinted, swap it out.
You can flush with running water, a bulb syringe, or the converter or piston. Keep going until the water runs clear, then follow the method that matches your filling system below.
Converter and piston pens usually take several fill-and-expel cycles. If the pen had heavily saturated or shimmer ink, expect a few extra rounds. And if you're about to switch to a light or contrasting ink, it's smart to flush a bit longer.
How to flush cartridge, converter, and piston pens
The basic idea stays the same, but the filling system changes how you move water through the pen.
For a cartridge pen, remove the cartridge before flushing. Then attach a converter or fit a bulb syringe over the feed opening to pull or push water through the nib and feed. A bulb syringe is especially handy here because it sends water straight through the feed and can clear residue fast.
For a converter pen, rinse the converter on its own first, then reattach it and cycle clean water through the nib and feed. Dip the nib into your clean-water cup, use the converter to draw water in through the nib and feed, then expel it into the waste cup. Repeat until the water looks nearly clear.
For a piston pen, leave the pen assembled. Submerge the nib in the clean-water cup and turn the piston knob to draw water into the barrel. Then reverse it slowly to push the water back out through the nib. Do not force or take apart the piston mechanism.
Comparison table: flushing steps by filling system
| Filling system | What to remove | How water moves through | Main caution |
|---|---|---|---|
| Cartridge | Remove the cartridge | Converter or bulb syringe over the feed opening | Remove the cartridge before flushing |
| Converter | Remove and rinse the converter separately, then reattach | Dip nib in clean water; cycle the converter to draw in and expel | Rinse the converter separately first |
| Piston | Nothing; keep the pen assembled | Dip nib in clean water; operate the piston to draw in and expel | Do not force or disassemble the piston mechanism |
When the rinse water stays nearly clear, move on to drying.
Step 3: Dry the pen and know when it is ready for new ink
After the final rinse, dry the pen before you refill it. Once the water runs clear, the next job is getting rid of leftover moisture inside the pen.
Start by gently shaking or tapping the nib section over a sink to help release trapped water. Then blot the nib and section on both sides with a clean paper towel. Be gentle here. Don’t rub the nib itself because some paper towels can scratch delicate nib surfaces or finishes.
How long to let a fountain pen dry
After blotting, place the uncapped pen section nib-down on a folded paper towel in a spot with good airflow. Keeping it nib-down lets water drain from the feed instead of sitting inside the feed and section. A cup lined with paper towel works too. It keeps the nib pointed down and catches drips.
How long you let it dry depends on when you want to refill:
| Drying approach | Best for | What to expect |
|---|---|---|
| Blot and refill | Same-day ink change | Fastest, but the first few lines may look slightly lighter |
| Air-dry for a few hours | Routine color changes | Less residual water and a more predictable color from the start |
| Air-dry overnight | Dark-to-light changes, saturated inks, or storage | Best chance of minimizing dilution |
Do not use a hair dryer or heat to speed things up. Air-drying is the safer move.
Signs the pen is ready for new ink
Your pen is ready when a few things line up: expelled water runs clear, blotting leaves no color behind, the converter or piston chamber looks clear, and the section feels dry.
At that point, a small amount of moisture may still be sitting in the feed. That’s okay if you’re refilling right away. After you fill the pen, write on scrap paper until the color and flow settle in. If you still see old color after several hours, use a pen flush before filling it.
When those signs are there, go ahead and refill with the new ink. You can find a wide variety of fountain pens and inks to explore for your next color change.
Conclusion: A simple routine for cleaner ink changes
This routine helps keep old ink from tinting the next fill. Empty the pen, flush the nib and feed with cool water until the water runs clear, blot it dry, and let it air-dry before you refill.
The steps change a bit depending on the pen:
- Cartridge pens: Remove the empty cartridge first.
- Converter pens: Run several draw-and-expel cycles.
- Piston pens: Use the built-in piston to move water through the pen, and lubricate the piston if it feels stiff.
Use cool tap water only. Skip hot water.
Refill only when the section blots dry and shows no color or moisture when you blot the nib section. A clear, dry pen gives the new ink a clean start.
FAQs
How often should I flush my fountain pen?
Flush your fountain pen every 2 to 4 weeks during regular use. That keeps the writing smooth and helps stop ink from drying up inside the feed.
If you use shimmer, pigment, or iron gall inks, clean it more often - ideally every 1 to 3 weeks. Those inks can leave more residue, so a little extra care goes a long way.
You should also fully flush the pen before switching ink colors. Otherwise, leftover ink can mix with the new color and affect how it looks on the page.
If you’re planning to store the pen for more than 1 to 2 weeks, empty it and flush it first. Leaving ink sitting in the pen that long can lead to buildup and harder starts later on.
What if my pen still shows the old ink color?
Keep flushing the pen with water until it runs completely clear. If there’s stubborn residue, dried ink, or a heavily saturated color stuck inside, soak the nib unit or converter in room-temperature water for a few hours.
If plain water still doesn’t do the job, use a pen flush solution made for fountain pens. After that, rinse everything well with water, then let all parts air-dry fully before you put the pen back together and refill it.
Can I refill before the pen is fully dry?
No. Let the pen air-dry fully after flushing before you refill it.
If moisture is still sitting in the feed, it can thin out the new ink and lead to flow problems or uneven writing. For the best result, place the parts on a lint-free cloth or paper towel and let them dry for several hours, or as long as 12 to 24 hours, before reassembling the pen and filling it again.