

Acrylic pen blanks usually crack for four reasons: heat, tool pressure, drilling mistakes, or stress during assembly. If I want fewer failures, I keep drilling slow, clear chips often, take light cuts, check for wobble, and avoid forcing parts together.
Here’s the whole article in plain English:
- Heat is the top problem. Acrylic can crack when drilling, turning, sanding, or polishing gets it too hot.
- Pressure and vibration break blanks fast. A hard catch, too much tailstock force, or a shaky setup can split or shatter the blank.
- Bad drilling sets up later failure. Off-center holes, thin walls, and exit blowout often lead to cracks later.
- Weak blanks fail even with good technique. Voids, bubbles, and poor curing can show up before turning if I check with a bright light.
- Assembly can ruin a good blank. Pressing hardware too hard or fitting parts that are too tight often causes late cracks.
A few numbers stand out:
- 500–800 RPM is a common drilling range mentioned for acrylic in one part of the article
- Around 200 RPM is also listed as a starting point in another drilling setup
- Peck drilling every 1/8 to 1/2 inch helps clear chips and cut heat
- Keeping the tool rest about 1/8 to 1/4 inch from the blank helps limit chatter
- A bad $3.00–$5.00 blank can cost more once I add tubes, bushings, and shop time
If I had to boil it down to one line, it would be this: acrylic does best with low heat, light pressure, good support, and zero forcing. The rest of the article explains how each crack pattern points to the problem and what I can change before the next blank goes on the lathe.
The Real Reason Your Acrylic Pen Blanks Keep Exploding
sbb-itb-1dd4fe9
Heat Buildup: The Most Common Cause of Acrylic Cracking
Cracks that start near the tube, or show up after sanding, usually mean one thing: too much heat. Acrylic softens as it heats up, and tiny cracks can begin before you can even see the damage.
Drill at Moderate Speed and Clear Chips Regularly
Drill acrylic at 500–800 RPM. Peck drill 1/4 to 1/2 inch at a time, and stop to let things cool any time the chips turn powdery or the blank feels hot.
Healthy chips should come off in curls or ribbons. If they look powdery or gummy, sharpen the bit or swap it out. A dull bit doesn't cut cleanly - it rubs, and that friction sends heat up fast.
Use Sharp Tools and Light Cuts When Turning
A sharp gouge or a fresh carbide insert will cut acrylic much more cleanly. Scraping, or staying in contact too long on one pass, can overheat the material in a hurry.
Use light, controlled passes at a lower spindle speed to keep heat down. If the blank feels hot, back off the cut depth and give it a moment before you keep going.
If heat control doesn't stop the cracking, the next things to check are tool pressure and vibration.
Tool Pressure and Vibration: Why Blanks Shatter on the Lathe
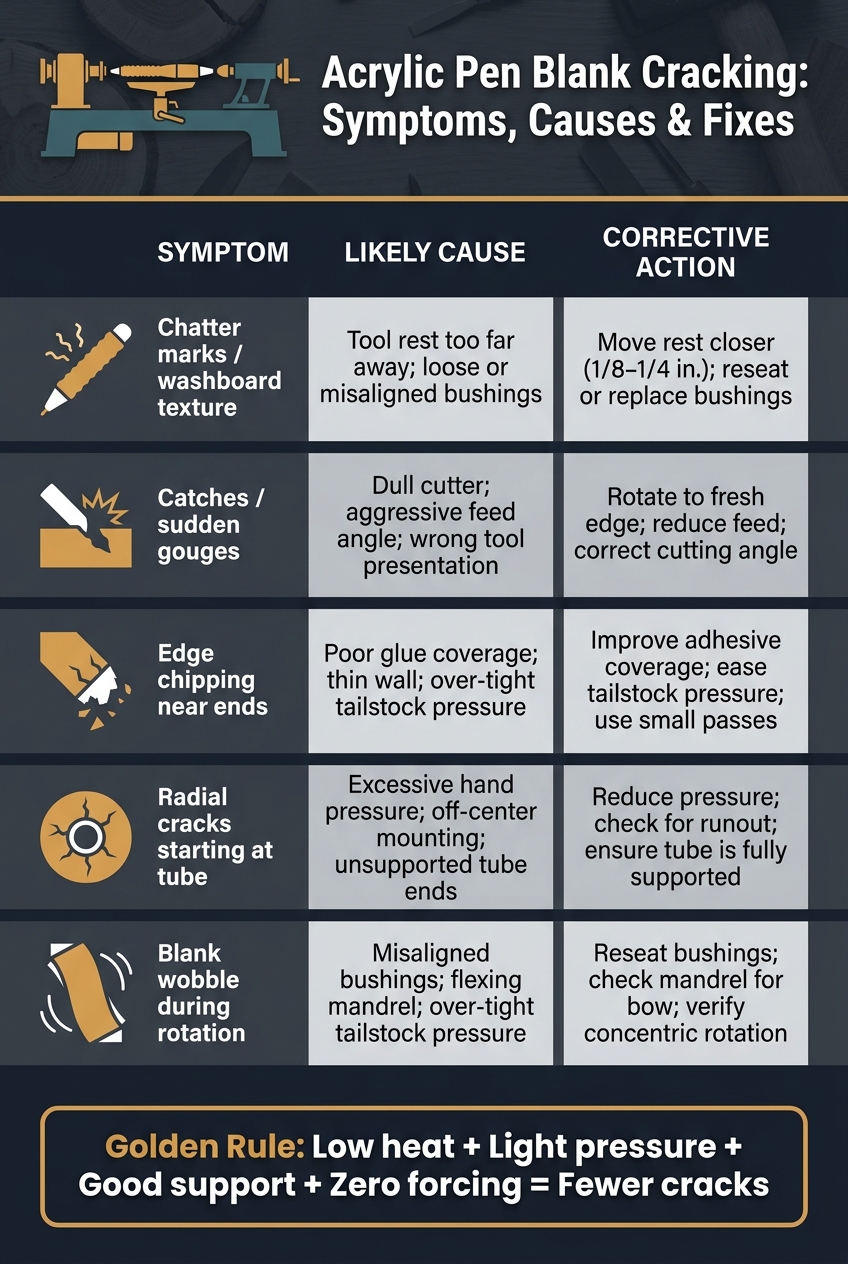
Acrylic Pen Blank Cracking: Symptoms, Causes & Fixes
If heat isn't the cause, pressure and vibration are the next places to look.
Acrylic is brittle. It doesn't bend much before it breaks. So when the tool hits too hard, or the setup starts shaking, the blank can crack in an instant.
The type of damage usually gives you a clue about what's off. Chatter, catches, and chipped ends don't all mean the same thing.
| Symptom | Likely Cause | Corrective Action |
|---|---|---|
| Chatter marks / washboard texture | Tool rest too far away; loose, worn, or misaligned bushings | Move the rest closer; reseat or replace bushings |
| Catches / sudden gouges | Dull cutter; aggressive feed angle; wrong tool presentation | Rotate to a fresh edge; reduce feed; correct cutting angle |
| Edge chipping near ends | Poor glue coverage; thin wall; over-tight tailstock pressure | Improve adhesive coverage; ease tailstock pressure; use small, incremental passes |
| Radial cracks starting at the tube | Excessive hand pressure; off-center mounting; unsupported tube ends | Reduce pressure; check for runout before cutting; make sure the tube is fully supported |
| Blank wobble during rotation | Misaligned bushings; flexing mandrel; over-tight tailstock pressure | Reseat bushings; check the mandrel for bow; verify concentric rotation |
Start with the tool rest. In a lot of cases, too much overhang is what sets off chatter and catches.
Improve Tool and Rest Setup to Cut Pressure
Tool-rest distance has a big effect on vibration. When the tool hangs out too far, it flexes more. That means more shake, more chatter, and a higher chance of a catch. Keep the rest about 1/8 to 1/4 in. from the blank, and move it often as the diameter changes instead of leaving it in one spot for the whole cut.
Rest height matters too. Set the rest slightly below center for gouges and scrapers. That helps keep the cutting angle under control and lowers the odds of the tool digging in. If the rest has nicks or rough spots, the tool can hop at the worst time. A quick pass with a stone can smooth it out. And if carbide inserts start to grab or leave a rough surface, rotate to a fresh edge right away.
If the blank still vibrates, shift your attention to the mounting and the tube support.
Check Mounting, Tube Support, and Glue Coverage
Runout puts uneven stress on the blank. Before you make the first cut, run the lathe at low speed and watch for wobble. If you can see runout, the problem usually comes from off-center drilling, a flexing mandrel, or bushings that don't fit snugly. Loose or worn bushings let the blank shift a little under tool pressure, and that keeps loading one side of the acrylic on every rotation.
Gaps between the tube and the bore are another weak spot. If the acrylic isn't fully backed up, cutting pressure can crack it. Thick CA or epoxy helps here. Coat both the tube and the bore, then twist the tube as you insert it so the adhesive spreads evenly and fills voids. Letting the adhesive cure overnight before trimming and turning gives the bond time to reach full strength before the tool starts pushing on it.
Drilling Errors and Weak Stock: Where Many Cracks Begin
If heat and tool pressure aren’t the issue, look at the drill hole next. A lot of cracks start right at the drill press. Off-center holes, exit blowouts, and weak stock leave thin walls and hidden stress that may not show up until turning or assembly.
Off-center holes are a common problem. When the bit drifts even a little, one side of the blank ends up much thinner around the tube. That thin area flexes more under turning and assembly pressure, so it’s often the first place to split. The same thing can happen when you drill straight through with heavy pressure. If the bit pushes hard through the exit end, it can cause blowout or tiny fractures. They may look minor, but once the blank is turned to final diameter, they can act like built-in starting points for cracks. Packed chips make it worse. They hold heat, add friction, and can tear the wall of the hole.
| Factor | Higher Risk | Lower Risk |
|---|---|---|
| Drilling method | Drilling straight through at full pressure - exit blowout, micro-fractures at the end | Stop short, then trim the exit end - removes the damaged exit zone, more even walls |
| Hole placement | Off-center - thin wall on one side, high localized stress | Centered - consistent wall thickness, stress distributed evenly |
| Wall thickness at thinnest point | Marginal - prone to flex and cracking | Adequate - lower crack risk |
How to Prevent End Blowouts and Off-Center Holes
Clamp the blank square in a self-centering vise or pen-blank chuck with full-length support, and mark both ends before drilling.
Use a moderate drill speed. Around 200 RPM is a commonly recommended starting point for acrylic. Then drill with a pecking pattern: short plunge, retract, clear chips, repeat. Pull the bit back every 1/8 to 1/4 in. so chips can escape and heat stays lower.
As the bit gets close to the exit end, back off the pressure. Better yet, leave the blank a little over-length, stop just short of breaking through, and trim off the exit end afterward. That cuts away the weakest zone and leaves you with a clean end to work from. It also removes one of the most common causes of later failures during turning. If you do drill all the way through, placing a scrap block under the workpiece can help support the exit side.
When to Reject a Blank Before You Start
Sometimes the hole is fine and the blank still fails because the material itself is bad. Clean drilling can’t fix poor stock. Acrylic with internal voids, bubbles, hard inclusions, or poorly bonded color layers is much more likely to crack, and careful technique only goes so far.
Hold the blank under bright light from the side and rotate it slowly. Watch for cloudy spots, obvious bubbles, or sharp internal lines that don’t match the surface pattern. If you see defects near the hole path or where the final wall will be thin, set that blank aside. The same goes for any blank that feels unusually brittle.
A $3–$5 blank that breaks halfway through the job can cost you the tube, the bushings, and your finishing time. It’s better to reject it before drilling.
Assembly and Finishing Steps That Prevent Late Cracks
Even a perfect turning job can still go wrong during assembly. In many shops, tube insertion and hardware pressing are where late failures show up. The frustrating part? Most of them are preventable.
Install Tubes and Hardware Without Stressing the Blank
A tube that is fully bonded does a much better job of resisting flex during pressing. Set the tube about 1–1.5 mm below flush so you have room to square the ends cleanly without cutting into the glue line.
Square both ends and dry-fit every part before you press anything together. If a piece needs force, stop there. That’s usually a sign something is off. Use a barrel trimmer that matches your tube diameter, then test each part with gentle finger pressure. If it doesn’t fit, lightly sand or ream the bore until it does.
When you’re ready to press the hardware, use a dedicated pen press and go slowly. If a part starts to tilt, stop right away and correct it. And once the component seats, stop pressing. More pressure at that point can do more harm than good.
Watch for visible gaps or thin spots too. Those areas often point to weak bond lines. A little thin CA wicked into those spots before pressing can strengthen the area and lower the odds of a late crack.
Assembly stress can wipe out all the care you put into the lathe work.
Conclusion: Key Steps to Cut Breakage and Waste
Most acrylic cracks are preventable. Slow pressing, square ends, and full bond coverage help cut late failures and waste.
FAQs
How can I tell if heat is causing the crack?
Heat buildup is often what makes acrylic melt and gum up your tools while turning.
To help stop that, keep your tools sharp and take light passes. When drilling, run at about 500 RPM and pull the bit out often to clear chips and keep the temperature down.
What drill bit works best for acrylic blanks?
Use the exact size your pen kit maker calls for. The right diameter lets the brass tube fit snugly without putting extra pressure on brittle acrylic.
No matter which bit you use, drill at about 500 RPM and pull it out often to clear chips and cut heat. That helps prevent melting and stress.
When should I throw out an acrylic blank?
Discard an acrylic pen blank if it has major damage that affects safety or makes the blank weak during turning.
Check for:
- Deep cracks
- Heavy stress-whitening
- Warping
- Internal fractures
- Deep voids
If the blank feels unstable or shows clear breakdown, it will probably fail under lathe pressure and is best thrown out.