

If your fountain pen hard-starts, skips, or writes a weak line after sitting, dried ink is the most common cause - and in many cases, I can fix it at home with a few low-cost tools.
Here’s the short version: I start with cool water, use a bulb syringe or the pen’s own fill system to flush ink out, soak only the nib and feed when needed, and move to a mild soap mix or a 1:10 ammonia mix only for tough dye-based buildup in modern pens. I avoid hot water, solvents, and forcing parts apart.
In plain terms, this article covers:
- What dried ink looks like: hard starts, skipping, pale lines, and railroading
- What to keep in a home kit: bulb syringe, blunt-tip syringe, small cups, cloths, water, and pen-safe flush
- How to clean cartridge/converter pens
- How to clean piston, vacuum, plunger, and snorkel-style pens
- What not to do: no hot water, no alcohol or acetone, no forced disassembly
- How often to clean: about every 2 to 4 weeks, and after ink changes
A few numbers matter here:
- Soak light clogs for about 15–20 minutes
- Soak older dried ink for about 45–60 minutes
- Use 68–86°F water
- Let parts air-dry for about 30–60 minutes
- Flush stored pens every 1 to 2 months
The main idea is simple: start mild, use the right tool for the pen type, and stop if the problem looks like damage instead of dried ink.
| Pen/problem | What I do first | Next step | What I avoid |
|---|---|---|---|
| Cartridge/converter pen with skipping | Flush with cool water | Short soak, then flush again | Pulling nib/feed out |
| Built-in filler with weak flow | Repeated fill-and-empty cycles | Soak nib/section only, then flush again | Taking piston or vacuum parts apart |
| Stubborn dye-based residue | Water first | Mild soap, then short ammonia flush if safe | Bleach, alcohol, acetone |
| Pen that leaks or has bent/cracked parts | Stop cleaning | Repair or replacement | Forcing a home fix |
If I’m dealing with dried ink - not broken parts - this process is usually enough to get the pen writing again.
How To Clean A Dried Out Fountain Pen
sbb-itb-1dd4fe9
Build Your DIY Pen Cleaning Kit
You don’t need a fancy setup to clean and maintain fountain pens well. A small kit with a few household basics and a couple of cheap tools will handle most dried-ink problems. Start with the items that move water through the pen fast, because that’s usually what gets old ink loose.
Supplies You Need for Flushing and Soaking
The core of the kit is two syringes. First, a bulb syringe - the type often sold as a baby nasal aspirator at drugstores. It pushes a strong stream of water through the section, which helps break up dried ink in the feed. Second, a blunt-tip syringe with no needle. That one gives you more control when you need to rinse converters and cartridges from the inside. Both are cheap and easy to find.
For soaking, use a couple of small cups or medicine cups. Cool tap water works for most routine cleaning. If your tap water is hard - which is common in many U.S. cities - grab a bottle of distilled water from the grocery store for final rinses. It can help stop mineral deposits from building up in the feed over time.
If ink is sticking around, add one drop of unscented, dye-free dish soap to a cup of water for a mild cleaning mix. For tougher buildup, use diluted ammonia only on stubborn dye-based ink in modern pens. Don’t use it on vintage pens or on any pen with aluminum parts.
Finish the kit with microfiber cloths and plain paper towels. That’s enough for basic and mid-level cleanouts.
What Each Tool Does for Dried Ink
| Tool | What It Does |
|---|---|
| Bulb syringe | Pushes water through the nib and feed in short bursts to loosen dried ink |
| Blunt-tip syringe | Flushes the inside of converters and cartridges; rinses after chemical cleaning |
| Small cups | Hold sections upright for controlled soaking without submerging the barrel |
| Microfiber cloth | Dries and wipes pen exteriors without scratching finishes or leaving lint |
| Paper towels | Absorb inky rinse water; wicking the nib against one helps test whether flow has returned |
| Distilled water | Helps prevent mineral buildup, especially useful for clear demonstrator pens |
| Diluted ammonia flush | Dissolves stubborn dye-based ink in compatible modern pens |
How to Store the Kit and Keep It Ready
Keep the kit close to your pens so cleanup feels easy, not like a chore. A labeled plastic bin or latching craft organizer works well. The label matters because it makes it clear this is not a general-use container.
Store liquids away from cloths and syringes. If you mix any solution - especially an ammonia-based flush - label it clearly. Write what’s inside and add a note like "Not for drinking – pen cleaning only." If kids or pets are around, put the kit on a high shelf or in a drawer with a child safety latch.
Store the kit near your writing area so it stays easy to grab.
Step-by-Step: Clean a Cartridge or Converter Fountain Pen
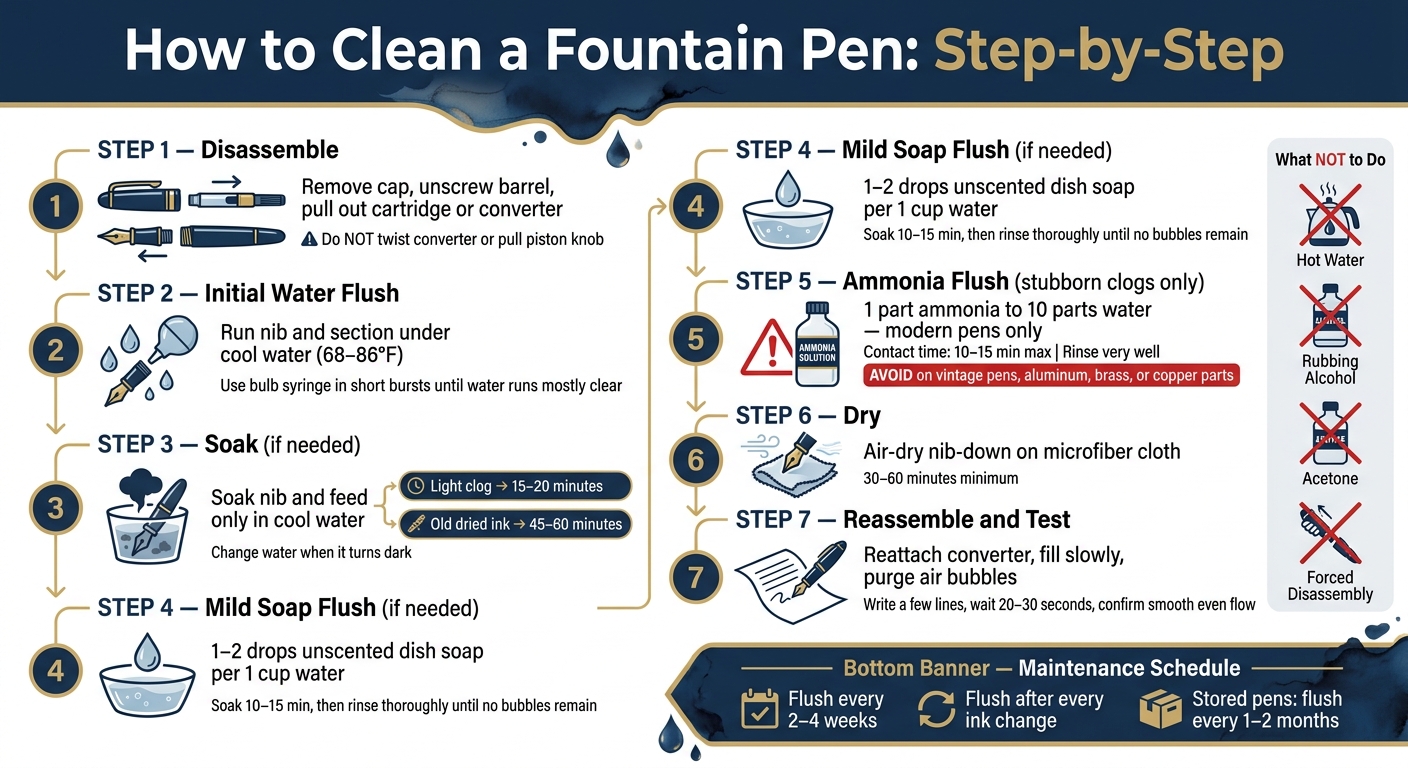
DIY Fountain Pen Cleaning: Step-by-Step Process Guide
With your kit ready, the cleaning itself is pretty simple. Start with the mildest method and only move up if the ink won’t budge. In many cases, dried ink comes out with cool water and a bit of patience.
Flush the Section, Nib, and Converter with Water First
Take off the cap, then unscrew the barrel from the grip section over a paper towel so it catches any drips. Pull the cartridge or converter straight out. Don’t twist it, and don’t pull on the piston knob. Leave the nib and feed where they are so you don’t throw anything out of line.
Run the nib and section under a gentle stream of cool to lukewarm water, about 68–86°F. Let some of the ink wash out first. Then place the bulb syringe tip against the back of the section, make a light seal, and squeeze in short bursts until the water coming through the nib looks mostly clear.
Clean the converter on its own by filling and emptying it with clean water over and over until the ink color is gone. If the water still looks tinted, move on to a short soak.
Soak and Use a Mild Flush for Stubborn Dried Ink
Put the nib and section in a small cup of cool water, with only the nib and feed under water. Soak for 15–20 minutes if the clog is light, or 45–60 minutes if the ink has been sitting for a long time. Change the water when it gets dark.
After that, flush the section again with the bulb syringe. If the ink color is still strong, use a mix of cool water and 1–2 drops of clear, unscented dish soap per 1 cup of water, then soak for 10–15 minutes. Rinse well with plain water until you don’t see any bubbles.
For heavy dye buildup, you can use 1 part household ammonia to 10 parts water on compatible modern pens only. Keep contact short - 10–15 minutes - and rinse very well afterward. Skip ammonia on vintage pens or on any pen made from materials that don’t handle ammonia well. Once the rinse water runs clear, dry the parts before you put the pen back together.
Dry, Reassemble, and Test for Normal Flow
Set the section and converter on a microfiber cloth or paper towel with the nib angled slightly downward so water drains away from the section. Blot the outside gently. Don’t rub. Let the parts air-dry for 30–60 minutes, or longer if they still seem damp.
When everything is dry, press the converter firmly back onto the section and screw the barrel back in place. Fill the pen slowly, push out a small amount of ink, then fill it again to help clear any air bubbles.
Test the pen on regular writing paper. Write a few lines, wait 20–30 seconds, and start again. A clean pen should start right away and write with even flow.
If the pen still hard-starts, repeat the water flush before moving on to built-in filler cleaning. Built-in fillers use a different flushing method.
How to Clean Piston and Other Built-In Fill Pens Safely
Piston, vacuum, and snorkel fillers are cleaned by moving water through the pen’s own filling system, not by taking parts off. If a built-in filler hard-starts or skips, flush the reservoir through the normal fill cycle. The goal is simple: clear the feed without pulling the pen apart.
Flush Built-In Fillers with Repeated Fill-and-Empty Cycles
First, expel any leftover ink with the nib pointed down over a sink or disposable cup. Then pour cool, room-temperature water into a small cup or glass. Put the nib into the water and use the pen’s normal filling action to draw water in, then push it back out into the cup. For snorkel-style pens, extend the snorkel tube first. For vacuum fillers, use the standard filling stroke.
Repeat the cycle several times, and switch to fresh water whenever the cup gets dark. A built-in reservoir holds more ink than a cartridge or converter, so it can take a while before the rinse runs clear.
If the ink is dried on and not letting go, soak only the nib and section in clean water for 15 to 30 minutes, then go back to the fill-and-empty cycles. Use a cup instead of running water so you can watch the runoff and avoid splashing.
Know When to Stop Disassembling and Clean from the Outside
Most piston and vacuum-fill pens are not made for routine user disassembly. If the nib unit doesn’t come loose with gentle pressure and a rubber grip, stop there. Forcing it can strip threads, crack the piston head, or damage the seals inside. Those internal seals and packing units are easy to harm and hard to reseal, which can lead to leaks.
In many cases, repeated flushes plus a short soak of just the nib and section - while keeping the barrel and piston knob out of the water - will clear dried ink without mechanical risk. If flow is still weak after a thorough flush, use a blunt-tip syringe to place pen flush directly onto the feed channels or breather hole from the outside. That can reach stubborn residue without touching the internal parts. If the pen still writes poorly after that, pushing deeper into disassembly is where problems tend to start.
Cleaning Mistakes to Avoid and a Simple Maintenance Plan
What to Avoid During Stubborn Cleanouts
Once a pen starts flushing again, the biggest danger is using the wrong cleaner or getting too rough with it.
Avoid hot water. It can warp feeds, distort sections, and damage converters, especially in plastic and ebonite pens. Use cool or lukewarm tap water instead.
Skip rubbing alcohol, acetone, and household solvents too. Those can crack plastic and harm seals. If you're dealing with stubborn dye-based residue, diluted ammonia can help, but only in the right cases. Rinse well after using it. It is not safe for every pen, so avoid it on pens with aluminum, brass, or copper parts, and on some vintage celluloid pens. And never mix ammonia with bleach or other cleaners. That can create hazardous fumes.
Physical force can do just as much damage as a harsh cleaner. Stiff brushes may scratch nibs and feeds. If a part doesn't want to move, don't force it. That can crack threads or damage piston mechanisms.
| Cleaning Agent | Strength | Typical Use | Key Precautions |
|---|---|---|---|
| Plain water | Low | Routine flushing, color changes, light residue | Always the first choice; use cool or lukewarm only |
| Mild soap solution | Low–Medium | Breaking surface tension and loosening dried ink | Use sparingly; rinse thoroughly afterward |
| Diluted ammonia flush | Medium–High | Stubborn dye-based residue | Dilute well; avoid aluminum, brass, copper, and sensitive vintage pens; rinse completely |
Which Cleaning Method Works Best for Each Problem
The best rule here is simple: start mild and move up only if needed.
Water flushes are enough for routine cleanouts and ink changes. If residue hangs on, try a pen flush next. Save diluted ammonia for pens whose materials can handle it safely.
Here’s the order:
- Water first
- Soak next
- Flush after that
- Ammonia only for compatible pens
As for tools, each one has its lane. Bulb syringes are great for routine flushing. Blunt-tip syringes work well when you need a more targeted rinse. Soaking helps loosen dried ink before you flush.
Conclusion: Keep Pens Writing with Regular Cleaning
Once the pen is clean, a few simple habits go a long way.
Flush with plain water every 2 to 4 weeks and whenever you change inks. If a pen sits unused, store it clean and empty, or run a water flush at least every 1 to 2 months. After soaking or flushing, blot the nib and let the pen air-dry nib-down before you ink it again.
The basic approach stays the same: start with water, use the right tool for the fill system, move to stronger cleaning methods only when the pen’s materials allow it, and never force anything apart.
A simple DIY kit can handle most cleaning jobs:
- a bulb syringe
- a blunt-tip syringe
- a small soak cup
- clean water
- a pen-safe flush
Clean pens before ink dries.
FAQs
How do I know if my pen has dried ink or actual damage?
Start with a thorough cleaning. Dried ink is often the reason for hard starts, skipping, or thin railroading lines. If those issues keep showing up even after repeated deep flushes and soaks, there’s a better chance something is physically wrong.
Watch for persistent flow issues, leaking after hot water exposure, or a nib that looks bent or splayed. If the nib and feed appear clear but you still have to use extra pressure to write, the issue may be mechanical.
Can I use ammonia on every fountain pen?
No. Ammonia-based solutions can help loosen dried, stubborn ink, but they’re not safe for every fountain pen.
Avoid using ammonia on pens with:
- Aluminum parts
- Vintage plastics
- Nitrocellulose barrels
- Resin
- Certain rubber seals
- Gold nibs made from 9–14K alloys
- Most vintage pens
For routine cleaning, or when you’re dealing with delicate materials, stick with distilled water or a mild dish soap solution instead.
What should I do if flushing still doesn’t fix the flow?
If flushing doesn’t fix the flow, soak the nib and feed in lukewarm water for a few hours. That extra time can loosen dried ink that’s stuck in the feed.
Need a deeper clean? Use a pen flush or a mild ammonia-based mix. Just don’t use those on vintage pens or aluminum pens, since they can cause damage.
If the pen still writes unevenly, take a close look at the nib tines to see if they’re out of line. You can also prime the feed by dipping the nib in ink.
And if the flow still won’t settle down, it’s smart to stop there and get help from a professional. A fountain pen is easy to push too far with DIY fixes, and a small issue can turn into a bigger one fast.