

If I want better handwriting with a fountain pen, I don’t need long sessions. I just need 10–20 minutes a day, a short passage, one steady setup, and a simple review habit. That’s enough time to work on letter shape, spacing, slant, baseline control, and pace without tiring out my hand.
Here’s the whole idea in plain English:
- Copy text instead of composing so I can focus on how I write
- Use a fountain pen with light pressure and a steady angle, often around 45–55 degrees
- Start with 30–60 words if I’m new, or 80–150 words if I want a longer session
- Keep the setup the same: one pen, one ink, one paper style
- Use paper around 80 gsm or more to cut feathering and bleed-through
- Warm up for 1–3 minutes with lines, ovals, and tall/low letter strokes
- Write at a pace that is slower than normal, but not stiff
- Check one thing per line: height, spacing, slant, or baseline
- Review each page for 2–3 minutes
- Track progress with a dated log and a 1–5 score for spacing, slant, and letter clarity
A few details matter a lot. For example, word spacing can be about the width of a lowercase “o”, page lines can be around 7–8 mm apart, and a weekly check against pages from 4–6 weeks earlier makes progress much easier to see.
If I keep the text short, the tools steady, and the review simple, copywork becomes a clean daily drill instead of random handwriting practice.
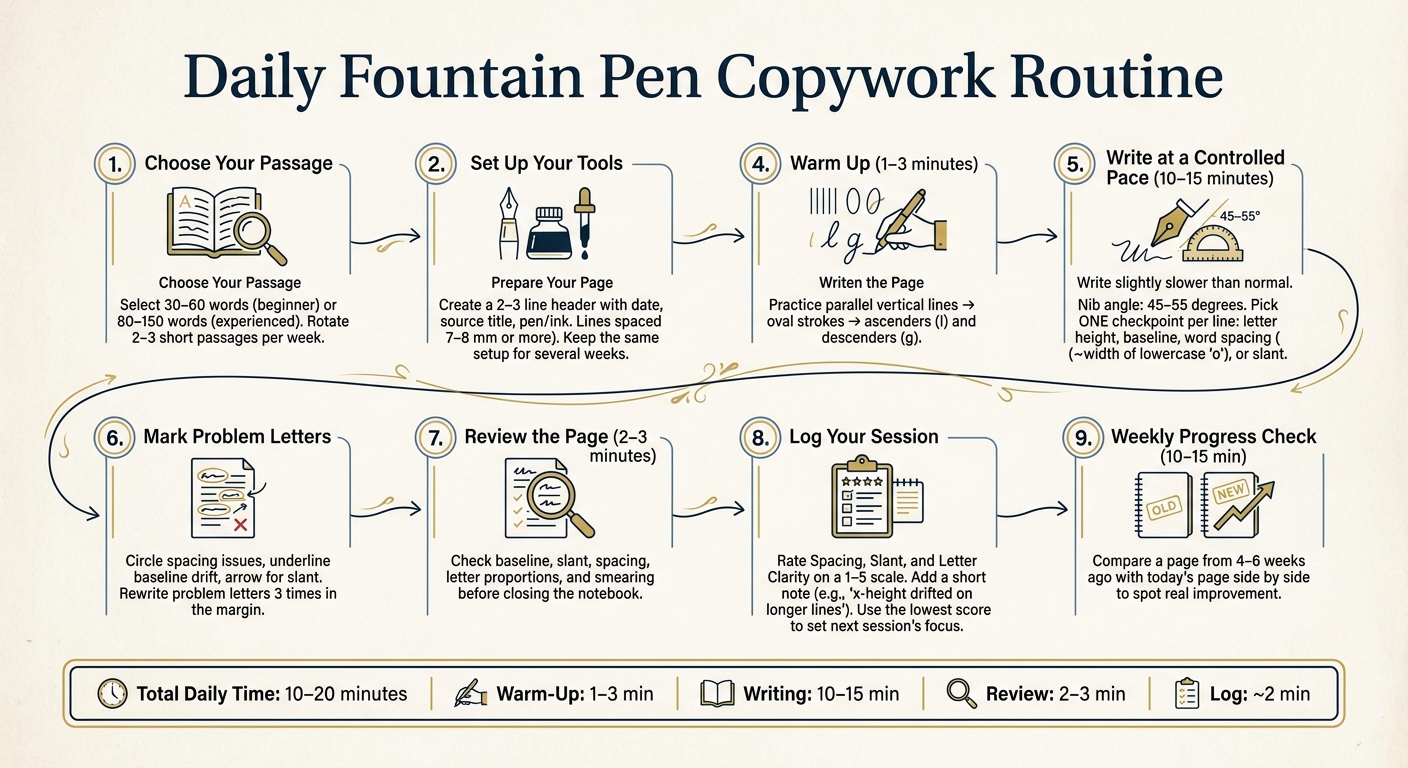
Daily Fountain Pen Copywork Routine: Step-by-Step Practice Guide
Handwriting practice with fountain pen | Beautiful and neat handwriting | Cursive handwriting
sbb-itb-1dd4fe9
How to Choose Source Texts for Daily Practice
The text you copy matters more than most people think. Pick something too long, and you’ll start rushing. Pick something boring, and tomorrow’s practice gets a lot harder to start.
A good passage hits a simple sweet spot: short enough to copy with full attention and interesting enough that you’d gladly write it again.
Start with Short Passages You Want to Write
If you’re new to this, aim for 30–60 words. That’s usually one or two sentences, a short quote, or a single stanza of poetry. It gives you enough room to work on letter shape and spacing without tiring out your hand.
If you’ve been at it a bit longer, you can stretch to 80–150 words, or about half a letter-size page.
The main rule is simple: choose passages you’d want to copy again. A verse you already know works well. So does a passage you just read and liked.
It also helps to rotate two or three short passages during the week. That keeps practice from feeling stale. And if you repeat the same passage two or three times across the week, you can compare pages side by side and spot real progress on identical text.
Match the Text to Your Handwriting Goal
Match the kind of text to the skill you want to build. That makes practice much more focused.
| Handwriting Goal | Best Text Type | Why It Works |
|---|---|---|
| Print clarity | Instructional or expository prose | Clear structure lets you focus on letter geometry and spacing |
| Cursive rhythm | Poetry or flowing narrative prose | Natural cadence encourages smooth, connected strokes |
| Slant control | Phrases with many tall letters (l, t, h, k) | Repeated vertical strokes make uneven angles easy to spot |
| Style imitation | Passages written in your target style | Copying the same words in a target hand builds muscle memory for that style's feel |
If you want better cursive rhythm, short poems or descriptive prose usually work best. The flow of the language helps your hand move in a smoother way.
After you’ve picked a passage, pair it with a simple pen-and-paper setup that makes writing and reviewing easy. Once the text is set, move to a clean page layout and tools that help you see what’s working and what needs work.
How to Set Up Your Pen, Paper, and Page Layout
Once you’ve chosen your passage, keep the rest of the setup steady. Pick one pen, one ink, and one page layout, then stick with them (see our fountain pen buying checklist if you're still choosing). That way, each session is easy to compare, and you’re judging your writing instead of chasing changes in tools.
Use a Simple Fountain Pen Setup for Steady Writing
Use a relaxed tripod grip and keep your nib angle around 45–55 degrees. Try to hold the pen the same way each time, and keep the same pen, ink, and grip for several weeks.
For the pen, a medium or fine nib on a lightweight or moderately weighted body is a good place to start. Plastic or resin bodies often help cut hand fatigue during longer sessions. Pair that with a standard dye ink with moderate flow in blue, blue-black, or black. Fountain Pen Revolution sells low-cost pens, nibs, and inks that work well for a simple practice setup. Keep that same combination for several weeks.
Once your tools stay fixed, set up the page so it’s easy to check later.
Build a Page You Can Review Easily
A clear page layout makes review much more useful. At the top, leave a 2–3 line header for:
- The date in U.S. format, such as July 24, 2026
- The source title you are copying
- The pen and ink, if you want to note them
Below that header, use lines spaced about 7–8 mm apart for your copywork. Leave a margin of about 1 inch open on one side. Use that space for short notes about problem letters, spacing, or slant drift.
Compare Paper Types and Ink Behavior
Paper and ink change both how writing feels and how the page looks. For fountain pens, paper of at least 80 gsm helps cut feathering and bleed-through. If you’re right-handed, turning the paper slightly clockwise by about 10–25 degrees often helps match your natural slant. Left-handed writers may like a similar counterclockwise turn.
| Paper Type | Pros | Cons |
|---|---|---|
| Ruled (lined) | Clear baselines and easy alignment | Fixed line spacing may not match your ideal letter size; generic paper may feather with wetter inks |
| Grid or dot grid | Good structure for baselines, letter width, and slant | Can feel more visually busy than lined paper |
| Blank with drawn guidelines | Cleanest look for scanning or photographing pages | Takes extra setup time; inconsistent spacing if guidelines are not drawn carefully |
| Ink Type | Smearing Risk | Control | Best For |
|---|---|---|---|
| Standard dye-based | Low to moderate | High | Everyday copywork; easy to clean and well-behaved on most papers |
| Very wet | High | Moderate | Broad or wetter nibs |
| Waterproof or pigmented | Low once dry | Moderate | Archival pages; requires more thorough pen cleaning |
For daily practice, standard dye ink on smooth, fountain-pen-friendly paper keeps your attention on the letters themselves. With the setup locked in, it’s much easier to slow down and spot consistency on the page.
How to Write at a Controlled Pace and Build Letter Consistency
Warm Up with Basic Strokes Before Copying
Once your tools are ready, move from setup into rhythm. Before you write even one word from your passage, spend 1–3 minutes on a short warm-up line. The point is simple: get your hand moving at a steady pace so the first letter on the page looks as controlled as the last.
Start with parallel vertical lines to build control. Then switch to oval strokes to loosen the wrist a bit. Finish with a few repeated ascenders and descenders, such as l and g, so you can check how far your letters rise above and drop below the baseline. This also helps settle your nib angle and ink flow.
After that, begin the passage at a controlled pace.
Copy Slowly Enough to Watch Spacing and Slant
Copy for 10–15 focused minutes, or just a few lines, at a steady pace. The right speed is a little slower than normal. Slow enough to see each stroke take shape, but not so slow that your writing starts to feel stiff.
While you write, keep an eye on four checkpoints: letter height (are a, e, and n the same height?), baseline alignment (are letters sitting firmly on the line?), word spacing (about the width of a lowercase "o" between words), and slant (do repeated letters like l or t lean at the same angle?). Don’t try to track all four at once. Pick one check per line. After each line, pause for 5–10 seconds, shake out your hand, and look things over before you continue. Regular practice is also a good time to clean and maintain your fountain pen to ensure it stays in peak condition.
If one letter starts going off track, mark it in the margin and rewrite it three times before moving on. It’s a small habit, but it stops problems from spreading across the whole page.
Using the same warm-up and the same pace each day makes small gains much easier to spot.
Compare Drills, Alphabet Practice, and Passage Copywork
Stroke drills, alphabet practice, and passage copywork each train a different part of handwriting. Mixing them based on your skill level can help you improve at a steady rate.
| Practice Type | Typical Session Time | Effect on Letter Consistency | Best For Beginners | Best For Experienced Writers |
|---|---|---|---|---|
| Stroke drills | 5–10 min | Strong: builds shape, spacing, and slant | Essential | Useful |
| Alphabet practice | 10–20 min | Standardizes letter form and size | Best | Useful |
| Passage copywork | 15–30 min | Builds consistency in real text | Useful | Best |
Pages written at the same pace are much easier to review side by side later.
How to Review Pages and Track Progress Over Time
Use Simple Checks After Each Session
Once you finish a page, shift out of writing mode and into review mode. Spend 2–3 minutes looking it over before you close the notebook. That short check gives you a starting point for the next session.
Look at baseline, slant, spacing, letter proportions, and smearing.
If one issue jumps out, mark it lightly in the margin with a pencil:
- Use a circle for spacing
- Use an underline for baseline drift
- Use an arrow for slant
Keep a Dated Record of Practice Pages
Date every page before you start writing. Add a short note about your focus area, such as "07/24/2026 - baseline + spacing." That makes it much easier to match pages later.
A bound notebook or three-ring binder helps keep everything in date order, so you can flip back through older pages without a mess. Once a week, set aside 10–15 minutes to compare a page from 4–6 weeks ago with a recent one. Day to day, progress can feel slow. But when you put those pages side by side, changes in spacing or slant often stand out right away.
Track Progress with a Repeatable Log
After each page, write down the same few numbers. Rate spacing, slant, and letter clarity on a 1–5 scale, where 1 means very inconsistent and 5 means steady across the page.
Then add a short note about anything specific you noticed. For example:
"ink flow improved after flushing FPR Tanoshii fountain pen"
"x-height drifted on longer lines."
Over a few weeks, those numbers show which areas are getting better and which ones may need a new plan.
| Date (MM/DD/YYYY) | Duration (min) | Focus Area | Spacing (1–5) | Slant (1–5) | Letter Clarity (1–5) | Notes |
|---|---|---|---|---|---|---|
| 07/24/2026 | 20 | Baseline & spacing | 3 | 4 | 3 | Crowded between words; fewer smears |
| 07/25/2026 | 15 | Slant consistency | 4 | 3 | 4 | Slant wobbly when speeding up |
| 07/26/2026 | 25 | Lowercase clarity | 3 | 4 | 4 | "a" and "o" clearer; watch "n" |
Use the lowest score to choose the focus for your next session.
FAQs
How long before I see better handwriting?
With steady daily practice, you may notice better handwriting within 1 to 2 weeks. Short sessions each day usually work better than longer, less regular practice because muscle memory builds through repetition.
Date your practice sheets and review them after each session to spot gradual gains in polish and consistency.
What if my hand gets tired during copywork?
If your hand gets tired during copywork, start with your grip. Keep it light and relaxed. A tight grip can wear your hand out fast.
Then look at your posture. Keep your wrist in a neutral position, and let your arm and shoulder handle more of the movement instead of making your fingers do all the work. If your hand still gets tired, take a short break every five minutes and shake it out.
Should I practice print, cursive, or both?
Choose the style that fits what you want to do. Both print and cursive can build muscle memory and help you gain better pen control.
Cursive often works well for artistic work or calligraphy. Print is usually the better pick for clear, day-to-day writing. The main thing is consistency. A little practice each day matters more than the script you choose.