

You do not need an ultrasonic cleaner to clean most fountain pens. In many cases, I can fix slow ink flow, color changes, and mild clogs with cool water, a cup, a converter, a bulb syringe, a soft brush, or a tiny drop of dish soap.
Here’s the short version:
- I start with the least aggressive option first.
- For light cleanup, I use a running water rinse or converter flush.
- For dried ink, I move to a cup soak, jar soak, or bulb syringe flush.
- For residue on the nib surface, I use a soft brush.
- For stubborn ink, I use a very diluted soap rinse and then rinse until no suds remain.
- I keep hot water, high pressure, alcohol, bleach, and forced disassembly out of the process.
A few numbers stand out:
- Routine flushing usually takes 2 to 10 minutes
- Short soaks often take 15 to 30 minutes
- Deep clogs can need 8 to 12 hours or more
- A full cleaning every 4 to 6 weeks is enough for many daily-use pens
If I had to sum up the whole article in one line, it would be this: <u>use cool water, light pressure, and patience</u>.
DIY Make Your Own Fountain Pen Wash / Flush
Quick Comparison
| Method | Best for | Time | Risk |
|---|---|---|---|
| Bulb syringe flush | Dried ink in nib/feed | 5–10 min | Low to medium |
| Running water rinse | Light cleanup, ink changes | 2–5 min | Very low |
| Cup or glass soak | Dried ink after disuse | 15 min to overnight | Low to medium |
| Converter flush | Cartridge/converter pens | 2–5 min | Low |
| Soft brush cleaning | Surface ink crust or paper fibers | 5–10 min | Medium |
| Soaking jar method | Deep feed clogs | 15 min to 48 hrs | Medium |
| Mild soap water rinse | Stubborn residue, pigment ink | 10–30 min | Medium |
What matters most is not the tool. It’s the order: rinse, flush, soak, then stop if the pen still has flow problems. At that point, the issue may be a cracked part, bent tines, or a seal problem - not dirt.
Before You Start: What to Take Apart and What to Leave Alone
Start by taking apart only the pieces meant for routine cleaning. If you pull apart the wrong parts, you can crack components, warp materials, or knock the nib out of line.
Parts That Are Usually Safe to Rinse
With most modern cartridge/converter pens, unscrew the barrel from the front section first. Then remove the cartridge or converter.
The front section - the part you hold, with the nib and feed attached - can usually be rinsed under cool running water or soaked nib-down in a cup of clean water. Take out the converter and flush clean water through it until the water runs clear. If your pen has a screw-in nib unit, unscrew it and flush it on its own so water doesn't get into the barrel mechanism.
Other pen types call for more care.
Parts to Leave Assembled
Piston-fill and vacuum-fill pens have internal mechanisms that are factory-lubricated and not meant to be taken apart for routine cleaning. Clean them by cycling cool water in and out through the nib.
Vintage pens need even more care. Many rely on shellac and delicate fittings, so don't force parts apart. Some nibs were set at the factory and can shift if you use pressure. Leave decorative trim and glued end caps in place, and wipe those areas gently with a soft cloth instead.
Even if you leave the mechanism intact, water temperature still matters.
Use Cool or Lukewarm Water Only
Use cool or lukewarm water. Hot water can warp plastic feeds, weaken seals, and loosen shellac on vintage pens. Lukewarm means warm, not hot - just enough to help loosen dried ink without putting the pen's materials at risk.
Once the pen is safely separated, pick the cleaning method that fits the clog and the pen's design.
Quick Comparison of All 7 Cleaning Methods
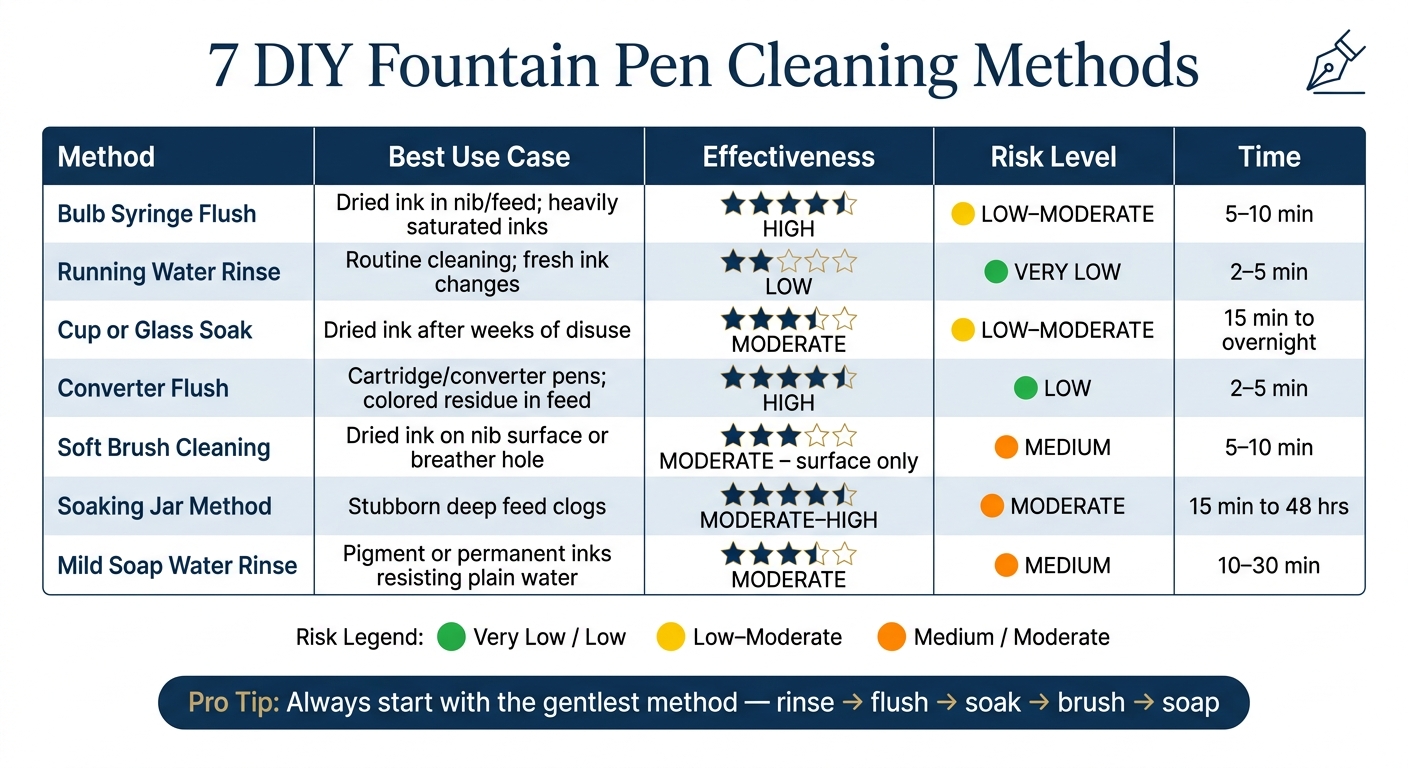
7 DIY Fountain Pen Cleaning Methods: Quick Comparison Guide
Not every pen problem needs the same fix. A fast ink swap is one thing. A nib that’s been left dry for a month is another.
Use the chart below to match the cleaning method to the clog, the ink, and the kind of pen you’re working with.
| Method | Best Use Case | Effectiveness | Risk Level | Time | Key Tip |
|---|---|---|---|---|---|
| Bulb syringe flush | Dried ink in nib/feed; switching between heavily saturated inks | High | Low–moderate | 5–10 minutes | Use gentle pressure; repeat, don't force. |
| Running water rinse | Routine cleaning; fresh ink changes | Low | Very low | 2–5 minutes | Use cool water and low pressure. |
| Cup or glass soak | Visible crusting or dried ink after weeks of disuse | Moderate | Low–moderate | Active: 5 min; Passive: 15 min to overnight | Submerge nib and section only; skip the barrel. |
| Converter flush | Cartridge/converter pens; clearing colored residue from the feed | High | Low | 2–5 minutes | Cycle slowly; aim for 8–15 passes until water runs clear. |
| Soft brush cleaning | Dried ink on nib surface, breather hole, or underside | Moderate (surface dirt only) | Medium | 5–10 minutes | Brush along the nib, never across the slit. |
| Soaking jar method | Stubborn feed clogs; cleaning multiple parts at once | Moderate–high | Moderate | Active: 5 min; Passive: 15 min to overnight | Submerge only the section, not the barrel. |
| Mild soap water rinse | Pigment or permanent inks that resist plain water | Moderate | Medium | 10–15 minutes | Use one small drop of mild soap; rinse thoroughly afterward. |
A good rule: start with the gentlest method that matches the issue, then step up only if the ink still won’t come out.
For tougher buildup, a cup soak plus soft brush cleaning works well when you can see crust on the nib. If the clog seems deeper in the feed, a soaking jar with a bulb syringe flush usually does a better job.
For day-to-day cleaning, bulb syringe flushing and gentle running-water rinses are the safest go-to options.
1. Bulb Syringe Flush
For routine buildup that a plain rinse won’t clear, a bulb syringe flush is usually the next move. It gives you controlled pressure to push ink out of the feed, and you can often find one sold as a nasal aspirator at a drugstore. It’s cheap and works well for regular pen cleaning.
This method is best for cartridge/converter pens with routine ink buildup, like hard starts, occasional skipping, or uneven flow after using a heavily saturated or shimmering ink. First, remove the cartridge or converter. Then fill a cup with cool or lukewarm water, around 68–86°F. Once the pen is ready, flush in short, gentle passes until the water runs clear.
Fit the nozzle snugly into the cartridge opening and squeeze gently. Ink-colored water will come out through the nib. Repeat with fresh water until it runs clear, which usually takes 5–10 full bulb squeezes. Between flushes, change the water in your cup so you’re not sending inked water back through the feed.
The main thing here is control, not force. Too much pressure can push out the feed or crack seals. Hold the section firmly, use light to moderate pressure, and stop right away if you feel resistance or hear creaking. If water won’t pass through, switch to soaking instead of pressing harder.
After flushing, blot the nib and feed, then let the pen air-dry nib-down before refilling. It also helps to keep one bulb syringe just for pens and rinse it after each use.
2. Running Water Rinse
For fresh ink and light residue, a running water rinse is the fastest next step. It’s also the most straightforward option in this section. This works best when the residue is light to moderate, especially if you used the pen recently and the ink hasn’t dried inside the feed or converter yet. If you just emptied a fill and want a quick clean before changing inks, this is a smart place to start.
First, take the pen apart based on the manufacturer’s instructions. Set the barrel and cap aside, remove the cartridge or converter, then rinse the nib, feed, and front section under a slow, gentle stream of cool or lukewarm water. Hold the nib downward so the water drains through the feed, and rinse for 20 to 30 seconds, or until the water runs mostly clear. Turn the section a little as you rinse so water moves through both sides of the slit, and don’t press the nib against the faucet.
This method does a good job with fresh dye ink. It does less for dried ink, pigmented ink, or iron gall ink. If the water still runs dark, move on to a cup soak or a bulb syringe flush.
In many parts of the U.S., tap water is fine for a quick rinse. But if your home has very hard water, minerals can build up over time. In that case, finish with a short rinse of distilled water.
The big thing to avoid is excess pressure. A strong stream can bend the nib tines or push water into joints and seals that are hard to dry. Keep the flow gentle, and never use hot water.
3. Cup or Glass Soak
If a flush still leaves ink behind, a cup soak can help. It gives dried ink time to soften before you flush again. Instead of pushing residue out with pressure, you let water slowly rehydrate it.
Remove the cartridge or converter first. Then take apart any section or nib unit that is meant to come apart. After that, soak only the removable parts that are designed to hold ink. In most cases, that means the nib, feed, and section in just enough water to cover them, about 4 to 8 oz. A gentle swish now and then can help loosen ink from the feed fins.
Be careful here: don’t soak parts with metal trim, clips, or decorative rings for long.
Start with 15 to 30 minutes. If the water turns dark, replace it and soak again as needed. Stubborn ink can take 1 to 2 hours. Once the water stays fairly light and the next flush comes out mostly clear, you’re done.
The biggest problem comes from soaking the wrong parts for too long. Metal trim, plated pieces, and vintage materials like ebonite or celluloid can corrode, discolor, or swell after extended water exposure. If you’re dealing with heavily pigmented ink, Fountain Pen Revolution suggests adding one small drop of mild dish soap, then rinsing very thoroughly afterward.
After soaking, flush every part with clean water. Blot them gently with a lint-free cloth, then let everything air-dry for several hours or overnight before you put the pen back together.
sbb-itb-1dd4fe9
4. Converter Flush
If a rinse or soak still leaves ink behind in a cartridge/converter pen, use the converter to flush the feed. Fill it with water through the nib by turning the converter knob, then turn it the other way to push the water back out. That sends water through the same paths the ink travels.
This is especially useful when a pen feels dry, scratchy, or starts skipping. It also helps when you're switching from shimmer or iron gall ink to a lighter ink.
What does it clean? The nib, the feed channels, and the converter reservoir. What it doesn't clean is dried ink sitting on the outside of the nib or on the grip section. For that, you still need a soft brush.
Sailor's official care guide suggests doing 5–6 draw-and-expel cycles, then soaking the nib section overnight for deeper cleaning. If the water turns dark partway through, swap it out for fresh water. When you're done, detach the converter and cycle it a few times in air to push out leftover water.
The big thing to watch for is a tight converter piston. If the knob feels stiff, stop. Don't force it. Extra pressure can crack the converter or strain the seal where it connects to the section, which can cause leaks. Slow, steady strokes work better than fast pumping.
If residue is still stuck on the nib surface, move to soft brush cleaning.
5. Soft Brush Cleaning
If a flush or soak leaves bits behind, soft brush cleaning is the next step. Use it when you can still see ink crust, dried pigment, or paper fibers on the nib, feed, or section threads.
Use an extra-soft toothbrush, a synthetic watercolor brush, or a small makeup brush that you keep ONLY for pens. Dampen the brush with cool or lukewarm water, and work over a towel so it catches drips. Then clean with short, light passes.
For the nib tines, brush in short strokes from the breather hole toward the tip. Follow the direction of the tines. Don’t brush across them. For the feed, brush along the fins lengthwise instead of scrubbing side to side. For section threads, press the bristles into the grooves, then rotate or flick the brush to loosen trapped ink and dust before rinsing
Rinse the part under cool water every few strokes, then check it under bright light. If residue is still there after a couple of gentle passes, brush again or let the part soak longer. Don’t press harder. That’s where problems start.
The main risk here is physical damage. Stiff bristles or too much pressure can scratch metal, bend tines, or wear down plating If the bristles feel stiff, skip that brush. Also stay away from alcohol, bleach, and strong household cleaners. They can damage seals, plastics, and finishes
Use this step to clear surface residue after flushing. If the clog goes deeper, move to the soaking jar method.
6. Soaking Jar Method
If rinsing, flushing, or brushing still leaves dried ink in the feed, the soaking jar method gives the ink more time to soften. It works best when ink is stuck deep inside the feed and won't budge with lighter cleaning.
Use a small jar that can hold the nib and section upright. Fill it with cool or room-temperature water only - never hot. Put only the removable front section in the jar. Keep the barrel and cap out, especially with pens that have metal trim, glued parts, vintage hard rubber, or seals you're unsure about.
Dry ink may loosen after a few hours. Pens that haven't been used for months often need 8–12 hours, and badly neglected pens may need 24–48 hours, with fresh water changes along the way. If the water gets heavily colored, replace it so clean water can keep drawing ink out of the feed channels.
The biggest risk here is leaving parts in water too long. Some vintage plastics can swell, warp, or stain during long soaks. Water around internal metal parts, such as springs or pressure bars, can also lead to corrosion or rust over time. If you don't know what the pen is made from, keep the soak short and check the manufacturer's guidance.
Once the ink loosens, stop soaking. Flush the section under cool running water, or use a bulb syringe until the water runs nearly clear. After that, stand the section nib-down on a paper towel and let it dry for several hours before you ink it again.
7. Mild Soap Water Rinse
If plain water and soaking still leave ink behind, a mild soap rinse can help. This works best for stubborn residue in the feed or converter. It’s also handy when you’re switching from a dark ink to a light one.
Use a very diluted mix: one drop of unscented dish soap in 8 oz. of lukewarm water. Flush the converter, or use a bulb syringe to push the solution through the nib and feed. If that’s not enough, soak the nib and feed in the solution for about 10 to 30 minutes, then gently agitate it to loosen any ink left behind.
After that, rinse the pen well with plain cool water until no suds remain. Any soap left inside can affect ink flow. Blot the section with a paper towel, and dry the section before you put the pen back together.
A few limits matter here. Keep soap away from piston mechanisms and seals, since detergents can strip lubrication. Also skip scented soaps, antibacterial soaps, heavy-duty cleaners, and household products like vinegar, alcohol, or glass cleaner. Some makers also recommend water-only cleaning for internal nib care, so if your pen’s maker says no soap, stick with plain water or an approved pen flush.
For most everyday cartridge/converter pens, a mild soap rinse is a middle-ground option when residue won’t budge with water alone. Use it once in a while, and make sure you rinse well afterward. If the pen still skips after this, the issue likely goes beyond routine cleaning.
When a Pen May Need More Than DIY Cleaning
If a pen still won’t write after the gentlest cleaning methods, the issue probably isn’t just ink sitting on the surface. And if gentle cleaning hasn’t fixed it, that’s your cue to stop. More soaking can turn a small issue into a bigger one.
Signs of a Stubborn Clog or Mechanical Problem
Persistent hard starts, spotty ink flow, or no flow at all after several flushes usually point to more than dried ink. The same goes for ink color that stays stuck in the feed after multiple rinses, or debris that keeps showing up after cleaning. In cases like that, the blockage may be deeper than basic at-home methods can reach.
If the pen keeps acting up across different inks even after a full cleaning cycle, it’s smarter to treat the problem as mechanical, not just dirty.
Before you add more water, check for damage.
Damage That Should Not Be Treated With More Soaking
Some issues get worse with extra liquid. Cracks in the section or barrel, loose trim, bent nib tines, and failing converter or piston seals are repair problems, not cleaning problems. More soaking can make cracks spread, wear down seal materials, and turn a fixable issue into a permanent one.
Vintage pens need even more care here. Long soaking sessions can do real harm. And if soaking leads to more leaking, or you keep seeing air bubbles, the seal has probably failed.
At that point, cleaning isn’t the answer.
When Replacing a Part or the Pen Makes More Sense
Sometimes the simplest move is to replace the part. A converter that won’t fill, leaks, or has a stuck piston is often better swapped out than flushed again and again. With common pens, a new nib or converter is often less expensive than repair.
If the pen body is cracked or the material has warped, professional repair can easily cost more than the pen itself. When cleaning changes nothing, inspect the pen for damage, then decide whether replacing the part - or the whole pen - makes more sense.
Common Mistakes to Avoid When Cleaning Fountain Pens
These methods only help if you use them gently. Most pen damage happens when people rush, force parts, or use the wrong cleaner.
Mistakes That Can Damage Nibs, Feeds, and Seals
Pressure is the biggest culprit. Too much pressure can strain seals, loosen fittings, and damage the nib. If water splashes back or the nib starts to flex, stop right there. That’s your sign the pressure is too high.
Scrubbing causes trouble too. A stiff brush, toothpick, or wire on the feed fins or nib tines can bend the tines, scratch the tipping material, or warp the ink channels that control flow.
Paper towels can also make a mess in ways that aren’t obvious at first. They can leave tiny fibers inside the nib and feed, which may lead to uneven ink flow.
Cleaning Products to Avoid
If water and a mild rinse don’t work, don’t go straight for harsh cleaners. Avoid bleach, isopropyl alcohol, acetone, and household ammonia cleaners unless the maker says they’re safe to use. These products can harm plastics, seals, plating, and surface finishes.
Why Slower Cleaning Is Usually Safer
In most cases, one rough cleaning session won’t beat a few gentle ones. Dried ink inside a feed needs time to soften and dissolve. If you try to force it out with pressure or heat, you can trade one problem for another.
Use short soaks and repeat gentle flushing until the water runs clear.
Conclusion
Most fountain pens don't need an ultrasonic cleaner.
In many cases, the simplest fix works best. Start with the gentlest option and only step up if the pen still needs help. For routine cleaning, a quick rinse under running water or a converter flush is often enough. If ink is still hanging on, try a short soak in a cup. Still no luck? Move to the soaking jar method or use a mild soap rinse.
For pens you use every day, a thorough flush every 4–6 weeks is usually enough. If you use shimmer or pigmented inks, clean more often since those inks can leave more behind.
FAQs
How do I know when to stop cleaning and check for damage?
Stop cleaning once the water runs fully clear during flushing.
Here’s a simple way to check: touch the nib to a clean paper towel. If no ink shows up, the pen is clean. You can also use a magnifying glass to look for any residue between the nib tines.
If the pen still skips or hard starts after several flushes, stop there and inspect it for physical damage, like bent or splayed nib tines.
Which pen parts should never be soaked or taken apart?
Do not remove the nib or feed unless the pen is made for easy disassembly. And don’t take apart internal piston, vacuum, or snorkel filling systems.
If you’re not sure whether friction-fit parts can be removed, or the manufacturer says not to, leave the nib and feed where they are. In that case, soak the entire section assembly instead to avoid accidental damage.
What should I do if hard water leaves mineral residue?
Switch to distilled water for your cleaning routine. It helps stop new mineral buildup that can interfere with ink flow over time.
If you already see deposits, give the pen parts a final rinse with distilled water. Using it on a regular basis can help keep the feed clear and the pen working well.