

If I were starting nib work today, I’d buy just 3 things first: a 10x loupe, brass shims, and smooth paper. That covers the main beginner jobs: check the tines, clean the slit, and test the result. If you find your fountain pen not writing correctly, these tools help you troubleshoot the cause.
Here’s the short version:
- Use a loupe to spot tine alignment and slit issues before touching the nib
- Use brass shims to clear dried ink and paper fibers between the tines
- Use smooth paper to test scratchiness, skipping, and flow after each small change
- Add 12,000-grit micro-mesh later for light smoothing only
- Use a lamp, tape, a rubber grip, and a flush bulb as support tools, not first buys
The cost stays low for a starter setup. A brass shim is about $3.25, a 12,000-grit micro-mesh sheet is about $5.00, and a bundled cleaning/tuning kit is about $31.00.
What matters most is the order:
- Inspect
- Clean
- Test
- Only then, smooth if needed
A lot of common nib issues that feel like “rough tipping” are just dirty slits, poor alignment, or paper issues. So I’d skip heavy tools and start with the basics.
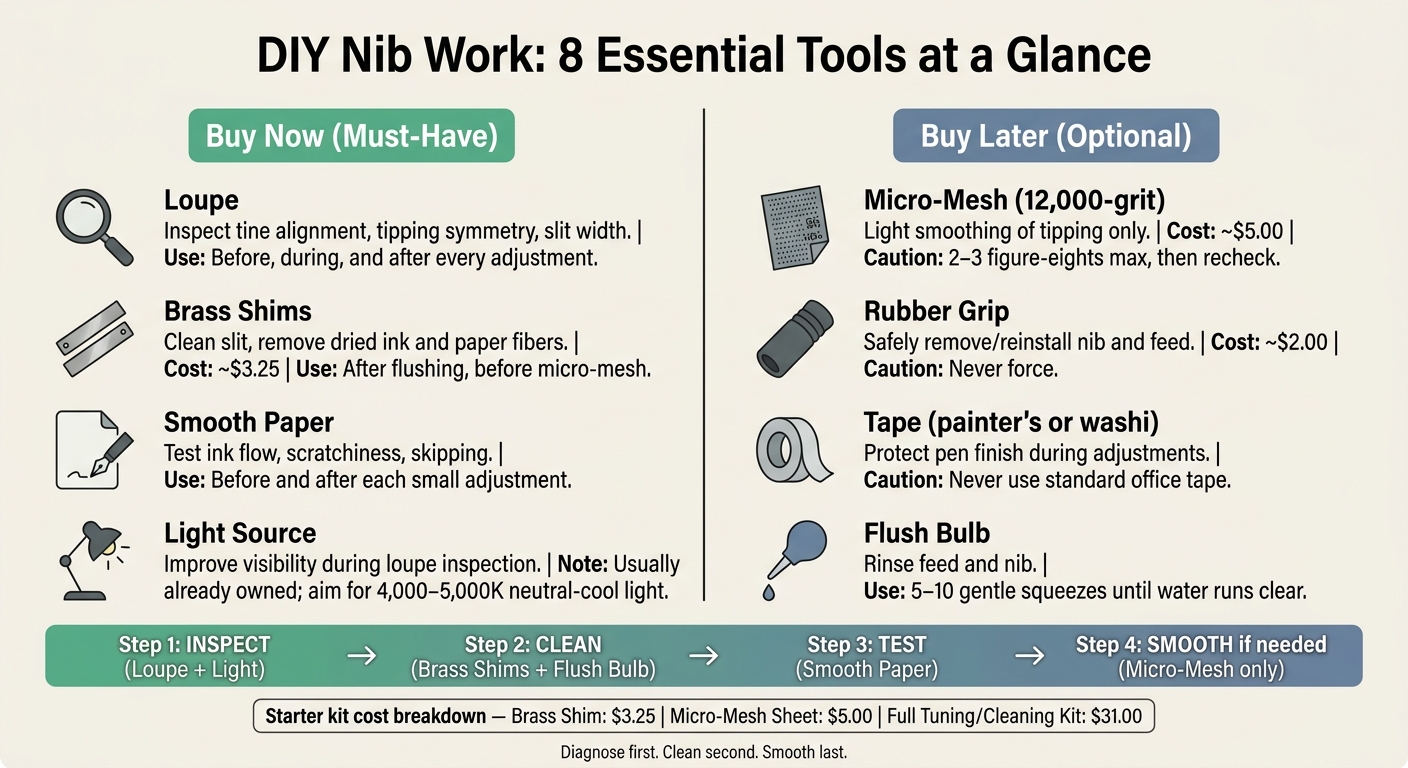
DIY Nib Work: 8 Essential Tools at a Glance
10 Most Essential tools for tuning your Nibs
sbb-itb-1dd4fe9
Quick comparison
| Tool | What I’d use it for | Buy now or later? | Main caution |
|---|---|---|---|
| Loupe | Check tine level, slit, tipping | Buy now | Don’t adjust a nib that already writes fine |
| Brass shims | Clean and inspect the slit | Buy now | Don’t force the shim into a tight slit |
| Smooth paper | Test feel and ink flow | Buy now | Bad paper can fool you |
| Light source | Make the loupe usable | Usually already owned | Dim light leads to bad calls |
| Micro-mesh | Light smoothing | Buy later | Too much use can ruin the tip feel |
| Rubber grip | Pull fountain pen nib/feed with more control | Buy later | Too much force can damage parts |
| Tape | Protect the finish | Buy later | Avoid sticky office tape |
| Flush bulb | Rinse feed and nib | Buy later | Don’t squeeze too hard |
My takeaway: keep the first kit small, cheap, and focused. For beginner nib work, seeing clearly, cleaning gently, and testing often matter more than owning more tools.
1. Loupe
A loupe is a small magnifier that lets you inspect tine alignment, tipping symmetry, and slit width. It’s the first tool to use before you touch the nib.
Primary Nib-Work Task
Before you grab anything else, use the loupe to check three things:
- Whether both tines sit level
- Whether the tipping is centered and even
- Whether the slit stays centered all the way to the tip
If a pen feels scratchy in one direction, the cause is often simple: one tine is sitting a bit lower than the other. You usually won’t spot that without magnification.
Best Time to Use It
Use the loupe before, during, and after each adjustment. Then test the pen with short strokes. Fountain Pen Revolution's nib-tuning guidance specifically recommends using a 10x loupe under good lighting, then rechecking after every adjustment and testing with short strokes.
Beginner Buy-Now vs. Buy-Later
Buy now. A loupe gives you information before you take action. That matters. Otherwise, it’s easy to reach for micro-mesh or brass shims when the pen may just need a simple flush.
Risk if Misused
Don’t “fix” a nib just because it looks a little off under magnification. If the pen already writes well, leave it alone. The writing test comes first, and the loupe should support that test, not replace it.
If glare gets in the way, an unlighted loupe may work better than one with a built-in light.
If the slit needs cleaning, brass shims come next.
2. Brass Shims
A brass shim is a thin strip of brass that slides into the slit between a nib’s tines. Since brass is softer than steel or gold, it’s less likely to mark the nib, as long as the edges are smooth and you use a light touch.
Primary Nib-Work Task
After you inspect the nib, use a brass shim to clean the slit. A few careful passes can remove dried ink and paper fibers that a flush may not clear.
It also helps you check tine spacing. If the shim moves through with even resistance, spacing is usually in good shape. If one tine grabs more than the other, that can point to scratchiness or ink flow trouble. In that sense, the shim is a diagnostic tool first. It helps you figure out whether the problem is debris, spacing, or flow before you move to any abrasive work.
Best Time to Use It
Use brass shims right after cleaning and maintaining your pen and before any micro-mesh work. A common workflow looks like this: flush, inspect under a loupe, use the brass shim, inspect again, and then test the writing. If cleaning doesn’t fix the issue, the next step is light smoothing.
Beginner Buy-Now vs. Buy-Later
Buy now. Brass shims are low-cost. Fountain Pen Revolution sells individual brass flossing sheets for $3.25, and they’re also part of the Fountain Pen Tuning/Cleaning Kit for $31.00.
Risk if Misused
The main mistake is using too much force. If you push a thick shim into a tight slit, you can spread the tines all at once and change ink flow. If you keep levering the shim, you may twist the tipping or harm delicate nibs.
Go slowly, check your work under magnification, and treat the shim as a cleaning and diagnostic tool - not a bending lever.
3. Micro-Mesh
If cleaning the pen and checking alignment still don’t fix the feel, the next step is micro-mesh. This is a fine abrasive sheet used to polish a nib’s tipping, the small hard material at the very end that touches the paper. It helps with tiny rough spots and drag. It does not fix bent tines or other physical damage.
Primary Nib-Work Task
The usual approach is simple: make a few short figure-eight motions, or a few light pen-like strokes, on the sheet. Then test the nib on paper before doing anything else. Fountain Pen Revolution says its 12,000-grit sheet should be used for only 2–3 figure-eights at a time, then the nib should be checked again.
For nib work, 12,000 grit is the standard finishing point. Use it wet with a few drops of water so the nib glides more easily across the sheet. Check the feel often, and stop the moment the nib writes smoothly.
Best Time to Use It
Micro-mesh should be the last step, not the first. Start by checking tine alignment, ink flow, and the other plain causes of scratchiness. If a nib is catching badly, skipping, or feeling sharp in one direction, figure out why before reaching for any abrasive. A loupe and good lighting should come first.
Beginner Buy-Now vs. Buy-Later
Buy later. It makes more sense once you can tell the difference between true roughness and problems caused by alignment, ink, or paper. If you decide to add it later, Fountain Pen Revolution sells a 12,000-grit Micro-Mesh Nib Smoothing Sheet and also includes it in its Tuning/Cleaning Kit.
Risk if Misused
The main risk is over-polishing. Too many strokes, or too much pressure, can round off the tipping, make the nib feel too glassy, and lead to poor ink starts. As The Pen Archive puts it, "polishing the tipping, not grinding it." Use a light touch and quit as soon as the nib feels smoother.
4. Light Source
A loupe is only as good as the light behind it. Without enough light, magnification just gives you a bigger blurry mess. With good light, you can clearly check tine alignment, tipping shape and nib sizes, the slit, and small surface flaws.
Primary Nib-Work Task
The main job of a light source is simple: help you inspect the nib with precision before and after each adjustment. One common method is to hold the nib up to the light and look through the loupe at the slit. You should see a consistent hairline strip of light running through it.
Then rotate the nib under the beam. That makes reflections shift, which helps you spot rough areas, twists, and small tine problems that are easy to miss head-on.
Best Time to Use It
Use the lamp through the whole process: inspect, adjust, then inspect again. That steady back-and-forth helps you make small fixes instead of drifting into bigger mistakes.
Beginner Buy-Now vs. Buy-Later
Buy now - but you may not need to buy anything. A desk lamp you already own is often enough. If you do have a choice, an adjustable lamp with neutral-cool light around 4,000–5,000K works well because it shows metal surfaces and ink colors more accurately than warm, yellow light.
A focused beam also helps more than soft room light. It throws surface contours and edges into sharper view, which is exactly what you want when you're checking a nib.
Risk if Misused
Dim or scattered light turns the whole job into guesswork. Shadows can make tines seem aligned when they aren't. They can also make rough tipping look smoother than it is. That's how people end up over-correcting a nib that wasn't fully visible in the first place.
If you're squinting, move the lamp.
Once the nib is visible and aligned, the next tool is for controlled handling: a rubber grip.
5. Rubber Grip
Once the inspection is done and you need to handle the nib, a rubber grip makes the job a lot easier. It’s a small sleeve, pad, or finger cot that helps you hold a pen section or nib/feed assembly without slipping, which matters a lot on glossy plastic or metal parts.
Primary Nib-Work Task
Its main use is simple: it helps you remove or reinstall the nib and feed. With a steadier hold, you can apply straight, even pressure instead of fighting the pen with your fingers. It can also help if a section is stuck and needs careful removal.
Best Time to Use It
Use a rubber grip when you’re removing or reinstalling a nib and feed, or when you’re making small adjustments that call for a steady hand. If the pen has a soft finish, go easy on the pressure so you don’t leave marks.
Beginner Buy-Now vs. Buy-Later
Buy later. Most beginners can get through flushing, alignment checks, writing tests, and light flossing without one. A rubber grip starts to make more sense when you begin removing nibs and feeds on a regular basis, or when you catch yourself thinking, “Maybe pliers would help.” That’s usually a sign to grab the rubber grip instead. It’s cheap too - about $2.00.
Risk if Misused
The biggest risk is using too much force. If the nib or feed doesn’t move with gentle pressure, stop and take another look. Also keep the grip away from ventilation holes and ink channels.
Next comes tape, which helps protect the pen during more delicate work.
6. Tape
Tape has a small but handy place in nib work: it protects the pen’s finish and can help keep the pen steady while you work. That matters when you’re making repeated passes and don’t want small slips to leave marks behind.
Primary Nib-Work Task
The most useful move here is simple. Wrap a strip of low-tack painter’s tape or washi tape around the grip section to guard the finish during shim work or light smoothing. It doesn’t change the nib itself, but it helps protect the pen while you dial in your angle and handwriting posture while working carefully. After that, the next step is clearing the ink path with a flush bulb.
Best Time to Use It
Tape makes the most sense before and during jobs that involve repeated motion or pressure near the pen’s finish. That includes smoothing with micro-mesh, sliding brass shims between the tines, or any session where you keep shifting your grip and repositioning the pen.
Use it, do the work, then take it off right away so you don’t end up dealing with residue.
Beginner Buy-Now vs. Buy-Later
Buy later. Tape isn’t a core nib tool. A loupe, brass shims, and micro-mesh have a direct effect on the nib. Tape mostly helps around the edges of the process.
For many beginners, careful hand placement is enough. But if you start working on pens with delicate finishes, or you find yourself doing smoothing sessions more often, painter’s tape or washi tape starts to earn its spot in the kit.
Risk if Misused
Skip standard clear office tape completely. It can leave sticky residue and may pull at lacquer or plating when removed. Also, don’t put tape over wet ink. The adhesive can lift pigment and smear it onto other parts of the pen.
Used the right way, tape stays in the background and does its job; next comes the flush bulb for cleaning the feed.
7. Flush Bulb
Once you’re done with inspection or light nib work, you want a clean reset before testing again. A flush bulb helps you rinse the feed and nib with water, which clears out ink and small bits of debris before inspection or tuning.
Primary Nib-Work Task
Use it before inspection and again after smoothing so leftover residue doesn’t mess with ink flow. Go for 5 to 10 gentle squeezes, or until the water runs clear. That way, your next writing test gives you a cleaner read on what changed.
Best Time to Use It
Flush first. Then inspect. After any mechanical work, flush again and retest. If you skip that second rinse, leftover residue can cause skipping. And then you’re stuck guessing: was it the tuning, or just gunk still in the feed?
Beginner Buy-Now vs. Buy-Later
Buy later. For routine cleaning, a converter rinse is usually enough. A flush bulb makes more sense if you clean pens often, use stubborn inks, or keep several pens in rotation.
Fountain Pen Revolution includes a flush bulb in its Fountain Pen Tuning/Cleaning Kit, which also bundles brass flossing sheets and micro-mesh. After cleaning, test the nib on smooth paper.
Risk if Misused
Too much pressure can knock parts loose or bend a delicate nib. Stick with room-temperature water and gentle squeezes. Avoid hot water and household cleaners.
8. Smooth Paper
After the loupe, shims, and micro-mesh, smooth paper tells you if the nib got better. This is the surface you come back to again and again while tuning.
Primary Nib-Work Task
Smooth paper is where you check every small adjustment. Write figure-eights and short lines to test ink flow, feedback, hard starts, skipping, and scratchiness. The goal is simple: see whether the pen writes evenly and feels comfortable in every direction.
It also helps you tell the difference between a nib issue and a paper issue. That matters more than it sounds. Rough or absorbent paper can make a decent nib feel off, while smooth, consistent paper gives you a cleaner read on what's happening.
Best Time to Use It
Use it before you adjust anything, then again after each small change. That back-and-forth rhythm makes it much easier to track what each pass is doing.
Beginner Buy-Now vs. Buy-Later
Buy now. Keep a dedicated test notebook or pad just for nib work so your results stay consistent across sessions. You don't need anything fancy. You just need paper that behaves the same way each time.
Risk if Misused
The main risk is misdiagnosis. Inconsistent paper can hide flow issues or make a good nib seem rough. And don't use the back side of paper for polishing. It can round the tipping and erase useful feedback.
Next, sort these tools into must-haves and optional buys.
Must-Have vs. Optional: Quick Reference
Use this quick reference to pick your first kit without overthinking it.
| Tool | Primary Use | Beginner Priority |
|---|---|---|
| Loupe | Inspecting nib tine alignment and small parts | ✅ Must-Have |
| Brass Shims | Flossing and cleaning between tines | ✅ Must-Have |
| Smooth Paper | Testing writing feel and ink flow | ✅ Must-Have |
| Light Source | Improving visibility during inspection | Usually already owned |
| Micro-Mesh | Smoothing scratchy or rough nibs | Add after basics |
| Rubber Grip | Safely pulling nibs and feeds | Optional later |
| Tape | Protecting pen surfaces during adjustments | Optional later |
| Flush Bulb | Deep cleaning the pen section | Optional later |
If you're just getting started, loupe, brass shims, and smooth paper do the heavy lifting. They cover the main beginner tasks: inspect, clean, and test.
Micro-mesh comes later. It helps with surface roughness, but it won’t fix tine alignment or ink flow. So if you can’t yet read what the loupe and paper are telling you, micro-mesh can do more harm than good.
The rest, like rubber grip, tape, and a flush bulb, are task-based tools. Nice to have when the job calls for them, but not part of the first round. Next, it’s time to turn these priorities into a starter kit.
Building Your Starter Kit
Use this quick-reference list to put together your first kit, starting with the items that matter most. Begin with a loupe, a light source, a flush bulb, and smooth paper. If you expect to remove nibs or make small tweaks, add a rubber grip too.
The order matters more than how many tools you own. Diagnose first, clean second, smooth last. That simple sequence can save you a lot of trouble. Once the pen is clean and the nib is aligned, smoothing should be the final step, not the first thing you try. Using micro-mesh too soon can damage the tipping.
Hold off on brass shims, micro-mesh, and tape until the basics are in place and working well. If you'd rather buy everything at once, Fountain Pen Revolution sells a bundled Tuning/Cleaning Kit with the same core tools in one purchase.
FAQs
How do I know if my nib needs tuning?
Check the nib both by sight and on the page. With a 10x to 20x loupe, look for tine misalignment or a gap that’s too tight or too wide. Another simple check: lightly run the nib over your fingertip. If it catches on one side, the tines are likely out of line.
Then test the pen on smooth, high-quality paper. Scratchiness, skipping, hard starts, or uneven ink flow usually point to a nib that needs adjustment. Before you assume that’s the issue, clean the pen first to rule out dried ink or debris.
When should I use micro-mesh instead of a brass shim?
Use micro-mesh to smooth the nib’s tipping material and cut down on scratchiness.
Use a brass shim to clean dried ink from between the tines or to check tine gaps. It’s not for polishing or smoothing the tipping material.
What paper is best for nib testing?
Use smooth, fountain-pen-friendly paper like Rhodia, Clairefontaine, or Tomoe River. That way, you can judge scratchiness or skipping without the paper muddying the result. If you want a fair comparison, use the same paper every time.
If you’re checking a nib after smoothing, Rhodia or Clairefontaine in the 80–100 gsm range is a solid pick.